When is it necessary to replace the rear shock absorbers of a Prado 120
Experts do not recommend determining the breakdown yourself. Consultation with experienced mechanics at the service center is required.
It is advisable to have your car undergo annual maintenance. Prevention will help to determine wear in advance and carry out the replacement procedure. Along with the springs, experienced mechanics will replace the rear shock absorber bushings in the Prado 120, if necessary.
There are three main signs by which you can understand that the Toyota Prado springs have worn out:
- when driving off-road or driving over speed bumps, the vehicle bounces as if on a spring;
- noise or creaking appears from under the wheels when leaving the pit;
- controllability is lost on uneven roads, you have to steer the car so that it does not go to the side;
- the front or rear end drops under heavy braking.
Various knocking noises appear when the rubber bushings near the rear springs dry out. They also need to be replaced. It is advisable to do this procedure together with changing elements that maintain smooth movement on the roadside.
Rear suspension features
Many Prado models in the 120 body are equipped with rear air suspension with rubber pneumatic cylinders. It differs from others in that it operates on compressed air.
The elements of the rear air suspension are:
- Switch. It is able to turn off automatic height control and switch operating modes. There are three modes in total: HI-high, used when driving off-road, Normal-medium, used on a regular road, LO-low, necessary for convenient exit or entry into the car.
- Control indicator. If the control indicator is not lit, it means it is turned off, and if it is blinking, then some kind of malfunction has occurred that can be corrected by reading its diagnostic codes.
- Air filter. Its main task is to purify the air from various pollutants. It is not disassembled, so if it breaks, the entire body will need to be replaced.
- Compressor. Consists of the compressor itself, valve and dryer.
- Pneumatic cylinder. Consists of an air chamber filled with high pressure compressed air. It is needed to support the body and change its height.
- Pneumatic receiver. It consists of a separate reservoir and a block of solenoid valves. The reservoir is used to store the exhaust air, and the solenoid valve passes compressed air between the cylinders.
- A sensor that determines the height of the body. It consists of a brush sliding along the receiver, which creates a plate and is located on the left and right sides of the rear axle.
These are all the components that are found in the rear air suspension.
Which shock absorbers to choose
When purchasing silent blocks, it is advisable to take the original. The vehicle comes from Japan, so Japanese suspension struts are suitable:
- regular KYB Excel G;
- enhanced Shimax +2;
- Tems Kib.
If there are no originals, then experts advise taking South Korean JETT.
Also, these components come in two types:
The original parts have a swap. They are able to change rigidity. Such racks will cost from 5 thousand rubles and more. There are pneumatic ones, which consist of two pipes. They operate by gas distribution, without hydraulic adjustment.
Characteristics of original shock-absorbing devices:
- resistant to corrosion;
- resistant to stones and sand;
- maximum stroke of the rod;
- durable, reliable.
Although the originals are more expensive than analogues or Chinese fakes, they will last longer and cover all replacement costs.
You can do the Toyota Prado 120 suspension repair yourself. In terms of complexity it is quite simple. However, if the car owner has never had to deal with replacing shock absorbers and does not know where they are located, then it is better to contact a service center.
Price issue
The cost of repairing the air suspension in the cabin is high: just purchasing a cylinder will cost 8-10,000 rubles, depending on its originality. The cost of restoring an air spring is no less than 9,000. For work on just one side of the suspension you will have to pay at least 5,000 rubles.
Repairing breakdowns with your own hands is much cheaper: you only have to spend money on consumables.
Air suspension requires regular maintenance. For example, the average service life of cylinders ranges from 100 to 200 thousand km, and in off-road conditions and low temperatures they can be damaged even earlier. Level sensors often fail due to moisture ingress, and the compressor often fails due to overheating.
Installing a spring suspension instead of pneuma will save your Toyota from constant breakdowns.
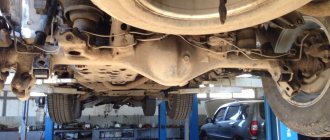
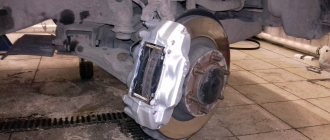
Removing shock absorbers
To replace the suspension struts, you first need to remove the shock absorbing elements. The removal procedure is done as follows:
- Raise the rear of the vehicle on a jack so that the wheels are hanging in the air.
- Unscrew the bolts that secure the wheels. Take them off.
- Unscrew the screw that holds the lower ear of the shock-absorbing element.
- Spray the axle and upper rod with “liquid key”. This fluid will help remove the shock absorber from the axle. It removes dirt and rust.
- Unscrew the top nut and remove the “glass”.
- Unscrew the lubricant filter remover.
- Now you can remove the shock-absorbing device from the axle.
If the shock absorber is rusty and does not want to give in, you need to take a grinder and carefully cut it off.
Before installing a new suspension strut, it is necessary to bleed the shock-absorbing device, since it is in a compressed state. The pumping procedure is as follows:
- Place the part in a vertical position.
- Squeeze and unclench up and down several times.
- Movements should be smooth. The car owner should not hear knocks and squeaks. Then the part is normal and can be installed in place of the old one.
After the first two procedures are completed, you can begin assembling the rear shock absorbers on the Prado 120.
When to replace the shock absorber bushing and how to do it
The suspension struts are attached to the axle using bushings. Typically these are metal devices with a rubber seal inside. There are two pieces on each shock absorber. Attached with 19 screws.
To replace them, the car owner does not need to jack up the vehicle.
The procedure consists of the following steps:
- Unscrew the screw and washer that secures the shock absorber.
- If the washer is stuck to the screw, you need to separate them and remove the rust. Since after installing a new silent block, if the washer does not rotate around the screw head, it may damage the seal when tightened.
- Pull the suspension strut out of the rod.
- Remove the bushings from the shock-absorbing device lugs.
- Clean the inside of any rust and remaining rubber.
- Use cleaning liquid to remove rust from the rod.
- Insert one part of the silent block.
- Install the shock absorber eye and insert the second part of the rubber seal.
- Attach the shock-absorbing element.
The screw thread is treated with silicone grease or copper paste. This is done so that the parts do not stick to each other, and saves the screw from the harmful effects of rust.
Prado 120 air suspension design
The air suspension control system (ANS) consists of the following mechanisms.
- ABS control unit for Prado without pneuma.
- Door position limit switches.
- Speed sensors.
- ANS system relay .
- Pneumatic cylinder.
- A sensor that determines the amount of ground clearance.
- Air valve Prado 120.
- Control valve.
- Bypass valve.
- Release valve.
- Air filter.
- Trunk opening sensor.
Air suspension control system (ANS)
pneumatic indicators and switches on the dashboard:
- ANS system mode indicator .
- Pneumatic on/off indicator.
- ANS control unit .
- TEMS control unit .
- Connector for diagnostics.
- Stop signal switch limit switch.
- Flag for switching pneumatic modes.
- Air switch " OFF ".
Pneumatic indicators and switches
The Prado 120 air suspension system also includes the following mechanisms :
- block that controls electrical equipment (receives information from limit switches and redirects it to the AHC );
- ABS control unit (sends information from speed sensors to the ANS );
- ANS system control unit .
Compressor
The Prado 120 air suspension compressor consists of an air dryer, an exhaust valve and the compressor itself . Let's look at the purpose of each of these parts.
Compressor device
The compressor supplies air to the air cylinders that lift the body. It only works when the engine is running. The name of the exhaust valve speaks for itself - air comes out through it when the body is lowered. There is always some amount of water vapor in the air. A dehumidifier is used to remove condensate from the system.
Receiver
The receiver is composed of a valve block and an additional air tank . The air released by the pneumatic cylinder temporarily accumulates in an additional container. This reduces the time spent changing the suspension height.
Receiver device
The Prado 120 air suspension valve block consists of three elements:
- bypass valve - serves to bypass air between pneumatic cylinders;
- control valve – connects the compressor and the pneumatic cylinder;
- pressure relief valve – connects the pneumatic cylinder and additional capacity.
Body position sensors
These mechanisms are located on the Prado 120 air suspension and are responsible for determining the height of the body above the road.
The design of body position sensors
The body sensor of the Prado 120 is designed simply. The shaft is connected to a brush that runs over a resistor. The interaction of the resistor and the brush forms resistance; it has a variable value and depends on the angle at which the sensor shaft is rotated. When the brush is rotated, the output voltage also changes.
Pneumatic cylinder
A pneumatic cylinder maintains the body at a given height, raising or lowering it as necessary. The pneumatic cylinder ensures smooth operation. Structurally, this is a separate air chamber containing compressed air.
Pneumatic cylinder
Link to replacing the Prado 120 air spring.
Prado 120 rear shock absorber repair
Content
General repair instructions
- Instruments and controls
- Lighting, windshield wipers and defroster
- Instruments and meters
- Ignition, gearbox, parking brake
- Air conditioning system
- Other equipment
- Information before driving
- Maintenance
- Description
- Adjusting the clearances in the valve drive
- Cylinder block
- Cylinder head
- Cylinder head gasket
- Replacing the drive belt
- Replacing the camshaft
- Replacing the rear crankshaft oil seal
- Description
- Checking the ignition system
- Camshaft position sensor
- Crankshaft position sensor
- Description
- Replacing the oil filter
- Oil pump
- Oil radiator
- Description
- System check
- Replacing the thermostat
- Replacing the cooling pump
- Coolant replacement
- Radiator
- Precautionary measures
- System check
- Replacing the fuel pump
- Fuel pressure control
- Replacing the fuel injector
- Fuel filter
- Removing and installing the fuel tank
- Precautionary measures
- System check
- Generator bulkhead
- Generator replacement
- System check
- Starter overhaul
- Starter replacement
Exhaust system
- Checking the exhaust emission control system
- Checking the exhaust gas recirculation (EGR) system
- Exhaust gas recirculation (EGR) valve replacement
Automatic transmission
- Precautionary measures
- Checking the automatic transmission oil
- Automatic transmission replacement
- Replacing temperature sensors
- Replacing the speed sensor
- Park/neutral position sensor
- Checking the torque converter clutch and drive plate
- Replacing the transmission valve block
- Replacing the gearshift cable
Manual Transmission
- Checking oil for manual transmission
- Replacing the manual transmission
- Manual transmission clutch bulkhead
- Manual clutch pedal
- Clutch master cylinder overhaul
- Clutch slave cylinder overhaul
- Replacing the transfer case adapter seal
- Precautionary measures
- Adjusting the transfer case oil
- Transfer case bulkhead
- Replacing the transfer case oil seal
- Replacing the speedometer driven gear
- Checking the center differential lock
- Cardan shaft
- Replacing the rear left axle shaft
- Replacing the front left wheel hub
- Replacing the hub stud
- Precautionary measures
- Adjusting the oil level
- Front differential housing
- Rear differential housing
- Adjusting the front wheel alignment angles
- Front shock absorber
- Left upper lever
- Left lower arm
- Front stabilizer bar
- Left shock absorber
- Left pneumatic cylinder
- Left coil spring
- Lateral thrust
- Rear stabilizer bar
- Upper control lever
- Lower control arm
- Precautionary measures
- Steering column
- Power steering system
- Steering rod with power steering
- Power steering pump
Shock absorbers kyb 741072
Kayaba (KYB) is a Japanese manufacturer of spare parts whose products are in demand all over the world.
Some car enthusiasts, in order to save money, resort to a trick - adapting parts at a low cost to their car. In comparison with the original TEMS on the Prado 120, Kayaba shock absorbers are two to three times more profitable in price.
Shock absorber kyb 741072 - analogue of TEMS on Prado 150, rear twin-pipe gas-filled. After simple manipulations, it can also be used on the Land Cruiser Prado 120 model.
Unlike the original shock absorbers, these have a thick and long rod and a larger seat at the bottom rubber band. Therefore, when installing, you need to add a washer, select rubber bands and plates with wider holes. Some drivers recommend using rubber bands from TLC Prado 150. The upper shock absorber washer will have to be ground off so that the part fits into the hole on the frame.
Judging by the reviews, 741072 kyb installed on the Prado 120 are tougher in operation. However, there are no serious differences from the original.
Air spring repair and replacement
Replacing an air spring on a Prado 120 is a relatively painless event, compared to other interventions in the air suspension. In the best case, everything will be done by patching microcracks that form during the operation of the car. The holes detected by the “soap test” are coated with sealant. To prevent the appearance of new holes, the pillow is impregnated with silicone.
If the rubber casing bursts while driving, you need to immediately stop and remove the one responsible for the operation of the compressor from the fuse box. If it is not turned off, there is a high probability that in addition to the need to repair the air springs, the replacement of the Land Cruiser 120 compressor will be added.
When completely replacing a pillow:
- Disable automatic suspension adjustment.
- Raise the car.
- Disconnect the compressor pipe from the receiver.
- Disconnect the airbag tube from the valve that regulates the suspension height.
- Raise the car higher, freeing the cushion.
- Remove the fork holding the air spring in the seat cup.
- Put on a new pillow.
- Secure the plug.
- Connect the valve pipe and the compressor pipe.
- Lower the car.
There is nothing complicated about how to change the air spring on a Prado 120. But sometimes, after tampering with the suspension, the computer refuses to work correctly.
To eliminate the problem, you will have to carry out diagnostics. The diagnostic block is located on the left side of the front panel, not far from the driver’s seat. A wire is connected to it, the other end is connected to a laptop with the diagnostic program installed. Any errors detected are corrected and the Prado operates normally again.
Advantages of TEMS stands
On some cars, under the hood there are often racks with variable stiffness. They are designated by the letters TEMS (the acronym stands for Toyota Electronically Modulated Suspension).
Their advantage is that you can adjust the stiffness of the shock absorber from the passenger compartment. The suspension control system is electronically adjusted and allows you to select the appropriate mode - Sport, Comfort, etc.
Modes change, adapting to the track, vehicle load, and desired speed. In addition, when braking, the operating mode changes automatically.
Front and rear TEMS shock absorbers help improve the Prado 120's stability, handling and driving safety.
Diagnostics
To avoid unpleasant surprises on the road, it is necessary to regularly diagnose the Prado 120 air suspension . For self-diagnosis, there is a connector in the interior of the SUV. And the technical instructions for the Prado 120 describe this process in detail.
Prado120 technical documentation and instructions can be found here.
Technical instructions Prado 120
It is useful to visit a car service center from time to time to check the air suspension of the Prado 120. The following signs :
- when the engine is not running, the car sags;
- one of the selected manual modes is not held;
- the valves in the electromagnetic block are not sealed;
- after starting the engine, the front or rear of the car rises.
First, computer diagnostics . Check the serviceability of the system, valves and sensors. Then the mechanic checks the pneuma for external defects and eliminates them.
Diagnostic connector
Monitor the condition of the air suspension. A fault detected in time will help you avoid unpleasant surprises on the road.
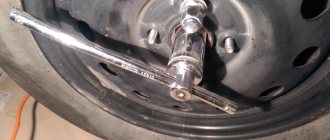
How to replace shock absorbers on a Prado 120
Over the entire life of a car, shock absorbers are changed two or three times. This is done more often if there is a desire to improve the performance of the car or modify its behavior on the road.
Before you buy a shock absorber, you need to check the availability of a passport with a warranty and technical characteristics. Many supplier companies sell spare parts without documentation.
Shock absorbers are replaced in pairs. Some manufacturers even sell them in sets of 2. It is possible to install single-pipe and double-pipe at the same time, but they must be the same along the axis.
Before direct installation, the spare part must be “bleeded”, this will help avoid damage:
- Smoothly compress the part, lowering the rod down, fix it for 2-4 seconds.
- Without changing the position of the rod, turn the shock absorber over, hold the spare part in this position for another 3-5 seconds, then smoothly pull the rod out to the end of the stroke.
- Turn the stem down again, wait 2-4 seconds, repeat all operations 5-7 times.
A correctly “pumped” part works smoothly, the piston does not fall through when moving.
After bleeding, the spare part must be left in the working position (with the rod up) until installation on the car.
Engine replacement
I don’t really want to write such an addition, but as they say, once A said, say B, so on to the topic.
I brought the car after replacing the internal combustion engine. It was not possible to check the operation of the internal combustion engine over time, so leaving the service station immediately for a long distance in the taiga of 1100 km. (it was scary, the fireman even took a satellite phone just in case). For the first 400 km there was still a federal road, from which it was possible, if something happened, to return for little money on a tow truck, so during this period of time I tried to test the engine in extreme conditions (well, as in extreme conditions - that’s 4 liters, it seemed to collapse, the engine purred a little around 4.5 thousand rpm and already 150 km/h - and again the speed is 2.5 thousand km - I had no desire to further confuse checking the engine with suicide). But nothing happened, everything was good. Besides the fact that now the engine does not rattle the chain when starting, there are absolutely no other changes, everything is the same - it pulls the same, it works the same, the fuel consumption is the same and we can already say that there is no oil consumption, as on the previous engine (it has always been one level from replacement to replacement). No CHEKs or anything else.
The amount of service station services including the engine amounted to 218 thousand rubles:
— Engine 2007 contract, had everything except the starter, mileage is not known exactly, but should be less than 100 because. – 180 tr.
— Replacement — 18t.r.
— Troubleshooting of an old engine – 8 tr. (It was possible not to do it, but not to see what was inside would be wrong).
- Oil change along with flushing and filter - 4.9 tr (I always poured Mobile 5-30, then they filled me with Motul 0-20, for now let it be, but somehow it seems to me that this is not such a high-tech engine to pour such oil – but ok, in principle there was an idea to try driving it before).
— Checking all fluids (after all, the car had been watered, so it was necessary to check everywhere) – 1t.r.
— Refilling the air conditioner 1.8 t.r.
— I don’t remember exactly what else, some small things, including my car being thoroughly washed (sent a piece of dirt, both inside and outside).
I also add the amount for tow truck services - 35 thousand rubles, plane tickets and return trip - 15 thousand rubles. total budget for the adventure is 268 thousand rubles - yes, it’s not cheap entertainment :)
In order not to run into this again, I went to the points of sale of snorkels found in Khabarovsk and never found anything in stock. As one of the sellers told me, it’s a very rarely requested accessory for this car, only to order (well, for some reason I don’t have doubts about these words :). In general, now it’s a leisurely order and probably installation will only be by summer (I don’t see any point in installing it in winter).
As for the engine, an autopsy showed broken connecting rods on two cylinders. There were small traces of contact between the rest of the connecting rod and the block, but I didn’t see anything particularly criminal. There was an idea to restore it, but I stood there, looked at it all and decided, no, it died like that, it died, I took away small accessories (pump, injectors, generator, compressor and something else - I didn’t get carried away). I donated the rest to the service station workers for metal (if I had somewhere to put it, maybe I would have taken it, but I didn’t consider it necessary to carry a bunch of pieces of iron over 1000 km).
Once again I carefully studied where the air comes from - damn, grabbing the water is of course a very, very minimal option - I'm lucky along the way :) Don't make a similar mistake, keep an eye on the fender liner (the same option may be if you suddenly feel the urge to drive without a front bumper, this is in the reviews I found it too). Well, that seems to be it - good luck to everyone.
Owner reviews about adjustable struts on the Prado 120
The TLC Prado 120 has air suspension installed only on the rear axle. Thanks to it, the machine does not sag when fully loaded.
Among the negative consequences of pneuma operation, the need for additional maintenance and breakdown of the compressor and receiver are noted.
Replacing or repairing air suspension is expensive, provided that original parts are used. If desired, you can find more affordable analogues of stabilizers and silent blocks that are not inferior in quality.
For some car enthusiasts, adjustable stiffness is a definite plus, for others it is an unreasonably expensive feature. Reviews from car owners vary:
- “On the Prado, the road itself feels better, the suspension without air does not allow you to adjust the stiffness, but this is very convenient - all the holes and bumps are eaten up,” Dmitry, 17 years of driving experience.
- “I didn’t notice much of a difference: it’s normal to drive in the front seat in any mode,” Vladimir, 23 years of experience.
- “Without air, it is extremely rigid, and the rear part bounces so much that you have to carry ballast, especially if you have to drive on a rough road,” Andrey, 14 years of experience.
- “This is debatable. It all depends on the purposes for which the car is purchased,” Alexey, 9 years of experience.
The chassis of the Land Cruiser Prado is considered durable and strong, but diagnostics must not be forgotten, especially when air suspension and shock absorbers with adjustable stiffness are installed.
Used Toyota Land Cruiser Prado 120: what to prepare for?
The newest Toyota Land Cruiser Prado 120 is over 10 years old, but they are still considered incredibly reliable. Maybe these machines have no weak points at all? What and how should be controlled to avoid irreversible problems and large investments?
The most economical engine is a 2.7-liter gasoline engine. It has almost no weak points, except for sensitive injectors and a pump that lasts approximately 200 thousand km. After this period, it is better to immediately change the pump (about 7,000 rubles), but it is advisable to clean the injectors every 100 thousand mileage. Replacing injectors becomes relevant after every 300 thousand (from 3,000 rubles apiece).
For a more powerful 4-liter engine, you need to monitor the injectors according to the same schedule. The valves have to be adjusted every 200-250 thousand km, and this is done manually, since there are no hydraulic compensators. If the car was manufactured before 2004, you should absolutely not overheat the engine - the cylinder head will be deformed (about 25,000 rubles). Engines of cars younger than 2004 are more resistant to overheating.
The resource of a three-liter diesel engine is about a million ! Unless, of course, you refuel with “left” fuel. Every 120-150 thousand you have to change the timing belt (up to 3,000 rubles) and check the valve clearances. Fuel injectors are also changed at the same intervals (from 10,000 apiece). The plastic gears of the turbocharger servo drive last about 120-150 thousand - their condition must also be monitored so as not to destroy the “turbine”.
If you prefer diesel engines, and your budget is only enough to buy a car from 2003-2005, then your original engine definitely needs comprehensive diagnostics! Burnt-out pistons (from 4,000 rubles apiece) are a typical problem with this edition. So, if the engine was rebuilt, replacing defective parts, this is more of an advantage than a disadvantage.
automatic transmission is considered virtually indestructible and phenomenally simple. Even changing the oil (from 600 rubles per liter) is recommended very rarely - every 80 thousand. But it’s better not to wait for the maximum period and check the condition of the “transmission” every 20,000 km. The more you drive off-road, the more often you will have to carry out oil service, otherwise the torque converter and clutches will fail.
In the transmission, the most common problem with the Toyota Land Cruiser Prado 120 is the differential lock actuator. Or rather, its plastic gears. Every 200-250 thousand mileage it is best to change it entirely (approximately 30,000 rubles). Another feature of the transmission is the need to inject the universal joints of the cardan shafts every 10,000 km (from 500 rubles). (Just like on UAZ cars!)
The critical limit for the suspension is 150 thousand km. For this mileage, the chassis will require significant costs: these are new ball joints (about 1,000 rubles apiece) and suspension arms (from 4,000 rubles for the lower one, from 9,000 rubles for the upper one). The rear stabilizer lasts approximately 200 thousand (from 3,000 rubles).
If there is an air suspension , special attention will need to be paid to the TEMS shock absorbers. Their resource usually ends at 150 thousand (from 20,000 rubles for the front, from 30,000 rubles for the rear). Front wheel bearings do not last forever - every 100 thousand you need to check their condition, and after 150 thousand, most often, replacement is required (from 5,000 per bearing).
The brake system of the Toyota Land Cruiser Prado 120 must be cleaned and lubricated annually, otherwise corrosion and souring of the pistons in the cylinders and guides in the calipers cannot be avoided. Also check the condition of the handbrake cables: they last for 5-6 years, after which the cables stretch or sour (a new one costs from 1,800 rubles).
The frame of an SUV should be inspected at every opportunity in order to notice the first signs of corrosion in time. Of the attached parts, corrosion primarily appears on the hood and roof edge. If chips appear on these parts, they must be immediately processed and repainted!
On pre-restyling cars (manufactured before 2007), it is often necessary to change the tailgate hinges - it sags due to the spare wheel attached to it. After 2007, the spare wheel began to be mounted under the bottom of the trunk - in this case, washing and lubricating the winch is vitally important so as not to destroy the mechanism.
From time to time, owners of the Toyota Land Cruiser Prado 120 are let down by the rear air conditioning circuit running along the right side. The tightness of the tubes is broken after 7-8 years of use. A radical solution is to cut off the back contour, but not everyone is ready for this... More often, the tubes are simply changed (there are “reinforced” ones on sale).
If the cabin heater motor , it is not necessary to immediately change it or the entire heater. First, it would be a good idea to lubricate the motor, after which the noise may disappear. Usually the problem occurs at 120-150 thousand. But the ignition switch, which can fail with very active use, is better to replace immediately and as a set - body, cylinder and keys (at the dealership - approximately 15,000 rubles).
Text by Vladimir Alekseev