Table with errors
Full description of error codes for Toyota cars:
General faults
The following components are subject to diagnosis:
Transmission faults
Possible causes of the malfunction:
More details on what to check:
Possible causes of the problem:
Possible causes of the malfunction:
Sensor malfunctions
To resolve the issue, it is recommended to do the following:
Electrical and electronic faults
Possible causes of the malfunction:
- stopping the engine when idling;
- difficulty starting the engine;
- “triple” of the power unit when driving uphill;
- RPM surges.
Possible causes of the malfunction:
Possible causes of the problem:
- broken or damaged line of the speed shift solenoid valve SR;
- SLU is shorted or disconnected.
damage to the wires on the instrument cluster or disconnection of contacts;
malfunction of the main wiring harness in the engine compartment;
failure of the left front anti-skid sensor;
Possible causes of the problem:
damage or wear of the harness with electrical circuits connected to the instrument cluster;
malfunction of the twisted wire assembly;
failure or disconnection of the contact from the horn button;
To diagnose, you need to do the following:
To find the cause, perform the following steps:
Two-digit Type 9 codes
Possible causes of the malfunction:
Fault codes are considered for the following Toyota models:
- 4Runner
- Avensis T25 (Avensis T25);
- Avalon (Avalon);
- Auris (Auris);
- Aristo (Aristo);
- Brevis (Brevis);
- Caldina (Kaldina);
- Carina (Karina);
- Cami (Kami);
- Camry V40 (Camry);
- Chaser (Chaser);
- Corolla MMT, Ceres, SV40 (Corolla);
- Corona Premio (Crown Premio);
- Crown 1G FE (Crown);
- Estima (Estima);
- Fielder;
- Isis (Isis);
- Ipsum (Ipsum);
- Gracia (Grace);
- Granvia (Granvia);
- Highlander (Highlander);
- Hilux (Hilux);
- Land Cruiser 200 (Land Cruiser);
- Majesta (Majesta);
- Mark, Mark2 (Mark);
- Nadia (Nadia);
- Noax (Noah);
- Passo (Passo);
- Platz
- Prado (Prado);
- Previa (Previa);
- Prius (Prius);
- Rav4 (Rav 4);
- Soarer (Sorer);
- Surf
- Town;
- Verso (Verso);
- Vista (Vista);
- Vitz (Vitz);
- Wish (Wish);
- Yaris (Yaris);
- Windom (Windom);
p00b0
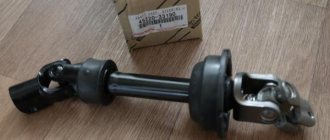
The code indicates damage to the left turbine power supply. Often the turbine itself is destroyed due to poor location. Turbine malfunction occurs due to excessive air entering the unit.
Checking turbine equipment elements will reveal damaged contacts and parts. It is possible to eliminate the p00b0 error in the Land Cruiser 200 by replacing the unit cartridge.
How to diagnose the error?
The self-diagnosis process for Toyota vehicles can only be performed using connectors DLC1 and DLC2.
The test block is made in the form of a small plastic module equipped with a lid. Depending on the car model, the location of the connector may vary, but usually it is located in the engine compartment on the left side. On the block cover there is the inscription “Diagnostic”. In older versions of Toyota, the device is located next to the battery.
For Toyota Karina cars 1992-1997, as well as Corona and Mark 1992, error codes can only be read by reading the blinking LEDs. In newer versions of vehicles, the DLC2 module is located in the vehicle interior. It can be seen under the center console panel or near the driver’s feet, under the steering wheel. The module is made in the form of an oval or circle. The diagnostic process consists of closing certain contact elements of the block, which must be connected in a specific sequence.
Algorithm for checking:
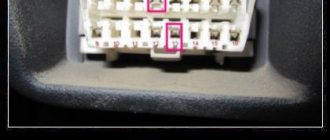
- The protective plastic cover is removed from the connector. On the reverse side of the lining there is a special diagram showing the terminals of the block.
- Using a piece of wire, cable or paper clip, you need to make a jumper that is mounted between the pins numbered TE1 and E1.
- The key is inserted into the lock and the ignition is activated. When conducting diagnostics, the heating and air conditioning systems must be turned off.
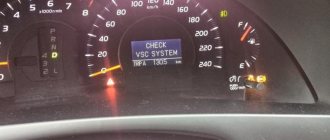
- During the test, you need to look at the Check Engine LED indicators (for diagnosing the power unit) and at O/D (for the gearbox). The user must record the number of blinks of the light bulb, as well as the intervals.
Pin designation on the DLC diagnostic block
You can determine the absence of malfunctions in the operation of the internal combustion engine (ICE) and gearbox by two symptoms:
- LED lights blinked evenly at the same interval and duration 11 times;
- The Check indicator blinks continuously and evenly at intervals of 4.5 seconds.
If there is no contact diagram on the cover or it has been erased, you can determine the required pins as follows:
- The car's ignition system turns on.
- One of the contact elements of the light indicator is connected to any standard engine ground bolt.
- The second output of the light bulb is connected in turn to each contact of the diagnostic block.
- At the moment when the Check indicator lights up on the dashboard, we can conclude that the required pin has been found.
To read the code you need to count the LED blinks:
- when a combination appears, the LED blinks quickly, lights up for a few tenths of one second;
- the time interval between decimal and unit readings will be no more than 1.5 s;
- the pause between each subsequent code will be 2.5 seconds;
- series of codes for various problems are separated by a pause of 4.5 s.
Errors in cars from different manufacturers
AcuraAlfa RomeoAudiBMWBuickCadillacChevroletChryslerDaewooDodgeEagleFIATFordGeneral MotorsGeoGMCGreat WallHondaHUMMERHyundaiInfinitiIsuzuIVECOJaguarJeepKiaLamborghiniLand RoverLexusLincolnMazdaMercedes BenzMercuryMINIMitsubishiNissanOldsmobileOpelPeugeot/C itroenPlymouthPontiacPorscheRAMRenaultSaabSaturnScionSubaruSuzukiToyotaVolga SiberVolkswagenVolvoVAZ (LADA)GAZ (GAZ)GAZ (Mikaz 11)GAZ (Mikaz 7.6)UAZ (Bosh ME17)UAZ Patriot (IVECO diesel)
Poll: Were you able to diagnose the problem? (Number of votes: 20)
Yes, in person
Yes, with the help of a friend
Yes, from an official dealer
No
To vote, click on the desired answer.Results
Tell your friends:
Please rate, this is very important for us:
Votes: 0 people Rating: 0 out of 5.
How to reset the error?
To clear a fault code, perform the following steps:
- The car's ignition system turns on.
- On the diagnostic block, to reset the memory of the control unit, contacts TC and E1 are closed.
- Over the next three seconds, the user must press the brake pedal at least 8 times.
- Then you need to make sure that the LED indicator blinks with a pause of 0.5 seconds.
- The ignition is turned off and the jumper is disconnected from the pins. If the error codes are successfully cleared, the anti-lock brake indicator will not illuminate on the instrument panel.
You can use a computer to remove combinations of faults. If the diagnostics were performed using a laptop, software is used to reset the memory.
Auto electrician website. Repair practice, electrical circuits, etc.
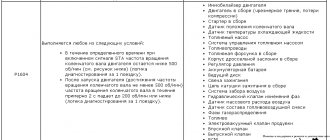
Code P1336 Monitoring the control of the throttle valve drive, mismatch of signals from sensors “A” / “B” of the throttle position
Code P1336 is entered if: - the ignition is on; — the sum of the signals TPS A and TPS B differs from the reference voltage of 5 V by more than 0.3 V for 0.5 s.
The malfunction indicator lights up 5 s after the fault code appears. Description of checks
1 Using a scan tool, check whether code P1336 is active at the time of diagnosis. 2 The check is carried out in accordance with the map for code P2135. Diagnostic information Diagnostic tool in “1 Parameters” mode; 6 Add. Options; 3 ADC inputs” shows the signals of TPS A (UDKP1) and TPS B (UDKP2) in volts. When the throttle valve is opened, the TPS A signal increases, the TPS B signal decreases. With the throttle valve fully closed, the TPS A signal should be in the range of 0.3...0.6 V, the TPS B signal should be in the range of 4.4...4.7 V. The controller recalculates the voltage signals of TPS A and TPS B into the percentage of throttle opening flaps. The diagnostic tool is in “1 Parameters” mode; 1 General view" displays the percentage of throttle valve opening WDKBA, which is calculated as the arithmetic average of the signals TPS A (%) and TPS B (%). 0% corresponds to a fully closed throttle. 100% corresponds to the maximum throttle opening per lever. The signals TPS A and TPS B are mismatched if the following condition is met: |5 V – (UDKP1 + UDKP2)| > 0.3 V If a mismatch between the TPS A and TPS B signals is detected, the engine control system will operate in emergency mode until the end of the current trip: de-energizing the electric throttle drive and limiting engine speed (2500 rpm). If the EDM or ECM is replaced, or the controller is reset using the diagnostic tool (mode “5 Additional tests; 1 ECM reset with initialization”), it is necessary to perform the throttle valve zero adaptation procedure. To do this, with the car standing, you need to turn on the ignition, wait 30 seconds, turn off the ignition, and wait until the main relay turns off. Adaptation will be interrupted if: — the engine is cranking; — the car is moving; — the accelerator pedal is pressed; — engine temperature below 5 °C or above 100 °C; — ambient air temperature below 5 °C. If the electric throttle actuator is de-energized, the throttle valve is held in the Limp home position (6-7%) using direct and return springs.
The cost of diagnosing errors for Ford at service stations in Moscow and St. Petersburg
Approximate prices for computer diagnostics of faults:
| City | Company name | Address | Phone number | Price |
| Moscow | North Motors | St. Dubninskaya, 83 | +7 | 2500 rub. |
| Silver elephant | St. Pyalovskaya, 7 | +7 | 3500 rub. | |
| Saint Petersburg | Automagic | St. Uchitelskaya, 23 | +7 | 2000 rub. |
| ClinliCar | Bolshoy Sampsonievsky Ave., 61k2 | +7 | 3000 rub. |
Troubleshooting
To fix the error, it is best to use the Toyota Techstream functionality.
- We enter the Uzer Help section and open ABS/VSC/TRC Live. There is a list in which you need to select the “Utility” item. After activating it, we get to the menu where there is a line “Test Mode”, click on it.
- A window will appear confirming that you have entered the “Test Mode Wizard”. Having chosen ABS ECU, press the “Next” button.
The system will ask you to confirm that the following conditions are met:
- The vehicle is parked on a level surface.
- The steering wheel is set to the position corresponding to driving in a straight line.
- The gear shift lever is in the “Parking” position.
- The engine is not running.
- Ignition is on.
More category errors
C1361C1381C1401C1402C1403C1404C1405C1406C1407C1408C1413C1414C1415C1416C1417C1425C1427C1428C1432C1433C1434C1436C1437C1439C144 0C1442C1443C1445C1511C1512C1513C1514C1515C1516C1517C1524C1531C1532C1533C1534C1535C1551C1552C1553C1554C1555C1581C1582C1611C161 2C1613C1621C1622C1625C1626C1627C1628C1645C164AC164EC1657C1658C1659C1662C168BC168CC1691C1694C1695C1AE0C1AE5C1AEFC2126C2182C2300C230 1C2303C2304C2305C2306C2307C2308C2309C2310C2311C2315C0200/31C0205/32C0210/33C0215/34C0226/21C0236/22C0246/23C0256/24C0273/13C0 274/14C0278/11C0279/12C0365/43C0371/55See all errors →