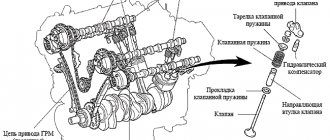
The intake camshaft is equipped with a VVT-i clutch. The two overhead camshafts are driven by a single row chain with an 8 mm pitch. The angle between the intake and exhaust valves is 27.5°. The camshafts actuate the valves through adjusting tappets. The intake valve diameter is 34 mm, the exhaust valve is 29.5 mm, the intake and exhaust valve lift is 8 mm. The VVT-i system clutch is located on the intake camshaft, which smoothly changes the opening time of the intake valves in the range of 50°. The 1AZ-FE engine has a volume of 2 liters (1998 cc). The cylinder diameter and piston stroke are the same, 86 mm. Compression ratio 9.6:1. Power output is 145 hp. at 6000 rpm and 190 Nm at 4000 rpm. This engine was installed on Toyota Avensis, Toyota Caldina, Toyota Camry, Toyota RAV4, Toyota Vista, Toyota Premio, Toyota Avensis Verso.
REPLACEMENT
| 1. REPLACE TIMING CHAIN COVER OIL SEAL |
Remove the oil seal using a screwdriver and hammer.
Place the oil seal stopper on wooden blocks.
Apply multi-purpose grease to the working edge of the new oil seal.
Keep the edge free of foreign particles.
Using SST and a hammer, install the new oil seal so that its surface is flush with the edge of the timing gear cover.
Special Tool (SST): 09223-22010
Do not hit the seal at an angle.
Preparing for work
You should begin preparing for work by selecting a new timing belt. Today there are many companies producing timing belts. The undisputed leaders are undoubtedly Conitech and Gates. Their products are of almost impeccable quality, however, their prices are steep.
Parts from Dayco, Bosch or Lemforder may not be as good, but they are much cheaper. It makes no sense to go into deeper details; here everyone will choose a manufacturer based on preferences and finances. However, it should be mentioned that it is best to get components for the car from an authorized dealer. Of course, few people are satisfied with a markup of 30–50%, but this is a kind of guarantor of safety. At the moment, there are many fakes, and they are so good that they can fool even experienced sellers. Naturally, all the quality goes into the visual design and in practice, fake belts quickly deform and break.
INSTALLATION
INSTALL NO. 2 CHAIN ASSEMBLY
Install the crankshaft so that its key is horizontal on the left.
Rotate the drive shaft so that the cutout is facing up.
Align the yellow marked links with the timing marks on the gears as shown.
Install the sprockets on the crankshaft and oil pump shaft, putting the chain on the gears.
Temporarily secure the oil pump drive shaft sprocket with a nut.
Insert the damper spring into the adjusting hole, install the chain tensioner plate and secure it with the bolt.
Tightening torque: 12 N*m
Align the oil pump drive shaft sprocket adjustment hole with the groove on the oil pump.
Insert a 4mm diameter pin into the oil pump drive shaft gear mounting hole to fix the gear, and tighten the nut.
| 2. INSTALL CRANKSHAFT DRIVE SPROCK |
| 3. INSTALL CHAIN SUPPORTER NO. 1 |
Secure the chain guide with 2 bolts.
| 4. INSTALL CHAIN ASSEMBLY |
Set the piston of cylinder No. 1 to TDC on the compression stroke.
Using a wrench, rotate the camshafts (at the hex part) until the timing marks on the camshaft gear are aligned with the timing marks on the No. 1 and No. 2 bearing caps, as shown.
Using the pulley bolt, rotate the camshaft so that the camshaft key is on top.
Place the chain on the crankshaft drive sprocket, aligning the link with the gold or orange mark with the crankshaft timing mark.
Using SST and a hammer, press the drive sprocket onto the crankshaft.
Special Tool (SST): 09309-37010
Align the links with the gold or orange marks and the timing marks on the timing wheel and camshaft sprocket, and then install the chain.
| 5. INSTALL CHAIN TENSIONER SHOE |
Install the chain tensioner shoe and secure it with the bolt.
| 6. INSTALL TIMING CHAIN GUIDE |
Install the timing chain guide and secure it with the bolt.
| 7. INSTALL NO. 1 CRANKSHAFT POSITION SENSOR GEAR |
Install the crankshaft position sensor sprocket so that the F mark is at the front.
Remove any remaining old sealant and ensure that no oil gets on the mating surfaces of the timing chain cover, cylinder head and cylinder block.
Apply a bead of sealant (4.0-5.0 mm (0.157-0.177 in) diameter) as shown.
Branded sealant Seal packing black from Toyota, Three bond 1207B or similar.
- Remove all oil from the contact surface.
- Install the chain drive cover within 3 minutes after applying the sealant.
- Do not add engine oil for at least two hours after installing the chain cover.
Apply the sealant in a continuous bead as shown.
Branded sealant Seal packing black from Toyota, Three bond 1207B or similar.
- Remove all oil from the contact surface.
- Install the chain drive cover within 3 minutes after applying the sealant.
Secure the timing chain cover with 11 bolts and 2 nuts.
Bolt length:
| Bolt A | 10mm head length is 30mm(1.18 inch) |
| Bolt B | 12mm head length is 30mm (1.18 inch) |
| Bolt C | 14mm head length is 40mm (1.57 inch) |
Using an E10 torx socket wrench, install the threaded rod for the serpentine belt tensioner.
| 9. INSTALL NO. 1 CHAIN TENSIONER ASSEMBLY |
Release the ratchet, then push the plunger all the way in and hook the hook onto the pin to lock the plunger in the position shown in the illustration.
Install a new gasket and secure the chain tensioner with 2 nuts.
If, when installing the chain tensioner, the hook becomes disengaged with the plunger, return the hook to its place.
| 10. INSTALL RIBBED BELT TENSIONER ASSEMBLY |
Install the serpentine belt tensioner and secure it with a bolt and nut.
Do not raise the engine higher than necessary.
Install the right engine mount bracket and secure it with 3 bolts.
| 12. INSTALL CRANKSHAFT PULLEY |
Using SST, secure the pulley and tighten the bolt.
Special Tool (SST): 09213-54015 (91651-60855) 09330-00021
Rotate the crankshaft counterclockwise and then remove the hook from the plunger pin.
Rotate the crankshaft clockwise and check that the piston is extended.
Remove any remaining old sealant. Be careful not to get oil on the mating surfaces of the cylinder block and oil pan.
Apply sealant in a continuous bead (3.0 - 4.0 mm (0.118 - 0.157 in) diameter) as shown.
Branded sealant Seal packing black from Toyota, Three bond 1207B or similar.
- Remove all oil from the contact surface.
- Install the oil pan within 3 minutes after applying the sealant.
- Do not add engine oil for at least two hours after installing the oil pan.
Install the oil pan onto the cylinder block.
Tighten the 12 bolts and 2 nuts evenly in the order shown in the illustration.
Place a telescopic hydraulic jack under the engine and place a block of wood on the jack.
Remove the motor lifting device and hoist.
Remove hooks No. 1 and No. 2 for hanging the engine.
| 14. INSTALL CRANKSHAFT POSITION SENSOR |
When installed, the O-ring must not be cracked or bent.
Apply a thin layer of engine oil to the sensor O-ring.
Install the sensor and secure it with the bolt.
Connect the wiring harness clamp.
Install the connector clamp.
Connect the sensor connector.
Make sure the sensor wiring harness is secured behind the tab on the timing chain boot using a special clamp.
Remove all old sealant from the contact surface.
Apply Seal packing to the 2 areas shown in the picture.
Branded sealant Seal packing black from Toyota, Three bond 1207B or similar.
- Remove all oil from the contact surface.
- Install the oil pan within 3 minutes after applying the sealant.
- Do not add engine oil for at least two hours after installing the oil pan.
Secure the cylinder head cover with 8 bolts and 2 nuts.
Install the 2 engine wiring harnesses and secure it with the 2 bolts.
Connect 2 ventilation hoses to the cylinder head cover.
| 16. INSTALL IGNITION COIL ASSEMBLY |
Install 4 ignition coils and secure with 4 bolts.
Connect the 4 ignition coil connectors.
| 17. INSTALL SUPPORT ROLLER BRACKET |
Install the mounting bracket, securing it with 2 bolts.
| 18. INSTALL RIGHT ENGINE MOUNT |
Install the right engine mount and secure it with 4 bolts and 2 nuts.
| 19. INSTALL FRONT ENGINE MOUNT |
Install the front engine mount and secure it with 2 bolts.
Install the bolt to secure the front engine mount front bracket.
Release the 2 engine wiring harness clamps.
Install the wiring harness guard and secure it with the bolt.
| 20. INSTALL RADIATOR EXPANSION TANK |
Install the radiator expansion tank and secure it with 2 bolts.
| 21. INSTALL GENERATOR ASSEMBLY |
Make sure the crankshaft position sensor wiring harness is secured behind the tab on the timing chain boot using the special clamp.
Install the generator and secure it with 2 bolts.
Connect the wiring harness clamp.
Install the wiring harness clamp bracket with the bolt.
Connect the generator wire and secure the connection with a nut.
Install the contact blank.
Connect the generator connector.
Using a 19mm socket wrench (SST), loosen the serpentine belt tensioner by turning the lever clockwise, then install the fan and alternator serpentine belt.
Special Tool (SST): 09216-42010
- Connect the SST and tools so that they are close to each other during operation.
- When installing the tensioner, slowly rotate it clockwise for at least 3 seconds. Do not apply force suddenly.
- Once the tensioner is fully installed, do not apply more force than necessary.
Install the right reinforcement and secure it with 4 bolts.
Using a caliper, measure the free length of the compression spring.
Minimum allowed length:
41.5 mm (1.634 in)
If the free length is less than the minimum permissible, replace the compression spring.
Install the new gasket by hand until it is flush with the exhaust manifold.
- Make sure the gasket is installed in the correct installation direction.
- Reuse of removed gaskets is prohibited.
- Do not press on the gasket when installing the front exhaust pipe.
Install the front exhaust pipe and secure it with 2 compression springs and 2 bolts.
Let's get started
Remove the decorative plastic and unscrew the four bolts securing the ignition modules. We remove the modules.
We unscrew eight bolts, two nuts and one stud on the 10th valve cover. The intake manifold is missing from the photo, since it was removed to disassemble the engine, you do not need to remove it.
Remove the valve cover along with the gasket.
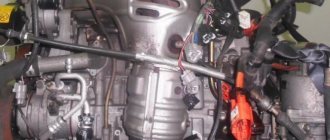
Disconnect the negative terminal of the battery. Disconnect all wiring from the generator and unscrew the two bolts securing it. We remove the generator. Photo from the back.
Jack up the engine. We remove the engine mount, unscrew three 14mm bolts. If the two side ones can be unscrewed using a cardan without any problems, then the third one is under the ABS block..., as well as two nuts and a 14mm bolt securing the support to the engine bracket. The VVT valve prevents you from removing the support; carefully remove it. Fastened with one 10mm bolt.
We drain the antifreeze from the radiator and cylinder block.
The valve on the block is located under the exhaust manifold. On the radiator on the left, below.
Set the top dead center.
Remove the front right wheel and plastic mudguard.
The mark on the crankshaft pulley should be opposite the “0” mark on the timing cover.
There are two marks on the camshaft sprockets opposite each other. If this does not happen, turn the crankshaft one revolution. The photo quality is poor because it was taken with a flexible camera. There is no other way to take a picture because the air conditioning, ABS and power steering pipes are in the way.
Let's simulate the position on the removed parts.
On the exhaust camshaft sprockets, mark the chain link opposite the top mark. On the VVT sprocket the link is opposite the long mark.
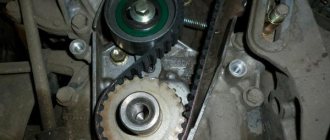
Remove the accessory drive belt. Using a 19 key, use the special protrusion on the automatic tensioner to turn it clockwise and remove the belt. Loosen the tensioner mounting bolt.
Unscrew the tensioner mounting nut.
The spar into which the bolt rests prevents you from removing the tensioner. To get it out you will have to jack up the engine. We place a jack under the front part and unscrew the nut on the gearbox support and remove the bolt.
Raise the front of the engine as much as possible and remove the tensioner. We also unscrew the pin on which it was held, since it will interfere with removing the timing chain cover.
Also, by unscrewing three 14mm bolts, remove the support bracket.
Unscrew the six bolts number 10 securing the pump.
Remove the coolant pump. Two bolts are shorter than the others; they were not removed in the photo. We remember or mark places.
We stop the crankshaft, unscrew the bolt and remove the crankshaft pulley. To lock the crankshaft, we use a simple method: engage fifth gear, insert a suitable-sized screwdriver into the brake disc so that it jams it against the brake caliper, and unscrew the bolt with a slight movement of the hand.
Unscrew 8 bolts to 10 and three to 12 timing covers. Remove the crankshaft position sensor. We also remove the power steering pump, two 12mm bolts.
The timing chain tensioner is installed on the top left of the cover; remove it by unscrewing two nuts 10 mm.
Remove the timing cover. When the cover is removed, the location of the bolts for its fastening is visible.
Remove the crankshaft position sensor rotor.
We unscrew one bolt of the tensioner shoe and two chain guides and remove them.
The tensioner shows signs of unacceptable wear.
Place a mark on the timing chain link opposite the crankshaft sprocket mark.
Remove the old chain and crankshaft sprocket. The three links of the new timing chain have standard marks, yellow or black, depending on the manufacturer. If we attach our chain to a new one, all the marks should match, as well as the number of links.
Unscrew the VVT clutch bolt while holding the camshaft with a wrench. Remove the VVT sprocket. Never unscrew the four pentagonal bolts.
We do the same with the exhaust camshaft sprocket.
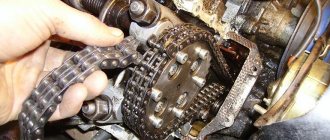
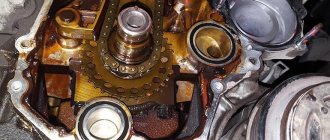
The timing drive mechanism looks like this.
We wash all the parts, clean all adjacent surfaces from old sealant. We do not turn the camshafts and crankshaft.
How to replace the timing belt on a Toyota Rav 4 with your own hands?
The gas distribution mechanism of a car is responsible for controlling the phases of supply and exhaust of gases to the engine cylinders. This occurs due to the transmission of torque from the crankshaft to the camshaft through the timing belt. The belt itself is a very simple part, but its wear or even rupture can lead to truly catastrophic consequences for the engine. In this material, we will look at how to replace the timing belt on a Toyota Rav 4 with your own hands.
When is replacement required?
The following signs indicate the need for diagnosis:
- Exhaust gases are black in color, with a pronounced burning smell;
- Ringing and knocking in the engine;
- Power loss at low or high speeds;
- Engine vibration when driving.
The main sign that the timing belt needs to be replaced is the presence of abrasions and chips on its teeth. In addition, it is worth paying attention to the outer surface of the part. If there are breaks, cracks, dents or other mechanical damage on it, it should be replaced immediately.
In addition to reducing the dynamic characteristics of the car, untimely replacement of this part can lead to serious consequences for the engine. So, a worn belt may sooner or later break. This leads to a mismatch between the operating cycles of the valves and pistons. As a result, the pistons begin to hit the valves, bending them. The piston heads themselves are also deformed. Repairing them will be expensive.
Preparing for work
You should begin preparing for work by selecting a new timing belt. Today there are many companies producing timing belts. The undisputed leaders are undoubtedly Conitech and Gates. Their products are of almost impeccable quality, however, their prices are steep.
Before you start replacing the timing belt on a Toyota Rav 4, you should park the car in the garage, block the rear wheels and let the engine cool. Carrying out replacement on a hot engine can cause serious burns. In addition, on a hot or even warm engine it will not be possible to properly tension the belt, which can lead to accelerated wear. Immediately before replacement, for safety reasons, you should remove the keys from the ignition and disconnect the negative terminals of the battery.
To replace you will need the following tools:
- Set of open-end and spanner wrenches;
- Ratchet and socket set;
- Torque wrench;
- Candle key;
- Pulley lock;
- Tripod;
- Jack;
- Rust solvent WD-40 or its equivalent.
Do-it-yourself replacement of the timing belt on a Toyota RAV4
The procedure for replacing a belt on a RAV4 consists of three stages and is carried out according to the following algorithm.
Preparing to replace the belt
Sequencing:
- We dismantle the front right wheel and install a tripod under it;
- We dismantle the plastic engine cover, then remove the high-voltage wires and unscrew the spark plugs;
- We unscrew the two fastening bolts holding the plastic case and bend it to the sides;
- We remove the belt of the mounted units; to do this, loosen its tension roller;
- Unscrew the mounting bolts of the generator and move it to the side. There is no need to disconnect the wires;
- Unscrew the fastening bolts of the power steering reservoir and the fastening of the tubes. After this, move the tank to the side without removing the tubes;
- Jack up the engine. It is best to install a wooden block between the engine and the jack;
- We fix the pulley. This can be done using a special tool. If it is not there, you can insert the shank of a drill bit or a metal pin into one of the holes in the pulley. We put a spanner on the pin, and a piece of pipe on the wrench. This structure must rest against the ground. Next, loosen the pulley mounting bolts;
- We unscrew the bolts securing the right engine mount and its bracket, and then dismantle them;
- Loosen the fastenings of the power steering pump, then move it to the side and remove the power steering belt;
- We dismantle the top cover of the NRM and remove it.
Belt replacement procedure
Sequencing:
- Align the marks on the lower pulley with the mark on the lower casing of the gas distribution system;
- We dismantle the crankshaft pulley;
- Unscrew the bottom cover of the gas distribution system;
- We loosen the fastenings of the tension roller, then press the roller down and tighten the bolt;
- Remove the timing belt;
- If necessary, we dismantle the parasitic and tension rollers;
- We clean the surface under the gas distributor caps from dirt, dust and smudges;
- Installing a new belt and rollers;
- We mount a new parasitic roller and tighten the fastening bolt with a force of 42 Nm;
- We mount the idler roller and its spring. Then we press it down and tighten the fastening bolts;
- Check the marks on the pulleys. There is a mark on the small crankshaft pulley that should coincide with the mark near the oil deposit;
- We put on a new timing belt. It should be put on so that the slack is on the tensioner side;
- Loosen the tensioner fastenings;
- Install the belt guide washer and the lower timing case. Next, you should install the pulley and attach its fastenings;
- We turn the crankshaft clockwise two full turns and check the marks. If the marks are lost, the belt should be removed and the marks should be set again;
- Turn the crankshaft clockwise until the mark on the pulley coincides with the mark located five centimeters to the left of the zero mark;
- Tighten the tensioner mounting bolts with a force of 42 Nm;
- We mount the upper timing belt cover;
- We carry out further assembly in reverse order.
At this point, the procedure for replacing the timing belt on a Toyota Rav 4 can be considered complete.
Advantages of repairs in our car services
Competitive prices and high quality work are appreciated by absolutely all of our regular customers.
Toyota Specialization
Having settled on this brand of car, we studied it like no one else; not a single detail can be hidden from us.
Your car, no matter what repairs are required.
Do dealers offer expensive replacement parts? We repair any Honda components. Don't waste money where it can be avoided.
Availability of basic consumables in the services, or delivery from the warehouse within 1 hour.
Comfortable waiting area
Have a pleasant time using our services (TV, Wi-Fi, tea, coffee).
Contact the services of our network for specialized and high-quality service
Replacing the timing chain in Toyota Rav4
A part whose timely replacement ensures reliable engine operation is a timing chain or belt in a Toyota Rav4. Depending on which motor is installed, the timing of this procedure may vary.
In Toyota Rav4 with gasoline power units of 2.0 and 2.5 liters, a chain is installed that synchronizes the positions of the crankshaft and camshaft. In cars with a 2.2-liter diesel power unit, manufacturers have provided a timing belt that performs the same functions.
Pros and cons of timing chain
It is well known that a chain is much more reliable and has a longer service life than a belt. In addition, replacing the timing belt of a Toyota Rav4 chain drive is diagnosed in several ways, which can be read about below. That is why the timing of installing a new chain is very vague. In Rav4, this figure almost always exceeds the mark of 100 thousand km, or even 200.
With a belt drive everything is more pragmatic. The manufacturer recommends replacing it after reaching 90 thousand km, earlier or later. But in the latter case, the risk of breakage increases significantly. When installing the belt, a tension roller and pump must be installed.
The timing intervals for replacing the timing belt/chain largely depend on the conditions in which the vehicle is operated.
Ways to find out if repairs are needed
It is impossible to determine the size of the timing belt after a certain mileage without removal, and this procedure itself is not part of the diagnosis. With a chain drive everything is much simpler. In order to determine whether the Rav4 timing chain needs to be replaced, you need to follow simple recommendations.
- Measure the length of the chain.
Using a caliper, measure the distance between the 8 links. The length of the section should not exceed 52.4 mm (2.063 inches). If this value is greater, a replacement must be made.
Using the same tool, the distance between 16 links is determined. It should not exceed 122.6 mm (4.827 inches). To obtain an accurate result, the circuit is measured in both cases in three randomly selected areas.
Use a caliper to measure shoe wear. The maximum wear value should not exceed 1.0 mm (0.039 in).
Wrap the chain around the drive sprocket and measure the diameter. If it is less than 51.6 mm (2.031 inches) there are obvious signs of wear and both elements need to be replaced
Measurements must be carried out in such a way that the measuring device touches the chain rollers.
Preparatory activities
It will not be superfluous to listen to the operation of the engine. The first sign of wear is increased noise in the engine compartment area. If during a visual inspection there is play on the camshaft sprockets in all directions and there is no tension, then replacing the timing chain on a Toyota Rav 4 is mandatory.
The replacement process is not complicated, but access to the components that need to be dismantled leaves much to be desired. Without experience or special tools (including measuring tools), this procedure should be left to specialists. It is important to remember that you must use only original spare parts according to the catalog number.
Before installation for Toyota Rav 4, you must purchase all parts. The set consists of:
- chain guide;
- chain tensioner shoe;
- VVT system sprockets;
- exhaust camshaft sprockets;
- crankshaft sprockets;
- crankshaft oil seal;
- timing chains;
- automatic chain tensioner.
You will also need a valve cover gasket and a tube of high temperature sealant.
It is necessary to remove the negative terminal, placing the car securely on an inspection hole or lift, taking into account the need to jack up the engine. Prepare a container for antifreeze with a volume of at least 6.5 liters. Carefully drain the antifreeze from the radiator (bottom of the radiator) and cylinder block (under the exhaust manifold).
Disassembly for timing chain removal
Replacing the Rav 4 chain begins with dismantling the following components and parts:
- ignition module;
- valve cover (unscrew 8 bolts, 2 nuts, 1 stud)4
- generator;
- water pump.
Next, you need to jack up the engine and remove one support. To do this, perform the following operations.
- Unscrew 2 side bolts and 1 bolt located under the ABS block.
- Disconnect the support fastenings to the bracket by unscrewing 2 nuts and 1 bolt.
- Before removing the support, remove the VVT valve by unscrewing 1 10 mm bolt.
Remove the right wheel and plastic protection.
In order to remove the tensioner, it is necessary to jack up the engine. Otherwise, you won’t be able to remove the part - the spar will get in the way.
Remove the following elements:
- timing chain tensioner.
- timing cover.
- power steering pump.
- sensor and rotor that determine the position of the crankshaft.
Be sure to place a mark on the chain link opposite the crankshaft sprocket mark. Remove the old chain and crankshaft sprocket. Attach the new chain and make sure that all marks on the new chain match.
After securing the camshaft with a wrench, unscrew the VVT clutch bolt and remove the VVT sprocket.
The disassembly process is complete. Wash the parts that will be installed with the new ones from dirt, sealant and oil. It is PROHIBITED to turn the crankshaft and camshaft.
Assembly with new parts
The camshaft marks located on the new chain should be aligned with the marks on the camshaft and crankshaft. They are located six links away.
Make sure that the camshaft and crankshaft marks match.
The tensioner pin should face up. Bring the tensioner into working position by pressing the top of the shoe until it stops. To check, use the material at hand (wire) and try to move the pin. If she gave in, then everything is fine.
Check the marks located on the crankshaft pulley and between the camshaft sprockets. You can ignore the marks located on the chain, as they will move. This is due to the fact that there are fewer teeth on the crankshaft sprocket than the number of chain links.
The rest of the assembly of all components and parts is carried out in the reverse order. Take into account the tightening torques.
Source
Remove the following elements:
- timing chain tensioner.
- timing cover.
- power steering pump.
- sensor and rotor that determine the position of the crankshaft.
Be sure to place a mark on the chain link opposite the crankshaft sprocket mark. Remove the old chain and crankshaft sprocket. Attach the new chain and make sure that all marks on the new chain match.
After securing the camshaft with a wrench, unscrew the VVT clutch bolt and remove the VVT sprocket.
The disassembly process is complete. Wash the parts that will be installed with the new ones from dirt, sealant and oil. It is PROHIBITED to turn the crankshaft and camshaft.