4164 Apr 20
Toyota Corolla 120 is a combination of impeccability and reliability, high quality workmanship and ergonomics. It can be equipped with either a gasoline or diesel engine, each of which has high performance parameters.
One of the difficult modes in which any type of engine has to work is idling. The difficulty is that due to low pressure in the injection path, an ineffective ratio of the resulting air-fuel mixture occurs and its combustion is unstable. In this case, the difference in pressure levels contributes to the combustion waste being thrown back into the cylinder area. These processes gradually lead to wear and tear of all engine components and mechanisms, and also significantly reduce the environmental friendliness of exhaust gases.
Signs of trouble
The operation of the Toyota Corolla idle speed sensor is designed by the manufacturer for the entire service life of the engine, but sometimes problems with the wiring, as well as the appearance of soot, oxidation and other deposits on the walls of the sensor lead to its failure.
A malfunction of the device can be indicated by such changes in the operation of the car as:
- increase in the amount of fuel consumed;
- instability of speed when there is no load on the engine;
- increased level of engine vibration;
- The car starts to stall at low speeds.
All these factors are a reason to diagnose the idle air regulator, identify the cause of the malfunction and clean or replace the part.
Problems with the sensor lead to rapid wear of the power unit and the entire fuel system of the car, so they must be corrected as soon as possible.
Settings
If the car's speed fluctuates at idle, or even more, the car simply stalls at idle, or the speed is too high, you should think about adjusting the idle speed sensor. Since his work is closely related to BDZ, it is necessary to start with him.
Remote sensing position
First you need to pay attention to the gap between the throttle drive stop and the stop screw. There should be no gap in the closed position of the damper. Please note that this screw does not regulate engine idle speed, but simply prevents wear on the damper.
Disconnect the chips and unscrew the DZ mounting bolts
Don't be surprised if you find the screw head sawed off. Many vehicles have this installed from the factory. A serviceable and adjusted damper moves smoothly, without jerking when starting, and does not require additional forces when pulled from its place.
Throttle position sensor
The throttle position sensor can be adjusted without removing it.
- loosen the fastening bolts;
- use a 0.7 probe to connect to contacts IDL – E2;
- by gently tapping with a hammer, you need to catch the moment when the resistance on the multimeter is equal to infinity (that is, the conductivity disappears);
- tighten the bolt of the upper sensor mounting, check everything according to the manual;
- tighten the bottom bolt and carry out a control check with all probes on all contacts.
Idle valve
It is worth noting that the resistance at the IDL – E2 contacts in itself does not matter, the main thing is that it does not exceed the permissible limit according to the manual (2.3 kOhm).
Spring adjustment
On the 3S-FE engine, the idle air valve is designed in such a way that the “shutter” can be opened either by an electromagnetic solenoid or by a spring, without the use of electronics. As already noted, this was done so that in the event of a failure of the electric mechanism, the engine does not stall, but continues to operate at idle.
For the spring to fire properly, it must be installed correctly. To check the correct operation of the spring, you need to disconnect the idle speed sensor chip. If installed correctly, the engine will maintain speeds of 1000-1200, and not 700-800, as when the electronics are running. This happens due to the inability of the spring to adjust the amount of air supplied depending on the load on the engine. This creates a power reserve in case electrical equipment is turned on (lights, cooling fan, etc.). Accordingly, as the load increases, the engine speed will decrease.
Spring
The spring must be set in such a way that without a solenoid it maintains the required 1000-1200 revolutions, there are no more tricks here. The most convenient way to adjust:
- warm up the engine to operating temperature;
- turn off the engine and remove the coil;
- loosen the spring bolts and start the engine;
- select and install the spring position corresponding to a speed of 1050-1150 rpm;
- tighten the fastening bolts and secure the coil in place;
- adjustment is complete.
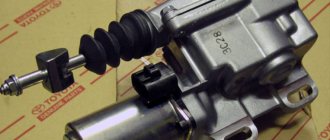
Features of the sensor and rules for replacing it
The idle speed sensor is an important device in the vehicle control system that regulates engine speed when the crankshaft rotates at the lowest speed. It regulates the amount of air entering the engine (bypassing the throttle valve) necessary for stable operation at low speeds.
Cleaning or replacing the idle speed sensor of a Toyota Corolla 120 (sedan, hatchback, station wagon) may be required after 15,000–20,000 km, although the car’s on-board computer will not signal this. It is always necessary to focus on the operation of the engine.
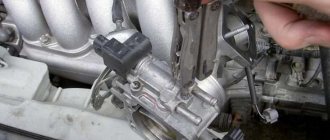
The sensor is located directly on the throttle valve, and cleaning or repairing it requires removing the valve itself. First, the air inlet attached to the throttle is removed. After this, the bolts and nuts securing the damper are unscrewed. All hoses connected to the element are removed, which should be marked in advance so that there is no confusion during installation, and also plugged with choppers so that liquid does not leak out of them.
Next, you need to remove the sensor itself, which is mounted on 4 bolts. Most often, the reason for its unstable operation is contamination of the internal part with soot and plaque, which prevent it from working according to the parameters specified by the control element. Such contaminants complicate the operation of the rotor, and it requires effort to turn it.
You can install a new mechanism, or you can clean it and use the sensor for some more time.
It is recommended to carry out cleaning regularly, even in the absence of problems, every time the air filter is replaced.
Special liquids should be used for cleaning, and before reinstallation, thoroughly dry both the sensor and the throttle valve. The installation process is performed in the reverse order of removal.
Cleaning the XX valve
To clean the 3S-FE idle valve, you will need a brush and an ordinary “carb cleaner” (carburetor cleaning fluid). The main contamination of the valve is carbon deposits (plaque) on its internal part. You can soak the valve in cleaning fluid for several hours.
Prepare plugs to prevent coolant leakage
After the procedure, rotation of the valve should be very easy and unimpeded. At the same time, it is worth cleaning the throttle mechanism: there is no need to disassemble it. After moistening with cleaning liquid, carefully clean the unit with a rag or toothbrush. Assembly is carried out in reverse order. Before screwing it into place, it is worth applying a thin layer of sealant to the electromagnet.
What is an idle speed sensor and why does it get dirty?
This valve is one of the most important elements of a power unit operating on the principle of internal combustion. This element helps the car automatically maintain the required speed when the ignition system is activated. That is, the unit not only helps to drive the vehicle efficiently, but also stabilizes the operation of the engine.
On a Toyota Corolla, when it gets dirty, the car's computer does not detect an operating error, because for it low or high speeds do not mean a malfunction of the system. When the owner of the car presses the gas pedal, the same thing happens; he can either increase or decrease the speed.
The idle speed sensor works as follows - as soon as the ignition system starts, the car’s computer sets the valve to the desired value, but it is not familiar with such concepts as oxidation, soot, and deposits on the walls.
That's why when the computer sets the parameters on a Toyota Corolla, it has no idea that the valve may not open completely due to contamination.
You can try to manually adjust the element; to do this, you need to change the angle at which the element is open through the grooves located under the bolts. If the adjustment does not fix the problem, then the only way to solve it is cleaning.
Sensors for the Corolla 150 engine management system
Crankshaft sensor. The crankshaft sensor is one of the main sensors servicing the engine control unit. It synchronizes the operation of the ignition system and is designed to generate injector control pulses. In the event of a malfunction of this sensor, engine operation is blocked, impulses are not sent to the ignition system or injector control impulses.
A typical initial symptom of a faulty crankshaft sensor is reliable cold starting of the engine. Then, as the engine warms up, it begins to malfunction, then stalls and will not start. After cooling down it starts again, but then the situation repeats itself.
The sensor is located at the front of the engine.
To dismantle it, a 10mm wrench is required; it is secured with one bolt.
You can check the sensor using a multimeter. To do this, you need to check the resistance between the contacts; it should be approximately 1000 - 1500 Ohms.
The original crankshaft sensor (articles 9091905070, 6PU009167411, 0902216) costs from 2500 rubles.
Camshaft sensor. This sensor serves to correlate (harmonize) the operation of the crankshaft and camshaft. In the event of a mismatch between the rotation angles of the crankshaft and camshaft, a “meeting” of pistons and valves is possible, which certainly leads to the need for a major overhaul of the power unit. Therefore, at ignition angles above the limit, the control system blocks engine operation. This process also occurs when the camshaft sensor fails. The sensor is located as shown in Figure 5.
An analogue (items 90919-05060, ADT37240, 17110, SS10939) costs about 2000 rubles.
Coolant temperature sensor. Designed to control engine temperature and prevent it from overheating.
You can check the sensor by monitoring the resistance between its terminals. At a temperature of about zero degrees Celsius it is 5 – 10 kiloohms. When the temperature rises to 80 degrees Celsius, the resistance drops to hundreds of ohms.
The price of a coolant temperature sensor (analogous to article numbers KW414, 8942233030, 894220D010) is from 500 rubles.
Knock sensor. Located on the engine block. The appearance of the sensor is shown in the figure:
The sensor is involved in adjusting the ignition angle when using low-quality gasoline to eliminate the dangerous phenomenon of engine detonation. The sensor can only be checked using special equipment - an oscilloscope.
Oxygen sensor (lambda probe). There are two such sensors in Toyota Corolla 150 gasoline engines: one is located on the exhaust manifold in front of the catalyst (front), the second is after the catalyst (rear). In Corolla 150 cars with a catalyst that has expired, mechanical blende is often used. In this case, the second oxygen sensor is installed through the fitting. The oxygen sensor generates a signal that controls the fuel/air ratio. If the oxygen sensor is faulty, fuel consumption increases significantly (up to 50%). The lambda probe cannot be restored. The “native” oxygen sensor is expensive, you can replace it with a universal one.
In this case, installation of the original connector is required.
Oil pressure sensor. The sensor cannot be repaired or serviced. Sensors from other models of various manufacturers are suitable (articles 8353028010, 8353060010, 8353060020, 37240PHM003 and others).
The cost of sensors starts from 300 rubles.
Fuel level sensor. Located in the tank (in gasoline engines, combined with the fuel pump system).
Air flow sensor (flow meter). Located next to the air pipe. If the sensor malfunctions, an incorrect air/fuel ratio is formed, the engine runs unevenly (idle speed floats), and starting is difficult. It cannot be repaired; the sensor needs to be replaced.
Sensor locations
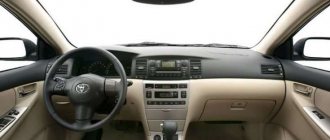
Before we begin to talk and show about the installation locations of the above sensors, it is necessary to make certain remarks in order to clarify some points that are unclear to many users. So, firstly, the above article is not a step-by-step guide to action or DIY repair. The presented article is an overview, and its main task is to show with examples and photographs the location of important sensors, and also to talk about what parameters this or that element is responsible for.
Secondly, this article is aimed primarily at owners of Toyota Corolla 120, the most common versions in the Russian Federation and the CIS. It's no secret that the 120th Corolla has several restyled versions, and it's not worth talking about the configurations. Therefore, it is worth saying that the manual is based on versions of cars with front-wheel drive, manual or classic automatic transmission and engines marked (ZZ), i.e. 1ZZ-FE/3ZZ-FE/2ZZ-GE, since the main “circuitry "and the location of the sensors we are interested in is approximately the same.
Let's move directly to the component layout; in the image below you can see the main elements:
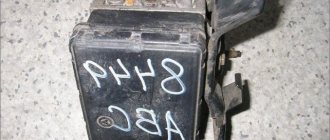
- electronic control unit (5);
- ignition coils (3);
- fuel injector (2);
- fuel pump (6);
- electric fan relay (10);
- DTOZH (4);
- DPKV (12);
- DMRV and TPS (8);
- DD - knock sensor (11);
- DPRV - phase sensor (9);
- lambda probe (7);
- VVT-i system valve (1).
The DPKV is located on the front cover of the cylinder block; a special molding is made in the housing for this sensor.
Mass air flow sensor, TPS - two important components of one system - the intake. The first one is located in a seat in the pipe leading from the air filter to the throttle valve.
TPS (as well as idle control) are located directly in the throttle body.
DPRV (phase sensor) is installed in the upper part of the cylinder head (cylinder head)
The knock sensor (DS) is located on the cylinder block, the sensor itself is rigidly fixed to the plane of the block using a bolt.
The speed sensor is located behind the front wheel; to remove it, you will need to remove the wheel and fender liner. The process of replacing the sensor on the other side is exactly the same.
There are two oxygen sensors - the front one is located directly on the pipe behind the exhaust manifold, and the second rear sensor is on the pipe in the area of the front passenger's feet.
The oil pressure sensor is located next to the pulley, in a special boss on the cylinder block.
The ABS sensors are located behind the wheel hubs. To access them you will need to remove the wheel, brake caliper, brake disc and the hub itself. After which you can remove the sensor.
The steering sensor is located on the inside of the steering column, but to remove it you will need to disassemble most of the steering column, right down to the steering shaft that goes into the engine compartment.
Sensors for other vehicle systems
Speed sensor. Located on the gearbox. The signal from the sensor is sent to the ABS, engine control units and instrument panel.
ABS sensors. ABS sensors are electromagnetic type and react to the angular movement of the wheels. Failure of sensors is often associated with damage to conductors and clogging of the control zone.
Airbag (crash) sensor. Sensors react to acceleration during a collision. Located on the inside of the bumper.
Rain sensor. Installed on the windshield. The sensor may fail when washing the car with aggressive agents.
Brake pad wear sensor. Usually built into the brake pads and replaced together with them.
Interior temperature sensor. Rarely fails.
Air conditioning system pressure sensor. If the sensor malfunctions, the air conditioning system does not turn on. Designed to monitor pressure in the refrigerant system.