The other day I discovered this problem: when accelerating from a standstill or during sharp acceleration, a “dip” in power appears in the range of 1500 - 3000 rpm. The car began to drive “stupidly” and accelerate “sluggishly”. There was no point in sinning on gasoline, because... Only AI-95 was refueled at the same gas station. My friends also fill up at the same gas station, so the option of low-quality fuel is eliminated.
Candles. I also changed them not so long ago - so it’s not the same.
The next thing that came to mind was the throttle valve, so that’s what I’ll talk about.
Saturday. Everyone is painting eggs and getting ready for Easter, but I, armed with CARB CLEANER and two old spark plugs, set out to eliminate the trouble.
Fortunately, I have experience in cleaning/disassembling such units - I did not encounter any problems on the way to the target. The following is the process in order:
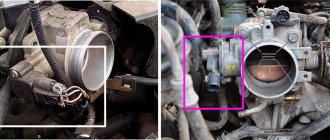
1) Remove the cover from the valve covers, disconnect the mass air flow sensor and another plug from the sensor located next to the mass air flow sensor. This is most likely the air pressure sensor in the intake manifold. We remove two hoses from the same sensor. They are on clamping clamps and can be opened by hand (for convenience, you can mark them with a proofreader or marker so as not to get confused). Then the air intake cover, the gas outlet pipe from the camshaft and the rubber pipe going to the throttle valve itself. All the clamps on this pipe are bolted, except for the clamp on the throttle. You need to open it with pliers; it is lockable, so you don’t have to hold it constantly. You should be careful not to tear off the fasteners and wiring. This procedure took about 10-15 minutes. After this it should look like this:
2) Remove the air pressure hose in the intake manifold. Remove the plug from the damper and use a screwdriver to loosen the wire fastening. It is located on a metal plate on one of the throttle mounting bolts. On the same plate there is a lock for the fuel supply pipe - we also carefully remove it. Then we remove the air supply tube to allow the engine to idle (it is rubber without any clamps). 25 minutes have already passed. It turned out like this:
3) Gradually loosen the 4 throttle mounting bolts (head 12) diagonally. By this point, the engine should have cooled down to an acceptable temperature, but it is better to wear a jacket with sleeves so as not to accidentally get burned on the valve cover. That's 30 minutes. flew by.
4) Take pliers and two pre-prepared spark plugs. They are necessary to plug the coolant supply hoses. Jew. throttle. Unclench and slide the clamps on both hoses onto the hose. Carefully remove the unscrewed throttle from its mounting location, as far as the length of the coolant supply hoses allows. Jew. After which I first removed hose No. 1 and quickly plugged it with a candle, then, just as quickly, I removed and plugged hose No. 2. 35 minutes have passed.
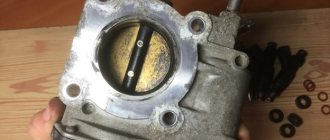
Here is our “Chukhonets”)))
5) After this, carefully remove the mesh (it’s better to remember which part it was “outside”). Next it was time for CARB CLEANER. Insert the red tube into the spout of the can and off you go! Just be careful - everything flies in different directions and most likely will not wash off your clothes, and take care of your eyes. After washing, you can gently scrub with a toothbrush and rinse again. If necessary, you can bend the flap with your finger, again carefully!
Necessary tool
To clean the throttle valve, you will need to remove the assembly from the power unit. To do this you will need to prepare the following tools and material:
- crosshead screwdriver;
- pliers;
- open-end and ring wrenches for 10, 12;
- socket heads for 10, 12 with ratchet and extension;
- drill with a diameter of 6 mm, drill;
- bolts size 5x20 – 3 pcs;
- brand of antifreeze used in the power unit, in an amount of 200 ml;
- idle air valve gasket (article 22215-7A680);
- throttle body cleaning fluid;
- WD-40.
How and why to flush car engine injectors
An article about washing car engine injectors: why wash injectors, work progress, choice of fluid. At the end of the article there is a video about how the engine works after flushing the injectors.
Since the quality of the fuel used cannot be called ideal, the injectors become clogged over time, which leads to deterioration in injection quality
. This is also reflected in the operation of the engine itself, so it will not be difficult to notice a malfunction.
- Read an article on the topic: What are engine injectors, types and principle of operation
Removing the throttle body 1NZ-FE
The throttle body is located in the engine compartment between the power unit, battery and cooling radiator. To dismantle it you will need to perform the following steps:
- We find the BDZ under the air and cooling pipes, we begin operations to obtain the necessary space for access to the device;
- Initially, a thin hose is disconnected directly from the unit being dismantled;
- Next, remove the large air pipe. To do this, you will need to loosen the two fastening clamps using a ten-point socket and remove the hose coming from the breather;
- The 1NZ-FE throttle valve changes position due to the connected gas pedal cable. To disconnect it, you will need to unscrew two nuts with a 12 mm spanner and remove it from the seat;
- Unclip the two latches and remove the top cover of the air filter, moving it to the side. To obtain a larger stroke, it is necessary to disconnect the power cables from the two air vent sensors;
- Next, dismantle the lower half of the air filter housing. It is secured with three bolts. We unscrew them using a ten-point socket and an extension;
- Subsequently, we remove the lower part along with the connected inlet pipe. It will be more convenient to disconnect it from the fastener located on the headlight unit. You will need to use a ten key. It is enough to unscrew one of the two bolts on the fixing bar;
- We take out the dipstick from the gearbox, disconnect the power connector for the throttle position sensor and the idle air valve motor;
- We remove the fastening strip of the gas pedal cable by unscrewing two nuts with a 12 mm wrench. It is moved to the side without disconnecting the wiring;
- To gain full access to the BDZ, it remains to disconnect the tube for inserting the dipstick into the gearbox. It is fixed with two 10mm bolts. After unscrewing them, the tube is pulled out by slightly lifting it up. You don’t have to do this step, but getting access to the remote sensing block will be problematic;
- The final step is to unscrew the last 12 bolt that secures the throttle unit. After this, nothing will prevent you from removing the unit from the power unit.
Description and cost of the part
Before starting work, it is important to familiarize yourself with the purpose of the part. The throttle valve is an element of the intake system of an internal combustion engine. The part is designed to control the flow of air into the engine.
It is installed between the intake manifold and the air filter. The throttle valve can also be partly called an air valve. If it is open, then the pressure in the intake system is equal to atmospheric pressure.
Most cars use a mechanical drive on the throttle valve (including Toyota cars). Accordingly, the drive ensures the connection between the damper and the gas pedal (using a metal cable).
The part body is included in the cooling system. With the help of pipes, gasoline vapors are captured, as well as crankcase ventilation.
The module consists of an electric motor, housing, throttle valve, gearbox and position sensors. The latter, in turn, prevent many breakdowns.
The average cost of a throttle body in an auto parts store varies from two to five thousand. The original product has a price of 2500 rubles. More expensive options have better quality. When replacing a part in the cabin, the cost will increase by three to four thousand.
It is worth noting that cars of different years of manufacture may require different dampers. Before purchasing, consult with experts or carefully study the material on the topic.
We disassemble and clean the BDZ
After removing the throttle, you will need to prepare two bolts with a diameter of seven or eight millimeters, wrapped in rags. They will be required when disconnecting the coolant hoses from the BDZ. The bolts seal the hose outlets, which prevents antifreeze from spilling. The pipes are held on by clamps.
Subsequently, the 1NZ-FE throttle valve is disassembled and cleaned. To do this, you must complete the following steps:
- We dismantle the idle air valve 1NZ-FE by unscrewing three screws with a Phillips screwdriver. At this stage, difficulties may arise due to the oxidation of fasteners that stick tightly. As a result, the contact edge of the screw is licked off with a screwdriver. To unscrew them, you will need to drill out the screw heads. To do this, use a drill, a drill with a six-millimeter diameter. The thread remaining in the seat can be unscrewed without problems;
- Using a special liquid, we clean the 1NZ-FE throttle valve. It is necessary to thoroughly wash off black soot and oil deposits. In the future, it remains to reassemble the BDZ in the reverse order, using new screws to secure the idle air valve and gasket.
A little theory
One of the main characteristics of a car's suspension is its ground clearance, or the distance from the road surface to the lowest point of the car. The main factor influencing its size is the height of the suspension. It can be easily changed both up and down. By increasing it, you can raise the car above the ground, by decreasing it, you can lower it, but at the same time the Camry’s handling will increase several times, which will become especially noticeable when cornering at high speed. And you also need to take into account that if you raise the Toyota Camry’s ground clearance by only 5 cm, the car’s handling at high speeds will significantly decrease.
ways to raise a Camry to 30 , 40 or 50:
- Install extended springs. But you should immediately be prepared to replace the shock absorbers, since their working stroke will move to the upper part. In addition, if the car gets into deep holes, the standard shock absorbers will begin to “pop”, since their working stroke will be shorter than the spring stroke.
- Install springs with increased stiffness - they will not bend under the weight of the car. This method can increase the car's ground clearance by up to 5 cm. But this will negatively affect the comfort in the car - small road irregularities will no longer be handled so effectively by the suspension, which will make a long trip by car not so pleasant.
- Install the screw suspension kit. A set of 4 “charged” struts (springs + shock absorbers) will cost Camry owners about 40–60 thousand rubles. The peculiarity of the suspension is the possibility of its adjustment: by rotating the rack with a special key, you can raise and lower the car. The only drawback of this method is the inability to automatically raise and lower the body.
- Install a set of air springs. In a similar way, you can raise a Camry in 40 and 50 body styles - there are many offers on the market for installing air suspension on this model range.
- Install special spacers. Typically, they are made of rigid polyurethane and are mounted between the strut support and the body. The thickness of such a spacer determines how much the car can be raised. This method is accessible and low cost - the average price of a set of spacers for 2 racks for a Camry is set at 800–1000 rubles. But it should be taken into account that in order to attach the strut supports to the body, you will also have to purchase extended studs.
But the easiest way to raise the car body is to install tires with a higher profile. Or you can completely replace the wheels by installing wheels and tires of increased diameter. This will allow you to increase the ground clearance by 1–3 cm, which is often more than enough for confident driving in the city. For most car owners, this is the easiest way to raise the car, since installing Barnaul springs on it makes the suspension too stiff. Important! Before you raise the Camry Grace by replacing tires, you should carefully select its size. Otherwise, you will need to “roll” the arches.
Remote sensing training
After cleaning the throttle valve, an increase in engine idle speed may be observed in the range from 1500 to 2000 rpm. In this case, you will need to perform throttle training on the 1NZ-FE power unit. To do this, you need to place the car on a level surface and warm up the engine to operating temperature. In this case, the neutral gear at the gearbox must be turned on and all electrical appliances must be turned off, such as a multimedia system, heating stove, lighting devices, and so on. In the future you will need to perform the following steps:
- Disconnect the negative terminal from the battery, then reconnect after five minutes;
- Turn the ignition key to the first position without starting the power unit. At the same time, the indicator lights on the dashboard should light up;
- Without changing the position of the ignition key, after thirty seconds, disconnect the negative terminal of the battery;
- After five minutes, connect the battery and start the engine;
- Over the course of fifteen minutes, the idle speed of the 1NZ-FE engine will gradually drop to normal levels. In some cases this may take a little longer.
Is it worth cleaning the fuel injectors on Camry 40
Decreased acceleration dynamics, increased fuel consumption, and an uninformative accelerator pedal are the primary signs of a fuel system malfunction. The above factors are harbingers of other breakdowns, for example, the ignition system. The technician must be extremely careful during the initial diagnosis, otherwise you can follow the wrong path and the breakdown will not be fixed.
You should not ignore the primary signs of a fuel circuit malfunction, as it can have disastrous consequences for the engine and the vehicle as a whole:
- premature wear of the fuel pump;
- increased fuel consumption: 6 – 7%, or 3 – 4 l/100 km;
- reduction in dynamic performance by 4%;
- difficulty starting the engine;
- unstable operation of the power unit at idle;
- an increase in the diameter of the injector nozzle due to excess pressure;
- reduction in engine performance by 25 - 30% compared to a clean nozzle.
Cleaning algorithm
Now we will give a step-by-step algorithm for properly cleaning the throttle valve.
- First of all, you need to get to the damper itself. The design is different in different engines. But as a rule, to do this you need to remove the air duct that runs from the damper to the air filter.
- Dismantle the damper. To do this, unscrew several mounting bolts (2-4 pieces), and also disconnect the necessary connectors (for example, the connector from the absorber purge valve).
- To clean, you must use a carburetor cleaner. There is a wide variety of them, and in auto stores you can easily find a product in accordance with your preferences and capabilities (we will talk about them later).
- Using a rag and the mentioned product, you must thoroughly wipe the damper outside and inside.
- You also need to clean the protective grille (if your car has one).
- Assembly of the unit is carried out in the reverse order.
An easy way to clean your throttle body
The correct way to clean the throttle body
Cleaning without removal
Also, many car owners are interested in the question of how to clean the throttle valve without removing it. Such methods do exist, but you must immediately understand that high-quality cleaning is only possible by dismantling the damper .
To do this, you will need a special product - an intake tract cleaner. You can use different brands. You can also use EGR valve cleaning fluid, WD-40, and solvents for cleaning.
So, the procedure without removing the node :
- As in the previous algorithm, you need to remove the air duct to get to the damper.
- With the damper closed, spray the surface with cleaning liquid and remove the cleaned dirt using a rag.
- Open the damper and remove dirt from the side surface.
- Make sure that the cleaning agent gets into all channels. The cleaning procedure is similar using a rag.
Let us repeat once again that for proper cleaning, the throttle valve must be removed from the car. And when installing it back, it is advisable to replace the damper gasket with a new one. Fortunately, its price is low.
It should also be remembered that in most cases, after cleaning the throttle valve, it is necessary to perform actions to “train” it . This procedure is carried out either using a computer (by connecting it to the car's ECU), or by manipulating the ignition and gas pedal. In this case, it is impossible to give universal recommendations, since they can differ significantly for each manufacturer and even model. Remember this!
Causes of pollution and ways to combat them
There are several reasons why the throttle body becomes dirty over time. By avoiding them, you will automatically extend the time between cleanings. Reasons mentioned include:
- Using low-quality gasoline . If there is sediment in it, it will definitely end up in the throttle system, where it will turn into carbon deposits. Therefore, try to refuel with high-quality gasoline and refuel at reputable gas stations.
- The fuel filter is clogged . If you do not change the fuel filter on time, it is likely that dirt particles from it will enter the fuel system, including the throttle body assembly.
- Dust and dirt entering the suction system . This can be caused by various reasons. Clogged air filter, violation of the integrity of the air duct, various mechanical influences.
- Crankcase gases with oil dust . They are the main cause of oil deposits on the valve. They can enter the combustion chamber through the valve cover from the crankcase ventilation system. The situation is aggravated by the fact that they tolerate oil dust. It burns and remains as a residue on the surface of the throttle body.
Fuel filter clogged
Replace air and fuel filters in a timely manner, fill them with high-quality gasoline, and prevent dust from entering the vehicle’s ventilation system. All this saves you from having to clean your throttle body before the scheduled time.
How to remove the throttle
| Name of funds | Description | average price | Notes |
| LIQUI MOLY ThrottleClappen-Reiniger (LM-5111) | The best air damper cleaner available today. Effectively removes dirt and oil deposits. | 520 pp. | Aerosol, volume 400 ml in a bottle. |
| Mannol carburetor cleaner | It cleans oil and dirt well from the sash. It is cheaper than ABRO and the cylinder has a larger volume. | 115 p. | Aerosol, volume 400 ml in a bottle. |
| Abro Carb & Throttle Cleaner (CC-220) | High quality cleaner. Popular among car owners in our country. | 200 s. | Aerosol, volume 220 ml in a cylinder. |
The price is the price of summer 2021 for Moscow and the region
Result
If the above is faulty, check the condition of the throttle valve. Its cleaning is not very difficult. However, if you clean, the dynamic performance of the car will be greatly improved. Therefore, do not forget to regularly clean the valve every 30.50 thousand kilometers. To clean, use any of the following methods. Fortunately, they are inexpensive, so they are accessible to any motorist.
Source