The heroine of this article is the Toyota Corolla headlight unit and, specifically, the Toyota Corolla front headlight. If we touch on the topic of “how to remove a headlight,” it also suggests replacing Toyota Corolla light bulbs. Replacing the light bulbs will wait for now, let's look at the new headlights for a Toyota Corolla, which my client went to buy a headlight for a Toyota Corolla all the way to Moscow. Let's unpack...
New headlight for Toyota Corolla
Manufacturer – Taiwan. The price of the headlight is 2350 rubles. Standard headlight. The original headlight costs several times more. Carefully placed in a box, protected with backings, there is a film on the glass of the headlight, of course there are no light bulbs in it, only the headlight itself and a meager photocopy of the instructions. And, as it turned out, it is extremely difficult to buy headlights for a Toyota Corolla 2008 in our Volgograd and neighboring Saratov regions.
Toyota Corolla front headlight
Instructions for the Toyota Corolla headlight
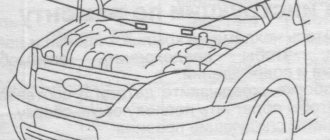
In order to remove the headlight, you will have to release the sides of the bumper.
toyota corolla headlight
Here we will unscrew the first bolt with a 10mm wrench.
Toyota Corolla front headlight
Then, unscrew the two upper headlight bolts and use a curly screwdriver to unscrew the self-tapping screw securing the radiator grille.
How to remove the headlight of a Corolla
Under the radiator grille, the headlight snaps into the “TV” eyelet with a side mount.
Replacing the front headlight of a Toyota Corolla
After that, disconnect the 5 power plugs.
Replacing Corolla headlights
In order to remove the plug, you need to press the tab and pull it towards you.
Corolla headlight replacement
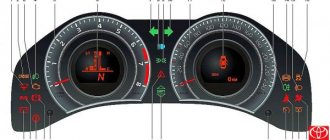
Now, you need to install all the bulbs and the light corrector on the new headlight. In the photo below they are indicated (let's go from right to left) :
- Low beam light (red arrow)
- Marker light (green circle)
- Headlight range control (yellow arrow)
- High beam light (red arrow)
- Turn signal light (red arrow)
Replacing Toyota Corolla headlight bulbs
On the new headlight there are plugs in the bulb cells. They, like light bulbs, need to be turned counterclockwise to pull them out.
Replacing the low beam light bulb on a Corolla
Replacing Toyota Corolla light bulbs
We unscrew the headlight corrector and also screw it onto the new headlight.
Toyota Corolla headlight leveler
Toyota headlight range control
Turn it very carefully, first checking whether the thread of the corrector bolt and the thread of the internal element of the headlight match, its thread is plastic.
Replacing the headlight adjuster for Toyota Corolla
How is the adjustment made?
You will need to start the car and turn on the headlights to check how the mowing line marked on the paper matches the boundaries of the headlights.
It is not useful for you to separately adjust the low and high beam, because the optics design is such that the adjustment of one element leads to the automatic adjustment of the other element to it.
The headlights have a special screw that helps make adjustments; You shouldn't put too much pressure on it, because it might just break. Adjustment is made with a screwdriver. You will need to do this until all the mowing lines match. The perfectly adjusted headlights are true to the drawn lines. The screw rotates clockwise. From time to time it happens that the headlights look up, in order to correct this, you can turn the screw out a little.
It is necessary to adjust first vertically, then horizontally. When all the mowing lines match, the adjustment process can be considered complete. If the screw is broken, the task will be more difficult to cope with, but it can be drilled out and replaced with another one. The main thing is not to destroy the thread during work.
Setting up headlights will not take much time if you approach this process well and follow all the tips correctly. The main difficulty is finding the most flat surface and wall possible, so it’s more convenient to contact a car service center.
Replacing light bulbs!
Replacement of low and high beam bulbs must be done carefully. Do not touch lamp bulbs with bare hands - they may burn. Wear gloves and after installation, wipe the bulb bulbs with a soft, lint-free cloth (preferably lightly moistened with alcohol). Naturally, until you install the bulbs and wipe them down and let them dry, you cannot connect the power plugs to them.
Replacing Corolla headlight bulbs
The Corolla 2008 has low and high beam bulbs with non-removable blocks.
And so, replacing the low beam bulb. The Toyota Corolla lamps that were on the old headlights were made in America.
Toyota Corolla low beam lamp: SYLVANIA 9005 HB U 22N12V6OW DOT LO607 USA
Replacing a Toyota Corolla low beam bulb
There are three guides on the light bulb sockets, two of the same size and one of a smaller size... In the headlight, the light bulb socket has similar grooves. Insert the light bulb and turn it clockwise until it stops and the light bulb is locked.
Replacing a Toyota Corolla high beam bulb
Replacing a Corolla headlight turn signal bulb
The high beam bulb is also changed, and the turn signal bulb is also replaced. The marker lights also change. But, unlike the low and high beam bulbs, the side light bulb (like the turn signal bulb) comes without a socket. Replacing side light bulbs:
- Rotate and remove the light bulb socket from the headlight
Replacing side light bulbs for Corolla headlights
2. Remove the light bulb from the socket and insert a new one
Replacing headlight bulbs on a Toyota Corolla
3. Insert into the socket and turn clockwise until it stops.
Replacing the Toyota headlight bulb
Just like replacing the side light bulb, the turn signal bulb is also replaced.
Checking and adjusting optics on Toyota Corolla
First, let's start the engine. After this, we turn on the optics and check whether the boundaries of the mowing line of light coincide with the lines on whatman paper. We do everything exactly as indicated in the diagram below.
You only need to adjust one beam of light, either the high beam or the low beam - this is due to the fact that the optics are a single unit, where adjusting one parameter automatically adjusts the second parameter.
To adjust vertically, we need to turn the screw, which is located on the optics, exactly in the same place as indicated in the photo.
Adjustments must be made using a screwdriver. It is necessary to adjust in accordance with the above scheme, where it is necessary to achieve correspondence in the lines of light with the lines on whatman paper.
The screw turns clockwise, but if the headlights are turned up too high, the screw must be unscrewed slightly.
Having adjusted the vertical glow, we move on to horizontal adjustment. Again, using a screwdriver, we adjust by tightening another screw, the location of which is indicated in the figure.
Having adjusted the horizontal according to whatman paper, the process of adjusting the head optics can be considered complete. We roll up the Whatman paper, but don’t throw it away. Perhaps it will be useful to you or your friends. Whether the process is complex or not is up to you to judge, but there is no denying that you will have to try to do everything right.
Which lamps to choose
Before you go to the store and buy light bulbs, you need to remember two rules:
- Headlights should not blind road users traveling towards the driver.
- If there is no lighting along the entire roadway, then the lamps should provide a view of forty meters ahead.
After this, it is advisable to familiarize yourself with the table of original components for the Toyota Corolla.
| Lamp designation | EAK number |
| For high beam | NVZ |
| Low beam | HB4 |
| Front turn signal | WY21W |
| Fog lights | H11 |
| Front dimensions | W5W |
| Rear fog light | W21W |
| Reversing light | W16W |
| Rear turn signals | P21W |
| Stop signal | W21 |
| Room lighting | W5W |
Replacement of lamps is carried out only with high-quality and original devices. They will last longer and will not create other worries.
To replace the old ones, they are suitable from the Koito Whitebeam company. In addition, they have good recommendations from experienced mechanics. They came to the Russian market from Japan and have a range one and a half times greater than the brightness of conventional 55W lamps.
Attention! Koito Whitebeam cooperates with the Japanese manufacturer Toyota .
Therefore, these lamps are tailored for cars from this manufacturer.
How to configure?
Adjusting the headlight can be done with your own hands, despite the fact that this process is quite labor-intensive and can cause certain difficulties. It is not always possible to adjust the headlight the first time. More often, car owners turn to workshops where assistance is provided by an experienced specialist.
If you want to try to adjust the headlight yourself, then it would not hurt you to study in detail the instructions on how to do this.
READ 2022 Toyota Tundra all of us; learned about a new full-size pickup truck
Installing an additional brake light
Typically, an additional brake light is installed on the rear parcel shelf, for this you need to:
- prepare a Phillips screwdriver;
- disconnect the battery wire from the “–” terminal;
- raise the upper part of the cabin shelf;
- attach an additional brake light to the wiring block (the block is first brought out to the shelf of the car's interior);
- Screw in two fastening screws and secure the brake light to the shelf lining.
To remove the additional brake light, you need to perform the reverse steps of installation.
Step-by-step instructions for installing glove compartment lighting in a Toyota Corolla
In order to install lighting for the feet and glove compartment, it is necessary, first of all, to prepare the necessary equipment, purchase parts and tools. Let's start, perhaps, with the backlight. We will introduce into it a specially purchased LED strip with 120 diodes, with a power of 720 lumens per 1 meter. By the way, who didn’t know, today this is the brightest tape of all existing on the domestic market.
Let's get started. We take and measure the holes in the glove compartment. Ours is slightly smaller than a regular plastic card. Literally 5 mm on each side will overlap the hole. And this is actually very good, our entire structure can simply be grabbed with glue and forgotten for 13,000 hours, which is approximately two years of continuous burning. Below is an approximate diagram of the location of the glove compartment lighting elements. Everything is very simple.
So, we take any plastic card, or material similar to a plastic card, and cut it off. The template is ready. We will glue the purchased LED strip onto them. We take it and cut off the amount of tape we need, and then carefully glue it onto our template. The photo shows how to do it.
Next, we properly solder all the strips and check their performance from the battery. They should all burn equally. After everything has been done, we take and glue the board onto the hole. It is worth paying attention that you should glue it at an angle, since if you glue it evenly, the light will not fall directly into the glove compartment. The photo shows how we glued it for the first time without a corner, and the light shines past.
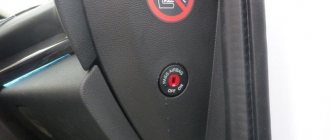
Next, having chosen the right angle and installed our card with diodes, let's take up the backlight on/off button. We will need the reverse button. It looks like an ordinary button, only it has the opposite effect, that is, when it is pressed, the circuit is open; when there is nothing holding the button, the circuit is closed. The photo shows an example of that button.
Next, let's install it. It's not difficult to do this. There is a plug on the left side of the glove compartment when it is open; remove it and take out the glove compartment. You need to screw the button in such a way that it protrudes slightly from the hole in the plug. The photo shows the approximate location of our button.
Next, in order to do everything beautifully, we take a plug and, having made the correct measurements, punch a hole in it. Scissors acted as a tool for punching holes. Let's look at the photo.
Next, we connect all the wires, carefully hide them, make sure they don’t catch on anything, and connect the whole thing through fuses to the main circuit of the car - a direct line that has voltage even in the muffled position.
After the chain has been completely assembled and checked, we put the glove compartment in place and rejoice at the improvement we made with our own hands. It’s worth going into a dark room or garage and checking how the glove compartment lighting works. By the way, before assembling, it is worth adjusting the on/off button; the glove compartment should fit snugly against the panel and at the same time press the button enough to open the circuit.
Next, we do the same with the places for the feet, only now the tapes can simply be glued to the surface and the connection can be made to the general lighting panel, for example, when the lighting on the ceiling is turned on, the foot lighting also turns on. Or, as a last resort, you can display a completely separate button for turning on the foot lighting. Backlighting for a Toyota Corolla is a very important element that makes a comfortable car even more convenient. And now you don’t have to use the poor flashlight from your phone to look for something that has fallen on the floor or gotten lost in the glove compartment.
How to replace tail lights?
The rear headlight units of the Toyota Corolla E120 and E150, located on the fender and on the trunk lid, are installed in the exact reverse order of removal.
Before installing new lighting fixtures, empty cells should be wiped and then installed. When fixing the new headlight, we use the same bolts and connect the wires to it in the same way as we disconnected. Next, we connect the vehicle’s power supply system and test the connected equipment.
It should be added that reverse lights must be purchased original ones that meet all technical requirements. The leading companies producing such optics remain Eagle Eyes and Depo.
Installing an additional rear light
Considering the fact that installing an extra light fixture will be a change to the factory design of the car, responsibility for its installation will lie entirely with the car owner.
Despite this, some drivers carry out this work on their own. To do this, new holes are cut out in the bumper or new optics are attached to the bottom of the bumper.
Setting the fog lights
PTF tuning and installation play a big role in ensuring road safety for both the driver and other road users. The setup is carried out after installation and connection have been completed. Any recommendation in this case is food for thought only. There are no exact rules on how to adjust fog lights on a Toyota Corolla, so many turn to a specialist for help, while others do this work themselves.
The easiest way is to drive up to the wall and watch how the light flux dissipates. It is worth remembering that on a Toyota Corolla the dimensions can be located at different heights, depending on the model, so the best way to accurately adjust the light is to experiment.
- https://corollafan.ru/tyuning/tojota-korolla-protivotumannye-fary.html
- https://automanya.ru/tojota-tyuning/ptf-tojota-korolla-150.html
- https://corollacar.ru/tyuning/protivotumannye-fary-na-tojota-korolla.html
How to remove tail lights on a Toyota Corolla?
The Toyota Corolla E120 and E150 reverse lights have differences. Thus, the rear left light of the Toyota Corolla e120 station wagon has a stop, turn and fog signal, and the right rear light has a stop, turn and reverse signal.
These rear headlight units consist of two halves, one half is located on the trunk lid, the second on the fender. Let's take a closer look at what is required to remove both parts of the rear headlight unit.
To remove the standard Depo taillight mounted on the fender, you need to:
- disconnect the battery wire from the “–” terminal;
- raise the trunk trim;
- remove the plastic fasteners holding the corrugation with wires;
- unscrew the three fixing nuts;
- squeezing the retaining clip, disconnect the socket connecting the wires;
- After making efforts to overcome the latch, remove the headlight.
To remove the standard Depo tail light installed on the trunk lid, you must:
- prepare a wrench for “ten”;
- disconnect the battery wire from the “–” terminal;
- in the luggage compartment, find a cover that hides the intertwined wires;
- carefully pry with a screwdriver and remove the cover of the technological hole;
- disconnect the wires from the socket into which the lamp is screwed (if all the wires are the same color, it is better to mark them to avoid a short circuit when installing a new headlight);
- unscrew the light bulb from the housing;
- Unscrew the two fastening nuts and remove the headlight.
To avoid breaking the holding clip, after unscrewing the two nuts, it is better to move the optics body a little, without jerking, so the clip will detach without cracks or breaks.
Relays and fuses for Toyota Corolla 120
By ordering headlights from DEPO optics from us, you purchase main, additional and side headlights that will serve you for many years. Eagle Eyes headlights High-quality automotive optics from the Eagle Eyes company - Toyota Corolla 120 headlight is another way to equip your Toyota with excellent headlights.
This Taiwanese optics fully complies with all necessary global requirements and ISO standards.
Toyota Corolla 120 headlight , in short, with us you will find everything you need and even more! A structured catalog allows you to quickly search for optics without being distracted by unimportant things. Tuning Toyota Corolla headlights is one of the easiest ways to improve the appearance of your car by equipping it with functional and durable optics.
READ How to reset errors on VAZ 2115
If all is well, install the mudguard in its original place.
Adjusting headlights is an important procedure. Don't forget that the optics need to be prepared for the Toyota Corolla 120 headlight. To do this, we create operating conditions and park the car on a perfectly flat surface. The distance to the wall is five meters. We make notches on the wall to adjust the headlights as accurately as possible. For adjustment we use special screws.
After we have adjusted one Toyota Corolla 120 headlight, the second one must be covered with a thick, light-proof fabric.
Now let's move on to setting up the glow - vertical and horizontal. The second headlight is adjusted in the same way. Don't forget that properly adjusted optics will not blind oncoming drivers when driving.
Timely replacement of parts is the key to success and safety.
Tuning lights
To make changes to the appearance of your car, you just need to start tuning your car headlights. This is a fairly simple operation that allows you to give your car a unique appearance.
As a rule, the most common is to replace standard lamps with xenon ones. In this way, you can not only increase the light intensity of the optics, but also increase safety: xenon shines much further. LEDs, in turn, give a futuristic look to your vehicle and make it more attractive.
The so-called “angel eyes” are trims designed to decorate headlights. Visually, this solution looks quite unusual. Especially if the car is light in color.
EAGLE EYES is the most suitable option for quickly tuning the front light. Inside, the headlights are black, there is a lens, diodes and a luminous rim. The article number for this option is TY1026-B9WCW-BH.
The DEPO tuning headlight model is more budget-friendly and affordable. This is a Euro light for a sedan, the inside parts are also black. The article number of the original headlight is 212-11B5P-LD-2.
Headlights Toyota Corolla De120
The most popular analogues of lights on Toyota Corolla are: More expensive versions of rear lights, as a rule, serve as ready-made tuning. For example, additional diodes are built into them or xenon is installed immediately.
The headlights of the Toyota Corolla and the headlights of the Toyota Corolla E and e s to and years of production lend themselves well to such changes. How to remove the headlight yourself? In order to replace a light bulb or lens element, you will need to know how to disconnect, disassemble and reassemble the headlight. Toyota Corolla 120 headlight
Toyota Corolla 120 headlight The left headlight is located slightly differently than the right headlight, however, they are structurally the same and can be disassembled using the same algorithm. How to remove a Toyota Corolla 120 headlight Corolla lighting product, there are quite a lot of videos, it is recommended that you familiarize yourself with it before starting work. The right and left headlights of the Corolla are held on by four bolts located on the inside. You don't have to disassemble half of the car, just open the hood and you can reach the fastenings of the upper part.
But removing the lower bolts is not so easy; you will need to dismantle the front bumper. The most convenient way to dismantle the bumper of a Toyota Corolla 120 headlight and other years of production is to use an overpass or pit for this. The removed part should not be placed on asphalt or a dirty place, this can damage the paintwork, so it is better to prepare some material for the bumper in advance in which it can be placed.
Toyota Corolla 120 headlight bolts are much more convenient if the car is not dirty, but you cannot always notice them, since they merge with the body. It will be convenient to use a diagram that shows the location of the bolts on a car or another year of manufacture.
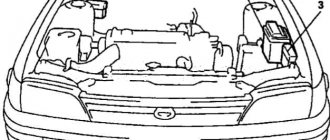
You need to start removing the Toyota Corolla 120 headlight from the top bolts. To do this, you will need to open the hood and unscrew the decorative radiator grille. Rubber covers may remain along the edges; for example, they were installed on E to protect the bolts from dirt and moisture. If there are no covers, no problem; unscrew the bolts along the edges, then the last one located in the center of the grille.
If you forgot about the third fastener, you can break it by applying force when trying to remove the radiator grille.
PTF installation process
- To install fog lights on a Toyota Corolla, you need to remove the plug on the front bumper.
Be sure to secure one side of the PTF with self-tapping screws and connect them to the factory wiring. This is actually all the work that is done directly with the headlight itself. It will take no more than ten minutes of time.
After the PTFs are inserted on both sides, you should begin installing the relay. In the Toyota Corolla, the block is located under the glove compartment, in front of the air conditioning filter. The red arrow shows where the relay needs to be inserted.
Here is the relay itself that needs to be installed.
Next, we find the green wire in this connector and solder it to it. The green wire goes directly to the installed relay.
We screw the soldered wire to the ground of the car, that is, to the ground of the car. Now the headlights will light up with the lights on. We also need to install a button to turn the PTF on and off. Here is the disassembled button itself and the wires from it.
Should I install xenon?
Bilens is a fairly popular solution: it is installed like standard headlights without any special modifications, so there is no need to buy new optics entirely. You can choose lenses from SVS, designed for 2.5 inches; a 3-inch option may be suitable; before purchasing, it is recommended to try on which lensed products will fit in size. The larger the lenses fit, the better. The kit should include a special lamp (H1 is suitable) and an ignition unit, you can install Optima, it is of decent quality and affordable price. In this case, you will not have to change the original headlight, only its internal contents.
Having installed the above equipment, you will immediately notice an improvement in light dynamics and the appearance of a clear light boundary. Unlike diode rings, lighting is effective not only in the dark, but also at dusk and does not attract the attention of traffic police inspectors.
Advice: if your car does not have auto-corrector, you will have to lower the headlights to the middle position when going uphill, otherwise you will blind oncoming drivers.
The headlights of the Toyota Corolla 150 and the headlights of the Toyota Corolla E120 and E110 from 1999 to 2006 and 2007 lend themselves well to such changes.
How to remove the headlight yourself?
In order to replace a light bulb or lens element, you will need to know how to disconnect, disassemble and reassemble the headlight. The left headlight is located slightly differently than headlight , but they are structurally the same and can be disassembled using the same algorithm.
There are quite a lot of videos on how to shoot a lighting product on a Corolla 2006; it is recommended that you familiarize yourself with them before starting work. This process is step-by-step, and it is better not to break the sequence, otherwise you can cause damage to the device, and both the “filling” and the glass of the lens may suffer. right and left headlights the Corolla are held on by four bolts located on the inside. You don't have to disassemble half of the car, just open the hood and you can reach the fastenings of the upper part. But removing the lower bolts is not so easy; you will need to dismantle the front bumper.
The most convenient way to dismantle the bumper of a car made in 2006 and other years is to use an overpass or pit. The removed part should not be placed on asphalt or a dirty place, this can damage the paintwork, so it is better to prepare some material for the bumper in advance in which it can be placed.
It is much more convenient to look for bolts if the car is not dirty, but you cannot always notice them, since they merge with the body. It will be convenient to use a diagram that shows the location of the bolts on a car made in 2006 or another year.
You need to start removing the headlight from the top bolts. To do this, you will need to open the hood and unscrew the decorative radiator grille. Rubber covers may remain along the edges; for example, they were installed on the E120 to protect the bolts from dirt and moisture. If there are no covers, no problem; unscrew the bolts along the edges, then the last one located in the center of the grille.
Attention: the grille should not be pulled. If you forgot about the third fastener, you can break it by applying force when trying to remove the radiator grille.
The lower part of the grille is attached to grooves, so there is no need to unscrew it, but it must be removed carefully. The upper mount that holds the bumper is also located under the grille. The bolt in the center is made of plastic and must be handled with care. In order for it to come out, you need to pry it up. The 120 body in this regard is no different from the 150. There is no need to remove the bolt itself, release the connection and leave it hanging; removing the bumper will not hurt.
The remaining fastenings need to be looked for under the arches. It is advisable to wash the car before work, this will not only make it easier to find the bolts, but also to unscrew them. You can find the bolt by bending the plastic protection; it is located under the plastic cover. You will need to have a key for 10; It is more convenient to use a ratchet.
Pay attention to the lower part of the bumper: there are several more bolts securing it. Often they are clogged with dirt, you need to fill them with WD-40 and wait a while, otherwise you won’t be able to unscrew them.
After unscrewing everything, look under the bottom of the bumper. At this point it is connected to the body using a beam and is held on by two plastic bolts. After this, the bumper can be removed ; it must first be removed from the wings. Having separated it, remove the bumper from the grooves located under the headlight. After this, you can remove the headlight; it is easy to disassemble intuitively; headlight and those installed on the left side have special fastenings. Remember the sequence of actions: this will be useful for assembly.
Replacing ventilation and heating panel backlight lamps: step-by-step instructions
We tried three different options for light bulbs, which were installed and operated one by one. The first option, the most common one, is yellow light, not very bright. The second we tried was a diode - the performance and energy consumption are excellent, but after a while such diodes can fail, it all depends on its quality. The third option is an SMD diode - its light is dazzling, white, but it also has its drawback - it shines in one beam, the light does not scatter (the problem can be solved, but you will have to tinker). The photo below shows each of the described options.
Next, we disassemble the panel into which we need to insert the prepared diodes and insert our bright LEDs in place of the old light bulbs. Be sure to follow the direction of the light, as it is thrown out in a beam. In the photo, the included panel, however, is still disassembled, so to speak, at the stage of verification and testing.
When everything is checked, you can assemble and enjoy the result. As a result, the panel glows much brighter and more pleasantly compared to the old yellow light bulbs that were previously installed in your Toyota Corolla. You can judge the result yourself. Photo below.
This completes the repair of the heating and ventilation panel lighting. Next, we can talk about how to make lighting in the glove compartment, as well as illuminate the legs of the passenger and driver if it is not there.
Headlights for Toyota Corolla: removal, installation and replacement
Standard Toyota Corolla headlights in 150 and 120 body styles do not always satisfy their owners in terms of quality. The way out is very simple: you need to replace the optics by installing one that will meet your requirements.
The optics of Toyota Corolla 150 2006, 2007 and earlier years of production can be easily modified. There are some difficulties when removing, but replacing headlights, lenses, and installing new optics does not cause difficulties even for amateurs. If you doubt your abilities, contact a car repair shop.
Sources:
https://club-mashin.ru/toycor/corservice/svetodiodnye-zadnie-fonari-na-korollu-e120.html https://proteu.ru/toyota/%D1%84%D0%B0%D1%80% D1%8B-%D0%BD%D0%B0-%D1%82%D0%BE%D0%B9%D0%BE%D1%82%D1%83-%D0%BA%D0%BE%D1%80 %D0%BE%D0%BB%D0%BB%D1%83-%D1%81%D0%BD%D1%8F%D1%82%D0%B8%D0%B5-%D1%83%D1%81 %D1%82%D0%B0%D0%BD%D0%BE%D0%B2.html https://club-mashin.ru/toycor/corservice/fary-na-tojotu-korollu-snyatie-ustanovka-i- zamena.html
Safety regulations
Replacing a light bulb requires the car owner to follow standard safety rules. This general regulation includes the following list: