The Toyota Corolla has excellent sound from the speakers from the very beginning, so they play one of the most important roles in the operation of the car. But it happens that the speakers can break, fail, or begin to hiss, in which case their replacement is simply necessary so that the sound matches the high-quality brand of the car. You can install the speakers in your car yourself; you don’t need to be a mechanic or auto mechanic; installing them will take you literally an hour or two.
Door noise and replacement of standard speakers with Hertz
In the summer, I made noise on the front doors and replaced the standard speakers with 2-component Hertz DSK 165.3 acoustics, here is the test subject himself:
A little background on the choice of speakers. Initially, I was simply interested in high-quality, pleasant sound, not such that the whole neighborhood would listen to you, but just a pleasant sound!) The planned budget was limited to five rubles. From the theoretical data, what acoustics to take were our own UHIs! With this arsenal, I went to the store) After listening to a couple of three test subjects in the category from 4500 to 5000 rubles, including pioneer and jvc, without confusion I chose - HERTZY, because the sound was much more pleasant and richer.
There in the store I bought podiums for speakers, the seller insisted that they were specifically for Corolla and everything would fit without any shamanism! As it turned out later, it didn’t fit! (out of three holes, well, at best, two coincided on one door on the other, and even less!) We solve the problem with the help of a drill and a drill bit.
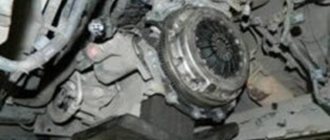
Well, let's start from the beginning. I removed the door trim, the removal process was very simple, no problems arose! The only problem is that the standard speakers are not bolted, but riveted, I had to get a drill and drill them out, there were no particular difficulties either. The magnets on the standard speakers made me smile!))
Continue as usual: wipe the door with a degreaser and glue the vibration material. Based on the experience of the previous car, I am inclined to believe that you shouldn’t push anything other than a vibrating device into the door itself (the space where the glass goes down). because there is a very humid environment there and all sorts of sound-absorbing materials absorb moisture, peel off, and so on. In general, I made such a light Shumka. (m2 noise material inside the door, some kind of cheap STP 0.5 or 1mm for the technological holes) the doors became more pleasant to close and thereby created a box for midbass. Of course, if you wish, you can also stick something sound-absorbing on the door trim. but it’s fine for me as it is!) Well, then I’m attaching photos of the work process. Some photos show blue fabric covers on the seats, I apologize for such insolence - this is just a collective farm from the previous owner. At the moment, the covers have been liquidated and destroyed in the most brutal way.
Source
Replacing rear speakers on E150
People, please tell me which speakers to use in the rear shelf for the factory radio and whether the standard plastic covers will interfere with the high-frequency speakers?
Which one is better on the car sound forum (Hertz, DSL are not bad companies, it all depends on your budget), the sizes there, in my opinion, are 6x9
The most interesting thing awaits you when removing the speakers, this process is not easy
https://corolla-club.ru/doc2/rm04f1ru. 02xay000x.html
What's the point of using other speakers for this radio? It doesn’t swing even these. If you want to take some larger magnets and better quality factor, and theoretically swing it a LITTLE better due to this, it is artificially crushed by filters so much, both at the bottom and at the top, that it’s hardly worth spending money on good ovals, for the sake of this A LITTLE, without replacing the GU itself. The standard GU amplifier has a rating of only 4x20W. You need to start from the head. PS: I unsoldered these filters, it became much better with the standard ones.
What's the point of using other speakers for this radio? It doesn’t swing even these. If you want to take some larger magnets and better quality factor, and theoretically swing it a LITTLE better due to this, it is artificially crushed by filters so much, both at the bottom and at the top, that it’s hardly worth spending money on good ovals, for the sake of this A LITTLE, without replacing the GU itself. The standard GU amplifier has a rating of only 4x20W. You need to start from the head. PS: I unsoldered these filters, it became much better with the standard ones.
Let there be music, part 3 “Replacing the rear speakers and starting to make noise on the shelf”
Finally, I got around to the garage where the material left over from the previous car lay, not all of it, of course, but I can also use what I have, what I’ve already spent on the roof and trunk. And so, first of all, we begin to disassemble this whole matter. What we need for this, even though many people have written about it, I will still describe it, because when you go to some information and many magazines say, “many people have written about this, and I won’t write about it,” but nothing like that, on This is wasting a lot of time, I apologize, I went a little to the side, but oh well, let's go! As for the tools, we will need a 10mm wrench, or better yet, a head with a ratchet, straight hands, and the material itself, what to make everything from and what to change, we will also need a spatula to pull out the clips that remain in the metal. When I was calcining the roof and trunk, I made it from a piece of aluminum, but it’s complete nonsense, but it still worked out, and then when disassembling, I ran a little in front of a couple of clips still remained in the metal, I did everything in the yard while my wife and child were walking on the site, and during my next smoke break I see something lying near the trash can in the sand (an incomprehensible thing) I go up and there is this spatula for clips, how it got to the playground in the yard remains a secret, but when I found it I was crushed like all the children from the playground)))) Well, I went a little to the side, we continue, in order to get to the speakers, first we remove the lower seat of the rear sofa (just pull it to the top, first on the right then on the left), then unscrew the two soft side panels they go on the sides of the rear back, at the bottom there is a 10 nut, we lift them up a little and here they are in our hands. Then, in general, everything is easy and simple, since this is a Toyota, and the engineers thought through everything to the smallest detail, for which many thanks to them! We carefully just pull out all the plastic from its seats, namely the light plastic near the roof, then a small insert, then the long part to the threshold. The rear parcel shelf is attached to three clips; we just gently pull it up with a little force; there is also plastic behind the seats; for convenience, it is better to remove it and glue it too.
At this point, the disassembly is complete, and we move on to the next stage of cutting out the spacers for the speakers. Why did you decide to change the speakers? To do this, just look at the photo without words
Source
Replacing the original radio
How to replace a radio:
- First you need to pry the central tunnel trim on the right and carefully remove it.
- We perform similar actions with the left overlay.
- Now we pry up the upper right and left decorative trims until they click and remove them.
- Remove the panel with the two central air ducts.
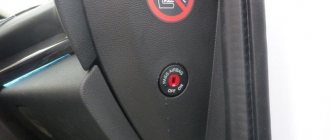
- Next, you need to disconnect the connector from the emergency button and make sure that their latches remain intact.
- Using a 10 mm socket wrench, unscrew the 4 bolts.
- Now pull the radio towards you and disconnect all antennas and power connectors.
- Using a size 8 wrench, unscrew the mounting plates from the original radio and remove the 4 plastic latches, they are yellow.
- Now you need to screw the plates onto the new radio and install the yellow latches on it.
- We connect all the antennas and install the unit in its place.
- All parts are installed back in the reverse order.
Acoustics in Toyota Corolla 150
Type: Mid-bass speakers Size: 8 inches (20 cm) Frequency range: 34-6000 Hz Maximum power: 420 W Nominal power: 210 W Impedance, Ohm: 4 Sensitivity, dB: 94 Class: Number of channels: Type: Mid-bass speakers Size: 6.5 inches (16.5 cm) Frequency range: 36-7000 Hz Maximum power: 360 W Rated power: 180 W Resistance, Ohm: 4 Sensitivity, dB: 93
Type: Mid-frequency acoustics Size: 3.7 inches (9.5 cm) Frequency range: 750 – 10000 Hz Maximum power: 120 W Resistance, Ohm: 4 :
Type: Coaxial acoustics Size: 6x9 inches (15x23 cm) Frequency range: 42 - 23000 Hz Maximum power: 270 W Resistance, Ohm: 4 Sensitivity, dB: 92
Type: Mid-frequency acoustics Size: 2.75 inches (7 cm) Frequency range: 150-11000 Hz Maximum power: 100 W Resistance, Ohm: 4 Sensitivity, dB: 92.5
Speaker system: 2-way component Type: Component acoustics Size: 6.5 inches (16.5 cm) Frequency range: 45 - 22000 Hz Maximum power: 210 W Resistance, Ohm: 4 Sensitivity, dB: 91
Type: Component acoustics Size: 5.25 inches (13 cm) Frequency range: 48 - 22000 Hz Maximum power: 180 W Resistance, Ohm: 4 Sensitivity, dB: 90
Acoustic system: High-frequency acoustic system Type: Tweeters (tweeters) Size: 1 inch (2.5 cm) Frequency range: 1000-22000 Hz Maximum power: 100 W Nominal power: 50 W Resistance, Ohm: 4 Sensitivity, dB: 92
Type: Coaxial acoustics Size: 6.5 inches (16.5 cm) Frequency range: 45 - 20000 Hz Maximum power: 200 W Resistance, Ohm: 4 Sensitivity, dB: 91
Type: Component acoustics Size: 6.5 inches (16.5 cm) Frequency range: 62 - 23000 Hz Maximum power: 140 W Resistance, Ohm: 4 Sensitivity, dB: 92
Type: Coaxial acoustics Size: 5.25 inches (13 cm) Frequency range: 48 - 20000 Hz Maximum power: 170 W Resistance, Ohm: 4 Sensitivity, dB: 90
Type: Midrange Size: 5.25 inches (13 cm) Frequency range: 150-11000 Hz Maximum power: 180 W Rated power: 90 W Resistance, Ohm: 4 Sensitivity, dB: 95.1
[E12 Hatch] Installation of vibration/sound insulation of doors, replacement of standard acoustics. Photo report
Dimson
King breeder
Having driven more than 100 thousand km on it all the time. I realized that the standard music had already played its part and the cow needed a new voice... the question of replacing the music had been around for a long time, but never got around to it. After a certain time, this long-awaited moment arrived. I approached the selection of components for a long time and carefully (I wanted to achieve good sound at a reasonable cost) ... a break there is a lot of information on the net, and after listening to more than one sample of acoustics on stands, my choice fell on Morel Tempo 6 (2-component acoustics for the front) and Morel Tempo 6 coax (2-way coaxial speakers for the rear), an Alpine CDE-9880R will replace the standard radio in the near future. Having disassembled the doors, I was slightly horrified... there was not even a question of standard sound insulation, it was a sad look from a piece of film and batting, and the inside in the middle was decorated with a crookedly glued piece of vibration measuring 10x10 cm. With such a set of door excesses, you can’t expect normal sound. And...the process began to boil...15mm was purchased. plywood for spacers for acoustics, 8 sheets of STP vibroplast (Silver M1) for all doors + 2.5 m of splenium 3004, 4x12 self-tapping screws, 25x5 galvanized screws, M5 self-locking nut, washers for fastening spacers + all sorts of small things. Having drilled out the standard speakers, I took two templates using them and transferred them to plywood, the front ones are larger than the rear ones, at first it was a little confusing, because... The size of the purchased speakers (front/rear) is the same 16.5 cm, but everything fell into place without any problems.
Great opportunities
It’s hard to call them just an audio recorder. It is rather a symbiosis of a multimedia center and a tablet. Most of them are equipped with the popular Android operating system of various versions. They can easily handle multiple applications at once. That is, you can listen to music and use the navigation program at the same time.
Old CD radio Their high-resolution IPS capacitive touch screen makes it easy to control the device and works well in sub-zero temperatures. For Android there are a huge number of applications that can be installed on the radio.
Standard speakers Toyota Corolla 150
I’ll make a reservation right away for those who think this is a collective farm. I did everything myself and I like what I did. The standard sound on the Corolla is very bad, so the decision was made to make the front doors noisier, make the rear parcel shelf noisier and change the acoustics from the power steering.
So, what I did: the front doors and rear parcel shelf were disassembled, sealed with vibration and noise. For the speakers, both front and back, podiums were cut out of 2-centimeter plywood. Two-component Focal speakers (16.5 cm) are installed in front, tweeters are embedded in the corners of the doors, and Cadence three-way speakers are pancakes in the back. Instead of the standard GU I installed a Pioneer sph-da120. I connected the rear view camera ordered from Ali.
I'm pleased with the result. Plays well for the simplest system. Compared to standard music, heaven and earth. Costs are small (except for GI). Photo report:
I decided to please myself and replace the speakers in the doors and tweeters in the racks. After consulting with a local car audio store, my choice fell on the DLS brand. Model C6A was purchased. Spacers for radius 16 acoustics were also purchased.
Having removed the door trim, I was a little amazed. Original TOYOTA speakers were in the standard places
The next step was to adjust the spacers to the acoustics. It was required that the magnets of the speakers do not touch the glass when lowering the latter. It was also necessary that the door frames fit on all factory fasteners, without any further hand-made work or glue. After 6 hours and a lot of fittings, the desired result was achieved. A grinder with a stripping attachment, as well as a stationery knife, helped me with this.
There was an unresolved issue. Where should crossovers go? A solution was found.
it's like they were made for this
Next, we install the crossovers in pre-prepared places
All that remains is to correctly screw the speakers into their rightful place and... done
Replacing speakers on the rear shelf
How to replace speakers on the rear shelf:
- First you need to remove the rear seat cushion assembly.
- Next, you need to remove the side backrests of the left and right seats in the rear seat.
- Remove the support pad on the left and right rear doors.
- Then remove the left and right side trims from the rear seat.
- The left inner side panel must now be removed from the roof lining.
- After this, remove the left side roof lining itself.
- Finally, it is necessary to remove the trim panel assembly for small parts.
- And now you can start removing the rear speakers and installing new ones in their place.
- Reassemble all removable parts in reverse order and install them according to the instructions.
After this procedure, you will notice a significant improvement in the performance of the speakers. This is proven by perfectly clear sound, high frequencies and the most detailed sound.
Replacing the original radio system in your Toyota Corolla car will always be desirable. You can change your aggregate system not only because of an outdated model, but most importantly - for high-quality playback and sound of music. Its installation will not take you any time; it will go quickly and smoothly. All connectors for this procedure are included in the system, so there is no need to drill new ones. But there is a question that interests many motorists: is it necessary to cut the wires? So, the answer is – it’s not necessary, since all the wires are adapted to the system of your car.
Installation of Car Audio in Toyota Corola
Toyota King 2008 car
Installed acoustics:
- Hertz HV 165.4 L + Morel MT 22
- Pioneer deh 3100 dvd
Let's start with the fact that the Customer's requirements for this car initially consisted of a budget of a certain amount (selection of components + cost of work) and a certain style for the musical genre - This is RAP. Also, he simply, like the most ordinary person, wanted to feel comfortable in his “plastic” car, we hint that it was necessary to do thorough noise and vibration insulation of the entire interior + anti-creaking of all plastic parts of the car.
As for the installation of acoustics and amplifiers itself, we proposed to do the following:
Make front podiums for the midbass in the doors and for the high frequencies on the windshield pillars. In the trunk, make a subwoofer using Stealth technology for the left wing of the car. Make amplifiers under the false panel on the back of the rear seat. But the customer did not make one decision right away! The conversation leads to the fact that in one of our works he saw on the trunk lid an interesting podium made specifically for listening with the trunk open on the street. Well, you understand, we all love barbecue, and it becomes more and more fun when our favorite compositions are played. Having calculated his budget, he still decided on this invention and when the time came to pick up his car, the client was probably most pleased with the fact that now he also had his own small “BBQ OPEN AIR”.
We decided on the selection of components right away. For the front, we chose a good combination of bassy midbass Hertz hv 165 L.4 from the new line (which is directly similar to the higher class ML 165 from the Mille series) and silky tweeters Morel mt 22, which softly play the most subtle notes of instruments without straining harshness and distortions. All this was shared through the Hertz 2w.10 passive crossover.
For the bass section, we decided to try the Kicx QS 300 Subwoofer, also from the new line of this company, equipped with two 4-ohm coils and a very good nominal power of 600 watts. The amplifier for the subwoofer was taken from the same company Kicx QS 1.350, connecting the subwoofer to the 2nd amplifier gave it a power of 630 watts, which was undoubtedly enough for the subwoofer.
Now we had to decide on our idea for the trunk lid, since the budget was already really tight, we decided to take, in our opinion, the most successful 2-component acoustics in terms of price and quality, Morel Tenpo 6. After all, our requirements are a paper diffuser and a silk tweeter, and the price is just right.
After all the determinations and purchases, we began the installation itself.
The first stage, accordingly, was complete noise and vibration insulation of the car interior. The floor and trunk were glued with Bimast standard 4 mm + splen 4 mm and accent 10 mm, the rear doors and roof were glued with Vibroplast Silver + splen 4 mm and roof accent 10 mm. The doors were already taken much more seriously, since rigidity was required for maximum midbass output. The inner and outer parts of the door were rolled with Vizomat MP, which has excellent rigidity, but when gluing it requires heating with a hairdryer and careful rolling with rollers, after which a second layer of 4mm splen was glued, and on the door trim there was a soft material, Bitoplast 5mm, which gave an anti-creaking effect.
After gluing the car, we began making podiums for the front. We mainly use plywood as a base and finish it with putty and fiberglass on top. The HF stands are cleanly removed from putty of the same series; it creates rigidity very well. The lower podiums were covered with black leather, and the pillars with light gray Alcantara.
The subwoofer housing was made using the “more volume, less trunk space” technology, that is, STEALTH. The frame and base were 21 mm plywood, the back wall was entirely made of fiberglass. The thickness of the walls of the back shell turned out to be 8 mm, but the volume itself was 44-45 liters. We also made a false panel for the amplifiers, and covered it all with Graphite-colored carpet.
Lastly, we started making the podium-case for the trunk lid. The inside of the trunk lid itself was painted semi-matte black to match the color of the podium and the inside of the lid. The base was also plywood, but thinner 10 mm, after which they stretched a strong fabric and impregnated it with resin, after drying, they put four more layers of glass mat inside, and then they stretched a second layer of the same fabric and again thoroughly impregnated it with resin. After everything was done, The wall thickness turned out to be 4 mm, which is quite enough for such a frame (we are not building a subwoofer). All the irregularities were then smoothed out using putty and holes were cut out for the tweeters (In Russian - PISCHALKI). We reupholstered this podium with black Alcantara, and on the lid itself we installed two switches to turn the speakers on/off.
Let's summarize the above. On the front: the midbass played very tightly, with good attack and speed, at the lowest frequency limits it handled very well, while the tweeters themselves did not sound intrusive and softly conveyed good coloration at high frequencies. Regarding the stage, I will say that the correctly chosen direction of the tweeters gave a good scene, which can rarely be caught in a non-processor system. The voice stood in front of the driver directly above the dashboard, practically not moving anywhere, localizing a good effect of the depth and width of the stage. Regarding the subwoofer, I will say one thing: what we wanted is what we got, soft, accurate and beautiful bass, which in RAP is only “Hurray” and the power reserve is really good. Last of all, having already opened the trunk and pressed the on buttons, we heard the rear parcel shelf, which, according to its purpose, will be used for sounding the street. The very good attack and soft silk of the Tempo tweeters worked well at high volumes, producing loud and clear sound without distortion. The owner of the car himself was very pleased with the entire installation.
Replacing standard speakers
How to replace speakers:
- First you need to remove the inner door trim, behind which the column is located. To do this, you will need a screwdriver to carefully pry the material from the side and detach it for further removal.
- Now you see the speakers, to remove them you need to unscrew the fasteners using a screwdriver.
- After you have taken out the old speakers, wipe the area where they were with a slightly damp, almost dry cloth.
- When everything is ready to install new speakers, you can begin mounting them in a suitable place for them.
- It is necessary to install the speakers on the podiums for them, so the music will sound much better and louder, and most importantly cleaner.
- The last step is to return the casing to its rightful place and check the functionality of the speakers.
Ultimately, after the work done, you get new, great-sounding speakers that match the quality of the car.
Despite the high quality of the Corolla car, the original speakers sound very mediocre, especially after the car has driven about 100,000 km. Since their magnet is very small in size, it does not even stick to metal. Replacing the acoustics itself is not difficult; removing the casing takes about half an hour, and replacing the speakers takes even less time. Before replacing speakers, prepare yourself for the fact that you will have to do a lot of unscrewing and removing everything, and then putting everything back in place, but it will be worth it.
How to install a rear view camera on a Toyota Corolla E150: step-by-step instructions
Tuning or replacing a stock power unit allows you to increase the functionality of the car by installing additional electrical equipment - the most popular upgrade is installing parking sensors or a rear view camera. To install the KZV you will need no more than an hour of free time, as well as a set of tools: a set of wrenches and screwdrivers, pliers, electrical tape and a utility knife.
The installation procedure consists only of connecting the components to the general electrical circuit of the car - for the correct functioning of the camera at the front of the power unit, the following connectors must be connected:
- P1 – power supply to the short circuit;
- V1 – video signal output to the car head unit;
- V2 – analog video signal extender;
- P3 – cable for automation: designed for autonomous switching of the monitor to the short circuit;
- A1 – “positive” wire for the license plate illumination;
- A2 – license plate power supply mass.
To connect a rear view camera you need:
- Remove the trunk trim and the left side of the passenger compartment - there is a main cable duct there;
- Next, we lay the video signal wiring and the automatic camera switching cable, after which we restore the casing;
- Then we install the camera in the left license plate lamp, having first unscrewed the fasteners and fixed the device;
- Now we connect the camera to the power supply for the license plate illumination and connect the necessary cables to the control unit according to the diagram.
If you install additional acoustics to the power unit, it is recommended to power the rear view camera directly from the battery, which will reduce the overload on the wiring. When installing to a battery, it is important to find a powerful ground on the car to close the circuit - connecting to the “minus” of the license plate in this case is fraught with consequences.
Car radio for Toyota Corolla 2013+ left hand drive
To install it on a Toyota Corolla 2013+ radio, you also do not need any modifications to the design, adapter frames or an adapter to match the pinout.
The color of the radio completely matches the color of the car panel. It has a large 8-inch screen and a dual-core processor, as well as a built-in GPS receiver and DVD player. There is a digital radio and 2 USB connectors with extension cords for connecting flash devices, slots for SD and SIM cards. It is possible to connect a parking camera, as well as a hands-free function.
The main control menu for the Toyota Corolla 2013 radio is designed in the style of Windows 8 tiles. The Navitel navigation program is preinstalled. One of the unique features is turning off the screen glow when driving in the dark.
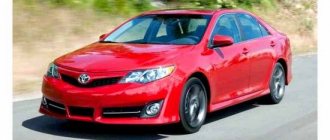
Features of the Toyota Corolla X
The driving and performance characteristics of the car are excellent:
- The interior is spacious and ergonomic; there is nothing superfluous here, but the necessary level of comfort has been achieved.
- The car moves off smoothly, and the transmission shifts without jerking.
- The controls are quite sensitive: the car reacts without delay to steering wheel turns and changes in the position of the pedals.
- The suspension softens minor road imperfections.
The 10th generation Toyota Corolla has expressive external features, thanks to the front bumper, headlights and radiator grille. The modern interior of the cabin, as well as the improvement of some functions, make the ride in this car comfortable. Excellent handling and a reliable braking system made this car popular.
What can be installed on a Toyota Corolla E150 and what is needed for this
The design of the E150 provides for the installation of a radio of any format, which allows you to expand the functionality of the car several times. When replacing a standard radio with an upgraded head unit, it is possible to:
- Connecting a subwoofer and an additional pair of speakers;
- Installation of parking sensors and rear view camera;
- TV or satellite navigation connection;
- Installation of radar detector and video recorder;
- Interactive control via remote control, buttons on the steering wheel or using a smartphone.
When choosing a power unit for the E150, you should take into account the device interface: it is recommended to purchase a model with a wide touch screen and an installed Wi-FI or Bluetooth module. The performance of the processor is also important: the clock frequency and number of cores will optimize the load on the device and produce better sound: the greater the processor power, the more clearly you can cut frequencies and calibrate the equalizer.
| Manufacturer | vendor code | CPU | Screen size | Display type | Readable formats | Approximate cost, rub. |
| Nekvox | NEKV7892 | MTK3360 800MHz | 8 inches 1080*720 | Multi-touch, with active LCD matrix | MP3, MPEG4, WMA, WMV, MPEG. | 11280 |
| CarWinta | CF 3007 | Allwinner T8*1.8 Ghz | 8 inches 800*480 | Multi-touch, active matrix LCD, multi-color | MP3, MPEG4, WMA, WMV, MPEG. | 20100 |
| LeTrun | Trun 1423 | MTK 3561 4*1.3 Ghz | 8 inches 1080*720 | multi-color, multi-touch, resistive | MP3, WMA, JPEG, AVI, WMV, MPEG. | 22300 |
| Roximo | RX-1104 | MTK 3561 4*1.3 Ghz | 7 inches 800*480 | multi-color, multi-touch, resistive | MP3, MPEG4, WMA, JPEG, AVI, | 23800 |
| Carmedia | KD 8010 P3-7 | RockChip PX3 4×1.6 Ghz | 7 inches 800*480 | multi-color, multi-touch, resistive | MP3, MPEG4, WMA, WMV, MPEG. | 25900 |
| Carmedia | OL 8694 | MTK3561 4×1.8 Ghz | 8 inches 1080*720 | With active matrix LCD multi-touch, resistive | MP3, MPEG4, WMA, JPEG, AVI, WMV, MPEG. | 27980 |
Please note! When purchasing an audio system in a Toyota Corolla E150, it is necessary to take into account the compatibility of the device with the design of the transition frame: the 1din model does not provide for the possibility of installation in a 2din frame, at the same time, an inversely proportional installation will cause a number of difficulties.
HOW TO CHOOSE A SPEAKER FOR Toyota Corolla?
It's time to choose speakers for your Toyota Corolla. Remember that high-performance speakers come with a delicate balance. So if you're trying to replace one or more speakers in your car, you'll need to make this choice methodically to maintain sound quality. We will give you various options and things to consider when choosing the speakers you want to replace in your Toyota Corolla:
- Choosing which speakers to replace (sometimes just a unit at the bottom of the door, although in some trims you'll have midrange speakers that constantly handle the low frequencies at the bottom of the door, and tweeters that handle the high frequencies at the top of the door).
- To do this, remove the cover or door panel and measure the diameter of the speakers you need to change, there are 3 standard sizes: 100, 130 and 165 mm.
- The more speakers you choose for a model that matches the size and installation of your Toyota Corolla, the more you choose a speaker model with more channels preloaded, the more correct your car's sound will be. Make sure the depth of your speaker matches the depth of your door.
- Make sure the watts and ohms are appropriate for your installation.
Installing front speakers Toyota Corolla Fielder
Task: replace the front speakers on a Toyota Corolla Fielder
The choice fell on the Kicx PDN 6.2 component speakers.
Progress of work on replacing standard speakers for Toyota Corolla Fielder with Kicx PDN 6.2
First, remove the trim from the door. The standard speaker is secured to the door with rivets, which must be drilled out with a 4 mm metal drill. This is done without any problems at all. And now I have my native Japanese speaker in my hands - Fujitsu 17.5W.
HOW TO USE SPEAKER/MEMBRANE ON Toyota Corolla
Let's start our guide on how to change speakers on a Toyota Corolla with a speaker fixing step . It's important to know that this is not an easy job and if you do it, it needs to be done on quality speakers because the cost and time spent on it may not be worth replacing it with a better speaker. However, if you decide to do this because your speaker is hissing and your sound is of poor quality, the only thing we can offer you is to replace the parts we call the suspension and diaphragm of your speakers, black edge, in most cases made made of polyurethane, which gives the speaker membrane of your Toyota Corolla the ability to move and reproduce sound. In case one of its two elements cracks or decomposes, you will be able to work on it. Last but not least, just before you start repairing the speaker, gently and several times press the diaphragm towards the bottom of the speaker and if you notice a rubbing noise, it means that your speaker is damaged and needs to be replaced . Instead, skip to the next sections of this article. If it doesn't make much noise, you can start repairing the speaker of your Toyota Corolla, here are the basic steps:
- Measure the diameter and thickness of the suspension/diaphragm assembly, order it online and don't forget the glue (1 tube for 2 speakers).
- Keep the diaphragm at the bottom of the speaker pressed down during the process, for example with a spray can.
- Using a cutter, carefully remove the hanger from the speaker frame, at this point you will have to be patient and gentle, making sure to remove any remaining hanger that may be attached to the frame.
- Follow the installation instructions included with your new suspension diaphragm to complete your Toyota Corolla speaker repair.
How to install a rear view camera: briefly about the main thing
Installing a rear view camera makes parking in hard-to-reach places easier, which significantly increases the comfort when operating the car in urban environments. Additional equipment packages for the Toyota Corolla E120 do not provide for the possibility of installing a KZV, however, this equipment can also be installed manually.
To install the system you will need no more than an hour of free time, as well as a standard set of tools - to mount a rear view camera you need:
- De-energize the car, disconnect the ground from the battery;
- Next, you will need to dismantle the plastic of the central panel in the cabin and remove the adapter frame for the radio and remove the left side of the car floor - this will allow you to get to the main cables;
- We remove the trunk trim and get to the wiring that supplies voltage to the license plate light and install the rear view camera in the left light bulb. It is recommended to connect the device directly to the battery, however, in case of low power equipment, the device can be powered from the wiring with power supply for the license plate illumination;
- After installing the camera, we isolate the equipment and run the video communication and power cables through the trunk along the general main flow in the car, then we connect the video output to the control unit, and the power to the battery through the instrument console.
- Now we test the device and, if necessary, calibrate the camera location, after which we restore the upholstery in the cabin and trunk.
It is important to know! When connecting equipment, you should not skimp on insulating materials - all wiring must be treated with heat-shrinkable tubing and electrical tape, and cable bundles must be secured with plastic bundles.
It is also recommended to install an additional fuse along the path of the “positive” wire leading from the battery, which will prevent the device from burning out in the event of a short circuit.
HOW TO REPLACE THE SPEAKER OF A Toyota Corolla? HOW TO INSTALL SPEAKERS
Finally, we come to the last section of our guide to changing speakers on a Toyota Corolla . Now we will find out what steps you need to take to install new speakers in your car:
- Disconnect the battery to avoid electric shock...
- Remove the cover of the speaker you need to replace, or the door trim of your xxx, if necessary (be careful not to break the trim fasteners, which are usually fragile).
- Remove the speaker that needs to be replaced by removing the screws holding it in place, being careful with the length of the wire behind it, unplug the connectors before removing it completely (remember to save the screws in case you want to put the old speaker back together).
- Connect your new speaker to your Toyota Corolla and try it out with the radio before you fix it, so you don't have to waste time if trouble arises.
- Install the new speakers and reinstall the door casing or trim.
- Duplicate the procedure for the number of middle tweeters you want to replace on your Toyota Corolla.
Quick suggestions, be sure to tighten the mounting screws when replacing speakers because they vibrate a lot and may come loose as you go. That's it, you just learned how to replace the speaker on a Toyota Corolla, now all you have to do is have fun with your favorite bits with these new speakers. If you are planning to complete an upgrade to your sound system, we recommend that you replace the car radio in your Toyota Corolla as it will determine the overall sound quality of your speakers, so be sure to check out our content on this topic.
If you need more guides on Toyota Corolla, go to our Toyota Corolla category.