Any equipment breaks, even something as simple as an iron. What can we say about a modern car, which is the pinnacle of engineering and technical thought in relation to devices for mass consumption.
And although automakers make every effort to ensure that breakdowns occur as rarely as possible and their consequences are not catastrophic, it is impossible to insure against all troubles. Including a broken alternator belt or other problems with the device that supplies the car with electricity.
But these troubles can be avoided, and if the inevitable does happen, you can eliminate many of the consequences yourself, which will allow you to avoid significant expenses of the family budget.
Drive belt and alternator on Corolla 120
The drive belt serves to transmit mechanical energy from the engine to the attachment.
Its breakage or poor condition makes it impossible to operate the car. Therefore, it is extremely important to promptly replace the drive belt and use only high-quality consumables. Otherwise, the car may refuse to move at the most inopportune moment, for example, on a highway far outside the city.
The stability of the voltage in the on-board network of the Toyota Corolla 120 depends on the condition of the generator. After its failure, the car is able to cover only a short distance using the battery charge. In this case, the improper condition of the generator causes surges and sags in the on-board network voltage, which can damage the Toyota Corolla 120 electronics.
Corolla maintenance regulations
Toyota Corolla E150 appeared in 2006. The base platform, as on the previous generation Toyota E120, was the Toyota MC platform. The car was equipped with two engines: 1.4 l - 4ZZ-FE (power 97 hp) and 1.6 - 1ZR-FE (124 hp). MultiMode robotic gearbox .
After restyling in 2010, the car began to be equipped with 1.33 liter engines - 1NR-FE (101 hp) and 1.6 liter (124 hp) and a six-speed gearbox or a four-speed automatic U340E, instead of a robotic one . However, this did not in any way affect the frequency of maintenance of the machine, but only the cost and consumables used.
For the Toyota Corolla E150, in the overall picture of maintenance, the first four can be distinguished; further adventures are cyclical, that is, a repetition of previous periods.
The Toyota Corolla E150 maintenance schedule table is as follows:
| Toyota Corolla E150 fluid volume table | |||||
| Engine | Engine oil (l) | Antifreeze (l) | Manual transmission oil (l) 5/6 stages | ATF automatic transmission (l) | Brake/Clutch (l) |
| 4ZZ-FE | 4,2 | 6,0 | 1,9/2,3 | 2,9 | 0,7 |
| 1ZR-FE | |||||
| 1NR-FE | 3,4 | 5,7 | |||
Article number and approximate price for the original Toyota Corolla 120 drive belt and its analogues
The original Corolla 120 drive belt has article numbers 9091602546, 9091602545, 9091602509, 9091602487. Its price ranges from 3,000 to 7,000 rubles. This cost is high, so car owners are looking for alternative options from third-party manufacturers. The best analogues of the original product are shown in the table below.
Table - Good analogues of the original Corolla 120 drive belt
| Manufacturer | vendor code | Approximate cost, ruble |
| Dongil | 6PK1692 | 500-550 |
| SKF | VKMV6PK1690 | 650-700 |
| Gates | 6PK1693 | 760-830 |
| Bosch | 1987947951 | 940-1000 |
| Meyle | 500061420 | 440-470 |
DIY drive belt replacement process
To replace the drive belt, you must follow the instructions below.
- Open the hood.
- Clean the tensioner bolt from dirt.
- Turn the tensioner bolt clockwise. To do this, you need to apply quite a lot of force. Therefore, it is recommended to use an extension cord.
- The loose belt must first be removed from one of the pulleys and then completely released.
- Put on a new drive belt. In this case, the belt should be placed last on the pulley, to which it is most conveniently accessible. To successfully complete this operation, you should loosen the tension roller with a 19 key.
- Remove the key "19". This will automatically tension the belt.
Toyota Corolla engine from 2013 Drive belt (1ZR-FE and 2ZR-FE engines)
Components
A - For models with a half-closed design. B - For metal type. 1. Lower engine cover No. 1. 2. Rear right lower engine cover. 3. Poly V-belt. Check Same as for models with 1NR-FE engines, plus additionally check the deflection and tension of the poly V-belt: - Standard deviation: 7.0-8.2 mm (new belt); 7.6-10.0 mm (used belt). — Standard tension: 700-800 N (new belt); 550-750 N (used belt).
Note: - When checking the deflection of the poly V-belt, apply a tension force of 98 N to it. - Check the deflection of the poly V-belt at the indicated point. — The tension and deflection of the poly V-belt should be checked after cranking the engine 2 turns. — The tension of the poly V-belt is measured with a cold engine. — When adjusting the serpentine belt, set its tension as close as possible to the middle value of the specified range. — When replacing the serpentine belt with a new one, be sure to carry out the following procedure after adjusting it: let the engine idle for 5 minutes, and then adjust the serpentine belt to the specified value for the new serpentine belt after the engine has cooled down. — When checking a serpentine belt that has been used for more than 5 minutes, the data for “used belts” must be used.
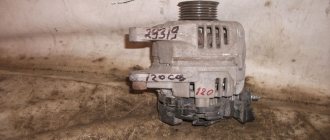
Article number and cost of the original Toyota Corolla 120 generator and its analogues
The article number of the original Corolla 120 generator is 2706022030, 270602706084, 2706027090, 2706064080, 270606408084, 2706064200. Its cost is from 8 to 16 thousand rubles. Experienced car owners recommend that if it is impossible to buy the original, purchase analogues from third-party manufacturers. A list of the best of them is located below.
Table - Recommended analogues of the original Corolla 120 generator
| Manufacturer | vendor code | Approximate cost, ruble |
| Bosch | 986040461 | 6500-6900 |
| As-pl | A6009 | 4900-5300 |
| Cargo | 111518 | 11700-12900 |
| Starline | AX1225 | 6500-7100 |
| Delta Autotechnik | L40460 | 12300-13200 |
Required Tools
To repair and replace the generator on a Corolla 120, you should prepare the tools that are listed in the table below
Table - List of tools for repairing and replacing the generator
| Name | Note |
| Key | "at 10", "at 12", "at 22" |
| Head | "on 10" |
| Screwdriver | Cross |
| Screw bearing puller | Required in case of bearing failure |
| Hammer | To press in a new bearing |
| Calipers | To measure brush sizes |
| Multimeter | For checking the chain. You can also use an ohmmeter. |
| Megger | To monitor the insulation condition |
Generator replacement process
The generator is replaced according to the instructions given below.
- Disconnect the battery. Otherwise, if the power cable falls on the body, the electrical components of the vehicle may be damaged.
- Remove the drive belt.
- Unscrew the “+” from the generator.
- Disconnect the terminal block.
- Unscrew the two fasteners that hold the generator.
- Remove the generator from the engine compartment.
- Install the new unit in the reverse order of removal.
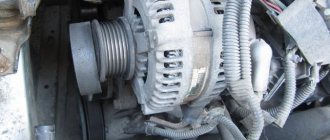
Basic generator malfunctions
If the belt is tight, but the generator does not recharge the battery, you can decide that it is the one that is faulty.
The reason may be a burnt-out diode bridge or a faulty voltage regulator. In such cases, these nodes are changed. The graphite brushes of the generator wear out even more often, and you can also replace them yourself.
Burnt and new diode bridge
But a burnt-out excitation winding is a nuisance that can only be eliminated by replacing the generator, and this is not a cheap pleasure. True, it happens quite rarely. You should also check that the generator wire is securely fastened to ground, and also look into the fuse box.
Toyota Corolla 120 generator repair
When a generator fails, replacing it with a new product is not always necessary. In many cases, the problem can be solved by repairing its electrical or mechanical parts. In this case, it will be possible to avoid the need to purchase an expensive unit, and the repaired generator will last for tens of thousands of kilometers. The algorithm for restoring functionality is given below.
- Remove the generator.
- Unscrew the three nuts that secure the protective cover.
- Remove the back cover.
- Remove the bushing located on the power contact of the generator. The insulating gasket must not have cracks or other mechanical damage.
- Check the resistance of the rotor winding. To do this, you need to connect a multimeter in ohmmeter mode to the slip rings. The nominal resistance value ranges from 2.3 to 2.7 ohms. A slight deviation is not a cause for concern, since it only indicates the error of the device. If the multimeter shows infinity, then there is a break inside the rotor windings. In this case, it must be replaced, since very few generator operators take on the task of rewinding the windings.
- Check if the rectifier unit is working properly. To do this, connect one probe to the ground of the rectifier, and touch the diode terminal with the second. The block must pass or not pass current.
- Swap the probes. The value on the multimeter should change. A diode in good condition allows current to flow in only one direction. If current flows in both directions, then the rectifier unit must be replaced.
- To remove the rectifier unit, you need to unscrew 5 screws.
- Remove the 2 screws that secure the brush holders.
- Remove the brush holder.
- During use, the brushes wear out. If the residual value of its protruding part is less than 4.5 mm, then the brush holder assembly must be replaced.
- Press down on the brush. It should move easily, without wedging. If there are jams, the brush holder assembly must be replaced.
- Check the condition of the insulation.
- Measure the diameter of the slip rings. They are also erased during operation and, if the intended value is less than 14 mm, then the rotor must be replaced.
- If extraneous noise is heard during operation of the generator or jamming is noticeable when turning the shaft, then the bearings must be replaced.
Source
Replacements according to service life
Replacing engine cooling system fluid. According to recommendations from the manufacturer, the coolant must be replaced the first time after 180 thousand km, then every 80 thousand km. car operation. Pink original Toyota Super Long Life antifreeze or its equivalent is poured into the cooling system. Concentrate articles: 888980072 - (5 liters - 5800 rubles), 888980070 - (2 liters - 2000 rubles), 888980071 - (4 liters - 4300 rubles).
Changing gearbox oil. Replacing transmission fluid in manual and automatic transmissions does not have a specific time frame. According to the regulations, every 40 thousand km. mileage only needs to be checked and lubricant added only if necessary. Most often, an oil change occurs when the gearbox breaks down or is replaced. However, to extend the service life and reliability of the gearbox, regardless of whether it is an automatic or manual transmission, the oil is changed every 90,000 km.
For manual transmissions, you will need 1.9 and 2.3 liters of GL-4/GL-5 gear oil with a viscosity of 75W90. The catalog number of the package for 1 liter is 888580606, the price is 1200 rubles.
For the U340E automatic transmission, a partial replacement will require 3.7 liters of Toyota ATF WS fluid, and a complete replacement with a vacuum automatic transmission will require 10.5 liters, the catalog number of a 4-liter canister is 08886-02305, and the price is 4850 rubles. In addition to the oil, it is necessary to replace: automatic transmission oil filter - 3533008010 (3000 rubles); gasket of the filter itself - 9030132010 (100 rubles); pan gasket - 3516821020 (600 rubles); gasket for the oil pan drain plug - 9043018008 (50 rubles).
If the car has a K311 CVT gearbox , then Toyota CVT Fluid TC is required, the catalog number of the original canister is 4 liters. — 0888602105 (4700 rub); sealing ring for the automatic transmission filler plug - 9043012008 (70 rubles); transmission filter in automatic transmission - 353300W060 (4200 rubles); automatic transmission pan gasket - 3516812091 (560 rubles); oil pan drain plug gasket - 9043018008 (70 RUR).
for replacing the drive belt on the Toyota Corolla E150 . However, through maintenance it is necessary to monitor the condition of the drive belt, and in case of damage and if there are visible signs of wear, it is necessary to replace the belt.
On average, the mounted belt of drive units is changed between 80-140 thousand km. For different engines they have different catalog numbers:
| Engine | 1,3 | 1,4 | 1,6 |
| vendor code | 90916-W2029 | 9091602470 | 90916-W2018, 99366-K0910 |
| Price | 1900 | 3300 | 2200/2800 |
Replacing the timing chain. According to the passport data, the service life of the timing chain is not provided, i.e. designed for the entire service life of the car. It is changed either during major repairs or when symptoms of its stretching occur.
For internal combustion engines with volumes of 1.3 and 1.6 liters, suitable chains are 13506-37010 and 13506-37070 (the products are interchangeable). The price of chains is from 4800 to 5200 rubles. A 1.4 liter engine is equipped with a chain with art. 1350622030, product price 5900 rub.
In case of wear, replacing the timing chain is the most expensive, but it is also rarely required.
Replacing the alternator belt on a Toyota Corolla
Every car driving on domestic roads has an electrical energy generator. It is the second, after the battery, source of current in the car, which runs from a running engine. This unit is driven by a special generator belt, which is placed on the generator and power unit pulleys of the vehicle.
Over time, as we all know, a car needs maintenance - it is necessary to replace filters, oil, as well as timing belts, alternator belts, etc. This is primarily due to their production. When one of the above components becomes unusable, it needs to be replaced. In today's article we will talk about how to replace the alternator belt on a Toyota Corolla.
As a rule, in modern cars such moving parts as belts are not equipped with protection, but are in open access not only to humans, but also to the environment. Over time, from exposure to small particles of dirt, dust, temperature changes - friction heats the belt to incredible temperatures - all this negatively affects the belt and gradually renders it unusable. And after this happens we need a replacement. We are faced with a choice - do it ourselves or go for service, spend money and they will replace it for you. Many experienced drivers will try to change it themselves, but we should warn you right away that this matter has its own nuances.
Main nuances when replacing the alternator belt on a Toyota Corolla
The first and most important nuance is choosing a suitable replacement part. Before purchasing, you should consult with a specialist in this field. This is necessary so that he can explain to you which ones are better, what their advantages are, and finally help you decide and choose the appropriate belt for your Corolla, as well as for its engine model. Depending on the engine model - length, width, its density - may vary.
The second point is when you have already purchased the necessary belt. This is its correct installation and tension. Any experienced driver will tell you that the tension between the generator and the engine greatly affects its service life. Thus, excessive tension will lead to rapid wear and failure, as well as shutdown of the generator. After all, if there is no belt, then the generator, which is an attachment that depends on the engine, is useless and only adds weight. This creates a huge problem - not a single car electronic system can function for a long time on battery power. Thus, it is necessary to correctly calculate the tension and correctly install it at your workplace. Next, let's look at step-by-step instructions for replacing it.
List of works during maintenance 1 (10,000 km)
Changing the engine oil. Engine oil poured into the Toyota Corolla E150 must comply with the ACEA standard: A3, B3 and B4, according to API: SL/CF. The type of oil should be selected depending on the climate in which the machine is operated, standard: SAE 0W-30, 5W-40. Toyota engine oil “ENGINE OIL 5W-40” is poured from the factory, the catalog number of the package for 1 liter is 0888080376. The price is 700 rubles. The same oil with a canister capacity of 5 liters 0888080375 will cost 3100 rubles.
Replacing the oil filter. For a gasoline engine, the original filter will be Toyota 90915-10003. Price 560 rubles.
Replacing the sealing washer of the drain bolt in the crankcase. The original ring has the article number - 9043012031, costs 100 rubles.
Replacing the cabin filter. When replacing the cabin air purifier filter, the original filter will be from Toyota 87139-30040. Its average cost is 480 rubles.
Checks during maintenance 1 and all subsequent ones:
- Cooling system hoses and connections.
- Fuel lines and connections.
- Covers for constant velocity joints.
- Hydraulic clutch (for vehicles with manual transmission)
- Front and rear suspension
- Wheels and tires.
- Hydraulic brake system.
- Braking mechanisms.
- Brake hydraulic pipelines and their connections.
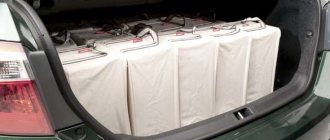
- Accumulator battery.
- Headlights.
- Glass and headlight washers.
- Cabin ventilation air filter.
- Seat belts, locks and attachment points to the body.
- Locks, hinges, hood latch, body fittings.
- Drainage holes.
Instructions for replacing the alternator belt
In fact, the procedure turns out to be very simple. First we need a new belt, a set of keys and a good wrench with heads suitable for the bolt.
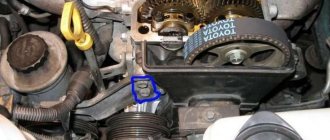
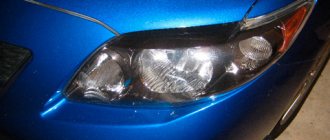
The replacement begins with the fact that you need to remove all the protection and get to the swivel bolt located on the engine. Let’s say right away that you shouldn’t bother processing it or trying to wash it with a special liquid - it will still be difficult to move it from its place. The photo below shows the bolt, as well as the direction in which it needs to be turned.
Once the bolt has been found, let's proceed directly to working with it. We need a good wrench. Since we didn’t have a crank, we made a lever from improvised materials. The bolt should not spin, it should be slightly pressed out. This is necessary in order to loosen the factory tension and remove it, as well as in order to subsequently put a new one in place. Below is a photo in progress.
So, unscrew the bolt and remove the old belt. What do we see? It was worn out and fairly cracked - this is what caused slipping and whistling when the engine warmed up, as well as when the gas pedal was sharply pressed.
We put the new belt on the lower pulley almost by touch, since there is very little space. It is very important that the belt sits exactly where it should, since the belt tension will change greatly if at least one track does not fall into place. The main rule when removing and putting on a belt is to remember how the old belt was put on. For more convenient work, two people are required. One of which will pull back the bolt, and the second will put the belt in place.
So, when the new one has been put in place, you can loosen the bolt and put all the protection removed from the engine back in place. This completes the replacement procedure. At the end of the work, it is worth checking its tension with special devices yourself or at a service station. And if it is loose, it is necessary to adjust the tensioner or replace the rollers, which, by the way, can also wear out over time when the vehicle is used.
Source
List of works during maintenance 4 (40,000 km)
Repetition of work provided for by TO 1 and TO 2, as well as the implementation of additional procedures. Namely:
Replacing the air filter. As an original filter, a filter with article number 1780121050 is used. The price is 1200 rubles.
Replacing brake fluid and hydraulic clutch (for cars with manual transmission). Any type of DOT4 is suitable for replacing TJ. The volume of liquid poured into the system is slightly more than one liter. The cost of the original brake fluid DOT 4, “Brake & Clutch Fluid”, art. 0882380112, 1 liter volume – 1000 rubles.
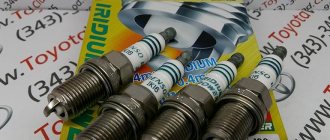
Replacing spark plugs.
- for 1NR-FE with a volume of 1.3 l and 1ZR-FE with a volume of 1.6 l, the original will be suitable - Toyota 90919-01253, price 1200 rubles. /PC. (in the original box there are iridium Denso SC20HR11 or SC16HR11 - 850 rub.)
- for the 4ZZ-FE with a volume of 1.4 liters - Toyota 9091901164 costing 260 rubles / piece. (Denso K16R-U11)
Checks are the same as during maintenance 2, plus monitoring the level of transmission fluid in the gearbox.
- Checking the level and adding oil to manual and robotic gearboxes.
- Checking the level and adding oil in the automatic transmission.
List of works for mileage 50,000, 70,000, 90,000 km
All work regulations provided for by Maintenance 1 - engine oil change and all related procedures.
List of works for mileage 60,000, 80,000, 100,000 km
A set of works provided for by the regulations of TO 1 and TO 2.
List of works for a mileage of 120,000 km
Perform all work from scheduled maintenance 4.
Replacing the Toyota Corolla alternator belt
Almost every fourth average vehicle owner has encountered a situation where an unfavorable combination of circumstances leads to actions that cannot be postponed. Drivers of Toyota Corolla cars are no exception, and this time we will consider what needs to be done in order to avoid breakage or wear of the alternator belt.
This problem occurs if the belt is too tight or, conversely, does not make good contact with the pulleys that depend on it. Such carelessness of the car owner leads to rapid wear of the above-mentioned part due to mechanical loads exceeding the norm. If this trouble does occur, then with a failed generator, the car will still be able to function for a short period of time due to the electricity remaining in the battery. But this additional “opportunity” can be fraught with consequences.
What causes a belt to break?
This happens due to the fact that the part of it that rotates in the direction of the driving pulley is stretched much stronger than when rotating in the dependent direction. As mentioned earlier, there is excessive load on the belt, which is the result of a break. In this case, the replacement of this part cannot be delayed even for a short period of time.
Advantages and disadvantages of the Toyota Corolla alternator belt:
- + withstands fairly high mechanical stress;
- + operates without unnecessary noise;
- + ensures uniform jerking;
- — short service life;
- — accelerated wear and the inability to drive a vehicle in case of insufficient belt tension;
- - gradual disruption of the functionality of the car due to constant additional load on the shafts and bearings due to excessive stress.
Review of analogues and original components
When selecting a belt for the E150 generator, it is recommended to pay attention to the original products from the company - class=”aligncenter” width=”628″ height=”392″[/img]
Dealer belts have a quality guarantee and are characterized by a long service life, which prevents the possibility of the product breaking when used at high speeds or in case of engine overheating.
| Manufacturer | vendor code | Compatibility by car year | Approximate cost, rub. |
| OEM | 16620-22032 | 2006-2014 | 1650 |
| OEM | 09916-02664 | 2006-2014 | 1660 |
| Novline | 1357022010 | 2008-2015 | 1560 |
| API | 25658528 | 2006-2017 | 1590 |
| TYG | 13506-0D020 | 2006-2018 | 1700 |
| TYG | 13540-0D010 | 2006-2018 | 1690 |
It is necessary to select belts by checking the vehicle VIN code and the spare part number for compatibility. If a non-standard model is installed on a car, it is advisable to choose a new belt of a similar form factor and degree of rupture.
Note! The front surface of the new belt must have a quality guarantee stamp and the name of the manufacturer.