A motorist should never forget that a car is, first of all, a technique, and it has the ability to break down, and, as a rule, always unexpectedly. Although can a breakdown be expected? When going on a long or short trip, you need to always be prepared for any surprises.
It could be a tire puncture or a brake fluid leak, or a broken alternator belt, so that these little things do not spoil the driving experience.
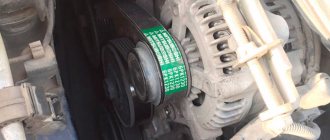
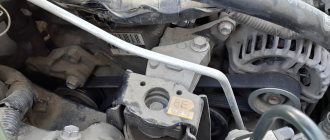
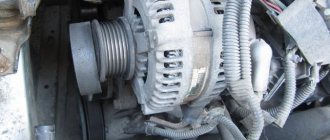
Drivers often observe this situation, namely a whistle from under the hood. The sound is especially amplified by the load on the machine's electrical system. For example, if the radio or hazard lights are on, or the high beams are on.
All this indicates wear or low tension on the alternator belt.
Replacing the Toyota Corolla (E150) alternator drive belt
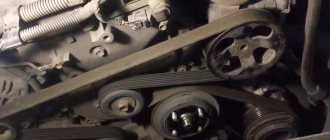
The generator, water pump and air conditioning compressor are driven by a serpentine belt.
In garage conditions, the belt tension is checked by pressing the belt branch between the crankshaft and generator pulleys. When pressed with a force of 100 N (10 kgf), the belt deflection should be 4-6 mm. If the belt is loose, it needs to be adjusted. The belt should be replaced if any tears, cracks or abrasions are found on it. Information relevant for Toyota Corolla (E150) models 2006, 2007, 2008, 2009, 2010, 2011, 2012, 2013 with gasoline engines 1NR-FE (1.33 l.), 4ZZ-FE (1.4 l.) and 1ZR-FE (1.6 l.). For tightening torques, see here On vehicles with 1NR-FE and 4ZZ-FE engines, an automatic auxiliary drive belt tensioner is installed that does not require adjustment.
Stages of work
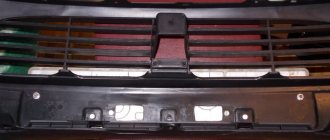
1) Remove the decorative engine cover. 2) Remove the front trim of the engine compartment (see here). 3) Disconnect the wire from the negative terminal of the battery.
4) Loosen the upper bolts. 5) and lower generator mounts. 6) Turn the adjusting bolt as far as possible and remove the old belt, moving the generator as close to the cylinder block as possible. 7) Place a new belt on the crankshaft, air conditioning compressor, water pump and alternator pulleys. After this, adjust the belt tension. To tighten the belt, move the generator away from the cylinder block by turning the adjusting bolt clockwise. 9) To loosen the belt, move the generator to the cylinder block by turning the adjusting bolt counterclockwise. Using a wrench, turn the crankshaft by the pulley mounting bolt two turns clockwise and check the belt tension again. Repeat the adjustment if necessary. 10) Tighten the generator mounting bolts.
To replace the accessory drive belt on the 1NR-FE and 4ZZ-FE engines, loosen the belt tension by attaching a wrench to the top shoulder of the tensioner and turning it either clockwise for the 4ZZ-FE engine or counterclockwise for the 1NR-FE engine, and then replace the belt.
Source
Procedure for replacing the belt:
1) the first and most important thing is to purchase a new belt.
2) then lay out the tools so that everything is at hand;
3) second, turn off the engine and remove the ignition key. Next, you need to open the hood and disconnect the negative cable from the battery;
4) the alternator belt is located to the left of the engine, so you need to visually inspect it again and make sure that it needs to be replaced;
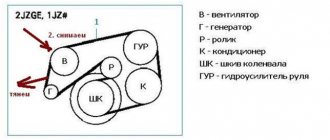
5) the main nuance of the entire procedure is to sketch or photograph the attachment points and location of the generator belt before removing it. This will eliminate the possibility of errors when installing a new belt;
6) then we proceed directly to the replacement.
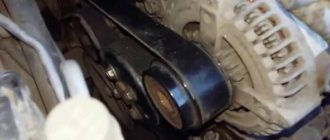
In order to remove the old belt, you need to loosen the tension. This is done by removing the tensioner bolt. This bolt does not need to be unscrewed at all; the belt will loosen immediately after turning the bolt;
7) visually compare the old and new belts, they must be identical;
if the belts are the same, we begin the installation process, the belt must be put on the pulleys;
9) using the tensioner bolt, we adjust the belt tension on the Toyota Corolla;
10) after all this, connect the battery and check that the installation is correct. To do this, we put a load on the car’s electronics. If the whistle is heard again, you need to increase the belt tension. Proceed carefully and with extreme caution so as not to break the belt.
After this, the alternator belt installation process is completed. If you act carefully and carefully, with a little effort, then this repair is quite possible to do yourself. The car is in good working order again and can be driven.
Belt Toyota Corolla Fielder (Toyota Corolla Fielder) price, photo
Since we didn’t have a crank, we made a lever from improvised materials.
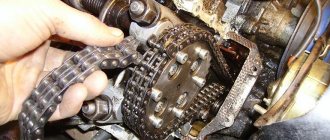
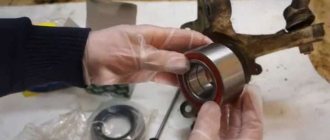
We eliminate the hum in the engine. Replacing the roller. Toyota Corolla E120.
One of which will pull back the bolt, and the second will put the belt in place. That is why, try to treat the replacement of this item with care.
To identify the car and reliably select the alternator belt for Toyota Corolla X E15 Sedan, you should carefully...
It must be checked for wear and possible damage. To check the reliability and correctness of the new belt, you need to turn on the car and load its electronics to the maximum: This is necessary in order to loosen the factory tension and remove it, as well as in order to subsequently put the new one in place.
The main rule when removing and putting on a belt is to remember how the old belt was put on.
Other articles
If you notice folds, bulges or peeling on the outside of the belt, this means that it has outlived its usefulness. When you need to change the Toyota Corolla alternator belt It is advisable to change the alternator belt every 50 km driven.
Do not try to save on purchasing a belt, since its price is affordable for everyone who owns a car, and failure to replace it in a timely manner may lead to aggravating circumstances, after which you will have to completely repair the entire car.
The belt may break even while the car is moving, but the car will not fail instantly; it will continue to operate until the battery runs out.
But it will run out very quickly, since it will not be supplied with electricity. That is why, try to treat the replacement of this item with care.
Undoubtedly, this procedure can be carried out independently, despite the fact that the speed of the car depends on the belt, even for a novice Toyota Corolla driver this will not be a problem. Replacing the alternator belt To replace the alternator belt on a Toyota Corolla, you must do the following: The alternator belt is located under the hood on the left side of the engine.
When the alternator belt needs replacing:
- if unusual sounds are heard from under the hood, the belt needs to be tightened or replaced;
- There is also a scheduled replacement of the alternator belt on the Toyota Corolla.
- It is carried out after the car has driven for about sixty or eighty kilometers;
- A broken alternator belt definitely requires replacement.
After making sure that the belt requires replacement, you need to decide how to actually change it. The easiest way is to go to a service station and a specialist will make a replacement. Or you can try to do it yourself.
The first time you need to take this seriously and understand how to change the alternator belt on a Toyota Corolla
.
More on the topic:
- How to choose the right tires for a car?
Review of analogues and original components
When selecting a belt for the E150 generator, it is recommended to pay attention to the original products from the company - width=”628″ height=”392″[/img]
Dealer belts have a quality guarantee and are characterized by a long service life, which prevents the possibility of the product breaking when used at high speeds or in case of engine overheating.
| Manufacturer | vendor code | Compatibility by car year | Approximate cost, rub. |
| OEM | 16620-22032 | 2006-2014 | 1650 |
| OEM | 09916-02664 | 2006-2014 | 1660 |
| Novline | 1357022010 | 2008-2015 | 1560 |
| API | 25658528 | 2006-2017 | 1590 |
| TYG | 13506-0D020 | 2006-2018 | 1700 |
| TYG | 13540-0D010 | 2006-2018 | 1690 |
It is necessary to select belts by checking the vehicle VIN code and the spare part number for compatibility. If a non-standard model is installed on a car, it is advisable to choose a new belt of a similar form factor and degree of rupture.
Note! The front surface of the new belt must have a quality guarantee stamp and the name of the manufacturer.
How to replace the drive belt yourself
To install a new belt, you will need a set of wrenches, as well as a wrench and a set of turning attachments.
Read more: 12 volt stabilizers
The whole procedure will take less than an hour and proceeds as follows:
- First you need to remove the protection to gain access to the rotary bolt that regulates the belt tension;
- Next you need to press out the bolt. You should not try to unscrew the part with keys or treat it with special liquids - dismantling will require a wrench or a rough lever;
- After releasing the bolt, the tension of the drive belt decreases, making the product easily accessible;
- The new belt is put on the pulley in the same way as the old one, and the fixing bolt is clamped with a lever.
Note! When installing the drive belt, it is important to pay attention to the location of the hooking elements - if installed incorrectly, the belt may come off or break when the gas pedal is pressed sharply.
If the belt tension is insufficient, the roller rollers will need to be replaced. It is recommended to change the drive belt on the Corolla E150 every 60,000 km, and roller rollers must be replaced every 100-110,000 km.
What to do if your belt whistles
The whistling of the drive belt is the first sign of wear and damage. Sometimes installing a new drive does not bring results, since the reason lies in damage to the pulley or idler roller. It is important to accurately identify the source to prevent similar breakdowns in the future.
What needs to be done: check the Corolla generator belt, its integrity, degree of tension, troubleshoot the shaft, inspect the pulleys, check for mechanical damage. You can replace the belt yourself, if you have experience and repair skills. There is no time for independent maintenance - entrust the work to service station professionals.
Replacing the alternator belt
To replace the alternator belt on a Toyota Corolla, you must do the following:
- The alternator belt is located under the hood on the left side of the engine. Be careful and avoid possible injuries and burns; before work, you must turn off the ignition and disconnect the negative cable from the battery. It must be checked for wear and possible damage.
- If there is no reason to worry, you need to check the tension level. Due to the weakening of the belt, it slips on the generator pulleys and shaft, which causes a very loud whistle. To properly check the belt, you need to press on it and tighten it slightly; to replace it, remove it completely.
- When checking the tension of the generator drive belt, the nominal deflection should be as follows: new - 7-8.5 mm; used – 11-13 mm; The power steering pump drive belt is as follows: new – 8-10 mm; used – 11-13 mm.
- It is important to know that the new alternator belt must be similar to the failed one, otherwise you risk damaging your vehicle.
- To remove a worn alternator belt, use a wrench to turn the tension roller clockwise to the side.
- A new belt purchased must be installed in exactly the same way as the previous one. Next, you need to tighten the belt using the tension bolt, but do not overdo it, as this is fraught with consequences.
- After finishing work, carefully check whether you have forgotten the wrench under the hood of the car.
- Connect the negative cable to the battery.
- To check the reliability and correctness of the new belt, you need to turn on the car and load its electronics to the maximum: turn on the headlights, air conditioning, music and hazard lights, then press the accelerator pedal. If the whistling continues, then the belt needs to be tightened further, but if not, then you have coped with the task perfectly.
Everything you need to know
The generator operates immediately after the car engine starts and continues until the ignition is turned off.
The generator performs a lot of functions:
- Recharges the battery;
- Provides engine ignition;
- Supplies voltage to additional electrical consumers in the car.
The principle of operation of the generator on the Toyota Corolla E150 is electromagnetic induction, as a result of which a magnetic flux passes through the copper winding of an electric coil and generates voltage. The output voltage synthesis is directly proportional to the rotation speed of the equipment.
Toyota Corolla III (KE) 1970 - 1981
Toyota Corolla generator guarantees the reliability, controllability, mobility and safety of your car on the roads. Original and branded spare parts are always available in warehouses at reasonable prices. However, speaking of repairs, even more important for driving safety is regular maintenance and timely repairs, subject to vehicle maintenance regulations:
- works well,
- does not lose its performance over long runs,
- more reliable and safer to operate
We make it easy to keep your car in good condition and provide great deals on our entire range of parts. Everything you need for service and repair can be found right here in our digital warehouses. Instead of endlessly searching for a retail auto parts store near you that doesn't necessarily have the parts you need, just pick up the phone and we'll deliver the auto parts you need to your door.
The main emphasis when selecting spare parts is based on the company’s experience.
It is profitable and safe to buy from us for a number of main reasons:
- Autocompas.ru is one of the leading online stores of auto parts, with daily traffic on the site of more than 30,000 people,
- Certified and reliable suppliers provide a full range of auto parts within access to their warehouses,
- The system has more than 500 suppliers and manufacturers who regulate prices with an eye on competitors and strive to make their goods more profitable to purchase.
Why look for a Toyota Corolla Generator anywhere else, wasting time? We have competent staff, payment, delivery and support services.
A special device is used to convert mechanical energy into electrical form. Generators of Toyota Corolla versions with body 110, 120 and 150 are three-phase type, with electric excitation, with a built-in rectifier unit. The voltage regulators included in them have an electronic operating principle.
Toyota Corolla E150 generator replacement and repair
The process of replacing a generator with your own hands is quite extensive, but will not cause difficulties. To repair equipment, you will need a slotted screwdriver, a set of wrenches, pliers and electrical tape.
Read more: Logan engine mount right
The procedure for replacing or restoring the functionality of the generator will take approximately 2-2.5 hours and can be performed with one pair of hands. To repair a generator on a Toyota Corolla E150 you must:
- Place the hood on the stop and turn off the power supply to the car by disconnecting the negative terminal from the battery;
- Next, you need to jack up the front of the car and remove the right front wheel, as well as remove the mudguards;
- Then we remove the decorative engine casing and its lining, after which access to the generator opens;
- Near the device, disconnect the electrical connector and remove the cover. To do this, you need to loosen the wiring harness with pliers, and after disconnecting the latch, disconnect the power wire;
- Now we loosen the drive belt to the required level and remove the product from the pulley;
- Next, all that remains is to unscrew the fixing screws on the mounting brackets and the equipment can be removed.
The dismantling procedure ends here: if it is not repairable, the generator must be replaced with a new model and the equipment must be installed according to this algorithm in reverse order.
How to remove a Toyota Corolla generator
Here is the sequence of steps to remove a faulty generator:
- jack up the car, remove the right front wheel;
- snap off the right and lower mudguards of the power unit;
- remove the decorative casing;
- unscrew the front trim of the engine compartment;
- disconnect the negative terminal of the battery;
- we take out the chip of the wires going to the generator;
- remove the generator power cable by slightly opening the protective cap and unscrewing the fastening nut of the wire end;
- Using the tension bolt, loosen the belt tension and remove it from the generator pulley;
- unscrew the two bolts securing the generator (top and bottom), pull it out of the engine compartment.
Now you can start disassembling the Toyota Corolla generator to determine which unit is problematic.
To do this, unscrew and dismantle the back cover, and then remove the insulating sleeve that protects the power contact of the generator.
Let's start checking the brushes, diode bridge, and the integrity of the rotor and stator windings.
Rotor check
Carefully inspect the contact rings. If there are contaminants, they must be removed using any solvent. After cleaning, we examine the inner surface of the rings for scratches and burrs; if any, the rings need to be sanded. For example, using grinding paste.
Now you can start checking the integrity of the insulation. The diagram for connecting a multimeter to a Toyota Corolla generator in resistance measurement mode is as follows: we connect one contact of the device to the ring, the second to the rotor core. If the device shows infinity, this indicates an insulation break. When connecting the multimeter leads to slip rings, the resistance value should be in the range of 3.5-3.7 Ohms. If the device goes off scale, there is a short circuit; if it is zero, there is a break in the insulation.
In any case, independent repair of the winding is impossible, that is, the part must be replaced.
Stator check
A short circuit in the stator insulation can usually be noticed even externally, since this causes strong heating of the wires and the insulation melts. If no visible defects are found, you need to use a multimeter to check the integrity of the stator winding. Nominal resistance values are in the range of 0.1-0.12 Ohm. If the device shows infinity, there is a short circuit, if zero, there is a break in the insulation, the stator needs to be changed.
Checking the diode bridge
To do this, you need to test it with a multimeter, connecting one contact of the measuring device to the diode under study, and the second to the terminal of the rectifier unit. Then we swap the contacts. If the diode is working properly, it will pass current in one case and not in another. If this is not the case, then the diode bridge is faulty. We connect and check other diodes in the same way. If at least one burns out, the diode bridge requires replacement.
How to repair an old generator on E150
To repair old electrical equipment, you will need the same set of tools, as well as a hammer and an electrical tester. Repair work on components begins with a complete inspection - first you need to check the integrity of the windings: the presence of a break indicates a failure of the rotor. The tester should show a resistance of 2.45 ohms, the infinity icon on the display is a sign of a break.
You should also check the diode rectifier unit - by connecting the tester in parallel, you need to check the ability to transmit current separately in each direction. If the circuit operates in both directions, the diode unit must be replaced.
Next, you need to replace the generator brushes - the protrusion of the components in a free state should not exceed 5 mm. The procedure for replacing components on a generator involves removing the top retaining screws and removing the insulation, after which you can disconnect the internal wiring and remove the equipment components.
The collection of components is carried out using the reverse algorithm - if there is no experience in repairs, it is recommended to sketch or photograph the generator circuit at the time of disassembly. Repairing a generator on an E150 with your own hands will allow you to save a lot on maintenance at a service station and gain experience - cases of electrical equipment failure on the road are rare.
Main nuances when replacing the alternator belt on a Toyota Corolla
The first and most important nuance is choosing a suitable replacement part. Before purchasing, you should consult with a specialist in this field. This is necessary so that he can explain to you which ones are better, what their advantages are, and finally help you decide and choose the appropriate belt for your Corolla, as well as for its engine model. Depending on the engine model - length, width, its density - may vary.
The second point is when you have already purchased the necessary belt. This is its correct installation and tension. Any experienced driver will tell you that the tension between the generator and the engine greatly affects its service life. Thus, excessive tension will lead to rapid wear and failure, as well as shutdown of the generator. After all, if there is no belt, then the generator, which is an attachment that depends on the engine, is useless and only adds weight. This creates a huge problem - not a single car electronic system can function for a long time on battery power. Thus, it is necessary to correctly calculate the tension and correctly install it at your workplace. Next, let's look at step-by-step instructions for replacing it.
Source
Features of the alternator belt
One of the advantages of the belt is its ability to withstand large overloads; it also has a silent design and smoothness of jerks. The pulleys help drive the power steering pump, alternator, water pump, and air conditioning compressor.
But the belt also has disadvantages, the most important thing being its short service life. Also, if the belt is poorly tightened, this leads to its rapid wear and the inability to operate the machine normally. When the belt is under high tension, this creates additional stress on the shafts and bearings. Accordingly, after all this, the car begins to gradually fail.
In order for your iron horse to work properly, you must constantly check the condition of the alternator belt. There should be no cracks or drops of oil on it.
To check the state of the belt tension, it is necessary, with the car turned off, to press your finger on its free branch, applying a force weighing approximately 6-12 kg. If the belt bends 7-10 cm, then everything is in order. If you notice folds, bulges or peeling on the outside of the belt, this means that it has outlived its usefulness.