Many car enthusiasts have encountered the need to remove the front bumper from a Toyota Corolla in the back of an E150. The reasons for taking this action can be very diverse. But almost any car enthusiast is able to complete the process independently and without the participation of a car service .
Video about removing the front bumper on a Corolla E150
The video will tell you how to quickly and effortlessly remove the front bumper from your car.
The process of removing the bumper on a Toyota Corolla E150
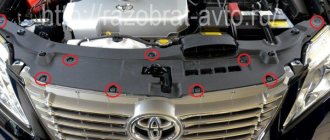
Technical diagram of the front buffer mounts.
Removing the front buffer from the Toyota Corolla E150 is quite simple.
To complete the process, you will need a minimum set of tools, namely: a flat-head and Phillips screwdriver, as well as a 10-mm socket with a ratchet.
Exact algorithm
When everything needs to be assembled, you can proceed directly to dismantling the front protective decorative element:
- We place the car on a flat surface for ease of work.
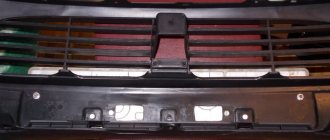
- First, you need to dismantle the elements that interfere with the dismantling of the buffer. Such a detail is the radiator grille. To remove the spare part you need to unscrew three mounting screws. Open the hood. We find the radiator grille mounting bolts... ...unscrew the left bolt... ...then the right one... ...and the one behind the radiator grille.
- Now, you can proceed directly to removing the buffer fasteners.
First, unscrew the central fastening to the central cross member of the front body panel. Unscrew the central bolt securing the bumper. - Now, on the right and left, behind the mudguards, there is one mounting bolt. We unscrew the front fender liner on each side and move them aside. You can then see the mounting screws that hold the buffer in place. We unscrew them. We unscrew the fender liner... ...move the plastic... ...and unscrew the fastening screw.
- Now on the lower edge of the bumper it is worth unscrewing one bolt on each side. Location of the lower bumper mounting bolt. Location of the lower bumper mounting screw on the edge.
- We remove the bumper from the mounting on the sides.
After that, pull it towards you, and it should be easily dismantled. The front of the car without the front buffer.
Removing the rear body kit
There are also situations when you need to replace the rear bumper. On the global Internet you can find many videos showing how to remove the bumper. In order to dismantle the rear body kit on Toyota Corolla cars E120, AE101, E150 and Fielder, you need to carry out the following series of actions:
- Open the trunk.
- Fold forward the carpet located at the bottom of the luggage compartment.
- Remove the mudguard assembly with the fender liner.
- Slightly move the trim and remove the body kit mount from the fender liner
- On each side from the bottom you need to unlock the fasteners with a screwdriver.
- After these steps, you can begin dismantling the fastening elements located in the center.
- Afterwards, you should unscrew the screws that secure the connection between the trunk and the body kit (there are two of them, and they are located on the outside).
- Now the body kit can be slightly pulled away from the car body. It is pulled near the fenders of the car, on each side.
- Also behind the fender liners, pull the edges of the bumper and it will hang down. All that remains is to carefully unlock the brackets and remove the part.
READ How to install a window lift cable on a VAZ 2107
Catalog number
Original unpainted bumper article number 52119-1F370.
52119-1F370 – original catalog number of the front buffer for Toyota Corolla E150.
The average cost of a product is 12,000 rubles.
From disassembly
Usually, when a part is completely destroyed, motorists do not buy a new one, but try to find a used one in good condition, and then repaint it in the color of the old one. The average cost of a supported buffer is 6000-7000 rubles.
Reasons for dismantling
The reasons why the front bumper on a Toyota Corolla is removed are quite typical and common. Often, this is done to repair or install additional equipment.
Let's look at the main reasons why you need to remove the front buffer of a car:
- Damage to a car part. In this case, the cause is usually a trivial accident in which the buffer is damaged or destroyed. This also includes dismantling for the purpose of painting or restoration.
- Dismantling the front buffer for the purpose of repairing or replacing parts that are located under them.
- Installing additional equipment will also require removing the bumper. In this case, we mean the installation of fog lights or additional lighting or other parts. Also, this category includes changing the bumper to a tuning version.
Choice
It is important to know that stores offer a wide selection of rear and front bumpers for Toyota Corolla from different manufacturers, years, etc. Most often, bumpers are from an OEM company, which produces exclusively original products. Among non-original manufacturers, TYG is popular.
Let's look at some of them:
From OEM manufacturer (original products):
- Rear for E150 sedan 2006: spare part number - FD-36451, original number - 5215912934;
- Rear for E120 from 2010: spare part number - FD-36450, original number - 5215912941;
- Front for E150 from 2006: article - FD-36395, original number - 5211912942
- Front with holes for headlight washers 2010 E120: article number - FD-36397, original number - 5211912962
From the manufacturer of non-original products (TYG):
- Rear 2002-2004 for E120: article - FD-71845, number: 521591A920;
- Front E120 2005: article - FD-71852, original number - 5211912935;
- Front E150: spare part article - FD-77891, order number - 5211912946;
- Rear E150: spare part article - FD-52501, order number - 5215912941.
In different stores prices vary from 2000-20000 rubles. The average cost of original bumpers is 13,000 rubles.
Front bumper
-under the hood, unscrew the screws and take out the clips (twisted and inserted from top to bottom) and remove the radiator grille
-under the grille take out the clips (inserted from top to bottom)
- along the perimeter of the lower part, unscrew the screws and take out the pistons (twisted and inserted from the bottom up) that secure the bumper to the protection
-turn the wheels to the left or right, depending on which side we will disassemble first
-in the wheel arches we take out the clips and turn out the screws
-with an assistant, release the corners from the latches in the wings and remove the bumper from the guides toward you
-remove the connector from the fog lights (if any)
-remove the connector from the parking sensor (if any)
-if there are headlight washers, disconnect the hoses (to prevent the liquid from leaking onto the ground, you should prepare a special container)
Disassembling the front element
To disassemble the Toyota Corolla bumper, you need to:
- Open the hood of the car.
- The next step is to remove the radiator grille; to do this, you need to unscrew the bolts with the rubber cover, as well as the other fasteners holding the radiator grille.
- The grille should be tightened and the latches holding it in place should be unlocked.
- The Toyota Corolla bumper rests on a special clamp located in the center. She is holding a car body kit.
- The next step will be to disassemble two more fasteners; they are located under plastic protection, above the front wheels. To make the process easier, it is better to use a wrench with a head.
- Self-tapping screws are screwed in from below on each side; they should also be unscrewed.
- There is a metal strip under the front of the case.
The part is attached to it using plastic fasteners. To remove them you will need a flat head screwdriver which you can use to grab the latch and pull it out a little and pull it down.
- The last step in disassembling the Toyota Corolla bumper is to remove the part from the car. To set, you need to lower down and gradually remove, starting with the correct headlight.
Rear bumper
-open the trunk lid and unscrew one screw on each side in the opening
-in the wheel arches, unscrew the screws and take out the pistons that secure the fender liners
-behind the fender liners, unscrew one screw on each side (twisted from bottom to top)
- along the perimeter in the lower part, unscrew the screws and take out the caps (twisted and inserted from the bottom up)
-with an assistant, release the bumper from the latches in the wings and under the rear lights
- pull it off the guides towards you
-remove the connector from the parking sensors (if equipped)
Conclusion
Removing the front buffer from a Toyota Corolla E150 is quite simple and you don’t have to contact a car service center for this. So, for dismantling you will need a minimum set of tools and skills.
The following two tabs change content below.
Experienced car enthusiast. I have an automotive education, namely: an engine repair mechanic. At the beginning of my career there was a VAZ-2107, then a BMW 5-series, a Toyota Supra and a right-hand drive MARK-2. Now the family has 2 cars: Peugeot 407 and Dodge Challenger 2021. I study each car from “A” to “Z”. I have a lot of experience and try to repair everything with my own hands.
OUR REAL WORKS! “NOT DOLLS”!
The cost of the work was:
Front bumper (removal/installation) — RUB 1,500. Front bumper (repair) — RUB 2,000. Front bumper (painting) — RUB 6,500. Front right wing (repair) - 2,500 rubles. Front right fender (painting) - 6,500 rubles. Right windshield pillar (painted) — RUB 3,500. Car wash - 500 rub.
The price is indicated on a turnkey basis (labor + materials).
The cost of the work was:
Front bumper (replacement) — RUB 1,500. Front bumper (painting) — RUB 6,500. Front right fender (replacement) - 1,000 rubles. Front right fender (painting) - 6,000 rubles. Right wing mounting bracket (repair) - RUB 2,000. Right wing mounting bracket (painted) — RUB 1,250. Front panel (repair) - RUB 2,000. Front panel (painting) — RUB 1,250. Front fog lights (installation) — RUB 1,500. Car wash - 500 rub.
Front bumper of Toyota Corolla E120: the main differences between the restyling and the pre-restyling
The manufacturing company modified the front bumper on the E120 to improve aerodynamic characteristics, which increased the downforce acting on the car when reaching maximum speed. Among the main changes to the bumper for the Toyota Corolla E120 are:
- The presence of a hidden air intake in the center of the part - to stabilize the pressure of oncoming air masses at cruising speed;
- Increasing the overall width of the bumper - the modernization made it possible to improve the streamlining of the body, which had a beneficial effect on the maneuverability and controllability of the car;
- Reducing the weight of the part - the use of less material in the manufacture of the reinforcing beam ensured a reduction in the weight of the finished specimen without loss of strength properties;
- Increasing the slope of the front wall of the part - tilting the wall at an obtuse angle increased the air flow to the radiator, resulting in an increase in the efficiency of the cooling system.
Despite the structural differences, the restyled version of the front bumper is designed on the basis of the old model, which ensures the interchangeability of parts: the E120 body requires the installation of both versions. Pre-restyling and restyling of the bumper have the same number and location of fixing elements, as a result of which the cost of producing components has decreased, and repair and restoration work has also been facilitated.
Bumpers on the E150: the main differences between the updated version and the restyled version
The design of the Toyota Corolla has undergone a lot of modernization, which also affected the front bumper. The main differences between the original pre-restyling models and the E150 restyling are:
- Form factor - the restyled version is characterized by improved streamlining, which has improved the aerodynamic characteristics of the car. This innovation increases downforce and promotes rarefaction of oncoming air masses, resulting in improved vehicle handling when reaching cruising speed;
- PTF location - the fog lights on the restyled version are brought closer to each other, resulting in better lighting: the light beam has a pronounced directionality, which prevents the possibility of blinding oncoming traffic;
- Reinforced fastenings - fixing supports provide greater strength, which makes it possible to increase the service life of components: the fastenings of the pre-restyling version wear out quickly due to high vibration load;
- Energy-absorbing base - the design of the reinforcing beam is characterized by greater shock absorption, which allows it to withstand increased pressure in a frontal collision.
The factory tuning of the front bumper for the E150 is of a purely technological nature, which made it possible to increase the controllability and maneuverability of the vehicle. Visual changes to the modified bumper have virtually no effect on the car's exterior - to style the car's design solution, you will have to install non-factory versions.
Despite the design features, the restyling and pre-restyling models of the front bumper for the E159 are interchangeable and can be installed on cars of their own generation, regardless of the year of manufacture. Compatibility has made it possible to increase the reparability of the vehicle, as well as reduce the cost of original components.
How to choose a front bumper for a Corolla E120: review of analogues and original models
When choosing a front bumper, you need to take into account the type of car body and the material used in the manufacture of the part. The most popular options are:
- Plastic - the part is a plastic body fixed to a reinforcing beam. This product is characterized by low cost, but becomes completely unrepairable in the event of mechanical damage. A plastic bumper is installed from the factory on minimally equipped cars or by owners to restore the aesthetics of the car;
- Galvanization is a metal part coated with a layer of zinc, which increases the strength and resistance of the structure to moisture. A galvanized bumper has the highest cost, but can withstand more than one year of use;
- Carbon fiber is an expensive option and represents the best balance between strength and weight. Installed as an aerodynamic body kit when tuning a car.
When purchasing a front bumper, you also need to take into account the body architecture: installing an aerodynamic body kit on a stock body may not be effective or may have a completely opposite effect.
| Manufacturer | vendor code | Part material | Body type compatibility | Compatibility by car year | Approximate cost, rub. |
| Novline | 60204091 | Plastic | Sedan/station wagon | 2001-2007 | 4650 |
| OEM | 521191E917 | Galvanization | Sedan/station wagon | 2001-2007 | 7200 |
| Novline | 28000032 | Plastic | Sedan/station wagon | 2001-2007 | 5200 |
| API | ap-0000805582 | Plastic | Sedan/station wagon | 2001-2005 | 4900 |
| API | ap-0000805624 | Carbon fiber | Sedan/station wagon | 2001-2005 | 7400 |
| TYG | TY04181BA | Galvanization | Sedan/station wagon | 2001-2007 | 8300 |
| TYG | TY04267BA | Galvanization | Sedan/station wagon | 2001-2007 | 8450 |
Note! Depending on the year of manufacture of the car, original components may differ in size, as well as in the number and location of fasteners. To select the correct part, it is recommended that before purchasing, check the components according to the VIN number of the vehicle with the article numbers for compatibility on the official website of the manufacturer.
If you purchase a bumper with an unsuitable design, it is advisable to return the part to the store - independent fitting of the spare part can disrupt the aerodynamic characteristics of the car, as well as cause the development of a corrosion center due to moisture accumulation.
Is it worth installing xenon?
Bilinza is a very popular solution: it is installed as standard headlights without any modifications, so you do not need to buy new optics. You can choose SVS lenses designed to fit 2.5 inches, can fit 3 inches, it is recommended to measure which lens fits before purchasing. The more lenses, the better. The kit should include a special lamp (suitable for H1) and a cigarette lighter, you can install Optima, it is of decent quality and an affordable price. The original headlights do not need to be changed, only their internal contents.
Having installed the above equipment, you will immediately notice an improvement in light dynamics and the appearance of a clear boundary of light. Unlike diode rings, lighting is effective not only in the dark, but also at dusk and does not attract the attention of the traffic police.
Tip: If your car doesn't have auto leveling, you'll have to lower your headlights to the middle position when climbing a mountain, otherwise you'll blind oncoming drivers.
Toyota headlights and Toyota Corolla E120 and e110 headlights from 1999 to 2006 and 2007 are well suited for such changes.
Is it worth buying a bumper from disassembly: everything you need to know
Purchasing components from the secondary market will allow you to save a lot on vehicle repairs - the cost of used spare parts is significantly lower than new parts. However, when purchasing a bumper, you need to fully check the quality of the product - the most popular parts on the secondary market are:
- Parts from car disassembly – cars sent for recycling are pre-disassembled for resale of components. When purchasing parts from a disassembly site, it is important to take into account the history of the car: parts after an accident may have microcracks that reduce their strength properties, and a sunken car may have low anti-corrosion properties;
- Analogs of competing models are the best option, allowing you to save money without losing quality. Competing companies produce parts of proper quality at a cost lower than original components, which is explained by the absence of the need to pay taxes;
- Chinese replicas are parts with low cost and unstable service life. Replicas of the front hood may disrupt the aerodynamics of the vehicle or damage elements of the engine compartment during vehicle operation. Often replicas are installed before the car is sold.
Purchasing components on the secondary market eliminates the right to free service under the concluded warranty agreement, therefore it is not recommended to install used spare parts during the first three mandatory maintenance periods.
Removing the front bumper of a Toyota Corolla
Now we will describe step by step the steps to remove the front body kit of a Toyota Corolla:
- Open the hood.
- Unscrew the protective panel above the bumper.
- In front, above the radiator, there will be self-tapping screws (2 pieces), they need to be unscrewed. These screws are located closer to the front of the car (not to be confused with the bolts screwed a little further through the eyes).
- We unscrew the screws (2 pieces), which are also located on top and attached through metal wedge-shaped plates.
- It is also necessary to remove the bulges along the length of the bumper (they look like large, thick nails). It is advisable to leave one button in the center so that while you unscrew everything else, the bumper does not move.
- Next you need to provide access under the car.
- Along the edge, at the bottom, there are six self-tapping screws that need to be unscrewed.
- Now you need to move up to the front wheel. Here, at a distance of about 20-30 centimeters from the lower edge of the wing, there is a clip that needs to be snapped off using a screwdriver.
- On the other side of the Toyota we do the same.
- Now the front body kit element is free.
- We take out the bump left in the center and the bumper should move forward a little under its own weight.
- We start the removal from the Toyota fender. There are about four latches located here.
- Applying force to the edge near the wing, we try to remove it.
- When removing the front bumper of the Corolla, you need to pull it towards you.
- Having done this operation on each side, the front body kit will be freed.
Step-by-step instructions for removing the front bumper on a Toyota Corolla
First of all, we need a set of tools. It can include various screwdrivers, wrenches from 8 to 17 mm, and so on. In addition, a rag will be useful, which we will use to wipe dirty surfaces. In general, before removing the bumper, it is best to wash the car - this will keep your car’s paintwork safe and sound, without scratches or abrasions.
We washed the Toyota Corolla. Raise the hood and take out the tools. We will need to unscrew 6 bolts and screws. Having done this, you will remove the plastic protection or, as it is also called, the visor above the radiator. In the photo they are highlighted with red ovals.
After this, we will need to unscrew 6 more bolts and screws that hold the entire upper perimeter of the bumper on the Toyota Corolla. By the way, it is worth noting that all Toyota Corollas have almost the same mounts, including Fielder.
With the bumper mounts at the top of the car removed, let's move on to the bottom of the front bumper. We take a 10mm wrench and carefully unscrew the bumper fastenings at the bottom - there are only 6 bolts. Also, don’t forget about the rotating clips on the arches, which can be removed using a Phillips screwdriver; turning them 90 degrees, they easily come out of their fastening points.
After all the fasteners have been removed and unscrewed, carefully pull the bumper, first on the sides, then in front - towards you as the car moves. The photo shows the places where you initially need to remove the Toyota Corolla bumper from the latches, and only then pull it towards you.
So, the bumper has been removed. Next, let's look at the simple process of installing a mesh on a Toyota Corolla. First of all, we need to buy mesh and copper wire. We will also need metal scissors, wire cutters and pliers.
You can buy a similar mesh at a car store. It doesn't cost much. The procedure is very simple - we take the mesh, apply it to the inside of the front bumper, the most important thing here is that it is positioned evenly, and finally, we screw it around the perimeter with copper wire. The wire should be tightened tightly so that the mesh does not dangle or rattle.
We do the same with the other mesh. When both meshes are completely screwed, you should cut off the remainder - leaving a few centimeters on each side. We carefully fold the remaining edges around. At this point, the mesh installation procedure is completed, the bumper can be installed in its place.
As we can see, everything worked out as a result, the car began to look better, and most importantly, the installed mesh will effectively resist debris.
Top
Toyota Corolla - Prices for work
Regular qualified maintenance will allow you to constantly maintain such qualities as performance, safety and reliability that the designers incorporated into your Toyota Corolla car. This will also help you maximize the value of your investment in the car.
How to remove the front bumper of a Toyota Corolla
| Usefulness – 69% | Print |
Removing and installing the Corolla front bumper is not difficult. The scheme is the same for all models 2006, 2007, 2008, 2009, 2010.
We will need: a minus screwdriver, a Phillips screwdriver and a ratchet wrench with a 10mm head.
It is advisable to carry out removal and replacement in a pit or overpass. Take care of this in advance and spread something soft and clean on the ground so that after removal you can put the bumper there.
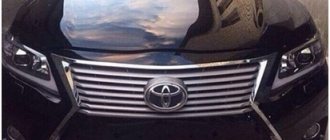
Silver Toyota Corolla
If during the process the location of the bolts is not clear, we check it with this diagram. The diagram applies to our bumper.
Bumper mounting diagram
Open the hood. The first step is to remove the central chrome grille. Unscrew the two bolts with the rubber casing at the edges as in the photo.
Bumper Grille Mounts
And another bolt in the center.
Attaching the grille in the center
After this, move it towards you and remove the grille, which is secured to the grooves at the bottom.
Under the grille we will see the upper bumper mount. It is connected in the center with a plastic bolt. You need to unscrew it by prying it up.
There is no need to completely remove the bolt. Let's leave it hanging on the bumper, the main thing is that the connection is freed.
Bumper mount under radiator grille
We lower it to the car arches under the front wheels. In the arches we bend the plastic protection under which there will be a bolt holding the bumper on top. Unscrew on each side with a 10mm ratchet wrench.
Bumper mounts under the arch
Bend the arch protection
In the same places but at the bottom of the bumper, unscrew one more screw on each side. We spray it with a bucket if it doesn’t come out well.
Bumper mounting diagram
Bolt under the bumper in the corner
Now on the front side of the bumper, below the bumper, there will be a mount holding the bumper with an iron body beam. The bumper is attached to it with two plastic bolts.
We pull them out with a screwdriver to minus.
Bumper mounting diagram
Bumper mounting bolt at bottom center
Now let's remove the bumper. First, we separate it from the wings, then, standing in front, we take it out of the grooves under the headlight.
Car without a bumper
What do you need to know when replacing a bumper yourself?
Despite the simplicity of the replacement algorithm, there are several rules that will allow you to install a new part efficiently and cost-effectively. To ensure that the installation of components does not aggravate the repair, it is recommended:
- Before replacing a part, it is advisable to buy plastic pistons - the fixing latches easily break, which reduces the reliability of fastening the components. To prevent damage to the pistons, it is recommended to unclip the latches with a slotted screwdriver after wrapping the tip with electrical tape;
- Also, during installation work, it is advisable to install a reinforcing beam on the body frame, which will increase the energy-absorbing properties of the bumper and reduce the amount of damage to the car in a collision;
- Tape the bumper around the perimeter with tape, electrical tape or masking tape - this step will prevent accidental damage to the paintwork of the bumper and hood of the car, and will also reduce the risk of breaking through the radiator grille.
Following these rules will help you quickly complete repairs and get your car ready for use. Installing the front bumper yourself will give you confidence in the safety of the car and will allow you to save on service costs - the cost of installation at a service station reaches half the price of new components.
Removing and upgrading a bumper on a Toyota Corolla: step-by-step instructions
Every motorist, sooner or later, makes various improvements to his car, takes care of its appearance and technical condition. In this article we will talk about how to remove the front bumper on a Toyota Corolla and make an easy upgrade by installing a mesh on the radiator grille.
In fact, this is not at all difficult to do and you will only need a couple of hours and tools to remove the part, improve it and put it back in place. A mesh is installed on the radiator grille to prevent debris from entering the car's engine compartment - this solution allows you to leave the radiator clean and tidy, protecting it from leaves, dirt, flies and other insects. So, let's get down to the fun part - disassembling the car.