Cars admin26.02.2020
How to remove a Toyota Corolla radio
Installation in TOYOTA COROLLA 120 body 720×540
Toyota Corolla. Removing the radio and Installing the YATOUR USB adapter.
Installing AUX on Toyota Corolla radio.
USB MP3 changer for toyota head unit
Disassembling the control panel TOYOTA COROLLA SW 2002
How to disassemble the instrument panel on a Toyota Corolla e12
Installing a Chinese radio in a Toyota Fielder
The options for the Toyota Corolla are constantly changing. If in 2006–2008 the Japanese could offer a not very functional filling compared to other manufacturers, then the models of recent years (starting from 2014) are not only reliable, but also an interior with modern devices, among which the Toyota Corolla radio deserves much attention . This is a universal gadget that is a collection of creative technical solutions and is ready to offer the user not only high quality sound and a flash drive connection, but also navigation functions, as well as other additional options.
How to remove the radio on a Toyota Corolla?
Almost every driver pays special attention to the audio system installed in the car, and if there is none, then he installs it in his car himself. In this article we will talk about how to properly remove the radio from a Toyota Corolla, as well as how to replace the standard one with new, more serious equipment. In our case, we will install a multifunctional radio tape recorder capable of playing all known music formats, as well as the most common video formats.
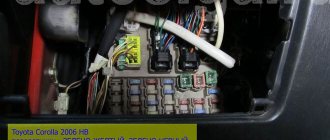
The name of the head unit is Phantom DVM-1733G HD-i. And we will install it in a 2009 Toyota Corolla. Of course, you can install common Android, but it would still be better to choose us, since it has a number of advantages. What is distinctive is that this model of the head unit has the ability to access the Internet when a modem is connected. So, let's begin the process of removing the factory radio on a Toyota Corolla. In fact, this is not difficult to do at all. By the way, here is a photo of the factory radio that is installed in the car.
Dismantling a standard music center
Often, standard head units (aka radios) are removed using the method described above, since they are attached to 2 or 4 clips. For example, the factory player on a Lada Priora car is held on by two latches, and to unlock them, thin steel strips must be inserted between pairs of radio channel switching buttons “2” - “3” and “5” - “6”.
Advice. Before you start disassembling the factory radio, find out about the method of its fastening, so as not to poke the pieces of hardware at random if you do not find technological openings.
In Priora, stripes must be inserted between the buttons
To remove car radios that are fastened with screws, you need to prepare a simple set of tools:
- thin flat screwdriver or knife;
- Phillips screwdriver;
- set of small sockets (from 6 to 10 mm).
With this mounting option, the factory turntable must be unscrewed using the heads
On different brands of cars, standard players can be mounted in different ways, but the principle is approximately the same: the device is screwed to brackets that are covered from the outside with a plastic lining. As an example, we propose to consider removing the radio on a Korean Hyundai Solaris car, performed in the following order:
- Use a flat-head screwdriver or knife to pry up the lower corner of the plastic decorative panel framing the stereo. Pull the edge and grab it with your hand.
- Gently pull it towards you and release the first latch, and then move around and unlock the rest.
- Holding the panel with both hands, remove it and, if necessary, disconnect the connectors located at the bottom.
- Unscrew the 4 mounting screws with a Phillips screwdriver and pull out the radio.
Factory car radio Hyundai Solaris
Advice. When dismantling any player, do not rush to disconnect the battery from the on-board network, since the device will power down in 10-15 minutes. It may be blocked and the next time you turn it on, it will require you to enter a security code that you do not have.
Step-by-step instructions for removing the radio on a Toyota Corolla
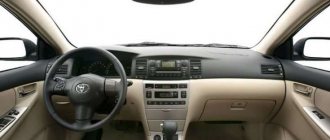
In fact, removing the standard radio is not so easy. You will have to unfold half of the central panel in order to get to the radio itself. Toyota's standard radio is unremarkable. Standard sound, no amenities, supports a small number of formats, of course, every self-respecting driver will want to replace it.
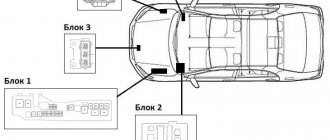
First we need to remove the silver trim. They are located on both sides of the central panel. Let's start, perhaps, on the right side. They are all held on with a latch. And to remove them you will have to pry off each of them - we used a special plastic knife or spatula in order not to damage the surface of the linings. The covers are removed from bottom to top. You need to pry from the outside of the panel. Let's look at the photo and everything will become clear.
Next, carefully pull towards you and remove the center panel trim of the Toyota Corolla. Place it aside. The result is the following - look at the photo.
We perform the same actions on the other side - the left. We also pry up the bottom trim and carefully remove it, then put it aside. We look at the photos, in principle, nothing has changed radically.
Next, we proceed to removing the upper linings, the removal principle is the same, but you should pry it off from below. Once you see the photos, you will understand everything. The same actions should be performed on the other side.
Having removed the covers, for your greater convenience, we decided to photograph the locations of the latches from the back side. The photos below should help you. There are four latches on each pad. They are highlighted with arrows.
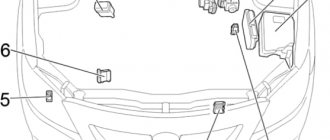
After all four pads are removed, we begin to remove the air duct - the top one. To do this, we grab it with both hands - left and right, and then gently pull it towards ourselves. Everything is very simple. Let's look at the accompanying photographs.
Before pulling it out completely, you should carefully disconnect the hazard light button connector. In the photo, the connector is highlighted with a red circle.
After the air duct is pulled out, we turn our attention to where the Toyota Corolla air duct latches are located. They should remain on the panel and not in the seats.
Here it is worth saying that the disassembly process is almost complete, but now we need a tool 10 key, with which we will unscrew the four bolts holding the radio. In the photo, each bolt is marked with an arrow. So you don’t have to look too hard. Next, look at the photos and use the photos to unscrew the bolts.
After the bolts have been unscrewed, carefully pull out the radio unit towards you. This is not difficult to do, much the same as with an air duct. We take it with both hands and pull it towards ourselves.
After the radio is almost pulled out, carefully disconnect all the wires going to it, try not to damage the plugs, there is no need to pull anything, just carefully remove it. You can wrap the radio with a soft cloth to prevent it from scratching the surface of the interior and center panel.
This completes the disassembly process. We can say that the Toyota Corolla torpedo is waiting for its new guest. Let's look at the photo of the work done.
How to remove the radio without keys?
If standard keys are lost, you need to make homemade ones, focusing on the shape of the slots. To see them, remove the device’s removable panel and plastic frame. Here is a list of available tools with the help of which owners of various cars manage to unlock the latches:
- thin steel strips 6-15 mm wide;
- stationery knives;
- plastic clamps for electrical wiring;
- nails and straight wire - for round holes;
- thin screwdrivers and other similar items that fit the shape of the cracks.
These steel strips can be used instead of keys
Reference. In many radios, the mounting slots are visible from the outside, so there is no need to remove the front panel and plastic frame.
The first step is to remove the front panel of the radio.
To remove the car radio, use the same algorithm:
- Insert first one and then a second strip of thin metal (or a utility knife, thin screwdriver) into the technological opening. Feel each latch unlock.
- If the turntable is supported by 4 clips, insert four instruments.
- Slowly remove the radio from the niche at the same time as the improvised keys.
The strips need to be inserted into the side slots
Advice. When using steel strips to open latches, be sure to wear cloth gloves to avoid cutting your hands on the sharp edges.
The music center is removed along with the strips
Installing a new radio on a Toyota Corolla
You can install absolutely any radio suitable for Toyota Corolla, including head systems on Android, etc. However, we chose the Phantom DVM-1733G HD-i. This model is very convenient and has fairly good performance. Let's get started installing it.
First of all, we need to unscrew the mounting plates of the standard radio, they will be useful to us. We take a screwdriver (Phillips head), it is best to use a wrench, of course, since the bolts can be very tight. We unscrew only 4 bolts. In the photo they are highlighted with red arrows.
We also remove the four yellow plastic latches; they will also be useful to us when installing the radio. Let's look at the photo, there they are highlighted in circles.
After all this has been done, we no longer need the old radio; we can put it aside, or sell it to someone on the Internet. We attach the removed mounting plates and latches to the new radio; this is not difficult to do.
After that, we take all the wires and connect them, including the GPS antenna, and bring the USB cord into the glove compartment for the flash drive. Without fixing it, we check the functionality, if everything is good, we take our radio and insert it in place of the old one.
Audio systems in Toyota Corolla e180
Standard radios
Corollas in the following trim levels: Classic, Style, Style+ are equipped with standard balalaikas that reproduce sound quite well.
The most necessary things are there: radio, equalizer, usb, aux. Reads flash drives up to 4 gigs, does not display all Cyrillic alphabet.
Panasonic radio
assembled in the Czech Republic, catalog number:
86120-02F70
In the maximum configuration, a standard Touch 2 radio was installed. Works on WiN CE, touch screen, navigation, reverse camera, bluetooth and all that. Catalog number: 86120-02080
Non-standard radios for Corolla E180
If we are considering an alternative to the standard radio, then in my opinion it makes sense to take a closer look at the multimedia center from China.
The radio has a huge display measuring more than 10 inches. Android operating system, which opens up huge and modern functionality.
And the cost of a Chinese radio for our Corolla is quite affordable, at the moment the price with delivery is 13,000 rubles. Link where you can purchase: https://ali.pub/25kt9k - be sure to read customer reviews!
Another option is a radio tape recorder with a slightly smaller display - 9″, but with mechanical knobs, volume control and selection of radio stations.
Some people do not accept radios without mechanical knobs, and there is some truth in this, since, for example, in subzero temperatures it will be difficult to start the radio from the touch button.
You can view the audio system on Ali using this link: https://ali.pub/25ktqa
Article rating:
Source
How to remove the factory radio of a Toyota Corolla 120 body
How to remove a Toyota Corolla radio
Installation in TOYOTA COROLLA 120 body 720×540
Toyota Corolla. Removing the radio and Installing the YATOUR USB adapter.
Installing AUX on Toyota Corolla radio.
USB MP3 changer for toyota head unit
Disassembling the control panel TOYOTA COROLLA SW 2002
How to disassemble the instrument panel on a Toyota Corolla e12
Installing a Chinese radio in a Toyota Fielder
The options for the Toyota Corolla are constantly changing. If in 2006–2008 the Japanese could offer a not very functional filling compared to other manufacturers, then the models of recent years (starting from 2014) are not only reliable, but also an interior with modern devices, among which the Toyota Corolla radio deserves much attention . This is a universal gadget that is a collection of creative technical solutions and is ready to offer the user not only high quality sound and a flash drive connection, but also navigation functions, as well as other additional options.
Features of use, possible malfunctions
If replacement, adjustment or repair is necessary, checking the correct connection of the terminals, or other problems arise in the operation of the car radio on a 10th or 11th generation Toyota Corolla, then you should know how to remove the radio yourself without affecting the overall performance or damaging the car. This will help determine why the sound disappears or some functions are not available.
Before starting work, be sure to make sure that there is no voltage on all wires in order to prevent a short circuit in the entire electronic network of the Toyota Corolla 2013 and other years of production.
The removal and installation process follows the following scheme:
- remove decorative trims on the sides and top;
- remove the air duct curtains by pulling them out along the guides;
- disconnect the electrical contact and unscrew the 4 bolts, and then, carefully disconnecting, pull out the radio and lower it face down;
- Next, you should disconnect the speaker connector, power plug, radio antenna and connection to the buttons on the steering wheel.
Installation is in the reverse order.
Pinout of a head unit is an activity for marking or designating all outputs of the device to facilitate the subsequent connection of multi-devices or connection via aux or other outputs of various gadgets.
Amplifier check
The amplifier is one of the most sensitive elements in an audio system to voltage changes. Any surge in the network can throw this extremely important mechanism out of action. In most cases, the board burns out or the fuse stops working correctly. The radio may function fully, but the driver will not hear the sound of musical compositions. Also, the microcircuit can burn out due to incorrectly connected speakers. If the radio works, but there is no sound, you need to disassemble the amplifier and check its microcircuit.
To check you need to do the following:
- Find a power source;
- Measure its readings with a multimeter - they should be 12V;
- Connect an external speaker;
- Connect the wires accordingly: power, ground, switching controller.
If the amplifier refuses to work, you can try to “revive” its micro-laughter using alcohol and cotton swabs. The mixture must be wiped, especially in those places where “burnt” areas are noticed, and then allowed to dry. If, after the work has been done, the mechanism still refuses to fulfill its duties, there is nothing left to do but buy a new one.
Checking the power supply to the audio system
Owners of Toyota Corolla are often faced with situations where the radio and cigarette lighter do not work. This picture says one thing - there are problems with the car’s electrical network. An incorrect connection or power surges leave their mark on the operation of the car radio: it may turn on, but not turn off. There may also be problems with the functionality of the device: the display is on, but the music does not play. In such cases, the first thing to check is the fuse and the protective diode.
The first element of the network protects the car radio from voltage surges, since the device does not have its own protective mechanism. It is necessary to check both fuses - under the hood and inside the car. If a burnt part is found, replace the protection with a new one. It is also important to ensure the integrity of the printed circuit boards located inside the audio system. They must be in good condition, without swollen capacitors or “burnt” tracks.
Functionality and manufacturers of sound playing equipment
The main emphasis of standard equipment is aimed at providing a minimum set of functions, without loss of sound quality and the like. That is, at the time of the release of this brand of car, its radio tape recorder fully meets the requirements and standards of the current period of time. But no more.
According to completely understandable market laws, the manufacturer will not install luxury-class equipment using the latest technological developments in this segment into a standard car. And, as a rule, after a very short period of time, given the speed and pace of changes in radio electronics, there is a need to completely replace standard equipment. You don't need to look far for examples. It is enough to remember a car radio, at least ten years ago, and compare it with samples of a standard car radio for today. The absence of functions such as GPS navigation, Bluetooth, support for 3, 4 G Internet and so on is simply unthinkable.
Almost like any standard household appliances and equipment, the production of standard car devices is brought by its copyright holders to China. Which does not at all mean the disgusting quality inherent in equipment made in artisanal conditions, all the same in China. The production of equipment takes place under constant control of compliance with the technologies and quality declared by the owner of the brand.
Instructions on how to remove the radio in a Toyota car
Based on the name itself - a standard car radio, you can already understand that this is a common device with the car itself, installed in it by the manufacturer. This type of equipment is designed by the company’s engineers specifically for installation in this specific brand. As a result, harmony and style of the interior of the cabin with the additional equipment of the front panel is achieved.
How to remove the radio in a Toyota car
What is a car's standard radio?
As was said, a standard audio player differs from universal and standard models in its narrow focus on one car (brand). This greatly simplifies the process of removing and reinstalling the device, if such a need arises. If for some reason a car owner decides to replace the standard car radio with a more modern, advanced model, then he will have to face some changes and modifications to the player’s seat and wire and communication connectors.
How to remove the radio in a Toyota car
Reasons for replacing the standard car radio
There are not so many reasons that can prompt a car owner to replace already installed sound reproducing equipment at the factory assembly stage.
- Firstly, this is the failure of the device itself with the absence of the possibility or desire to repair it.
- And secondly, the moral and qualitative obsolescence of this type of equipment and non-compliance with modern sound standards required for it, the lack of additional functions and capabilities.
Functionality and manufacturers of sound playing equipment
The main emphasis of standard equipment is aimed at providing a minimum set of functions, without loss of sound quality and the like. That is, at the time of the release of this brand of car, its radio tape recorder fully meets the requirements and standards of the current period of time. But no more.
According to completely understandable market laws, the manufacturer will not install luxury-class equipment using the latest technological developments in this segment into a standard car. And, as a rule, after a very short period of time, given the speed and pace of changes in radio electronics, there is a need to completely replace standard equipment. You don't need to look far for examples. It is enough to remember a car radio, at least ten years ago, and compare it with samples of a standard car radio for today. The absence of functions such as GPS navigation, Bluetooth, support for 3, 4 G Internet and so on is simply unthinkable.
Almost like any standard household appliances and equipment, the production of standard car devices is brought by its copyright holders to China. Which does not at all mean the disgusting quality inherent in equipment made in artisanal conditions, all the same in China. The production of equipment takes place under constant control of compliance with the technologies and quality declared by the owner of the brand.
How to remove the original radio from a Toyota Corolla
If you have a desire to independently remove the standard player from your Toyota car, then these instructions are just for such a case.
Removing the radio on a Toyota Corolla 120 is not as simple as it might seem to a person who has already encountered similar actions on other brands of cars.
At the very beginning, we remove the covers located on both sides of the car player on the central panel. They are attached to plastic latches and are very sensitive to external force. Therefore, you need to pry them off very carefully, from the outer side of the panel, from bottom to top. As a separator, do not use a metal knife or spatula. An ordinary plastic card copes with this task perfectly.
After releasing the linings from the latches, pull them towards you and set them aside separately.
Then we separate the upper linings in the same way, with the difference that they must be pryed off from below. There are 4 latches on each pad.
After the decorative trims are removed, it is time to remove the upper air duct. Everything is just as simple here. Grasping the air duct on the sides with both hands, carefully, not all the way, pull it towards you. Having freed the air guide device until free access to its rear part is possible, disconnect the connector of the emergency signal button.
Armed with key number 10, unscrew the 4 bolts directly holding the radio in its socket.
We remove the car player using the air duct principle. The operation to independently remove the standard car radio is completed.
Removing the radio from a Toyota Avensis
How to remove a Toyota Avensis radio?
The procedure for replacing the radio in a Toyota Avensis is as follows:
- the upper bar above the device is separated, secured with two clamps - latches;
- in the opened niche, find and unscrew the two upper bolts;
- separate the decorative trim from the gearbox;
- disconnect all connectors;
- remove the standard car radio.
Toyota Camry
Before removing the radio on a Toyota Camry, all systems of the car are de-energized. This operation applies to all brands of vehicles.
Next, the decorative washers and 2 control handles are separated by squeezing the springs on the axes of these handles with a flat screwdriver/
The front panel is removed, and the latches located on the rear panel return to their original state.
The screws located near the axes of the handles are unscrewed and removed, as are the brackets for their fastening.
The standard radio should easily come out of its socket.
The not completely pulled out radio is freed from the wiring connected to it.
Toyota Vitz
The standard radio on a Toyota Vitz car changes in the following sequence:
- The climate control adjustment knobs are removed. The two bolts located underneath are unscrewed.
- The side latches holding the climate control panel are released.
- The 4-corner screws holding the car radio are unscrewed.
- The player is removed.
We hope that our article will be useful to you!
1avtozvuk.ru
Unblocking algorithm
Usually, switching to protected mode when it is locked, SAFE is reflected on the radio screen. This means that the device is in a setup state and requires electronic unlocking by entering an activation code. Such protection is practiced by a number of brands, although theft of car stereos is already rare. Perhaps thanks to this feature.
Locked car radio
Regardless of whether the Nissan, Ford Focus, Volkswagen or Opel radio is blocked, the reason and method of unlocking are the same. When the device enters the service mode, nothing may simply be displayed, but when the radio is turned on, the “SAFE” mode will light up on the screen.
After that, try the following steps after checking all connections.
- Press FM and DX simultaneously until 1000 appears on the display. Please note that pressing these keys again will be interpreted by the radio as entering a code. You should not do this, so as not to encounter another blockage;
- Find the code stuck on the radio card;
- Use the buttons to enter stored radio frequencies to enter the code number. This is done like this: button 1 allows you to enter the first digit of the code, the second - the second, and so on. Buttons 5 and 6, respectively, are not used, only a four-digit code is entered;
- Press the FM and DX buttons until SAFE appears on the display;
- Wait for the parameters to be saved, after which the frequency of the radio station will appear on the screen and it will be ready to listen to.
Additional devices
The car radio combines a whole range of information devices, making it possible to display information from them on your screen - from built-in video cameras and remote devices, navigation equipment, parking cameras, and car condition monitoring devices. In addition, if necessary, you can output data from the on-board computer and car radio via an Internet connection, which provides communication with an external control center via a 3G modem.
The Toyota Corolla E150 is equipped with a standard radio 53816, manufactured by the Matsushita brand. Most Corolla 150 owners note that the volume of the acoustics is excellent, but the sound quality requires improvement.
Among the additional set of options that can be found on the 2013 Toyota Corolla radio, as well as all versions of the 10th and 11th generations of the Japanese legend (Fielder, Corolla Axio, etc.), the most notable are:
- antenna type radio signal amplifier;
- DVR CP-6001;
- DVB-T BOX;
- 2 DIN with navigation;
- the ability to connect the camera via Wi-Fi technology;
- Android system and the ability to synchronize with it.
The conveniently located monitor does not require you to turn or tilt your head to view the information on the screen. And the clear instructions describe in detail the process of installation, replacement and configuration; it is stored in the BC memory. In addition, all information that enters the on-board computer of the Corolla E150 and all cars of the 10th and 11th generations is displayed on the monitor. The presence of an aux output allows you to connect external audio media. For additional comfort and the possibility of convenient operation in the absence of lighting in the cabin, the standard Toyota Corolla radio in the 120 body and other cars of the 10th and 11th generations have backlighting of the control buttons using LEDs.
How to remove the original radio from a Toyota Corolla
If you have a desire to independently remove the standard player from your Toyota car, then these instructions are just for such a case.
Removing the radio on a Toyota Corolla 120 is not as simple as it might seem to a person who has already encountered similar actions on other brands of cars.
At the very beginning, we remove the covers located on both sides of the car player on the central panel. They are attached to plastic latches and are very sensitive to external force. Therefore, you need to pry them off very carefully, from the outer side of the panel, from bottom to top. As a separator, do not use a metal knife or spatula. An ordinary plastic card copes with this task perfectly.
After releasing the linings from the latches, pull them towards you and set them aside separately.
Then we separate the upper linings in the same way, with the difference that they must be pryed off from below. There are 4 latches on each pad.
After the decorative trims are removed, it is time to remove the upper air duct. Everything is just as simple here. Grasping the air duct on the sides with both hands, carefully, not all the way, pull it towards you. Having freed the air guide device until free access to its rear part is possible, disconnect the connector of the emergency signal button.
Armed with key number 10, unscrew the 4 bolts directly holding the radio in its socket.
We remove the car player using the air duct principle. The operation to independently remove the standard car radio is completed.
Removing the device according to the instructions
The algorithm for removing the radio if you have the keys is outrageously simple. It is worth considering in order to understand how to act if they are lost. The order is as follows:
- Remove the front panel of the player and the decorative plastic frame, prying it up with a flathead screwdriver if necessary.
- Insert the first key into the gap between the housing and the mounting frame, located at the end. You should feel slight resistance as the tool bends the latch.
- Repeat the same action with the second key.
- Grasp the radio with your hands by the protruding parts on the sides of the case and carefully remove it from the niche.
To remove the radio, 2 keys are used
Advice. There is no need to apply much effort; the device should be removed quite easily. At the end, act carefully so as not to pull the wires again and break the contact.
Special keys must be inserted into the side openings
When the radio is equipped with four latches, access to them is through 2 pairs of round holes. You need to insert 2 U-shaped keys into them and pull them out by the body, as described above.
The music center can be easily removed using keys
Functional
The Toyota Corolla radio in 120 and 150 body types is installed in a specially designed standard recess on the dashboard next to the steering wheel.
Combining a complex of control systems, navigation and attributes to improve comfort and entertainment, the car radio is a real on-board computer that any owner of a 2013-2014 Toyota Corolla, as well as all subsequent models, can afford.
Among the main functions equipped with Toyota Corolla radios of the 10th and 11th generations are the following:
- support for major video and audio file formats – R/VCD/CD/CD-R/CD-RW/DivX- MP3/MP4/WMA/DVD/DVD;
- menu interface in Russian;
- operating system based on Windows CE 6.0;
- 6 CD changer;
- operation of the radio in several modes simultaneously, for example, navigation and music files;
- built-in external antenna with GPS module;
- ability to connect an SD card;
- USB connector;
- aux connector;
- remote control.
Advantages of purchasing a Toyota Auris radio from our company:
- Affordable price. Our company is a dealer of many well-known factories in China, so prices for goods are among the lowest.
- Possibility of installation. We not only sell, but also install devices in the service center. All work is carried out quickly and efficiently.
- Prompt delivery. If you live in another city, we will send the radio to your Toyota Auris by any transport company.
- Free consultations. The specialists who work in our center have undergone special training. They can competently talk about each model.
- Big choice. We specialize in selling radios and car accessories. So you will find everything in one place.
Replacing the standard radio on a Corolla E120
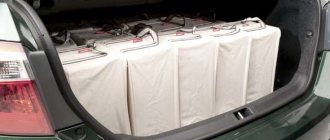
Hi all! In general, the standard radio with the body part of the 2005 Corolla 8612012880 (photo 1, 2) died for a long time... A friend fitted the standard 28185-4AF5A from the Nissan Sentra 2021 (photo 3, 4 and 5). The question is: is there such an adapter in the world (in Ali, for example) that would connect this Nissan radio without interfering with the original Toyota wiring? Because where to solder - I’m not an expert in this... A sound camera is not needed, in principle, you only need a seat bench and a radio. I found an adapter for the antenna on Ali. USB too.
Well, how will it look in the panel. Completely different in shape.
Fits true to size, the rest is minor stuff. There are transitional frameworks, if necessary.
connection chips are even sold on Ali. type in a search engine (Google or Yandex) adapter chip for nissan mc312d-w -313-15 DAD (in your mafon MOM) and . further according to logic. (you need to explain about Toyota. If yes, then write, they will help)
ps //// this car radio has an internal sound amplifier. . I just haven’t seen this Nissan model. which is in your photo.
It is possible that the sound amplifier (for speakers) is external, that is, outside the car radio itself, located in the passenger compartment or elsewhere in the car.
Last edited by MORE125; 01/08/2020 at 14:07 .
connection chips are even sold on Ali. type in a search engine (Google or Yandex) adapter chip for nissan mc312d-w -313-15 DAD (in your mafon MOM) and . further according to logic. (you need to explain about Toyota. If yes, then write, they will help)
ps //// this car radio has an internal sound amplifier. . I just haven’t seen this Nissan model. which is in your photo.
It is possible that the sound amplifier (for speakers) is external, that is, outside the car radio itself, located in the passenger compartment or elsewhere in the car.
Thanks for answers. I won’t say anything about the amplifier, I don’t know. It's definitely not in the trunk. I can look at the manual if interested. Now on to the cables. According to your instructions, I found this: The evidence seems to agree. I’ll write a question to the site, they’ll answer and I’ll write back.
Replacing the standard radio on a Toyota Corolla car
No matter how reliably and efficiently the components of the additional equipment of a Japanese car are manufactured, something may require replacement. More often this is done due to obsolescence. The world of compact car electronics and radio communications is changing very quickly, with new device models with new functions appearing every year. Therefore, there are often cases when the owner needs to replace the standard radio on a Toyota Corolla car. And this is quite understandable, because modern devices of electronic components, which abound in the car market, leave few people indifferent.
The modern multimedia systems offered for the Toyota Corolla are designed based on the advanced Android platform of the mobile segment. They involve innovations and various fillings, including technology from the world famous company Google. New generation standard Android systems have been developed based on the 4.1 platform. A universal head unit is suitable for absolutely any model of the Japanese concern Toyota, with which you can install navigation and Skype.
Photo 1. An example of a standard universal car radio on Android 4.1 for Toyota Corolla
The head unit, developed for the Toyota Corolla brand, is far from just a radio. It supports a large number of formats for playing and transmitting audio and video information. This allows you not only to listen to music while driving on the road, but also to change it using the equalizer with fine tuning, improving the sound.
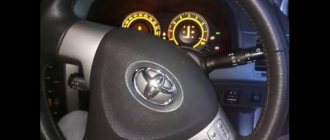
A highly sensitive FM tuner is also included with the radio and, using special connectors, makes it possible to control sound and video functions directly from the steering wheel of the car.
How to install and connect steering wheel buttons to the radio
The Android operating system allows you to control your Toyota radio in such a way that it turns into an on-board tablet computer. The capabilities of such devices, thanks to software updates, become inexhaustible, up to monitoring all on-board systems of a Toyota Corolla car.
Step-by-step instructions for replacing the standard car radio on a Toyota Corolla
First of all, before replacing, you need to remove the terminal from the battery to avoid a short circuit in the on-board network.
Remove decorative moldings from the sides and bottom. This does not require effort; just grab them well with your fingers and pull from the top point towards the rear window of the car.
Remove the decorative moldings from above. To do this, we cover their edges with paper tape. Then, using a thin plastic ruler or hard cardboard, we pick up the upper corners of the molding and push the ruler towards the clip. Then we pull it towards ourselves with both hands. Sometimes you have to apply significant force until the molding pops out of the latches with a click.
Remove the central temperature regulator. It is held on only by latches, guides and grips. We just drag it towards us, and then disconnect the wire connector to the emergency switch.
We remove the head unit itself to be replaced. To do this, unscrew the four bolts and pull them towards you. Having pulled it out, we lower the front panel down. The electrical connectors are exposed. We pull out all the connectors, and replace all the brackets from the removed radio with a new one.
We continue disassembling to install the car radio antenna. To do this, pull out the lower glove compartment, open it and pull the door stop towards you. We also pull out the entire glove compartment and pull it out of the hinges from the bottom, continuing to pull it towards us. We also remove the upper glove compartment. To do this, pull it out from the bottom point along the guide bow. It will easily come out from the bottom up, jumping out of three grips and four clamps.
We remove the right front pillar. If there is no airbag next to it, then removal will be easy. If there is a cushion, then you need to study the procedure for removing it in additional literature. First, remove the rubber door seal, pulling it with force, and remove the trim.
Pull the top edge to the left side with your hand. The clamp linings will diverge one by one. When this happens, pull the cover up along the guide.
We install a television antenna. To attach it, degrease the gluing surfaces. We clamp the grounding wire in the upper corner of the rack into the gap between the sheet edges of the body roof. We pass the antenna cable of the car radio down the rack along with the wiring harness, screwing it with electrical tape to the clips.
We bring it out from the bottom of the rack under the torpedo visor, and pull it towards the radio niche.
R.S. Under no circumstances should the wire cross the airbag!
After installing the antenna, we put the cover on the stand again and put everything in order.
We connect the power supply to the car radio antenna - black and red wires - to the power supply of the tuner. We find the connection to be opened and connect the wires according to their color.
We install a new radio, purchased for replacement, by winding and twisting the too long installation wires with electrical tape.
We find a place where we can place the TV tuner of the car radio. Without putting on the battery terminals, we connect all the wires.
We insert the head unit into place.
We install the trim around the gearbox, the cigarette lighter, and the temperature regulator in their places. We connect the connectors and plugs together in the order of disassembly.
Well, the replacement is complete. Now the only pleasant thing left is to use a multifunctional device for Toyota Corolla - a car radio of a completely new quality!
corollafan.ru
Connecting and replacing a radio with your own hands: what do you need to know?
The procedure for installing the head unit in the Corolla E120 will not present any particular difficulties: the entire scope of work is intuitive and can be done with one pair of hands at home. To replace the audio system in a car, you will need no more than an hour of time, as well as a slotted and Phillips screwdriver, pliers and insulating material. To install a new radio in a Toyota Corolla E120 you need to:
- Remove the negative terminal from the battery in order to de-energize the electrical circuit in the car;
- Next, we go into the interior and dismantle the central panel of the dashboard, after which we snap off the plastic pistons that secure the transition frame of the radio;
- Then we unscrew the screws securing the radio to the bracket, after which we pull the device slightly towards ourselves and disconnect all the plugs;
- Now you need to install new equipment, mount an adapter frame of the appropriate type and connect the PG to the vehicle system.
It is necessary to connect the wiring to the radio in detail according to the instructions supplied with the equipment - this will protect against incorrect connection and possible short-circuiting of the device. If there is standard wiring in the car, the radio can be connected using the factory method, where the purpose of the cables differs by the color of the winding:
- Yellow is the “positive” 12-volt wire, which powers the built-in amplifier. It is recommended to connect this cable directly to the vehicle battery, after inserting the fuse at a distance of no more than 30 cm from the battery;
- Red – designed to control the PG from the ignition switch and allows you to play music when the engine is off;
- Black is the “mass” of the system. If the acoustics are weak, the cable can be connected to the car body, and when installing an additional speaker package or subwoofer, a direct connection to the battery negative is necessary;
- White – is responsible for connecting communication antennas, through which you can strengthen the signal on a walkie-talkie, TV or GPS modules;
- White or red wires marked FL/RR are intended for outputting the signal to the speakers in the cabin. When connecting, it is important to observe the polarity of the connection, otherwise equipment failure or a decrease in power potential may occur.
- Orange - this cable is responsible for connecting the additional control buttons located on the steering wheel to the radio.
Note! If you connect a non-standard GU, the length of the factory wiring may not be enough - in this case, it is recommended to first purchase a couple of coils of cable in a multi-colored braid.
You should not skimp on the quality of wiring: the thickness of the cross-section for the power line and subwoofer power supply must correspond to the level declared by the manufacturer, otherwise the electrical network may be overloaded and the likelihood of a short circuit.
Types of radio mounts
To choose a method for removing a car player, you need to understand how it is fixed inside the panel. The following types of fastenings exist:
- on 2 side clamps;
- on 4 latches located on the side and top of the case;
- fastened with self-tapping screws or screws to the brackets.
Example of mounting a standard head unit
Note. The last method of fixation is typical for standard devices that are supplied to the car by the manufacturer.
Latch on mounting frame
The principle of fastening with latches (clamps) is that the body of the radio is enclosed in a metal mounting frame, and is not directly built into the panel niche. This intermediate part, which has special petals with protrusions or grooves (depending on the brand and model of the device), is securely fixed in the niche. The player body is equipped with mating latches that engage when the player is inserted into the socket.
The counterpart of the latch on the body
To unlock the latches and remove the car radio, keys of various shapes are used, supplied by the manufacturer complete with music for the car. They are lost over the years of car operation, since they are used extremely rarely. As a rule, the key is a shaped strip of metal or a handle inserted into 2 pairs of holes located on the front panel of the device.
This is what most car radio removal keys look like
The mountings of standard radios are most often made with bolts, screwed to brackets and hidden under the front plastic panel. Here you cannot do without a minimum set of tools to dismantle this panel and unscrew the mounting screws or bolts.
Handle key for unlocking 4 latches
Reference. All of the listed intricacies with hidden latches and special keys were invented by manufacturers with one goal: to make it as difficult as possible for thieves to steal the car radio when the car is broken into.
Location of key holes