3628 Apr 20
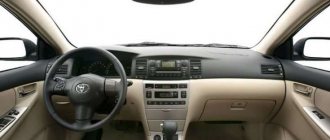
The 2013 Toyota Corolla sedan model has won the hearts of many car enthusiasts. Perfect shapes, business class style, comfort, and premium interior quality have found buyers all over the world. However, during operation, minor defects and shortcomings began to appear.
The blowing of the Toyota Corolla windshield causes dissatisfaction among many owners. It fogs up, is blown unevenly, and freezes. Some say that this is a design feature of the car, while others argue that the problem lies in the improper operation of the ventilation system. It is necessary to eliminate the cause of poor windshield blowing. Nothing should interfere with the driver.
1.12. Electronic climate control
Electronic climate control ensures maximum comfort in any weather conditions, any outside temperature and at any time of the year.
To ensure a constant and pleasant climate in the car, the incoming air temperature, air quantity and air distribution are automatically changed in accordance with external weather conditions.
The climate control refrigeration compressor cools the air and removes moisture.
When the refrigeration compressor is turned on, the air conditioner consumes such a power that it leads to increased fuel consumption. If there is no need for a refrigeration compressor, then press the ECO
.
The air purification filter removes dust and soot from the outside air, as well as pollen and spores.
With the air conditioning set to automatic, driving is possible almost always. If necessary, the climate control can be adjusted manually.
The climate control only works when the engine is running.
Basic settings for maximum comfort:
– press the AUTO
, display and function indication included; – open all air nozzles; – set the temperature on the display using the “+” keys or. „-” from 22° C to 24° C.
If necessary, a higher or lower temperature can be set.
Under special conditions (for example, frosted or fogged windows, unpleasant odors coming from outside), the climate control functions can be set manually.
After turning the ignition back on, the climate control is in the previously selected settings mode.
If necessary, set the operating mode as follows:
Drying and defrosting glass
Press (power-on control), the
AUTO
goes out.
The temperature and airflow will be set automatically, the glass will defrost and dry as quickly as possible.
Return to automatic mode: press
or
AUTO
.
Press (power-on control), the AUTO
goes out.
Turns on when unpleasant odors come in from outside. The air circulation system prevents the entry of outside air, allowing air to circulate inside the vehicle.
The air circulation system should be turned on only for a while, because Over time, the quality of air in the cabin deteriorates.
Return to automatic mode: press
or
AUTO
.
Automatic mode without cooling (fuel saving).
ECO
Press (power-on control), the
AUTO
goes out.
Turn on to save fuel. In this mode the refrigeration compressor is switched off.
The incoming air is not cooled or dried, limiting the comfort provided by climate control.
Return to automatic mode: press ECO
or
AUTO
.
The set temperature can be set using the “+” or “-” keys to values between 17° C and 27° C.
When set below 17° C, LO
: The climate control operates continuously at maximum cooling output and there is no temperature control.
When set above 27°C, HI
: The climate control operates continuously at maximum heating output and there is no temperature regulation.
By pressing one of the following keys ( AUTO
goes out) the following occurs:
air distribution to the upper space;
air distribution to the windshield, front side windows and front and rear footwells; air distribution to the overhead space, and to the front and rear footwells; air distribution to the front and rear footwells. Return to automatic mode: press the corresponding key again or press AUTO
.
Press on the right or left, the AUTO
will go out, the fan speed will increase or decrease. The display shows the airflow level between the K keys.
Return to automatic mode: press AUTO
,
A appears
. OFF
Press to turn off all climate control functions.
The air distribution settings remain in the previously selected positions.
External air access can be stopped by pressing a key
.
For reasons of comfort, climate control (heating, blowing and cooling control) should only be turned off if a malfunction occurs in the system.
Turn on climate control: press OFF
or
AUTO
.
The climate control works more efficiently when the windows and sunroof are closed. If the car interior becomes very hot after prolonged exposure to sunlight, open the windows for a while so that the heated air can evaporate faster.
To ensure trouble-free operation, do not cover the sensor openings in the climate control switch group and between the air supply openings in front of the windshield.
When the air conditioning is turned on, condensation forms on the bottom of the car.
AUTO buttons simultaneously for approximately 5 seconds
and
OFF
, the auxiliary motors will be synchronized, and the blower will stop for a while.
Source
How to improve airflow yourself
The air conditioner removes moisture from the interior well and improves glass blowing. It's summer. In autumn it is cool to use it, but in frost it is undesirable. We need to study the ventilation system.
You need to start by examining the air intake. If it is clogged, the carpets in the driver's and front passenger's cabin are damp, or even damp. It is necessary to carry out measures to clean the airways.
Next you should look at the cabin filter. They probably forgot to change it in time. Increased interior humidity indicates a necessary replacement. Some car owners don't put it back at all. But this affects the quality of the inhaled air and increases the level of humidity in the car.
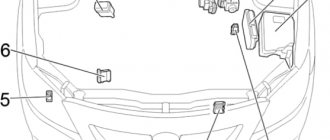
A failed recirculation valve is easily identified. They understood the cabin filter, but there is no feeling of fresh air inside the car. In the Toyota Corolla 150 body, it is located on the left under the dashboard. You can take out the cabin filter and open the valve manually through the hole in the shelf, but it is better to repair the damper opening mechanism. The control cable may be loose or the sensor may be faulty.
If all else fails, then the car has such a feature. You can improve the airflow for your windshield yourself. Refining the windshield blower will not require expensive funds. You will need an ordinary indoor ventilation grille. Buy it without frame.
Pre-measure the length of the deflector holes. You need tape or glue, car paint.
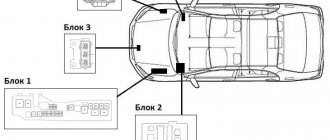
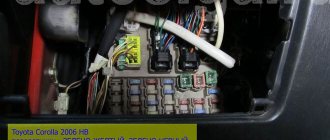
Fuse and relay box in the Toyota Corolla E150 interior
There are 2 mounting blocks in the cabin.
Block A
The unit is located to the left of the driver, under the box for small items.
Purpose of fuses:
| № | Designation | Current, A | Protected circuit |
| F1 | — | 30 | ECU block |
| F2 | — | 40 | Power supply for turn signal interrupter relay |
| F3 | — | — | Reserve |
Relay purpose:
| № | Designation | Name |
| R1 | — | Turn signal interrupter relay |
| R2 | — | Heater relay |
| R3 | — | Relay IG1 |
Block B
The unit is located at the bottom of the control panel, on the driver's side. To access it, you need to remove the cover, on the back of which there is a diagram with fuse symbols.
Fuse box diagram in the interior of a Toyota Corolla E150
Purpose of fuses:
| № | Designation | Current, A | Protected circuit |
| F1 | AM1 | 7.5 | Starter, fuel injection system, gear lock system |
| F2 | FR FOG | 15 | Fog lights |
| F3 | — | — | Reserve |
| F4 | ACCB | 25 | Starter, fuel injection system |
| F5 | DOOR | 25 | central locking |
| F6 | — | — | Reserve |
| F7 | STOP | 10 | Brake lights, ABS, fuel injection system |
| F8 | OBD | 7.5 | On-board self-diagnosis system |
| F9 | ECU-IG NO.2 | 10 | Reversing lights, heated rear window, auto-dimming rearview mirror, battery charging system, seat belt warning, hazard warning lights, turn signal |
| F10 | ECU-IG NO.1 | 10 | Automatic headlight leveling, electric steering, cooling fan, ABS, VSC, fuel injection system, audio system, Smart Entry system, electrical control unit |
| F11 | WASHER | 15 | Windshield washer |
| F12 | — | — | Reserve |
| F13 | WIPER | 25 | Wiper |
| F14 | HTR-IG | 10 | Air conditioning, heated rear window and side mirrors |
| F15 | SEAT HTR | 15 | Heated seats |
| F16 | TAIL | 10 | Headlights, taillights, license plate lights, side lights, instrument panel lights, fog lights, fuel injection system, |
| F17 | PANEL | 7.5 | Interior lighting, glove compartment lighting, instrument panel lighting, steering wheel switches |
| F18 | — | — | Reserve |
| F19 | FR DOOR | 20 | Front windows |
| F20 | RL DOOR | 20 | Rear left window regulator |
| F21 | RR DOOR | 20 | Rear right window regulator |
| F22 | SUNROOF | 20 | Hatch drive |
| F23 | C.I.G. | 15 | Cigarette lighter fuse Toyota Corolla E150 |
| F24 | ACC | 7.5 | Audio system, gear lock system, side mirror drive, electrical control unit, Smart Entry system |
| F25 | — | — | Reserve |
| F26 | MIR HTR | 10 | Heated side mirrors, injection system |
| F27 | — | — | Reserve |
| F28 | — | — | Reserve |
| F29 | RR FOG | 7.5 | Rear fog light |
| F30 | IGN | 7.5 | Steering lock system, SRS passive safety system, robotic gearbox, injection system, Smart Entry system |
| F31 | METER | 7.5 | Instrumentation |
Refinement of windshield blower Toyota Corolla 140/150
More than once in the vastness of the drive I have come across posts about improving the windshield blower. People write that on the highway at speed the glass begins to tighten from above. Okay, I think people do all sorts of crap for themselves (and not always healthy), but then I see everyone has started to improve the airflow, which means it’s quite possible that it’s getting much better this way, especially since they write that it’s like that , the difference is quite noticeable... I also decided to “spoil myself” with this, of course we have good frosts, almost like they happen in Siberia, + quite frequent snowstorms and blizzards. But while I ride in the city, I have no complaints about the airflow, the glass is always clean. But suddenly it touches and pulls somewhere along the highway, and the glass really starts to tighten. It's never too late to take it off. I took out the grate from the pantry (there was only one left from the renovation; I think it was just waiting in the wings). But it wasn’t so easy to get the grille out of the car, I still couldn’t pull it out, I was afraid to break it, but by hooking it with a wire in the right place, I managed to pull it out without breaking. I fiddled with the sensor a bit, trying to disconnect it. But he also unfastened without any problems.
0:1991
1:2496
Filed it down
1:17
2:522
Trimmed, fitted, glued
2:572
3:1077
I cut off the edges of the grille so as not to redirect the air flow blowing sideways, as was intended by the engineers
3:1295
WITH
4:1803
I painted it with matte black spray paint 4 times at intervals of 15-20 minutes (I didn’t bother with the primer)
4:2010
5:504
He applied it, looked, clicked his tongue - beauty. The color is perfect, as if it were factory!
5:678
6:1183
In three places (on the platforms) I glued it with double-sided tape.
6:1296
I didn't take any photos after installation. Who hasn't seen anything? In general, about a month has passed since the airflow was modified, but I haven't noticed any significant improvements (maybe because I haven't had the opportunity to ride long distances on the highway yet). But recently I noticed that in the upper corner on the driver’s side, ice forms on the outside of the glass and it does not melt, the wiper crawls over it and does not clean it off. Increasing the blowing force from “3 divisions” on the climate control to “5 divisions” (at +23) solves the problem in 3-5 minutes. But before (before the “rework”), with the stove operating in this mode, there was no hint of moisture freezing on the glass. It seems to me that the modification of the airflow, in addition to solving one problem (with the glass tightening in frosty conditions on the highway), at the same time gives rise to another problem (insufficient heating of the glass in the upper left corner). Now I’m thinking: either remove this grille for nothing and leave it as it was originally, or trim its edges a little and observe further
6:3022
https://www.drive2.ru/l/8872273/
6:35 next article:
Toyota Caldina windshield installation
For a long time I wanted to put seals on the windshield of my Toyota Caldina that would allow me to drive in the rain.
7:854
Rating 3.50 [2 vote(s)]
13135
Windshield air deflector
Hi all!
I wanted to add a review in chronological order, but I won’t. At the request of Alexey242, I outline the steps to improve the standard wind deflector for the windshield. This didn’t completely solve the problem (for me in particular), but it got better.
07/20/2014. I bought everything I needed and decided to start modifying the standard wind deflector for the windshield. The goal is to change the direction of the air flow so that it does not reflect from the glass, but goes along it as high as possible, thereby eliminating frosting. By the way, whoever has climate control seems to have no such problem, since the automatic switches on the air conditioner (it dries the air in winter). I tried turning on the air conditioner when traveling intercity, but it didn’t help.
So, I bought it for the household. the goods have two plastic vents. grilles of different widths: 167 mm and 194 mm.
Having previously placed a rag under the screwdriver so as not to scratch the plastic of the panel, I pry it with a screwdriver and pulled out the standard grille from the car panel. Cut off from the vent. grille parts with two “nozzles” and adjusted. 2 pieces on the edges of the wide grille and 1 in the middle from the narrow one fit perfectly. I drilled holes and fastened them with bolts, washers and nuts. I did not attach it to the edges of the factory grille (you can see everything in photo 1). I’ll let you know in advance that later I used black wires to tighten the edges of the new grilles to the factory grille, since they vibrated when driving.
Photo 2 shows how the “nozzles” are directed. It can be seen that the direction of air flow will change - it will become along the windshield.
I removed it from the factory grille and spray-painted it black twice to camouflage this collective farm :). Then I assembled the structure. The color is actually practically the same (photo 3).
Now I just installed the standard grille in its normal place. That's all. From the street it’s generally unnoticeable unless you look closely (photo 4).
I waited for the cold weather and this is the result. The photo was taken on 10/28/14 at an outside air temperature of -14 and snowfall, fan at 1st speed, “legs-to-forehead” flow distribution. The car stood at the store with the engine running for about 10 minutes.
The result is the famous three-leaf clover. I am now advertising for a well-known sportswear manufacturer :).
Seriously, it got better. At 2nd and 3rd speed, with a “legs-to-forehead” flow distribution on the highway at an air temperature below -25 and 3 or 4 passengers, the windshield does not freeze as before into the “viewing slot of the driver-mechanic of a Japanese tank” ( photo 5).
Maybe someone will improve my product. Good luck on the roads!
Photo No. 4
Photo No. 5
Photo No. 1