Every car requires periodic maintenance of its main components. These include the engine, gearbox, chassis, etc. There are elements that play a very active role when a car is driven and require major maintenance over a certain period of time, such as CV joints on a Toyota Corolla. These parts provide torque transmission at various angles, which can reach 70 degrees relative to the main axis. This is a kind of hinge that does not often fail. It begins to deteriorate due to dirt and therefore needs either major maintenance or complete replacement. In this article we will talk about both.
Toyota Corolla CV joint replacement
Constant velocity joints (CV joints) are the main culprits of problems associated with front wheel drives. At the same time, they themselves are quite durable, and fail mainly due to damage to the anthers , which protect the hinges from water and dirt.
Replacing a Toyota Corolla CV joint is not the easiest or cheapest thing, so it is important to periodically inspect the protective covers and change them as soon as possible. If water or dirt gets into the hinges, they can fail after just a few hundred kilometers , while intact anthers will ensure their long-term operation.
The original CV joint (outer right Toyota 4346009R20, 4346009R30) comes with the drive, so it is quite expensive, around 16,000-19,000 rubles. But the internal 4304002030, although separate, is not significantly cheaper. So most often, the owners of this car buy separately granules from HDK, FEBEST (0110ZZE150 external and 111ZZE120 internal) or intended for installation on another Corolla or Auris.
Drive Features
Making a car with driving front wheels allows constant velocity joints (CV joints), which are used in the drive design. The peculiarity of this type of hinge is the ability to transmit torque without loss when rotating one component of the drive relative to another at an angle of up to 70 degrees.
Car front wheel drive shaft
The drive shaft of a vehicle with a front drive axle must perform several functions, and simultaneously. It must transmit torque to the wheel hub from the gearbox, provide the ability for the wheel to move relative to the body (when driving over uneven surfaces), and also allow changing the angle of the wheel, that is, making turns (which is accompanied by the need to change the length of the shaft). And all this is done thanks to constant velocity joints.
In general, the design of the drive shaft of a front-wheel drive car consists of three elements:
- shaft (with splines at the ends for connection with hinges);
- internal CV joint (which connects the drive to the gearbox);
- external CV joint (for connection to the wheel hub).
There are two such drive shafts in a front-wheel drive car, one for each drive wheel.
Faults associated with Toyota Corolla CV joints
Vibration when driving - there may be severe wear on the outer wheel drive joint, deformation of the wheel drive shaft, or wear on the rollers of the inner wheel drive joint. In this case, you will have to replace a worn joint, CV joint assembly or inner CV joint.
The car pulls to the side - the inner CV joint race is damaged or worn out, or the outer CV joint is worn out/damaged. Replacement to come.
Lubricant leaks on the CV joints - either the clamps are not tightened properly, or the boots are torn. Clamps - tighten, boots - replace.
Noise or knocking noise while driving in the area of the front wheel - the rollers of the inner CV joint of the wheel drive are worn out and it’s time to change it.
Knocks when turning - extreme wear of the outer CV joint; replacement is needed.
What to do if the boot ruptures on the road
It is absolutely unacceptable to move with a torn boot. The hinge will not tolerate even the slightest contamination. Mixed with lubricant, these abrasives will quickly wear out its precision-made and polished grooves and render the CV joint unusable. But it is not always possible or willing to use a tow truck or carry out road repairs.
Temporary protection can be provided in a variety of ways, from wrapping the remaining boot with tape to cold vulcanizing holes and cracks.
Even a simple cloth wrapped and secured around the cover will help filter out dust. The main thing is to do this reliably and control the condition of the patch to the point of repair. And when replacing the cover, be sure to disassemble the hinge, rinse it thoroughly and fill it with new grease as required.
Dust will definitely get there, even if it is not visible. During operation, the temperature of the unit changes; it literally works like a pump for dirty air under the car. It is easy to check the tightness by simply squeezing the case with your hand. You can also check the condition in doubtful cases of the presence of surface cracks, although usually the problem area is immediately noticeable by the grease protruding outward.
How to change CV joints on a Toyota Corolla
To do this, you will need to remove the front wheel drive assembly. Then proceed to disassemble the grenades (external or internal) by holding the drive in a vice. So, first of all, look at the visual dismantling of the Toyota Corolla drive shaft using the example of a car in the E110 or E120 body, since the procedure is similar to that on the Auris and Corolla E150 cars produced after 2006.
When replacing an external or, especially, an internal CV joint, you have to pull the entire drive shaft out of the box, so first of all, don’t forget to drain the oil from the Toyota Corolla gearbox (at least half).
Remove the wheel and unscrew the hub nut with a 30mm socket.
According to the instructions, you need to unscrew the two nuts (at “19”) securing the strut to the steering knuckle.
but then the alignment will go wrong, so it will be easier to unscrew the ball joint from the lower arm (there are 2 nuts and a key bolt at “17”) and disconnect the stabilizer bar link (the so-called bone).
Then we remove the drive with the external CV joint from the steering knuckle and pull it completely out of the box. To do this, turn the steering wheel a little to the side, tapping a little with a hammer (preferably with a mallet) on the axis of the outer CV joint, so as not to damage the thread, and pull the axle out of the hub. At the other end, in order to remove the inner CV joint, you may need a pry bar.
If you are going to change only the outer CV joint or its boot itself, then you can also do without dismantling the inner grenade along with the shaft and draining the oil. Simply remove the clamp that secures the inner boot on the grenade and pull out the shaft with the tripod.
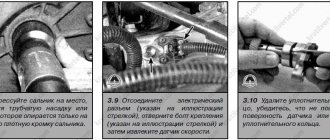
By the way, before removing the shaft from the inner CV joint, it is recommended to put marks on the shaft and the grenade itself. Using a screwdriver, press out the small clamp of the CV joint boot; by the way, it is disposable and cannot be reused. We install a special puller for removing CV joints. Let's secure it more securely. Using a baited nut and a ratchet with a head, we “squeeze” the CV joint out of its seat. We remove the puller. Moving the part from side to side, we remove the CV joint.
To remove the anthers, you need to remove the retaining ring holding the tripod and knock it off the shaft with the bearings. Then continue disassembly, rinse everything well to remove old grease and refill the hinges with fresh grease.
How much will it cost to repair CV joints on a Corolla E150: be on the lookout!
Replacing CV joints on a Corolla E150 is a rather expensive procedure, requiring the purchase of new components and a lot of consumables - in addition to the parts, you will need to buy boots, silent blocks, fixing clamps, technical oil and lubricant for grenades.
When choosing a set of CV joints for a Toyota Corolla E150, it is recommended to check the part numbers for compatibility with the vehicle’s VIN number, using the search program on the manufacturer’s official website. Installing incompatible parts can reduce the strength of the chassis and can provoke an emergency on the road.
Seal selection
Purchasing oil seals to replace them is a fairly simple task that does not require special knowledge. You can purchase original components from Toyota. The article number for them is 9031628003. Don't forget to check it before purchasing. The most popular oil seal production companies among car owners are:
| Manufacturer | vendor code | Cost, rub) |
| Musashi | T1245 | 250 |
| THO | 01010158 | 165 |
| FEBEST | 95HAY35550915C | 103 |
| Toyota (original) | 9031628003 | 579 |
Oil seals are an inexpensive consumable that needs to be changed quite often. In this case, overpaying for original components is irrational. You can safely purchase seals using high-quality THO or FEBEST.
All analogues of oil seals are made of high-quality rubber and do not allow any technical fluids to pass through. Therefore, you should not be afraid that the internal parts will rust from grease or oil.
CV joint seals on Toyota Corolla E150: what and when to change?
Installing new seals on the hinges is an integral part of servicing the vehicle chassis - neglecting replacement reduces the service life of CV joints. To replace, in addition to new seals and lubricant, you will need socket heads “30” and “13”, as well as a slotted screwdriver and a hammer. To replace consumables on CV joints you must:
- Place the vehicle on a lift or jack up the front of the vehicle;
- Drain the oil from the junction box;
- Next, you will need to remove the right drive and, using the tip of a screwdriver, remove the oil seals from the housing of the crankcase and the box;
- Then we lubricate the new part with oil and install the appropriate clamp for fixation, after which we install the oil seal in place;
- Now install the drive and fill in the transmission oil.
In order not to damage the new oil seal, it is also recommended to install the part using the tip of a slotted screwdriver, having previously wrapped the slot with masking tape or electrical tape.
Toyota Corolla E150 CV joint problems: common problems
Despite their long service life, CV joints often fail due to dirt and small abrasive parts getting inside the structure. The emergency condition of the vehicle's chassis can be diagnosed by the behavior of the vehicle - urgent replacement of components is necessary in the event of:
- Excessive vibration loading of the machine - there may be severe wear on the outer CV joint of the drive wheel or the possibility of mechanical grinding of the rollers of the internal joint. The situation can be corrected by replacing the inner joint or CV joint assembly;
- Uncontrollability of the car - when the car rolls or drives to the side, severe wear of the outer CV joint or inner race is likely;
- Jerking during acceleration or acceleration indicates an uneven load on the parts, which provokes backlash in the grenades. If this situation occurs, it is recommended to replace the CV joints as quickly as possible;
- Extraneous noise when starting the car - the situation is a sign of loose CV joints, which requires replacing components and restoring wheel alignment;
- The presence of smudges or oil leaks - the presence of traces of process fluids indicates wear of the rubber boots or weak fixation of the fastening clamps;
- Knocks when the car enters turns - severe wear or deformation of the outer CV joint; urgent replacement of the part is necessary.
Which one is better to choose anther?
When choosing a part, you should focus on the manufacturer and the material from which the case is made.
The quality of a product is usually clearly dependent on its price, unless, of course, it has been verified by several suppliers.
Some of the best and most widespread manufacturers in the spare parts markets are the brands GKN (Loebro, Spidan), Maruichi , SKF . They are also the most expensive, which indicates the best materials used. Such boots will never suddenly break, will last a long time, are very durable, and the repair kits contain everything you need, including high-quality specialized lubricant in the right quantity.
According to the material used, anthers are divided into:
- neoprene;
- polyurethane;
- silicone;
- thermoplastic;
- cheap crafts made from simple rubber.
There should be no questions about the latter; they cannot be used unless you plan to frequently replace expensive hinges. Neoprene is a little better, but this is also not the choice of a caring owner.
Usually, reliably factory-made cars are equipped with thermoplastic boots. This material looks tough and even fragile, but during operation it becomes elastic, remaining durable. Among the disadvantages, we can only note the high price and inconvenience during installation; often the clamps have to be tightened in two steps, the second after some mileage and shrinkage.
Silicone and polyurethane are quite specific materials with their own areas of application. The first is not elastic enough, and the second, with a price comparable to thermoplastic, does not have all its other properties.
Sometimes reinforced covers are found, usually in a conveyor configuration. These are extremely strong and reliable parts, but for practical repairs it is quite enough to use thermoplastic from a reputable manufacturer.
Buying it complete with reliable clamps, separately supplied ties of various designs are not always convenient to use. Moreover, plastic cable ties or screw ties, which with their massive lock are sure to get caught on something and fail, are especially unacceptable.
How to replace CV joints on a Toyota Corolla E150: detailed instructions for everyone!
The procedure for replacing CV joints is characterized by small and painstaking work, but can be easily done at home.
To repair components, you will need 2-3 hours of free time, as well as a pair of narrow-nose pliers, a hacksaw for metal, a wrench with a powerful handle, a slotted screwdriver and a hammer. The procedure for replacing CV joints is performed according to the following algorithm:
- First you need to drive the car onto a flat surface, then jack it up and install additional stops under the engine side members;
- Next, you need to de-energize the car by disconnecting the negative terminal of the battery;
- Then we remove the drive axle drive and begin dismantling the grenades, having previously driven the drive into a powerful vice;
Note! When replacing this structural unit, it is necessary to remove the drive shaft from the distribution box, for which it is necessary to drain all the oil from the system. If there is no contamination in the technical fluid, the oil can be reused provided it is drained into a clean and dry container.
- Now you need to dismantle the wheel and unscrew the hub nut. The structural unit is unscrewed with a socket wrench at “30”; if turning is difficult, it is recommended to treat the nut with WD-40 and dismantle it after it has become loose – otherwise, you can grind off the edges with a wrench;
- Next, we move on to fastening the strut and unscrew the steering knuckle fixing bolts with a “19” wrench and disconnect the stabilizer bar;
It is important to know! When dismantling the fixing units on the rack, the wheel alignment will be disrupted, which will require restoring the calibration at a dealer service station.
- Upon completion of the preparatory work, access will open to the drive with an external CV joint, which must be brought forward. To do this, you will need to turn the steering wheel in different directions and beat the structure with a hammer, after which the part can be removed;
Note! This structural unit must be processed with extreme caution so as not to damage the thread. The best option would be to use a wooden hammer or wrap the tip in a soft rag.
- Now we pull the axle out of the hub and dismantle the inner CV joint on the other side, slightly prying the part with a pry bar;
- Next, before the procedure for dismantling the CV joint, it is recommended to fix with a marker the location of the parts, in particular the joint of the shaft with the grenade;
- Then we press the metal clamp with the tip of a screwdriver and mount a puller to dismantle the CV joints, after which we tighten the support nut and use a ratchet wrench to squeeze out the part. We remove the puller and take out the CV joint, gradually rotating the part to the sides;
- Now we twist the fixing ring from the anthers and knock the bearings off the shaft.
The parts are ready to be replaced with new components. The procedure for assembling CV joints and installing the drive shaft is carried out according to these instructions in strictly reverse order. Before assembling the structural unit, it is recommended to wash all parts of old grease and apply a layer of the composition recommended by the manufacturer.
It is important to know! If the required type of lubricant is not available, the part can be treated with a molybdenum-based substance, but the use of graphite-containing lubricants is not recommended.
After assembling the components, it is also advisable to replace the boots and clamps with new ones. It is also recommended to check the integrity of the CV joint seals and lubricate the components every 3 months of operation.
How to replace a CV joint on a Toyota Corolla?
Every car requires periodic maintenance of its main components. These include the engine, gearbox, chassis, etc. There are elements that play a very active role when a car is driven and require major maintenance over a certain period of time, such as CV joints on a Toyota Corolla. These parts provide torque transmission at various angles, which can reach 70 degrees relative to the main axis. This is a kind of hinge that does not often fail. It begins to deteriorate due to dirt and therefore needs either major maintenance or complete replacement. In this article we will talk about both.
A little more about CV joints
The hinge provides torque transmission at different angles. Its main purpose is to transmit torque to the wheels. In the automotive industry it is used only for front-wheel drive cars, which is exactly what our Corollas are. The hinges wear out quite quickly, especially under the influence of the environment and careless operation of the car. It is very important that the rubber tightly covers the hinges themselves, and also keeps all the lubricant inside, which is intended to increase the service life of the part.
Replacing the constant velocity joint on a Toyota Corolla
Before we begin the procedure, we will tell you what we needed and how long it took us. Let's start with spare parts, materials and tools. First of all, we needed a repair kit - a rubber band and a metal insert from the company 1-56 Maruichi, we also needed a special lubricant - we used NEO LUBRICANT and Liqui Moly 47 Langzeitfett + MoS2. We will also need a garage - it is important to have a completely dust-free environment, as well as a set of tools that will help disassemble the car.
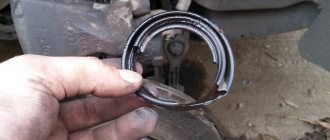
So let's get started. For us it all started when the CV joint rubber broke. We decided it was not too late to replace it, but if you want to install a new part, this instruction will also help you. Let's look at the photo. This is exactly what our torn CV joint rubber looked like.
After examining the inner rubber, as well as both on the other side of the car, we decided that we needed to change them all at once so that there would be no problems in the future. All the CV joint rubber bands have small cracks and are already quite worn out. The first thing we need to do is simply remove the wheel, after first jacking up the car from the front. Next we need to remove the cotter pin and control washer. This is not difficult to do if you have a suitable and convenient tool. Let's look at the photo.
After the sprocket has been removed, let's unscrew the hub nut. The most convenient way to do this is with a 30-degree deep socket. For convenience, just turn on the gear or ask someone to hold the brake pedal. For easy unscrewing, we use a large wrench, possibly with an additional lever. The photo shows the nut that needs to be unscrewed.
It is recommended to replace the external boot by removing the internal one, after first pulling the tripod off the shaft. In order to remove the drive shaft, all you need to do in the least painless way for wheel alignment is unscrew the ball joint from the lower arm - there are two nuts and only one bolt size 17., and also unscrew and disconnect the stabilizer bar link (as it is popularly called – bone).
To make things easier, we treat all the bolts we need with a special liquid - liquid wrench, it will help unscrew even the most dried-on bolts and nuts. After applying the liquid, it takes some time to soak.
After the liquid has done its job, which is 15-20 minutes, we take the keys and begin to unscrew the bolts and nuts we need. Let's look at the photo.
The drive shaft itself can be removed entirely, that is, the outer joint can be removed from the hub and the inner one can be pulled out from the gearbox. At the same time, it is important not to forget to drain the transmission oil from the box itself. We previously drained it.
But as for pulling out the internal grenade, nothing worked here, so we used the second option and removed the clamp that secures the internal boot on the grenade and pulled out the shaft with the tripod. In this scenario, there is no need to drain the oil, since the internal grenade remains in the box.
Next, we turn the steering wheel a little in the direction from which we will change the anthers or the CV joint itself. Lightly tap with a wooden mallet on the axis of the outer CV joint. This is necessary in order not to damage the thread. And slowly pull the axle out of the hub, while pulling the stand slightly to the side.
Next, remove the boot clamp from the inside of the CV joint, remove the boot from the grenade and remove the tripod. This is not difficult to do, look at the photo.
It is, of course, recommended to make notes which bearing should go into which grenade hole during reassembly. So, our drive shaft is removed.
Next, remove the retaining rings and knock off the ring holding the tripod with bearings from the shaft.
Next, remove the inner boot, then the outer boot.
Then we clean, lubricate and install everything in the reverse order, replacing the anthers with new ones. Let's look at the whole process in photographs. We clean exclusively with gasoline, wipe with any lint-free cloth, and use a brush when cleaning.
This completes the process of cleaning and replacing CV joint boots. As we see everything is very easy and simple, we did the same on the other side. If for some reason you want to change the CV joint completely, buy the entire assembly and install it after removing the drive shaft.
We clean everything from dirt and dust
Now you need to wash both hinges in gasoline or some solvent to remove old grease, sand and dust that got through the crack in the boot.
Old grease can be easily washed off with a brush. It is worth noting that at first I washed the tripod and the gasoline did not change much in color and remained transparent, although the lubricant was dark gray in color, but when I washed the outer CV joint.
Then the gasoline in the bath turned black (a graphite-containing CV joint lubricant was used). It follows from this that I used different lubricants for the external and internal hinges (as it should be).
Wipe everything with a clean rag and let the solvent dry a little.
For the outer joint I used Liqui Moly 47 Langzeitfett + MoS2 CV joint lubricant with molybdenum disulfide.
