Replacing the cabin filter on a Toyota Corolla E10
Not all Toyota Corolla E10 cars have a cabin filter as factory equipment, but on such cars you can install it yourself. Installation is simple - you need to use a paper knife or a miraculous bur with a typewriter, cut out an oval-shaped window welded from the factory for the filter, and put the filter in there, then close it with a plug. But still, this photo report will be about how to replace the interior cabin.
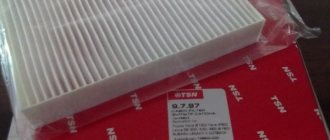
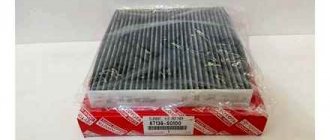
- 88508-12010 — Cabin filter for E10.
- 88899-12110 - Plug for E10.
- 88899-12340 — Plug from Corolla E11.
- 90467-07043-C0 — Pistons for plugs 4 pcs.
Plug and cap pistons
You will need to remove the glove compartment. Unscrew several screws and screws.
Inside the glove compartment there are 3 self-tapping screws (cross)
At the bottom of the glove compartment on the left there is 1 10 mm bolt and on the right 1 10 mm bolt + 1 cross self-tapping screw, approximately shown in orange circles in the photo above.
On the right under the glove compartment we fold back the plastic cover under which 1 10 mm bolt and 1 cross-tapping screw are hidden.
Source
Replacing the cabin filter
For a long time I could not understand why the stove was blowing so weakly. Fortunately, it’s already warm enough outside to actively use it, but nevertheless this fact was confusing. I ordered a cabin filter (and other little things, but more on that later). I picked it up today and will change it. Article number TOYOTA 8850812010
For some reason, many people disassemble the glove compartment and the threshold to get to the filter, but I did it without this. The main thing is to take your time and carefully insert the new filter along the guides.
The instructions seem to be for right-hand drive. I have a left one and when pulling out the filter had to be bent to the left.
The plug is located behind the glove compartment. To pull it out, you need to remove the plastic clips.
After this, we cling to the “tongue” and begin to carefully pull out the filter, bending it to the left.
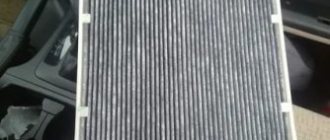
The previous owner apparently didn't bother much about the stove. Well, judging by the condition of the filter, it is not surprising that the air flow was bad.
The assembly process is in reverse order. Carefully slide the filter into the connector along the guides and put the plug in place, securing it with clips.
After replacing the filter, the stove began to heat much better, the flow of warm air can be felt even at the lowest power.
Source
Replacing cabin filter Corolla AE110 Toyota Corolla
1) Remove all the junk from the glove compartment and leave it open.
2) Unscrew 4 screws and 1 bolt (the manual says 3 screws and 2 bolts, but I only had 1 bolt and 4 screws).
To unscrew the top screws you need to open the glove compartment.
Screw location. The lower one is indicated by an arrow.
To unscrew the lower screw and bolt, you must close the glove compartment. The photo shows the bottom right screw and a Snickers wrapper.
To unscrew the bolt you will have to remove part of the threshold trim. There is no need to pull anything. I simply removed a piece of the triangular trim and, bending it back, unscrewed the bolt.
After this, the glove compartment itself will fall into your hands.
3) Cut out the false filter plug. In order to do this you will need to: a) Fold the front seats all the way down. b) Cover them with newspapers (we don’t want to get the car dirty, do we?). c) Miraculously turn around in the car with your feet towards the window on the back of the seat, sit with your butt on the edge of the seat and place your head and hands where the glove compartment used to be. In general, with my almost two-meter height, the Kama Sutra turned out even better.
We cut along the edges of the plug - the plastic there is very thin, but it is still difficult to cut due to the limited space under the glove compartment.
The plug has been cut out. You can straighten the edges with a file, but I did not do this. It would also be advisable to remove any debris and leaves from there.
4) Insert the filter.
The filter is inserted in 3 folds with the thin part facing up.
Be especially careful that the guides on the filter and in the hole match. The photo shows the WRONG way to insert the filter, which resulted in the filter being slightly wrinkled at the top. The filter should fold towards the driver, and not as indicated in the photo.
5) Close the filter with a plug. The rubber part should close the hole tightly. The filter is secured with four pistons, but since waiting for them is long and expensive, you can get by with four M6 bolts (shorter ones are better) and four M6 nuts.
The edge of the filter plug.
I also replaced the video cable going to the camera and secured everything well.
Why is a filter element needed, how often to change it, how to determine the need for replacement
The filter element ensures high air quality and cleanliness in the cabin, which is very important for the health of the driver and passengers.
Toyota Corolla in AE 103, 100, 110, 120, 150 bodies, as well as Toyota Corolla Spasio, cars produced in 2007, 2008, 2009, 2010, 2011, 2012 have the same principle for removing and installing a new cabin filter, which is located in these modifications in the same place.
Replacing the cabin filter is usually done when it is felt that the air flow from the ventilation, air conditioning and heating systems has decreased. In addition, the appearance of a not very pleasant persistent smell inside the car, as well as causeless fogging and condensation on the windshield are also signs of the need to replace the Toyota Corolla cabin filter, not only in the Corolla AE91 body, but also in other versions. It is advisable to inspect and test the functionality of the cabin filter element at least once a year to ensure its effective operation. And if necessary, it is worth replacing this cleaning element in a timely manner.
If the car is operated in dusty conditions, in arid climates and with poor air quality, then this consumable should be checked and replaced more often.
How to replace the cabin filter on a Toyota Corolla
To effectively clean the air in the interior of any car from dust, burning, soot, etc., cabin filters are used that clean the air flow coming from air conditioning, heating and ventilation systems. Replacing the Toyota Corolla cabin filter is a simple procedure that even a driver with little repair experience can handle.
Why is a filter element needed, how often to change it, how to determine the need for replacement
The filter element ensures high air quality and cleanliness in the cabin, which is very important for the health of the driver and passengers.
Toyota Corolla in AE 103, 100, 110, 120, 150 bodies, as well as Toyota Corolla Spasio, cars produced in 2007, 2008, 2009, 2010, 2011, 2012 have the same principle for removing and installing a new cabin filter, which is located in these modifications in the same place.
Replacing the cabin filter is usually done when it is felt that the air flow from the ventilation, air conditioning and heating systems has decreased. In addition, the appearance of a not very pleasant persistent smell inside the car, as well as causeless fogging and condensation on the windshield are also signs of the need to replace the Toyota Corolla cabin filter, not only in the Corolla AE91 body, but also in other versions. It is advisable to inspect and test the functionality of the cabin filter element at least once a year to ensure its effective operation. And if necessary, it is worth replacing this cleaning element in a timely manner.
If the car is operated in dusty conditions, in arid climates and with poor air quality, then this consumable should be checked and replaced more often.
Substitution rules
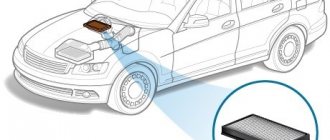
On the Internet you can find many different videos about how to install and choose the type and number of filter for cars in the back of E 100 and others. Usually there are no strict restrictions; the main thing is to choose a high-quality element that is suitable in size. In a Toyota Corolla, the process of replacing the cabin filter does not require special tools and can be quickly completed without going to a service station. Typically, the cabin air filter is located behind the glove compartment.
Before changing the cabin filter, you should prepare your work area by freeing up space in the front passenger seat. Empty the glove compartment and open the front passenger door.
While working, you may need to lie down, and in order to avoid getting dirty, it is recommended to spread something both on the floor of the car and on the ground in front of the open door.
The replacement step by step looks like this:
- It is necessary to open the glove compartment and press the latches on the right and left on which it is held, thus removing the lid and gaining access to the filter container.
- The container located behind the glove compartment must be opened; to do this, press the buttons on its lid and remove it.
- After that, the used old consumable is removed from the compartment, and its location is wiped with a damp cloth.
- After the location of the filter element has dried, you should begin installing a new one. It is very important to consider the correct installation method. Most often, arrows on the consumable itself indicate the direction of installation.
- Then you should install the covers in reverse order, first on the compartment with the filter, and then on the glove compartment.
Typically, all elements are simply and tightly inserted into their grooves, and the process does not take much time.
Conclusion
Installing a new cabin filter, regardless of what type of body the Toyota Corolla has, is quick and usually does not cause any difficulties. In this case, you should monitor its performance and periodically check for the degree of contamination. This will help protect the driver and passengers from dusty air entering the respiratory tract.
Substitution rules
On the Internet you can find many different videos about how to install and choose the type and number of filter for cars in the back of E 100 and others. Usually there are no strict restrictions; the main thing is to choose a high-quality element that is suitable in size. In a Toyota Corolla, the process of replacing the cabin filter does not require special tools and can be quickly completed without going to a service station. Typically, the cabin air filter is located behind the glove compartment.
Before changing the cabin filter, you should prepare your work area by freeing up space in the front passenger seat. Empty the glove compartment and open the front passenger door.
While working, you may need to lie down, and in order to avoid getting dirty, it is recommended to spread something both on the floor of the car and on the ground in front of the open door.
The replacement step by step looks like this:
- It is necessary to open the glove compartment and press the latches on the right and left on which it is held, thus removing the lid and gaining access to the filter container.
- The container located behind the glove compartment must be opened; to do this, press the buttons on its lid and remove it.
- After that, the used old consumable is removed from the compartment, and its location is wiped with a damp cloth.
- After the location of the filter element has dried, you should begin installing a new one. It is very important to consider the correct installation method. Most often, arrows on the consumable itself indicate the direction of installation.
- Then you should install the covers in reverse order, first on the compartment with the filter, and then on the glove compartment.
Typically, all elements are simply and tightly inserted into their grooves, and the process does not take much time.
Step-by-step instructions for a Toyota Corolla car
Replacing the cabin filter on a Toyota Corolla is a simple process and in order to carry it out we will need a new air purifying element purchased in a store and our hands. The container that prevents dirty air from entering the cabin in this car is located under the glove compartment on the side of the front passenger seat. At the first stage, it is best for us to prepare the workplace. You need to open the front passenger door and lay a blanket in front of the car. It will allow you to get the job done without getting too dirty.
At the second stage, we kneel down and open the glove compartment. Along its edges, on the left and right, there are special latches that hold the glove compartment lid. By pressing them, the lid will fall down - thus, we get direct access to the container that contains the cabin filter itself. The location of the latches is indicated by red arrows in the photo.
In the third step, we should open the container. This is necessary in order to gain direct access to the filter material. This is very easy to do - press the latch on the container and move its lid to the side. The red arrow indicates the location of the latch on the container.
Stage four. We take out the used air purifying element and if it is already dirty enough, we throw it away; we will no longer need it. After we pulled it out, it is important to prepare a place for the new filter. To do this, you just need to wipe the container with a damp cloth and wait until it dries.
When the wiped surface has dried, we move on to the next stage - insert the filter. It is worth paying attention to the inscriptions on the packaging of the purchased filter product or on it itself. In order for it to work fully, it must be inserted correctly into the container. Usually the correct position is very easy to determine by the arrows on the filter itself. In the photo, this moment is again highlighted with a red arrow.
After inserting the cabin filter, you must tightly close the container with it. After closing it, everything needs to be checked again. The container lid should snap on easily and without force.
After checking everything, you can put the glove compartment itself in place. This is done by simply lifting it up. It should automatically click into place and stay in place until the next time it is replaced.
We are cleaning our workplace. This completes the replacement process. As we have seen, replacing the air purifying element is not difficult - everything is done simply and without any effort.
Replacing the cabin filter for Corolla AE100 code 88508-12010
Source: https://odesoftami.com/sakura-zamena-filtra/ Read more at the link above, read and see #photos from our #trip on the blog on my website https://odesoftami.com/ It's interesting and informative! Subscribe to the #odesoftamicom channel, follow photo reports https://odesoftami.com/category/china/, comment on articles and videos, and our other #trips are already available in the Travel category or at the link https://odesoftami.com/category/travel / Also, in all our trips #by car, I provide information #road conditions https://odesoftami.com/category/travel/dorogi/ the best #routes, real reviews about #hotels, inns and other rented housing from private owners https:// odesoftami.com/category/travel/hotels/ and in general everything interesting just for you. = = = = = = = = = = = = = = = = = = Our regular subscribers look for us using the following hashtags: #Ukraine #Romania #Moldova #Belarus #Poland #Transcarpathia #Crimea #Odessa #Kyiv #Lvov #Odessa # drive2 #denisalekseenko #mountains #brody #kulevcha #lavra #pochaev #kievskayarus #rus #karpati #tatras #drivetravel #carpathians #dokarpaty #waterfall #auto travel #weekend walk #let's go with us #attraction #interesting places #tourists note #outlanderxl #corolla #mercedes #matiz # isodessy #what to see #where to go #tourism #car tourism #excursions #vacation #adventures #dolphins #nemo #lanzheron #fountain #uman #sofievka #salt mines #lipaka #parcels from china #aliexpress #travel #shopping #wwwodesoftamicom #odesoftami.ru #odessa #denisalekseenko = = = = = = = = = All videos on the #odesoftami channel, also known as the #odesoftamicom channel, are unique. All rights to these videos belong to the author of the channel, namely me https://odesoftami.com/aboutme/. Any posting of videos without a direct visible link to the website https://odesoftami.com is illegal and requires immediate removal. Read more about the content placement policy https://odesoftami.com/advertising/ and copyright here https://odesoftami.com/contact/ All Rights Reserved (c) 1997-2018 odesoftami — Deni© A!!ek$eenk0
Video Replacing the cabin filter of Corolla AE100 code 88508-12010 channel ODESOFTAMI. COM
Source
Replacing the Toyota Corolla cabin filter: instructions
Eight years after its debut, the Toyota Corolla was listed in the Guinness Book of Records as the best-selling model. As of 2013, over 35 million cars have been sold.
The most popular Corolla is in the CIS and Russia, including in body variations:
- E120 (2000 - 2007);
- E150 (2008, 2012).
Average level of comfort, safety, noise and vibration insulation, fuel consumption. What the average driver needs when operating a car in megacities.
The equipment is not fussy about maintenance; it will take a couple of minutes to replace the Toyota Corolla cabin filter yourself. Knowledge and experience are not required.
How often should I replace it?
In accordance with the manufacturer's regulations, the cleaning element is updated every scheduled maintenance - after 20,000 km .
For CIS countries, it is rational to reduce the replacement interval to 10,000 km. We take into account the level of dust and gas pollution in regions and megacities. In summer, the resource is reduced by fallen leaves and poplar fluff, which is absorbed by the air flow. In winter there is excess moisture, which contributes to the emergence and development of pathogenic bacteria.
Most motorists follow the recommendations in the operating instructions, which is also true.
Choosing a cabin filter
Catalog number of the original (factory) cleaning element: 87139-YZZ07, 88568-52010 , depending on the configuration, body type E120, E150.
The starting price for filters is from 1000 rubles from an official dealer. You can find it at car markets for 300 rubles cheaper. For many car enthusiasts, such amounts are beyond their means, so they are forced to look for cheap alternative options.
Proven and high-quality analogues:
The average price is from 550 rubles depending on the region.
Instructions for replacing the cabin filter on a Toyota Corolla
As mentioned at the beginning of the article, on modifications E120, E150 the replacement algorithm is identical. No tools are needed, just a new filter, rags, and a household vacuum cleaner for cleaning.
- On the right front passenger side, open the glove box and empty the contents;
- We press the plastic sides at the rear (E120) and remove the stops from the engagement grooves. On the Corolla E150 the algorithm is identical;
- Remove from the lower mount;
- The plastic cover and filter housing are located behind the glove box. We lift the lid and remove the cleaning element;
- We blow out the cavity with a vacuum cleaner, remove dust, dirt, leaves;
- Place the new filter in the downward arrow direction.
We assemble the structure in reverse order. Don't forget about the maintenance of the air conditioner evaporator. It is located behind the filter. To clean, use an aerosol and spray for 10–15 seconds. Dirt and waste products are removed through the drainage tube.
Source
How to change the cabin filter yourself
As already noted, the Toyota Corolla is one of the easiest cars to maintain in this regard. To remove the glove compartment, where the cabin filter is located on the Toyota Corolla of both modifications popular in our country, you do not need to use any tools - “straight” hands are enough. So, the sequence of actions is as follows:
- empty the glove box of its contents;
- if replacing the cabin filter of a Toyota Corolla 2008 is carried out in the winter season, it is advisable to warm up the car before starting work - cold plastic is more fragile and can easily break;
- to dismantle the glove box, you need to carefully move the side plates of the glove box in the rear part (in the depths) - this will disengage the latches holding the moving part of the glove box;
- to remove the glove box, now it is enough to remove it from the hooks located in its lower part;
- access will open to the lid under which the SF is hidden. To remove it, press on the plastic latches on both sides of the plate, disengaging them from the torpedo body;
- Now you can remove the cabin filter itself by simply pulling its housing towards you. To prevent accumulated debris from getting into the air ducts and heater fan (it will be quite difficult to remove them from there), you should remove the filter very carefully and slowly, without sudden jerks;
- After installing a new filter, perform the entire sequence of actions in reverse order.
Many owners combine replacing the Toyota Corolla AE104 cabin filter with preventative cleaning of the evaporator of the air conditioning system, since this unit is located directly behind the cabin filter element. However, it is much easier to do this through a drainage tube, which should be removed from under the carpet on the passenger side before starting work.
The procedure itself is extremely simple if you use an aerosol: just spray it through the drain or directly into the evaporator - the remaining liquid will flow down through the same drainage hole. After 8-120 minutes, you can turn on the car air conditioner, starting with the recirculation mode at the lowest fan speed, while the foot blowing mode should be activated - in this case, the evaporator will be purged as thoroughly as possible.
Cabin filter for Corolla 150
The cabin filter cleans the air coming in from outside. It traps dust, pollen and foreign bodies. Using a carbon filter allows you to clean the air from odors and harmful impurities.
During the operation of the car, the filter element gradually becomes clogged. As a result, its throughput is reduced. The stove and climate system begin to work less efficiently.
The problem with a clogged filter can be solved by cleaning or replacing it. If you are installing a new product, you must purchase an original filter element or follow the recommendations of experienced owners on choosing a consumable. In order for the filter to perform its intended functions efficiently, maintenance intervals must be strictly observed.
How to change the cabin filter in a Toyota Corolla yourself?
When replacing the cabin filter in a Toyota Corrola 150 body, there is no need to prepare special tools. The procedure is carried out only with the help of hands. There are no safety regulations. Care must be taken not to break the plastic when removing the filter element.
Step-by-step instructions for replacing the cabin filter on a Toyota Corolla:
- The filter is located behind the glove compartment. Therefore, you can get to it from the front passenger door.
- Open the front passenger door and then the glove box.
- Remove the glove compartment. To do this, you need to squeeze the edges and remove the lock from below.
- The lower glove box mounts look like this:
- A view of the cabin filter housing opens. It is necessary to dismantle the old part. Please note: it will contain a lot of dirt and dust.
- Install the new interior consumables into the plastic hole.
- Close the filter element cover.
- Reassemble in reverse order.
The process of replacing the cabin filter element on a Toyota Corolla is complete.
Why is a filter element needed?
Considering that there is a lot of dust and other dangerous impurities in the road air, it is dangerous to ignore the importance of the task performed by the Corolla 150/120 cabin filter.
For the Corolla's climate system to operate correctly, a constant flow of air is required, in the absence of which the system resorts to using recirculation flows. All this leads to the accumulation of dust on the filter, increased humidity in the cabin, constant fogging of windows and the development of a favorable environment for pathogenic microorganisms.
In this mode, the air conditioning, heating and filtration systems work to the limit, which leads to a reduction in service life, as well as an increase in fuel consumption.
Choosing a cabin filter
Catalog number of the original (factory) cleaning element: 87139-YZZ07, 88568-52010 , depending on the configuration, body type E120, E150.
The starting price for filters is from 1000 rubles from an official dealer. You can find it at car markets for 300 rubles cheaper. For many car enthusiasts, such amounts are beyond their means, so they are forced to look for cheap alternative options.
Proven and high-quality analogues:
The average price is from 550 rubles depending on the region.
The problem of choosing a cabin filter
The standard SF installed on the Toyota Corolla is a regular anti-dust product with catalog number 87139-YZZ07, the cost of which is around 400 rubles. Analogs of comparable quality can be found at half the price, so even if the presence of foreign odors is not a problem for you, using a non-original filter element may be financially preferable. The original coal product (catalog number 88568-52010) costs much more - 1000 rubles, but here you can also find analogues with a significantly lower price tag. We invite you to familiarize yourself with the list of dust cabin filters suitable in size for installation on Toyota Corolla cars in both bodies (120/150):
- Asam (catalog number 70345, price from 210 rubles);
- Agautoparts (catalog number AG5099, price from 220 rubles);
- Ashiika (catalog number 21TY-TY2, price from 220 rubles);
- BIGFilter (catalog number GB9859, price from 220 rubles);
- Denckerman (catalog number M110060, price from 220 rubles);
- AMCFilters (catalog number TC1006, price from 310 rubles);
- Amd (catalog number AMD-JFC111, price from 310 rubles);
- BluePrint (catalog number ADT32505, price from 310 rubles);
- Champion (catalog number CCF0123, price from 320 rubles);
- Jakoparts (catalog number J1342001, price from 320 rubles);
- JapanParts (catalog number FAA-TY2, price from 320 rubles);
- JcPremium (catalog number B42002CPR, price from 330 rubles);
- Asakashi (catalog number AC101J, price from 330 rubles);
- Meyle (catalog number 30-12-3190001, price from 330 rubles);
- Nipparts (catalog number J1342001, price from 340 rubles);
- Quattro (catalog number QF20Q00002, price from 340 rubles);
- SCT (catalog number SA1209, cost from 350 rubles);
- Starline (catalog number SF/KF9198, price from 350 rubles);
- Tamoka (catalog number F406101, price from 350 rubles).
We also provide a list of coal SFs:
- Alco (catalog number MS6188, price from 400 rubles);
- Delphi (catalog number TSP0325173, price from 400 rubles);
- Denso (catalog number DCF357P, price from 400 rubles);
- Filtron (catalog number AP142/1, price from 400 rubles);
- Fortech (catalog number FS-070, cost from 400 rubles);
- Fram (catalog number CF9466, cost from 400 rubles);
- Goodwill (catalog number AG162CFC, cost from 450 rubles);
- InterpartsFilter (catalog number IPCA107, price from 400 rubles);
- Kolbenschmidt (catalog number 50013944, price from 400 rubles);
- Kortex (catalog number KC0014S, cost from 400 rubles);
- Patron (catalog number PF2095, price from 400 rubles);
- Profit (catalog number 1521/2144, price from 400 rubles);
- Bosch (catalog number 1987 432084, price from 500 rubles);
- LYNXAuto (catalog number LAC-105, price from 500 rubles);
- Knecht (catalog number LA 109, price from 500 rubles);
- Mapco (catalog number 65550, price from 500 rubles);
- Mann (catalog number CU1828, price from 550 rubles);
- Nac (catalog number 77190CH, price from 550 rubles);
- Febi (catalog number 24433, price from 700 rubles);
- Micro (catalog number RCF1801B, price from 700 rubles);
- Avantech (catalog number CFC0108, price from 1000 rubles);
- Corteco (catalog number 80000419, price from 1000 rubles).
When replacing the cabin filter of a Toyota Corolla 2008 and other years of production, we advise you to pay attention to its dimensions - they may vary depending on the year of production, the number of the power unit and its displacement. In total, filters of the following dimensions (length/width/thickness) are suitable for Corolla, starting from the eighth generation:
- 0x219.5x20.5;
- 0x215.0x19.0;
- 0x221.0x20.0;
- 0x217.0x16.0.
You can find out the dimensions of your SF by referring to the user manual or by measuring it after dismantling.
Choosing a cabin filter
In catalogs, the standard cabin air purifier filter is designated by article number 87139-YZZ07. The cost of this element varies in the range of 400 rubles. The cost of non-original consumables is half as much, however, the quality of cleaning is much lower. The original Corolla 150 carbon filter with catalog article No. 88568-52010 will cost no less than 1000 rubles.
The lid is visible behind the removed glove compartment, open the latch
List of standard cabin filters compatible with Toyota Corolla 150:
- Asam (No. 70345, 210 rubles);
- Agautoparts (No. AG5099, RUR 220);
- Ashiika (No. 21TY-TY2, 220 rub.);
- BIGFilter (No. GB9859, 220 rub.);
- Denckerman (No. M110060, 220 rubles);
- AMCFilters (No. TC1006, 310 RUR);
- Amd (No. AMD-JFC111, 310 rub.);
- BluePrint (No. ADT32505, 310 rub.);
- Champion (No.CCF0123, RUR 320);
- Jakoparts (No. J1342001, 320 RUR);
- JapanParts (No.FAA-TY2, 320 rub.);
- JcPremium (No. B42002CPR, 330 rub.);
- Asakashi (№AC101J, 330 rub.);
- Meyle (No. 30-12-3190001, 330 rub.);
- Nipparts (No. J1342001, 340 rub.);
- Quattro (No.QF20Q00002, 340 RUR);
- SCT (No. SA1209, 350 rub.);
- Starline (No. SF/KF9198, 350 rub.);
- Tamoka (No. F406101, 350 RUR).
Install the filter correctly, the arrow on the filter should point down
Carbon absorbers compatible with Corolla E150:
- Alco (No. MS6188, 400 rubles);
- Delphi (No.TSP0325173, 400 RUR);
- Denso (No.DCF357P, 400 RUR);
- Filtron (No. AP142/1, 400 rubles);
- Fortech (No. FS-070, 400 rubles);
- Fram (No. CF9466, 400 rub.);
- Goodwill (No. AG162CFC, RUR 450);
- InterpartsFilter (No. IPCA107, 400 rub.);
- Kolbenschmidt (No. 50013944, 400 rub.);
- Kortex (No. KC0014S, 400 rub.);
- Patron (No. PF2095, 400 rub.);
- Profit (No. 1521/2144, 400 rub.);
- Bosch (No. 1987 432084, 500 rub.);
- LYNXAuto (No.LAC-105, 500 RUR);
- Knecht (No. LA 109, 500 rub.);
- Mapco (No. 65550, 500 rub.);
- Mann (No.CU1828, 550 RUR);
- Nac (No. 77190CH, 550 rub.);
- Febi (No. 24433, 700 rub.);
- Micro (No. RCF1801B, 700 RUR);
- Avantech (No. CFC0108, 1000 RUR);
- Corteco (No. 80000419, 1000 rubles).
When replacing the Toyota Corolla 150 cabin filter, check the dimensions of the filtration element, as they may vary depending on the year of manufacture and engine.
We install the glove compartment in place, fasten the lower eye of the stop. The image below shows where to mount
The following dimensions (LxWxD) are compatible with the filtration system of the 8th generation Corolla model under consideration:
You can find out the size of the filter installed on your vehicle by reading the instruction manual or measuring the element when removing it.
Benefits of a carbon filter
The design of the carbon cabin filter includes a layer of activated carbon, which absorbs chemicals at the molecular level. This allows you to protect those in the cabin from various types of dangerous compounds released with exhaust gases.
The carbon filter should be gray
The main advantages of using carbon absorbers:
- It is capable of actively absorbing a large amount of harmful substances that are released in exhaust gases, which is extremely important when driving in traffic jams. In such situations, you can safely use the air conditioner without resorting to recirculation mode;
- A clean carbon filter element prevents glass from fogging up;
- The degree of air purification increases to 95-98%;
- Retains external odors and volatile chemicals.
The stumbling block when choosing such a filter is the high price, which is almost 2 times higher than the cost of a standard element.
Replacing the Toyota Corolla cabin filter
Car owners often underestimate the importance of cabin filters. However, this consumable, similar to a standard air filter, is changed at some intervals, since untimely routine maintenance on this part significantly affects the health of people in the car.
It is easy to change the Toyota Corolla 150/120 cabin filter yourself without any significant effort or financial costs.
Why is a filter element needed?
Considering that there is a lot of dust and other dangerous impurities in the road air, it is dangerous to ignore the importance of the task performed by the Corolla 150/120 cabin filter.
For the Corolla's climate system to operate correctly, a constant flow of air is required, in the absence of which the system resorts to using recirculation flows. All this leads to the accumulation of dust on the filter, increased humidity in the cabin, constant fogging of windows and the development of a favorable environment for pathogenic microorganisms.
In this mode, the air conditioning, heating and filtration systems work to the limit, which leads to a reduction in service life, as well as an increase in fuel consumption.
Standard elements of the filtration system trap up to 90% of dust particles passing along with the air flow into the Corolla's cabin. Carbon adsorbers are capable of absorbing not just dust fractions, but also trap unpleasant odors and volatile substances such as carbon monoxide.
How often should I change the filter element?
In accordance with the manufacturer’s recommendations, routine maintenance to replace the filter in the cabin of the Toyota Corolla 150 should be carried out after every 20 thousand kilometers.
However, in our realities, such an interval does not justify itself: in the vast majority of cases, filters stop performing their cleaning function much earlier. Therefore, in reality, it is better to change the cabin air filter every 10 thousand kilometers.
Exceptions apply to cars operated in northern regions, where cold temperatures last much longer, which means the filter gets dirty much less often.
Signs that require replacing the air purification filter in the Toyota Corolla 150:
- persistent unpleasant odors, the intensity of which increases when the air conditioner is turned on;
- reducing the power of the air flow exiting through the deflectors;
- increased appearance of dust in the cabin even with frequent wet cleaning;
- fogging of windows for no apparent reason.
Choosing a cabin filter
List of standard cabin filters compatible with Toyota Corolla 150:
- Asam (No. 70345, 210 rubles);
- Agautoparts (No. AG5099, RUR 220);
- Ashiika (No. 21TY-TY2, 220 rub.);
- BIGFilter (No. GB9859, 220 rub.);
- Denckerman (No. M110060, 220 rubles);
- AMCFilters (No. TC1006, 310 RUR);
- Amd (No. AMD-JFC111, 310 rub.);
- BluePrint (No. ADT32505, 310 rub.);
- Champion (No.CCF0123, RUR 320);
- Jakoparts (No. J1342001, 320 RUR);
- JapanParts (No.FAA-TY2, 320 rub.);
- JcPremium (No. B42002CPR, 330 rub.);
- Asakashi (№AC101J, 330 rub.);
- Meyle (No. 30-12-3190001, 330 rub.);
- Nipparts (No. J1342001, 340 rub.);
- Quattro (No.QF20Q00002, 340 RUR);
- SCT (No. SA1209, 350 rub.);
- Starline (No. SF/KF9198, 350 rub.);
- Tamoka (No. F406101, 350 RUR).
Carbon absorbers compatible with Corolla E150:
- Alco (No. MS6188, 400 rubles);
- Delphi (No.TSP0325173, 400 RUR);
- Denso (No.DCF357P, 400 RUR);
- Filtron (No. AP142/1, 400 rubles);
- Fortech (No. FS-070, 400 rubles);
- Fram (No. CF9466, 400 rub.);
- Goodwill (No. AG162CFC, RUR 450);
- InterpartsFilter (No. IPCA107, 400 rub.);
- Kolbenschmidt (No. 50013944, 400 rub.);
- Kortex (No. KC0014S, 400 rub.);
- Patron (No. PF2095, 400 rub.);
- Profit (No. 1521/2144, 400 rub.);
- Bosch (No. 1987 432084, 500 rub.);
- LYNXAuto (No.LAC-105, 500 RUR);
- Knecht (No. LA 109, 500 rub.);
- Mapco (No. 65550, 500 rub.);
- Mann (No.CU1828, 550 RUR);
- Nac (No. 77190CH, 550 rub.);
- Febi (No. 24433, 700 rub.);
- Micro (No. RCF1801B, 700 RUR);
- Avantech (No. CFC0108, 1000 RUR);
- Corteco (No. 80000419, 1000 rubles).
When replacing the Toyota Corolla 150 cabin filter, check the dimensions of the filtration element, as they may vary depending on the year of manufacture and engine.
The following dimensions (LxWxD) are compatible with the filtration system of the 8th generation Corolla model under consideration:
- 0x219.5x20.5;
- 0x215.0x19.0;
- 0x221.0x20.0;
- 0x217.0x16.0.
You can find out the size of the filter installed on your vehicle by reading the instruction manual or measuring the element when removing it.
Benefits of a carbon filter
The design of the carbon cabin filter includes a layer of activated carbon, which absorbs chemicals at the molecular level. This allows you to protect those in the cabin from various types of dangerous compounds released with exhaust gases.
The main advantages of using carbon absorbers:
- It is capable of actively absorbing a large amount of harmful substances that are released in exhaust gases, which is extremely important when driving in traffic jams. In such situations, you can safely use the air conditioner without resorting to recirculation mode;
- A clean carbon filter element prevents glass from fogging up;
- The degree of air purification increases to 95-98%;
- Retains external odors and volatile chemicals.
The stumbling block when choosing such a filter is the high price, which is almost 2 times higher than the cost of a standard element.
Replacing the filter yourself
If you have “correctly growing” hands, replacing the cabin filtration element of a Toyota Corolla is not difficult. Before you change the cabin filter on your Corolla 150 yourself, empty the glove box.
Algorithm for replacing the cabin absorber:
- Empty the glove compartment;
- If replacing in the cold season, it is better to pre-warm the car, since cold plastic is fragile and therefore often cracks when pressed;
- To dismantle the glove compartment, carefully move the side walls and open the fixing elements of the drawer pull-out;
- Remove the glove compartment from the hook-shaped fasteners at the bottom of the glove compartment;
- Behind it is a cover covering the cabin filter. To remove the part, simply press down on the side clips attached to the body
- Take out the anti-dust element. Avoid getting debris into the air duct and heating fan, perform the manipulation very carefully, without pulling the filter with force;
- Insert a new filter.
After completing installation of the new absorber, secure the filter cover and then reassemble the glove box.
Conclusion
As you have already seen, the cabin filter is no less important than the standard air filtration element. Using a carbon filter provides a number of benefits, including more thorough cleaning of the air entering the cabin. However, before changing the cabin filter on a Toyota Corolla, check its dimensions. Please note that untimely replacement of consumables entails a detrimental effect of accumulated dust on the health of passengers, and also affects the operation of the vehicle.
Timing for replacing the cabin filter Corolla 150/120
The importance of timely replacement of the filter element is not always obvious. Meanwhile, as it becomes polluted, the amount of fresh air entering the cabin decreases sharply. Since the car's climate system cannot operate without an influx of air mass, it begins to use internal air, as if operating in recirculation mode. At the same time, the amount of dust in the cabin gradually begins to accumulate, and the increased humidity contributes to the rapid fogging of the glass and creates favorable conditions for the proliferation of pathogenic microflora.
Due to a lack of air flow, the efficiency of airflow decreases sharply; the air conditioner, fan and heater are forced to operate at maximum power, which reduces their service life and leads to increased fuel consumption. Typically, it is recommended to replace the cabin filter of Toyota Corolla 2012 and other years of production as each maintenance is completed, but this is a very rough recommendation, which also does not take into account the quality of domestic roads. More realistic signs indicating the need to install a new cabin filter include the following symptoms:
- the appearance of persistent foreign odors, which intensify when the fan is turned on;
- a noticeable drop in the power of the air flow blowing from the deflectors;
- rapid dusting of the interior, despite frequent wet cleaning;
- Frequent fogging of windows for no reason.
Replacing the cabin filter on a Toyota Corolla
The cabin air filter is an integral part of almost every car. It is responsible for cleaning the air entering the cabin, while trapping small particles of dust, sand, and so on. Therefore, it needs to be changed periodically.
Unfortunately, many motorists sometimes forget about the importance of replacing the cabin filter. And some have no idea what he is at all. But despite this, replacement still needs to be carried out. After all, an old, worn-out air filter is not able to carry out high-quality air purification and trap harmful particles. Consequently, you and your passengers yourself then breathe this polluted air.
Filter selection
To replace the cabin filter, you will need a new one. Of course, you can save yourself a lot by purchasing a cheap analogue or even making it yourself. But this is wrong, because you are trying to save on your own health. In this case, it is better not to skimp and buy an original spare part.
There are actually several positive aspects to using a quality filter element. Firstly, while moving you will breathe purified air. And secondly, clean air will also flow with fuel into the combustion chamber, forming a high-quality fuel mixture. This will significantly improve the performance of the car.
It is best to purchase a high-quality filter from trusted stores, as you may run into a fake. Some unscrupulous sellers, under the guise of the original, sell a cheap analogue from China or Poland. Another important fact: the filter is selected using special electronic catalogs. Therefore, you need to know exactly the chassis number, engine number and year of manufacture. But this is not difficult to find out, since all the necessary information is contained in the registration document.
Replacing the cabin filter step by step
Having decided on the choice of cabin filter, you can begin to replace it.
- Take an old jacket or something like that and put it under your feet. During the replacement process you will have to stand on your knees;
- After opening the trunk, press the special latches on the sides. After this, click on the trunk wall;
- After removing the trunk, you should see a filter under the lid. Remove this lid and set aside;
- The new filter element should already be ready;
- After removing the old filter, clean the panel from dirt and dust;
- Insert the new filter into place;
- Install the cover. It is attached using clamps, so press it until you hear characteristic clicks.
That's all, actually. You managed to replace the cabin filter yourself without any help. The advantage of the Toyota Corolla is its ease of replacement, which can be a serious challenge for you on other cars. A new filter should last you about one year or 30 thousand kilometers. After this, this procedure will have to be repeated. But you should no longer have problems with this, since you are already familiar with this process.
Replacing the filter yourself
The lower loop of the stop is attached here.
If you have “correctly growing” hands, replacing the cabin filtration element of a Toyota Corolla is not difficult at all. Before you change the cabin filter on your Corolla 150 yourself, empty the glove box.
Algorithm for replacing the cabin absorber:
- Empty the glove compartment;
- If replacing in the cold season, it is better to pre-warm the car, since cold plastic is fragile and therefore often cracks when pressed;
- To dismantle the glove compartment, carefully move the side walls and open the fixing elements of the drawer pull-out;
- Remove the glove compartment from the hook-shaped fasteners at the bottom of the glove compartment;
- Behind it is a cover covering the cabin filter. To remove the part, simply press down on the side clips attached to the body
- Take out the anti-dust element. Avoid getting debris into the air duct and heating fan, perform the manipulation very carefully, without pulling the filter with force;
- Insert a new filter.
Attach the support leg to the glove box
After completing the installation of the new absorber, fasten the filter cover, and then assemble the glove box back.
Step-by-step instructions with photos and videos: how to replace the cabin filter on a Toyota Corolla with your own hands
An important element in maintaining a normal atmosphere in the cabin of your Toyota Corolla is the cabin filter. Experts at official service stations recommend changing the cabin filter every season. Autumn has passed, we change the filter. Moreover, the price tag for such service stations varies, starting from 2000 rubles. Why so often? Yes, because the operation of the cabin filter depends on:
- Will your car windows fog up, or, for example,
- Will you breathe the exhaust from the PAZ car that is standing in front of you in a traffic jam?
If you drive more often on dusty country roads, this is an argument in favor of changing the filter more often, and vice versa, if your route more often runs along coastal roads, you can postpone the replacement.
Ultimately, of course, it’s up to you to decide how often to replace the cabin filter, but we’ll tell you how to do it yourself and save on car service costs.
To determine whether the filter needs to be changed right away, you need to inspect it. Prepare a new one to replace it; you should not shake off the old filter or, especially, wash it in water, since this will not return it to its previous properties, and by washing you risk washing out all the impregnation from it. As a replacement, you can use either a cheap analogue or an original filter; the second is more recommended.
The filter is located directly behind the glove compartment:
Replacing the filter on a Toyota Corolla
- Open the glove compartment;
- We squeeze the walls;
- We first pull out the left, then the right fastener;
- Fold down the glove compartment;
Next, open the plug and pull out the filter.
The plug behind which the filter is located
If the compartment where the filter was located is clogged with dirt and dust, remove it and wipe it with a cloth.
Then we insert the new filter, close the plug and return the glove compartment to its place.
This is how we learned how to change the cabin filter on a Toyota Corolla with our own hands.
Also watch the video: how to change the cabin filter on a Toyota Corolla yourself
Cabin filter, what is it?
The cabin filter on the Toyota Corolla serves as an air purifier that comes from outside.
Its main function is to prevent dust and foreign elements from entering the vehicle interior.
This prevents the entry of these elements into the lungs of passengers, and accordingly ensures environmentally friendly operation of the vehicle.
When should I change it?
According to most recommendations of experts and doctors, the cabin filter must be changed twice a year, namely in the spring (after the winter period) and in the fall (after the summer period).
This is due to the fact that it is during these seasons that the most frequent clogging occurs. Most automakers recommend replacing the element once every 50,000 km.
Differences in types of cabin filters
Before replacing the cabin air filter on a 2008 Toyota Corolla or other vehicles, you must select the appropriate consumables.
Types of cabin filter elements:
- Standard;
- Coal.
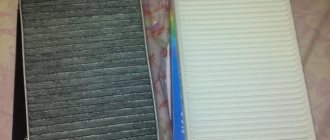
The main purpose of a standard filter element is to clean the air from dust and other small particles (during the flowering period of plants from pollen and other allergic particles). The basis of this consumable is synthetic fiber or paper. This material is capable of trapping particles up to 1 micron in size. Manufacturers of synthetic consumables electrolyze the fibers before sale. Thanks to this effect, in addition to the mechanical capture of particles, an attractive force acts. The disadvantage of such a filter is that it does not protect against exhaust gases and unpleasant odors that can enter the ventilation system.
Carbon filter elements, on the contrary, purify the air of toxins and heavy metal particles. Difficulties arise only when filtering carbon monoxide. The basis of the consumable is activated carbon (a porous component with a large specific surface area). The pores are excellent at trapping molecules of toxic gases. An adsorption effect occurs. The larger the particles of harmful components, the easier it is for the filter to capture them. The air purification process also depends on the ambient temperature and the flow rate of the ventilation system.
The design of carbon filters is based on the use of several layers. In addition to activated carbon particles and coconut components, the design includes anti-dust synthetic fibers. Thanks to this material, dust and pollen particles up to 0.5 microns in size are captured. This ensures 95% clean air that enters the vehicle interior.
Substitution rules
On the Internet you can find many different videos about how to install and choose the type and number of filter for cars in the back of E 100 and others. Usually there are no strict restrictions; the main thing is to choose a high-quality element that is suitable in size. In a Toyota Corolla, the process of replacing the cabin filter does not require special tools and can be quickly completed without going to a service station. Typically, the cabin air filter is located behind the glove compartment.
Before changing the cabin filter, you should prepare your work area by freeing up space in the front passenger seat. Empty the glove compartment and open the front passenger door.
While working, you may need to lie down, and in order to avoid getting dirty, it is recommended to spread something both on the floor of the car and on the ground in front of the open door.
The replacement step by step looks like this:
- It is necessary to open the glove compartment and press the latches on the right and left on which it is held, thus removing the lid and gaining access to the filter container.
- The container located behind the glove compartment must be opened; to do this, press the buttons on its lid and remove it.
- After that, the used old consumable is removed from the compartment, and its location is wiped with a damp cloth.
- After the location of the filter element has dried, you should begin installing a new one. It is very important to consider the correct installation method. Most often, arrows on the consumable itself indicate the direction of installation.
- Then you should install the covers in reverse order, first on the compartment with the filter, and then on the glove compartment.
Typically, all elements are simply and tightly inserted into their grooves, and the process does not take much time.
Before changing the filter, you need to purchase it, and here it would be useful to follow some recommendations. In this case, saving money by purchasing a cheap cleaner is not worth it. If possible, it is better to buy an original filter element or from a well-established manufacturer.
Do not forget that not only you, but also your passengers will have to breathe this air. This is doubly important if you frequently transport children. And of course you shouldn’t try to make it yourself, since the filter is made from a special material using a special technology.
If a visual inspection shows that the filter element is in good condition and can still serve, then it will be enough to shake it out and blow it with compressed air.
Tools
Car vacuum cleaner
First of all, in order to choose the right filter, you need to accurately determine the year of manufacture and body number of the car. In our case it is 150.
Stages
- Open the glove compartment and take out all the things from it.
- Remove the glove compartment mount.
- We fold it down.
- Remove the cabin air barrier cover.
- We remove the old air cleaner.
- Wipe the installation area with a rag or vacuum cleaner.
- We install a new cleaner.
As you can see, everything is simple and it took no more than 20 minutes. And the result: good heater performance and clean air in the cabin. If you have any questions, watch the video.
Source
Correct replacement of Toyota Corolla cabin and air filters
To purify air flows that come from the environment, as well as to prevent harmful substances in the form of dust, insects, soot from entering the car interior, a cabin filter is installed.
At least once a year, to ensure efficient operation, you need to check what condition it is in and, if necessary, replace it.
If the vehicle is used, for example, in an arid climate where there is increased dust, then it is necessary to check its condition more often than once a year.
Causes of malfunctions
The main reasons why regular replacement of the Toyota Corolla cabin filter is required are:
- This cleaning element prevents harmful substances from entering the car interior, which has a beneficial effect on the health of the car owner and his passengers.
- The interior of the car is kept clean for a long time, and therefore there is not often a need to clean it.
It is important to know that if the car is operated in urban conditions, then it is advisable to change the filter once a year or every 10,000 kilometers, and if driving occurs mainly in the countryside on country roads, it needs to be changed once every six months or once a month. If the car owner suffers from allergies, then replacement must be made before the plants begin to bloom.
Signs it's time to change
There are several signs by which you can understand that the cabin filter in a Toyota Corolla requires replacement:
- An unpleasant odor appeared inside the car.
- For unknown reasons, the windows begin to fog up.
- The air conditioner and stove are not working well.
Of course, the cause of the appearance of these signs may not always be a clogged SF, for example, if the stove does not work well in winter, this may be due to poor operation of the thermostat.
Choice
When choosing a filter, it is recommended to give preference to original consumables; of course, their price is higher than that of their analogues, but at the same time, their service life and quality are an order of magnitude higher. To make the right choice, you need to know the year of manufacture of the car, or VIN; you can find it out from the state registration certificate of the vehicle.
Salon
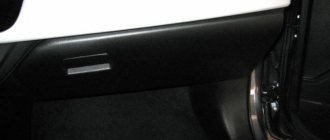
In order to replace the Toyota Corolla cabin filter, you do not need to have special knowledge; this process is very simple, and every car owner can handle it independently. An element that prevents dust from entering the car interior is located on the front passenger side under the glove compartment.
You should know that Toyota Corolla starting from 2007-2012 and also in the 103-150 body has the same location and principle of replacing a new filter.
When you have decided on the location and everything you need is prepared, you can start replacing:
- The first step is to open the glove compartment and press the special latches that secure the glove compartment lid. By pressing them, the lid will drop to the bottom, opening access to the container where the filter element is located.
- We open the container, this can be done as follows: you need to tighten the latch and move the lid to the side.
- We take out the cabin filter and wipe the dust off the area where it was located with a damp cloth.
- We insert a new consumable. To install it correctly, you need to pay attention to the inscriptions on it; there are arrows that indicate the correct position.
- Snap the container lid back on.
- The glove compartment is installed in its place; to do this, we simply lift it up and insert it into its place; it should automatically fall into the grooves and snap into place.
At this point, the replacement process can be considered complete. As you can see, all the work does not cause any difficulties. The main thing is to periodically check its condition and change it if necessary.
Air
Another important cleaning element in a car is the Toyota Corolla air filter. It is necessary to clean the incoming air into the engine cylinder, and if it is not changed in a timely manner, then contaminants begin to enter the engine, and the surface of the piston group parts begins to wear out quickly.
This consumable is of the panel type, which is made from a paper sheet with an external protective mesh in the form of small honeycombs. This design provides high-quality air purification. According to the Technical Regulations, the Toyota Corolla air filter must be replaced every 40,000 kilometers, and the condition must be checked every 20,000 kilometers.
Replacement
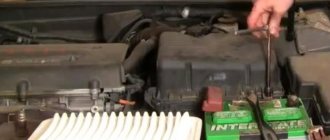
The VF is located in the engine compartment between the engine and the battery, in a plastic case. In order to replace it you need:
- On the body, release the two clamps that hold the top cover;
- Open the lid and remove the old cleaning element;
- Install new one.
After the new cassette is installed, you need to check the places where the rubber seals adhere to the body, and if there are no gaps, then the box can be closed with a lid. If during operation the air supply pipe interferes, it can be removed; this can be done using a Phillips screwdriver, which must be disconnected from the fixing clips.
Useful video
We recommend watching the video below:
Replacing the air filter, just like the cabin filter, will not be difficult; the most important thing is to periodically check its condition and replace it on time, this will help protect the car engine from pollution and premature breakdowns.