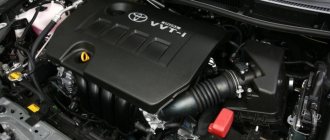
Cars admin26.02.2020
Actually, there was a need to adjust the thermal clearances of the valves. I won’t describe what/where/how to shoot, because... who will do it and so should know all this.
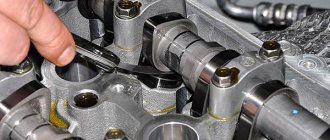
I didn’t remove the timing chain, I just moved the camshafts apart (one at a time). To make it easier, I pulled out the pushers using a magnet. Everything worked out quite simply and quickly.
Actually a few more photos
Each pusher has its own size. On the inside it says 42 - which means a pushrod size of 5.42 mm. Pushrods that can be purchased are available in sizes from 5.06 mm to 5.74 mm in increments of 0.02 mm. Pushrods installed at the factory can have other sizes, for example 5 .45 mm or 5.47 mm
Because the valve stem is thinner than the inner “platform” of the pusher, I had to find a ball - or rather, buy a magnetic (for lightness) ball to correctly measure the actual size of the pusher.
Actually a ball with a micrometer
Measurements showed that the dimensions of the exhaust valve pushers were sagging (which is not surprising for such a mileage). On the intake ones, almost all the pushers were “wear-free.”
We write down all measurements (including the initial thermal gap when the camshafts are still standing) or enter them into a pre-printed table - this also simplifies it when you start to think about which cups to put where and which new ones you need to buy.
We actually order valve pushers of the required size and repeat the disassembly procedure, replacing the pushers in the required order.
Some of the gaps turned out to be a little smaller than expected. Then it turned out that the probe seemed to be good, but when measured with a micrometer it showed 0.15 mm (actual size 0.17 mm), 0.25 mm (actual size 0.26 mm), etc.
Therefore, after 2-3 thousand km, when changing the oil, I plan to remove the cover and check the thermal clearances again with a “normal” dipstick.
Actually, the result of the adjustment was satisfactory. But, if you look at it globally, you could have skated another 150 thousand and done a “overhaul”
Since valve adjustment on Geely Emgand car engines is performed mechanically, sooner or later you may need such adjustment. For those who decide to do this on their own, this article will help. First you need to remove the plastic engine cover. There shouldn't be any problems with this. Now we begin to remove the ignition coil from the Geely Emgand engine. It needs to be dismantled in order to make it easier to remove the cylinder head cover later.
So, we disconnect the high-voltage wires from the coils and unscrew the fastening bolts. Now you need to remove the coils from the spark plugs. Now remove the cylinder head cover. To do this, you first need to disconnect the terminals from the battery. All textbooks teach this. Then we dismantle the two ventilation hoses, which are located near the cylinder head cover. Unscrew the nuts and bolts and remove the cover.
Then remove the timing chain cover and dismantle it. If any part of the car needs to be replaced, the website has a list of Geely Emgrand spare parts that can be replaced with analog ones. Now we turn the crankshaft so that the piston of the first cylinder is in the top dead center position. Then you need to check the clearances in the drive of all the valves shown in the figure. If the gap value does not correspond to the permissible limits, then it and the valve number must be written down. Now let's move on to the rest of the valves. In order to adjust them, you need to rotate the crankshaft 360°. After which the top dead center of the compression stroke will be in the 4th cylinder. We measure and write down the gap sizes, which are indicated by arrows in the figure. On our website you can also find information about the most important problems with Geely Emgrand.
Valve adjustment 1ZZ
Incorrect clearances in the valve mechanism of an internal combustion engine can cause its noisy operation, low power output, and also increased fuel consumption. Toyota ZZ series engines are no exception in this regard. Should I contact a car service or try to solve the problem myself? If we are talking about a 1ZZ-FE engine, valve adjustment can be done within a few hours, using inexpensive equipment.
Release of modifications of the Toyota 1ZZ-FE engine family
Over a long period of production of these engines, samples of various modifications were developed and produced:
- 1ZZ-FE.
- 1ZZ-FED.
- 1ZZ-FBE.
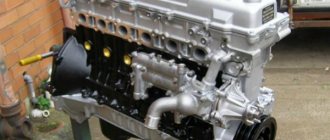
The Japanese manufacturer Toyota Motor Manufacturing West Virginia, located in Buffalo in the USA, was engaged in the manufacture of 1ZZ-FE. This engine is the most popular among the entire line; the 1ZZ FE engine was assembled over a period of nine years, starting in 1998. This engine has a power of about 140 hp. With.
Unlike the 1ZZ-FE, the design of the 1ZZ-FED power unit includes forged connecting rods of lighter weight.
The engine was assembled at the Japanese enterprise Shimoyama Plant.
The 1ZZ-FBE engine is designed to run on biofuel, in accordance with the E85 standard. It was produced for cars of the Brazilian market.
List of cars on which the Toyota 1 ZZ engine is installed:
- Toyota Corolla;
- Toyota Avensis;
- Toyota Caldina;
- Toyota Vista;
- Toyota Premio;
- Toyota Celica;
- Toyota Matrix XR;
- Toyota Allion;
- Toyota MR2;
- Toyota Opa;
- Toyota Isis;
- Toyota Wish;
- Lotus Elise;
- Toyota WiLL VS;
- Chevrolet Prizm;
- Pontiac Vibe.
Engine 1ZZ technical specifications
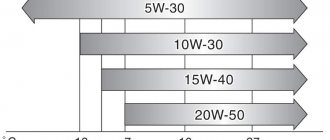
Engine name Toyota 1ZZ Cylinder block and cylinder head material Aluminum alloy with cast iron liners Fuel system Injector Cylinder arrangement Inline Number of cylinders 4 pcs. Each cylinder has four valves. Piston stroke length is 91.5 mm. Engine capacity is 1794 cm3. Power is 120 - 143 hp. c. Torque 165 – 171 Nm rpm Type of fuel Gasoline AI 92 Compliance with environmental standards Euro-4 Engine weight 1ZZ 135 kg Engine oil viscosity indicators 5W-30, 10W-30. Synthetics. Oil change interval 5 – 10,000 km 1ZZ FE engine life 200,000 km
When driving on city highways with heavy traffic, gasoline consumption is over 10 liters. On country roads, the Toyota 1ZZ engine is the most economical - consumption is about 6.2 liters. When driving in mixed modes - 8 liters of gasoline, respectively.
Necessary tools and formulas
To adjust 1ZZ valves you will need the following tools:
When adjusting the valves, the gaps between the pushers (cups) and the camshaft cams are measured. The valve mechanism on a cold internal combustion engine should have the following indicators:
Correct adjustment involves calculating the thickness of the new pusher (or the old one in the case of grinding). The calculation is carried out using formulas in which the thickness of the cup that does not meet the standards is of fundamental importance. If X is the thickness of the required part, Y is the thickness of the rejected part, and Z is the measured gap, then the formulas will look like this:
Features of engine maintenance 1ZZ-FE
This motor is not particularly capricious; maintenance is carried out within certain periods stipulated by the regulations. The manufacturer has developed the following rules:
- Change the engine oil every 10 thousand kilometers.
- If a car with a Toyota 1ZZ engine is operated under heavy loads, this parameter is reduced to 5,000 km of travel.
- The valve clearances of the gas distribution mechanism need to be adjusted after a mileage of 20,000 km.
- The timing chain needs to be replaced with a new unit after 150 - 200,000 km.
Due to the fact that the Japanese Toyota 1ZZ-FE engine is a disposable type of mechanism, its overhaul is not feasible. Activities such as re-lining of cartridges are not carried out here; these actions are not provided for by the design. The main liners are also not subject to restoration. You can extend the life of the Toyota 1ZZ engine only by following the maintenance rules.
If the 1ZZ engine jams, it will be quite problematic to repair. However, the car market retail chain offers sets of special repair kits made in Germany for Japanese Toyota 1ZZ engines.
Step-by-step description of adjustment
A prerequisite for adjustment is that the 1ZZ-FE engine must be cold. This fact is explained simply - the metal expands during heating. Therefore, adjustment work carried out on a hot internal combustion engine will lead to incorrect clearance values on a cold one (for example, after starting when warming up).
Removing the valve cover and moving the camshafts
To adjust the valves on the 1ZZ-FE engine, you need to remove the valve cover and move the camshaft. The sequence of actions is as follows:
Adjustment
The cups are removed using a magnet. In accordance with the calculations made, each pusher (of those that do not provide the required clearance) is ground to the thickness required by the formula with an engraver. In the process, you need to control your actions with a micrometer, determining the thickness of the element. The revolutions during grinding can be set to approximately 15 thousand per minute.
The vehicle's owner's manual states that a new pusher needs to be selected. The same information is often presented in services. If the valves have already been adjusted, it is likely that the car already has worn out cups. At the same time, the 1ZZ-FE valve clearances comply with the standards and the machine demonstrates reliable operation without extraneous noise.
The grinding procedure does not lead to weakening of the metal of the pushers and subsequent increased wear. Owners of a car with a 1ZZ-FE engine, who conducted a similar experiment with self-adjustment and grinding of cups, claim that the indicators corresponding to the norm were maintained for almost 100 thousand km of subsequent mileage.
Assembly
After adjustment, assembly is carried out in the reverse order. First you just need to wash the ground off abrasives from the pushers, lubricate them and put them in place. Next you need:
If everything is done correctly, the 1ZZ-FE engine will run smoother and the characteristic metallic knock will go away. If desired, valve adjustment can be combined with replacing the valve stem seals.
The main disadvantages of Toyota 1ZZ-FE engines
This motor is distinguished by its durability, increased reliability, and breakdowns in its design are extremely rare.
During operation, the most common problems in the operation of engines of the Toyota 1ZZ family were noticed. Some of them are noted in the following list:
- increased lubricant consumption;
- the appearance of knocking and unusual noises in a running 1ZZ engine;
- floating speed;
- 1ZZ engine vibrations;
- poor stability of the working elements of the power unit against possible overheating;
- The relatively small resource of the Toyota 1ZZ is equal to 200 thousand kilometers.
It has been noticed that the reason for the increased consumption of engine oil here is the oil scraper rings. Craftsmen have found a solution to this problem - replacement with new parts that were produced not in 2005, but a little later. To restore engine performance, it is enough to change the outdated oil scraper rings and add engine oil to the Toyota 1ZZ crankcase to a volume of 4.2 liters.
Engine knocking is most often caused by excessive stretching of the timing chain. As a rule, this is noticed after a distance traveled of 150,000 kilometers. To get rid of this defect, you need to replace the timing chain on the 1ZZ engine. If everything is fine with the chain, it is recommended to inspect the drive belt and its tensioner. The lowest probability of engine knocking is a failure to adjust the valve clearances on the 1ZZ.
To eliminate such a defect in the operation of an internal combustion engine as floating speed, it is necessary to flush the throttle valve block, as well as the idle speed valve.
If engine vibrations occur, check the rear mount. If no defects are identified, you will have to get used to this feature of a particular engine.
The cylinder block material is often deformed due to operation at elevated temperatures. If the geometry of this unit is broken, you will have to replace it with a new block.
Attention: It is officially considered that the 1ZZ is a one-time engine that cannot be repaired or restored; overhauls are not carried out here. Engines produced on the basis of 1ZZ-FE after 2005 are more reliable and durable. These are new generation engines: 2ZZ-GE (sports model), 3ZZ-FE, and the most advanced modification of the 4ZZ-FE engine.
Toyota Avensis Moscow-Izhevsk › Logbook › Adjusting the thermal clearance of valves 1ZZ-FE
Actually, there was a need to adjust the thermal clearances of the valves. I won’t describe what/where/how to shoot, because... who will do it and so should know all this.
I didn’t remove the timing chain, I just moved the camshafts apart (one at a time). To make it easier, I pulled out the pushers using a magnet. Everything worked out quite simply and quickly.
Actually a few more photos
Each pusher has its own size. On the inside it says 42 - which means a pushrod size of 5.42 mm. Pushrods that can be purchased are available in sizes from 5.06 mm to 5.74 mm in increments of 0.02 mm. Pushrods installed at the factory can have other sizes, for example 5 .45 mm or 5.47 mm
Because the valve stem is thinner than the inner “platform” of the pusher, I had to find a ball - or rather, buy a magnetic (for lightness) ball to correctly measure the actual size of the pusher.
Actually a ball with a micrometer
Measurements showed that the dimensions of the exhaust valve pushers were sagging (which is not surprising for such a mileage). On the intake ones, almost all the pushers were “wear-free.”
We write down all measurements (including the initial thermal gap when the camshafts are still standing) or enter them into a pre-printed table - this also simplifies it when you start to think about which cups to put where and which new ones you need to buy.
We actually order valve pushers of the required size and repeat the disassembly procedure, replacing the pushers in the required order.
Some of the gaps turned out to be a little smaller than expected. Then it turned out that the probe seemed to be good, but when measured with a micrometer it showed 0.15 mm (actual size 0.17 mm), 0.25 mm (actual size 0.26 mm), etc.
Therefore, after 2-3 thousand km, when changing the oil, I plan to remove the cover and check the thermal clearances again with a “normal” dipstick.
Actually, the result of the adjustment was satisfactory. But, if you look at it globally, you could have skated another 150 thousand and done a “overhaul”
Source
VVTi coupling
The VVTi coupling lasts at least 200,000 km, and when it fails, it begins to rustle and rattle loudly. The gasoline engine starts to run with diesel noise.
But before removing the coupling, and this is not the easiest or quickest procedure, you can check its operation.
To do this, you need to remove the chip from the VVTi valve while the engine is idling and apply voltage to it. Those. you need to put wires with suitable terminals on the valve contacts, and connect the other ends of the wires first to the negative and then to the positive of the battery. When you touch the “plus” the engine should start to stall. This basically indicates that the solenoid is working normally. And if the engine continues to run during such a check, then the solenoid or even the ECU is faulty.
As noted above, in some cases the VVTi clutch can be revived. That is, it can be disassembled (you just need to figure out how to unscrew the pentagon screws), clean it, slightly polish the surface opposite the stopper and reassemble it.