In modern cars there are two or more valves per engine cylinder. The role of the first (intake) is to start the fuel-air mixture, the role of the second (exhaust) is to release exhaust gases. The valves are actuated by a special gas distribution or valve mechanism. While the engine is running, the valves expand, and when the car engine is turned off, there must be a certain distance between them.
If the adjustment is incorrect, the engine does not operate efficiently and the service life of the parts is reduced. With increased clearances, a distinct metallic knock appears and engine power decreases, while with too low clearances, the valve seats burn out and the life of the power plant decreases. It is important for owners of cars with a 4A-FE engine to know whether the valves are bent and whether they need adjustment.
If the timing belt breaks on the 4A-FE engine, the valves do not bend.
Adjustment of valves
To adjust the 4A-FE valve clearances, it is not necessary to contact a service station; the procedure can be performed on your own. Adjustment technology plan for motor 4A-FE:
- First of all, remove the valve covers and unscrew the spark plugs in order to facilitate the rotation of the crankshaft. Next, set the piston of the first cylinder to the TDC position on the compression stroke. In this position, the first and second cylinders are checked at the inlet, as well as the second and fourth cylinders at the outlet.
- Then you need to rotate the crankshaft 360 degrees and check the third and fourth cylinders at the inlet, as well as the first and third cylinders at the outlet. The indicators must correspond to the recommended standards: at the inlet 0.19-0.29, at the outlet 0.39-0.49.
- After checking the gaps, if they do not comply with the recommended standards, adjustment is made directly. To do this, we dismantle the attachment belt, get rid of the crankshaft pulley, as well as the lower protective timing cover.
- The piston of the first cylinder must be again set to the TDC position on the compression stroke, then rotated 45 degrees back and the hydraulic tensioner removed. Then you need to dismantle the timing belt and remove the camshafts. Removable tappets must be carefully folded in accordance with the valve number so as not to be confused.
- Using a dial indicator, you need to measure the thickness of the spacer inside the removed pushers. The measurement results are entered into the prepared table. Thus, we obtain data on the gaps and see which ones need to be adjusted in accordance with the recommended standards. Formula: new spacer is the old spacer plus the nominal clearance. It is not easy to purchase new spacers in some cities and regions; in this case, you can install a part with a similar size.
- After replacing the necessary spacers, install the pushers in place and reassemble them in the reverse order. After turning it a few turns, you need to measure the gaps again. It is difficult to achieve an exact result on the first try, however, it is possible to correct the identified violations.
Design Features
In its series, the 4A FE engine has average performance and has the following design features:
- in-line arrangement of 4 cylinders, bored directly into the body of a cast-iron block without liners;
- two overhead camshafts according to the DOHC scheme to control gas distribution through 16 valves inside the aluminum cylinder head;
- drive one camshaft by a belt, transmitting rotation from it to the second camshaft by a gear;
- distributor ignition distribution from one coil, with the exception of later LB versions, in which each pair of cylinders had its own coil according to the DIS-2 scheme;
- engine options for low-octane LB fuel have less power and torque - 105 hp. With. and 139 Nm., respectively.
DOHC valve timing diagram
The engine does not bend the valves, like the entire A series, so there is no need to do major repairs in the event of a sudden timing belt break.
Why adjust valve clearances?
Two situations in which adjustment of 4A-FE valves is necessary: “pinching” and increasing clearance.
As the vehicle's mileage increases, the seat wears out, as well as the chamfer along the edges of the widest part of the valve, as a result of which thermal expansion pushes the wide part of the valve ("plate") out of the seat. Thus, the engine power decreases, the removal of thermal masses is disrupted, the “plate” melts and a negative effect occurs on the catalyst.
As the vehicle is used, the pusher plane wears out and the gap increases. Untimely adjustment will lead to a worsening of the situation and noisy operation of the 4A-FE motor. When such a situation occurs, the valve timing is disrupted, which negatively affects the power of the power plant.
Valve adjustment: what it is, why it is needed, and what will happen if it is not done
What is valve adjustment?
The operation of a conventional piston engine involves supplying a fuel-air mixture to the cylinders and removing exhaust gases from them. Both functions are performed by valves - inlet and outlet, respectively, alternately opening at the right time to fill and empty the cylinder. Their operation is controlled by a camshaft, which has special cams that act on the upper part of the valve, opening it into the cylinder. There are several designs of the drive mechanism - the camshaft can act on the valves almost directly, pressing the cam on the pushrods, or, for example, through special rocker arms, pushing one end of them, while the other presses on the valve. But in any of the cases, the design has a feature that interests us: the thermal gap between the camshaft cam and the valve mechanism part that opens the valve. After all, the operating temperature of engine parts, especially the valve mechanism and the valves themselves, is very high, and when heated, the metal tends to expand, which leads, in particular, to elongation of the valve. It is to compensate for this expansion that a thermal gap is needed, and adjusting this gap is called “valve adjustment”
Yes, from a logical point of view, the wording “valve adjustment” is not entirely correct. The valve under normal conditions, when the camshaft cam does not press on it, is closed: the valve plate is tightly pressed by a spring to the seat in the cylinder head, and proper tightness is ensured by chamfers on both elements. Accordingly, no adjustment of the valve is required here - but the thermal gap must be correct. That is, it is more correct to say not “adjusting the valves”, but “adjusting the thermal clearance of the valve drive.”
Why is valve adjustment necessary?
If you imagine a combination of “valve - tappet - camshaft” without a thermal gap - that is, tightly adjacent to each other when the engine is not running, then it is easy to understand that when reaching operating temperature, the elongated valve is “pulled by a spring from the cylinder” towards the camshaft , due to thermal expansion, this same camshaft will begin to constantly press, leading to a slight compression of the spring and loose closure of the valve. That is, when the operating temperature is reached, the valve will actually cease to fully perform one of its functions: to close tightly to seal the combustion chamber and isolate it from the intake or exhaust tract.
This can happen, for example, due to wear of valve seats and discs. Accordingly, in this case, adjustment of the valves is necessary to ensure the required thermal clearance to ensure complete closure of the valves.
— Kolesa.Ru (@Kolesa_Ru) June 3, 2021
The second option is to increase the thermal gap: for example, due to wear on the surfaces of the camshaft cams and valve drive elements. In this case, even after the engine reaches operating temperature, there will be a gap between the camshaft and the valve mechanism, and they will touch with shock and only at the moment of impact of the cam. This already has a detrimental effect on the life of the valve mechanism, but there are other consequences: the valve will open a little later and not completely, which means that the filling of the cylinder with the air-fuel mixture will deteriorate.
What happens if you don't adjust the valves?
If the valves are not adjusted in a timely manner, this will lead to a change in the thermal gap. At the same time, both an increase and a decrease in the thermal gap, as we have already understood, negatively affects the service life and operation of the engine. Reducing the clearance means incomplete closing of the valves, which leads to a number of consequences. Leakage of the combustion chamber due to a slightly open valve leads to a drop in compression and the breakthrough of hot gases into the intake or exhaust tract (depending on whether the intake or exhaust valve is slightly open).
In addition, it is worth noting the significantly increasing thermal load on the valves. After all, tight contact of a closed valve with the seat is one of the important conditions for its cooling, and if the valve does not fit tightly to the seat, cooling noticeably deteriorates. This is especially true for exhaust valves: the intake valves are additionally cooled by the air-fuel mixture entering the cylinders, but the exhaust valves ensure the exit of exhaust gases at extremely high temperatures, and for them, cooling in the contact area with the seat is of critical importance. In extreme cases, poor cooling of the valve due to a small thermal gap can lead to its overheating and destruction - the so-called burnout. In addition, the breakthrough of the burning air-fuel mixture into the exhaust tract increases the load on the catalyst (and if it is destroyed, abrasive dust can damage the cylinders).
The consequences of increasing the thermal gap are somewhat different. As mentioned above, it leads to the impact of the camshaft on the valve mechanism, which negatively affects its service life, as well as to untimely and incomplete opening of the valve. Deterioration in the filling of the cylinder with the air-fuel mixture means a violation of the valve timing and a decrease in engine output: that is, it will pull worse.
How do you know what the thermal gap should be?
The size of the thermal gap is determined by the manufacturer for a specific engine: if the motor design provides for valve adjustment, the indicators are usually indicated in the operating manual. — Kolesa.Ru (@Kolesa_Ru) June 3, 2019
In general, the thermal gap is, of course, very small; it is tenths of a millimeter - approximately 0.1-0.4 mm. In this case, it is usually determined using a set of probes in increments of 0.05 mm or less - that is, accuracy to the hundredth is maintained. It is worth noting that the thermal clearance for the intake and exhaust valves is different: as we already know, the exhaust valves heat up more - and therefore increase in size more and require a larger thermal clearance.
In practice, you only need to know the specific values of the thermal gap for adjustment - that is, if you do not do it yourself, these numbers will not be very useful to you.
How to Know When to Adjust Valves
The frequency of valve adjustment, if provided for by the engine design, is indicated in the vehicle’s operating manual. In general, this procedure is not performed so often - usually every 50-80 thousand kilometers. However, more frequent checking will not hurt - especially if the machine is equipped with gas equipment, since gas fuel increases the thermal load on the engine.
The second way to find out about the need to adjust the valves is a characteristic sound: a knocking or clattering sound when the engine is running, which does not go away as it warms up.
— Kolesa.Ru (@Kolesa_Ru) June 3, 2021
Well, if the car was not purchased new, and its mileage is already quite high, then adjusting the thermal gap will definitely not be superfluous - you just need to find out whether it is provided for by the design.
How to adjust valves?
There are several design options for adjusting the thermal gap. For example, one option is to select washers of the required thickness, which are inserted between the valve tappet and the camshaft cam. To adjust the gap, it is first measured with the existing washer, and then, if necessary, the washer is replaced with another one of greater or less thickness. An alternative option with a similar design is to select not adjusting washers of the required thickness, but the pushers themselves with the required parameters.
Another variation is to adjust the thermal gap using a screw mechanism. In this case, there is no need to select anything: the gap is measured with a feeler gauge and then, if necessary, adjusted by screwing in or unscrewing the adjusting bolt, which is then fixed with locknuts — Kolesa.Ru (@Kolesa_Ru) June 3, 2021
We clearly demonstrated this adjustment method in a separate material using the Renault Logan as an example.
Why do valves not need to be adjusted on some engines?
The repeated clarification that valve adjustment must be provided for by the engine design is very important: after all, many engines do not require this procedure. This depends on whether the motor is equipped with hydraulic compensators: these are devices designed to automatically adjust the thermal gap. They work due to the oil supplied to them from the engine (which is why, in fact, they are called “ hydraulic”
compensators") and completely eliminate the need for periodic manual adjustment of the valves. They themselves, of course, also do not last forever - the need to check and replace them is indicated by the same clicking knock, which does not disappear soon after starting, and sometimes even after the engine warms up. However, the main thing you need to know in the context of this material is that engines equipped with hydraulic compensators do not need valve adjustment.
Conditions and features of work
Despite the differences in the structure of the motors, there are general principles of adjustment. First of all, care should be taken to comply with the required temperature conditions 4A-FE specified in the technical manual. On a heated unit, it is possible to adjust the 4A-FE valves, however, in this case, the clearances will initially be increased, as a result of which the adjustment procedure is carried out with amendments.
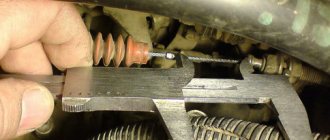
In addition, the gap should be measured using special feelers, where the main one is a 10 mm wide feeler. The optimal clearance at the inlet and outlet is 0.15 mm. However, this figure varies depending on specific engine models. As a result, for an accurate procedure you will need a full set of probes, and if this is not available, adjustment is possible using standard probes and the tactile sensations of an experienced auto mechanic.
Also remember that after tightening the locknut, the gap is lost, as a result of which accurate alignment is difficult - for this, the gap is initially left slightly increased by a small error.
Advantages and disadvantages
The main advantage of the 4A FE design is the fact that the piston does not bend the valve when the timing belt breaks. Other advantages are:
- availability of spare parts;
- low operating budget;
- high resource;
- the possibility of independent repair/maintenance, since attachments do not interfere with this;
The main disadvantage is the LeanBurn system - in the Japanese domestic market such cars are considered very economical, especially in traffic jams. They are practically unsuitable for RF gasoline, since at medium speeds there is a loss of power, which cannot be cured. Motors become sensitive to the quality of fuel and oil, the condition of high-voltage wires, tips and spark plugs.
Cylinder block 4A-FE
Due to the non-floating fit of the piston pin and increased wear of the camshaft beds, overhauls happen more often, but they can be done with your own hands. The manufacturer used high-resource attachments; the power drive has three modifications, in which the volumes of the combustion chambers are preserved.
Adjusting the thermal clearances of Toyota engine valves 4A-FE, 5A-FE, 7A-FE
Toyota 4A-FE engines for Toyota Carina E, Toyota Corolla, Toyota Crown (AE92, AE95, AT171 and AT180)
— Disconnect the high-voltage wires from the spark plugs, holding them only by the rubber tips. Improper handling of wires may result in internal wire breaks.
— Remove the protective cover for the engine electrical wiring and disconnect the electrical wiring from the cylinder head cover.
— Disconnect the positive crankcase ventilation system hoses from the crankcase ventilation valve.
— Unscrew the 3 cap nuts, remove the rubber bushings and the cylinder head cover along with the gasket.
Engines Toyota 4A-FE (AE101, AT190), 5A-FE and 7A-FE for Toyota Carina E, Toyota Corolla, Toyota Crown, Carib, Sprinter
— Disconnect the high-voltage wires from the spark plugs, holding them only by the rubber tips. Improper handling of wires may result in internal wire breaks.
— Disconnect the generator connector, generator wire, emergency oil pressure sensor connector, two electrical wiring clamps.
— After unscrewing the two bolts, remove the protective casing of the engine electrical wiring and disconnect the electrical wiring from the cylinder head cover.
— Disconnect the 2 hoses of the positive crankcase ventilation system from the cylinder head cover.
- Unscrew the 4 cap nuts and remove the sealing washers, cover and cover gasket.
Toyota 4A-FE engines for Toyota Carina E, Toyota Corolla, Toyota Crown (AE92, AE95, AT171 and AT180)
If this condition is not met, then turn the crankshaft clockwise 1 revolution (3600) and again align the groove on the pulley with the corresponding mark.
Engines 4A-FE (AE101 and AT190), 5A-FE and 7A-FE for Toyota Carina E, Toyota Corolla, Toyota Corona, Carib, Sprinter
Make sure that the hole on the camshaft drive pulley aligns with the mark on the bearing cap.
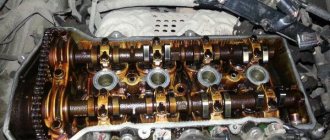
— Using a feeler gauge, measure the gap between the valve tappet and the back of the camshaft cam.
- write down the values of the gap that goes beyond the limits specified in the technical specifications; these values will be used to select the required shim size.
Nominal thermal clearance in valves (on a cold engine).
Turn the crankshaft 1 revolution (3600) and again align the groove on the pulley with the corresponding mark and check the valve clearances.
ICE 4A-FE (AE92, AE95, AT171 and AT180)
Adjust the thermal gap in the valves.
Replace the adjusting washer:
— Turn the crankshaft so that the protrusion of the valve cam, in which the clearance is adjusted, is oriented upward and does not touch the pusher.
- Using a suitable tool, press the valve tappet and place the tool between the camshaft and the valve tappet; then remove the device.
— Remove the shim using a small screwdriver and a magnet.
— Determine the size (thickness) of the shim that provides clearance in accordance with the specifications and select the shim.
— Install a new adjusting washer, place the washer on the valve pusher, use the tool to press the pusher and remove the tool
— Check the gap again.
Toyota engines 4A-FE (AE101 and AT190), 5A-FE and 7A-FE for Toyota Corolla, Corona, Toyota Carina E, Toyota Sprinter, Caldina
Adjust the thermal gap in the valves
— In these engines, to adjust the thermal clearance in the valves, the camshafts must be dismantled.
— Since the axial clearance of the camshaft is very small, when dismantling the shaft it must be held in a horizontal position, otherwise the seat of the camshaft thrust washer in the cylinder head may be damaged, which may cause jamming or breakage of the camshaft. Similar requirements must be observed when installing camshafts.
Maintenance schedule 4A FE 1.6 l/110 l. With.
The 4A FE inline petrol engine must be serviced within the following periods:
- The engine oil life is 10,000 km, then the lubricant and filter need to be replaced;
- the fuel filter must be replaced after 40,000 miles, the air filter twice as often;
- The service life of the battery is set by the manufacturer, on average 50 - 70 thousand km;
- spark plugs should be changed every 30,000 km and checked annually;
- crankcase ventilation and adjustment of thermal clearances of valves are carried out at the turn of 30,000 vehicle mileage;
- Antifreeze is replaced after 50,000 km; hoses and radiator must be inspected constantly;
- the exhaust manifold can burn out after 100,000 km.
Replacing the timing belt
The initially simple design of the internal combustion engine allows you to carry out maintenance and repairs on your own in the garage.