The gas distribution mechanism affects the operation of the 3S-FE engine, so its maintenance should be carried out in a timely manner. One of its main elements is the timing belt. Despite the fact that if it breaks, the valves do not bend, you should not wait until an emergency replacement. Let's consider the procedure required when servicing the 3S-FE timing belt.
Preparing for work
The timing belt on the 3S-FE engine, according to factory recommendations, should be replaced every hundred thousand kilometers. If the car is operated under constant loads caused by off-road driving or at high engine speeds, then its service life is limited to 80 thousand km. It is also recommended to carry out an unscheduled replacement if antifreeze, oil, or brake fluid gets into the drive. The source of the leak must first be eliminated.
Tools and spare parts
To replace the 3S-FE belt, you will need to prepare the appropriate set of tools and spare parts. At the same time, the cost and configuration of spare parts may vary, depending on the manufacturer and the need to repair individual components of the gas distribution mechanism. Tools you will need:
- end extension, wrench and ratchet with heads for 10, 12, 14, 19;
- torque wrench;
- a puller with a paw length of at least one hundred millimeters;
- clamps;
- clamps of various diameters, including for timing drive coupling;
- hammer;
- set of open-end wrenches;
- chalk or marker to mark marks;
- device for fixing the pulley.
Timing belt replacement diagram 3S-FE
A set of spare parts is prepared at the discretion of the car enthusiast, the complete list is as follows, with the original part number indicated in brackets:
- timing belt (13568-09041);
- bypass and tension roller (13503-63011, 13505-74011);
- pump (16110-79026);
- oil seals: oil pump shaft, camshaft and front crankshaft (15165-74020, 90311-38067, 90311-42035);
- oil pump gasket (15188-74050);
- spring (90507-17003).
Belt Drive Removal Procedure
- To replace the Toyota Camry timing belt , you must first perform several auxiliary operations. It is required to completely slow down the movement of all systems. To do this, a jack and wheel chocks are used, after which the crater protection is dismantled;
- After emptying the radiator (antifreeze should not get into other parts of the system), it is necessary to carefully remove the radiator, cooling fan of the pumping system, drive belts of the compressor and steering pump;
- Removing spark plugs;
- Dismantling the mechanical fastening components - protective distribution screen, support brackets fixing the timing belt;
- Dismantling the gas distribution system with air intake.
- Removing the crankshaft;
- Removing the lower and upper compartments of the front belt drive cover.
If you are dismantling Toyota Camry components when replacing the timing belt , you must achieve absolutely precise alignment of the camshaft gear marks with a similar mark on the rear panel of the belt drive.
Options for further action
If this condition has been achieved, we proceed to installing a new timing belt. Otherwise, we track previous actions. If necessary, duplicate them until the desired result is achieved.
Choosing timing belts from Gates Power Grip or how to distinguish the original from the counterfeit:
But having passed its exhausted life, these properties that it previously possessed (flexibility, strength) are lost.
The main identified defect is the appearance of cracks.
The appearance of cracks on the timing belt is usually accompanied by its breakage. Often other defects such as chipped teeth occur, which is then accompanied by the belt slipping relative to the gears of the crankshaft or camshaft.
The result is the most unpleasant thing! The symptoms of the engine speak for themselves, in which the obvious culprit is a rush, slippage of the timing belt: unstable engine speed, loss of power and its stopping. Toyota has developed this type of engine 4A-FE, the ability to avoid bending of the valve mechanism during slippage timing belt.
How much does it cost and what chain to install?
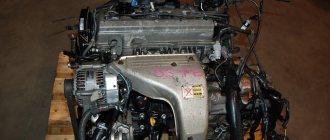
From the factory, the 2AZ-FE Toyota Camry V40 is equipped with an original Toyota timing chain.
When replacing, you can purchase similar chains from other brands, such as:
- ASParts AS4674;
- RoadRunner RR1350628011;
- Ruei RU28106.
The price for these products will vary from 1100 to 1400 rubles. But the chain from Febi, product code 100067, will be both more reliable and more expensive, costing 6,500 rubles.
In addition to the chain itself, other parts of the gas distribution mechanism will also be needed for replacement. In particular, the tensioner, damper and damper.
According to the originals there are such proposals:
Timing chain tensioners from Toyota 135400H030 art., price 1500 rubles. Toyota timing chain damper, product code 135610H030, costs 3,000 rubles. The timing chain tensioner number 135590H030 will cost 2500 rubles.
Prices are current for autumn 2017 for Moscow and the region.
Removing the valve cover:
When the belts and pulleys are removed, we begin to remove the valve cover. Remove the hoses from the breather fittings and the air mixing chamber.
Fastening the valve cover itself looks quite simple, there are four 10″ “blind” nuts securing it to the cylinder head, sealed with rubberized washers, and another fastening bolt where the high voltage wire bracket is located.
The cover itself has a groove that is designed for a sealing gasket to prevent engine oil leaks.
Then we unscrew it with a socket wrench number 10″, remove the cover, inspect for defects in the seals of the spark plug wells. It’s very simple to do: use your fingers to check each one for flexibility, if the seals are stiff (i.e. have lost their elasticity), immediately carry out a complete replacement. If you skip this step Problems may arise, simply engine oil gets inside the spark plug well, which is fraught with breakdown of the ignition spark, accompanied by engine vibration.
Replacement is very simple, we bend the three antennae as shown in the picture, knock out the old oil seals using a drift.
If they are in poor condition, then we take a set of new oil seals (Spark plug well oil seals Code: OEM manufacturer 90210-06010).
Then we carry out a careful pressing without damaging them. For a more reliable seal, we coat the upper seating edge with sealant.
The resulting result looks like this.
Toyota Camry timing belt replacement in Moscow: addresses of technical centers
1,153 auto repair centers
- Stoa
- Novofedorovskoe settlement, block No. 135, Torgovaya Square, 12, building 1
- +7
- daily, 09:00–22:00
3.2 4 ratings
- My Motor Service
4.6 18 ratings
- Autopilot
3.7 220 ratings
- WheelsCare Tire service
4.7 37 ratings
- Express oil change
5.0 3 ratings
- ASG-Market
4.2 11 ratings
- Autopilot
4.7 40 ratings
- BenzBMW
4.5 48 ratings
- Volvo
5.0 42 ratings
- Gadget
4.6 18 ratings
- JapGarage
3.9 26 ratings
- Repair zone
3.9 6 ratings
1 116 Show car services on the map
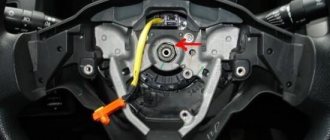
We dismantle the generator:
Find out the location of the generator contact terminals.
We disconnect the terminals in advance to remove the generator. We disconnect the electrical supply wires of the generator, remove the contact chip by hand. Then we remove the wire that has a rubber dust cap, take a spanner number 10″ and unscrew the wire terminal.
When removing the wire, you need to remove the plastic plug that goes through the top of the valve cover.
Loosen the tension on the generator, take a 14″ spanner and unscrew the upper central axial mounting bolt.
Then we unscrew the counter bottom bolt (which, when the engine vibrates, prevents the tensioner from loosening), loosening the belt tension. When the belt is subject to sufficient slack, we remove it. Then we unscrew the generator itself, remove it so that it does not interfere.
Install the crankshaft pulley:
Tightening the pulley mounting bolt occurs by lubricating the threaded connection with a thread locker or an available sealant.
Then we tighten it under force with a 120 Nm torque wrench or a pneumatic impact wrench.
Then we assemble the upper part of the dustproof casing, install the valve cover. Install a new gasket, placing it in the groove on the cover. We put it on the cylinder head, put new washers on the four studs, and tighten them with a force of 6 Nm. so as not to completely crush the washers.
We put the hoses on the fittings, breather and air mixing chamber. First of all, installing the air conditioner drive belt, then we install the generator in place. Putting the belt on it, making sure the required tension. We screw the removed battery terminal back into place.
Now you can start starting the engine to check its operation. If everything is done correctly, the engine will start without any problems.
We further assemble by putting the removed barrel of the washer glass in its original place. We screw the dirt protection removed from below and install the wheel.
How to change the timing belt on a Toyota Camry?
Since the Toyota Camry timing belt is a big budget item, the logical question is whether you can replace it yourself. Unfortunately, accessing it is very difficult, and only the most experienced amateur mechanics and those best equipped with tools will be able to comprehend this operation, we will even so quickly describe the various steps that need to be followed to change this timing belt:
- Place your Toyota Camry on stands and, depending on your engine, you may have to remove the wheel. Remove the timing gearboxes.
. - To do this, you need to buy a timing kit to ensure that all engine parts remain in the correct position, otherwise your engine will break. Remove other components that are bothering you (such as the damper pulley).
- Remove the old wiring after loosening the tension rollers. Before installing a new one, you must remove all tension rollers and the water pump.
- Install a new water pump.
- Install new tension rollers, paying attention to the location of each of them.
- Install the new distribution of your Toyota Camry, following the markers.
- Tension the belt as specified in the manufacturer's information.
- Fold the rest again.
- Make sure the engine is running correctly.
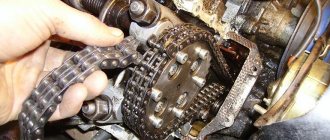
We remove the toothed pulleys to replace the oil seals:
We remove the camshaft timing pulley in such an interesting way. Holding the camshaft journal with an adjustable wrench, unscrew the central bolt with a 14″ wrench.
The oil seal appears, we remove it without any problems, use a screwdriver or a sharp object to make a hole, and remove it from the seat.
The main thing is not to forget to lubricate the place of contact of the oil seal and the camshaft with grease, this is done to reduce friction by increasing the service life. Then we install a new oil seal, driving it through a drift (you can use any soft spacer). We will tighten the toothed pulley in the same way as we unscrewed it, we will do a test tightening with a torque wrench under force 60Hm.
How much does it cost to replace a timing belt?
Finally, we will try to give you an idea of the cost if you are looking to replace the timing belt of your Toyota Camry . Keep in mind that if you do this in the brand's garage or in a car center such as Feu Vert, the price can vary greatly, but in general we estimate that the distribution price varies between 400 and 900 euros , depending on the location where you you do it, and your engine. Remember that the kits include a belt, idler pulleys and a water pump.
If perhaps you have any further questions about the Toyota Camry, don't hesitate to contact us. Toyota Camry category.
The process of dismantling components and assemblies:
First of all, we loosen the nuts of the front right wheel, then we jack it up, removing it. Putting a support stand under the body, because the jack will be needed later in the process. We unscrew the engine protective cover from the bottom in the mud.
We take precautions to avoid a short circuit, remove the battery terminals, and remove interfering access points to the timing belt.
We dismantle the windshield washer tank, which has a large volume, takes up a huge space in the engine compartment, creating inconvenience. To do this, take a key number 10″, unscrew the top bolt of the windshield washer tank, disconnect the hoses coming out of it, disconnect the power connector for the water pump, and carefully remove the tank.
This is what the removed windshield washer tank looks like when you remove it.
We remove the high voltage wires of the spark plugs, removing them, then unscrewing the spark plugs.
We change the chain drive ourselves
Of course, such repairs can be entrusted to specialists, but these instructions are intended for those who do everything themselves. This process cannot be called simple, but any car enthusiast can handle it, if he so desires.
- First, remove the covers from the valves and motor.
- Disconnect the left terminal of the battery.
- Raise the car with a jack and remove the right wheel. After this we will be able to see the crankshaft pulley.
- We place a lining under the motor and remove its support.
- We remove the generator belt.
- Now we need to unscrew the bolt on the crankshaft pulley; to do this, the crankshaft itself will have to be locked.
- The power steering generator may be interfering with us. If so, it will need to be removed. After this, the side cover can be easily removed.
- We remove the hydraulic tensioner, having first dismantled its shoe. Move the gear aside and remove the chain.
- Let's start installing the new chain.
As you can see, there is nothing difficult about this. Be sure to check the alignment of all marks. If they do not match, the chain installation process will have to be repeated. After installing the new drive, we start the car and check its operation.
A few tricks
- All instructions write about the need to dismantle the oil pan. But you don’t have to do this. This action is recommended to be performed only to prevent dirt from getting there. Just cover it with a rag.
- Dismantling the cooling radiator, and therefore draining the antifreeze, is also extra work that need not be done. You can get to the timing chain without this extra hassle.
- Many people unscrew the motor eye with the tube. This is also optional. You can only bend the tube. It is copper and will give in easily. And if you remove the eye, you will have to unscrew a bunch of bolts to do this. Why do we need this extra red tape...
- The bolt on the crankshaft pulley can be easily unscrewed with a 19mm head. No special tools are needed for this.
- Do not start removing the chain from the tensioners because the sprockets may jump off the marks. You need to start the process of removing the chain by unscrewing the bolt that secures the left camshaft. To do this, the camshaft will have to be fixed between cylinders 3 and 4.
- After installing the chain, the crankshaft should be turned 2 times. In this case, the marks on the sprockets must coincide with the marks placed on the casting.
Final action:
Installing a new timing belt, tension pulley, checking the position of the marks, assembling dismantled components, starting the engine for the first time.
It is necessary to install the belt tension roller with a tension spring, fixing it in a weakened state. That is, give tension to the spring by tightening the tension roller with a centering bolt. Since the pre-set marks are already ready. Unpack the new timing belt, put it on the crankshaft and camshaft toothed pulleys.
We loosen the centering bolt and apply tension with the roller as far as the spring will allow us. We turn the entire timing mechanism, check the belt tension, if there is insufficient slack, loosen the tensioner centering bolt, then use a pry bar to adjust the required belt tension.
You will need a jack, a block and a standard set of tools. Also a thread locker and a set of hexagons)
I will describe the assembly process in detail, but any “Captain Obviousness” can disassemble it in the reverse order.
In the photo - the right wheel and the attachment belts, the crankshaft pulley, the bracket, the support, the timing belt and its casing, the rollers, the pump, the thermostat and the radiator hose have been removed
So that the engine could hang without support, I first placed a block under it. The car itself is on a jack.
The same thing - the view from the arch:
I'm taking a new pump - I bought a GMB for 1000 rubles.
I screw it home. It is better to tighten the bolts diagonally in several passes with a torque of 19 Nm.
At first I installed the pump on the paronite gasket that it came with, but then I switched it to the sealant, since the gasket was not airtight. There are no problems with the sealant, despite the fact that its mating surface does not have a groove. (This is the GMB, Aisin has a groove)
I “charge” the timing belt (I bought a SUN for 1000 rubles) and attach the bracket. There is no need to tighten it right away. In general, pulling out and inserting this bracket between the engine and the spar is a big deal, but in general it can be done, you just need to show more persistence))
I fasten the idler roller with a torque of 40 Nm, anointing the thread with a lock as written in the manual:
I put marks on the pulleys (gears? which is correct?)))
I fasten the tension roller, also 40 Nm and with a thread lock. Don't strip the thread - you'll have to remove and possibly change the oil pump)))
The position of the crankshaft will be checked immediately - see the position of the mark in the photo:
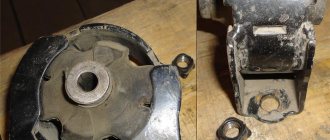
The old hydraulic tensioner was completely finished and could be pressed loosely with a finger. I took a new one from 1mz for 1000 rubles. Original.
If you play with it, you will need to cock the pin again. This is done in a vice. So slow:
I screw the tensioner:
I pull the pin)) - the belt tightens:
I immediately place the lower part of the casing and stretch out the bracket - it also presses the casing.
I take a new thermostat (original - 800 rubles), a new rubber band and insert it into the pump. By the way, in the photo it is not placed correctly, there is a small hole there - it should be on top:
I screw on the radiator hose. I put the chip on the sensor. By the way, this sensor is only for Carlson’s work. There are a total of 3 temperature sensors in Prom.
It can be seen that the mark on the pulley shows 0 degrees, which means the knee is in the correct position - at TDC of the first cylinder.
I fix the crankshaft pulley and tighten it to a torque of 200 Nm. I unscrewed it using the same principle))
I put in place the second part of the bracket (made of non-ferrous metal) and the support (gel):
I connect both parts of the bracket with nuts; you can climb up from the wheel well and below.
Now I turn the engine clockwise 2 turns by the crankshaft pulley. I'm checking the marks. The mark on the crankshaft pulley shows 0 degrees, and the marks on the pulleys of both cylinder head coincide with the marks on the belt casing. Everything is clear))
If something doesn’t match, then you just need to again set 0 degrees on the crankshaft pulley on the scale and remember how many teeth the marks on the cylinder head pulleys do not correspond to, remove the tensioner, move the belt by the memorized number of teeth where necessary. Install the tensioner a second time; if you are too lazy, you don’t have to check it - everything will be guaranteed to be correct after tensioning.
As you can see here, you don’t need to sweat like on the 3S with tension and catch the marks.
...I install the second part of the belt casing and the gusset:
That's it - you can add antifreeze to the radiator and BC until it stops, start the engine and bleed the system. I will write in the next entry how to do this correctly on the prominant.
All that remains is to put the wheel on and lower the car from the jack.
Now comes the important part of the repair:
When starting to remove the belt, let's look at the installation marks. Align the marks of the crankshaft toothed pulley. Scroll the crankshaft until the marks match. They are located on the side of the toothed pulley and the engine block housing.
For greater confidence, the correct coincidence of the marks will show the position of the pistons the first and fourth must be at top dead center.
Let's look at the camshaft marks:
There is a method of installation by marks: in this case, the mark is the hole with the letter “K”; this hole coincides with the groove of the camshaft support journal, in which the seal is located.
The next practical 100% working method is to make sure that the tags are installed correctly.
You will have to remove the ignition distributor cap (by unscrewing three 10″ bolts). Observe the slider, if done correctly. The position of the slider coincides with the first high-voltage wire, which means the first cylinder is at top dead center.
When should you replace the timing belt on your Toyota Camry?
Now we will answer the question that you all should ask yourselves, when to produce Toyota Camry timing belt? It is necessary to know that each engine is different and, as we have shown above, we should not skip replacing this part. The more we advance in time, the more manufacturers improve the timing belt, and generally, the newer your Toyota Camry is, the less you'll have to worry about your belt. However, check your Toyota Camry's service record to know the exact service life and maximum mileage you can achieve before setting the timing . Typically, timing belts have a service life of 5 to 10 years and a maximum mileage of 80,000 to 200,000 km .