The timing belt is a consumable part in an internal combustion engine, which is the connecting link between the crankshaft and the camshaft. It is located in the engine compartment on one side of the power unit. The plastic casing, which is installed above it, protects it from atmospheric and physical influences. This is the main belt, without which the vehicle will not start. But, like any other consumable part, it needs to be replaced. When and how to do this - read the article.
How to Replace the Alternator Belt on a Toyota Avensis ~ AUTOINTERLINE.RU
Toyota Avensis Broom Bortjournal Replacing the drive belt and tension roller
(engine 1ZZ-FE)
It's time to replace the belt and how to connect the roller with it. Initially, I wanted to replace it myself, but out of curiosity, I went to a service station and found out about the cost of this procedure: with spare parts, the amount of work was 5,000, without spare parts, 2,000.
Order spare parts from the website plentycar.ru. Ordered on Monday and Thursday of the same week, I received an SMS notification of my arrival at my city's warehouse. I ordered not the original, but replacements, which were recommended to me by the owner of the office (he installs the same replacements on his car, only a Chrysler car) and I am very pleased with them. V-shaped belt CONTITECH (Germany) (catalog number 6PK1733, price 710 rub.)
Before replacing, I read how others changed them themselves and helped me here in these two posts: This and This
To replace, I need the following set of keys:
To unscrew the roller, you will need a star wrench, something like a hexagon.
You also need a small flat blade screwdriver to remove the plug on the roller.
Well, of course, a rag
Source: https://autointerline.ru/kak-zamenit-remen-generatora-na-tojota-avensis/
Where is the drive belt located?
On a Toyota Vitz, the drive or alternator belt can be found under the hood of the car, on the left side of the engine. It is stretched on several rollers and is located between the engine, the pump and the so-called “cushion” - the motor support.
Preparation for replacement and necessary tools
Before replacing, you must remove the ignition key and disconnect the negative terminal from the battery. It is also advisable to let the car cool down for a couple of hours. If you perform a hot replacement, you risk serious burns.
To replace the drive or alternator belt in a Toyota Vitz you will need:
- Head 14;
- Head 12;
- Key for 10;
- Key for 14;
- Key to 17;
- Ratchet;
- Two cardans;
- Ratchet extension;
- Jack.
Step-by-step replacement instructions
Replacing a part on a Toyota Vitz occurs according to the following algorithm:
- We install the car on a pit or a lift;
- Unscrew the locking screw;
- Unscrew the three mounting bolts of the support;
- Loosen the generator rotation axis bolt;
- Using a jack, raise the engine. You can choose an air conditioning pump as a support;
- Move the generator towards the engine;
- We loosen the belt tension and remove it;
- We install a new one and tighten it;
We carry out the assembly in the reverse order.
Toyota Avensis: timing belt replacement
The timing belt is a consumable part in an internal combustion engine, which is the connecting link between the crankshaft and the camshaft. It is located in the engine compartment on one side of the power unit. The plastic casing, which is installed above it, protects it from atmospheric and physical influences. This is the main belt, without which the vehicle will not start. But, like any other consumable part, it needs to be replaced. When and how to do this - read the article.
When is it necessary to change the timing belt?
Replacing the timing belt on a Toyota Avensis 2.0 diesel is carried out every 60-70 thousand kilometers or at the first signs of wear.
Signs that replacement is needed:
- The internal combustion engine is difficult to start in any weather;
- Dark color of exhaust gases due to desynchronization of the mechanism and incomplete combustion of the fuel mixture;
- External condition: material detachment, abrasions, presence of oil or coolant on the surface;
- Extraneous noise in the engine compartment.
If at least one of the above symptoms is noticed, it is necessary to begin preparing for the replacement procedure.
Belt selection
The best option when choosing a *high-quality timing belt* is to purchase an original component. These belts were created by engineers who also created engines for a particular car. When creating components, all mathematical calculations were used.
Quality control is at the highest level.
But if original components are rare in the vehicle owner’s region, and the official dealer is located several hundred kilometers from the vehicle’s location, you can use high-quality analogues.
Names of popular component companies:
- Contitech;
- Dayco;
- Gates;
- Bosch.
After choosing a belt, you can proceed directly to preparation.
Self-replacement
Preparation for replacement is based on two basic steps:
- Collection of necessary tools;
- Study and follow safety rules.
Required tools and materials:
- Set of wrenches;
- Set of heads;
- Screwdrivers (slotted and Phillips);
- New belt;
- Clean rags;
- Fabric gloves;
- Retainer for flywheel and tensioner;
- Other tools (as needed).
Safety regulations:
- Before replacing, place the vehicle on a level surface. You can use an overpass or a garage.
- Apply the parking brake and install wheel chocks.
- Shift the gear lever to neutral position.
- Disconnect the negative terminal of the battery.
After collecting the necessary tools and studying safety regulations, you can proceed to the replacement procedure.
Removing the belt
Step-by-step process for removing the old timing belt:
- Place a jack under the front right side of the vehicle. Loosen the front right wheel bolts. Raise the vehicle using a jack and remove the wheel.
- The wheel arch has plastic protection installed. It is secured with two bolts and two plastic clips. It needs to be dismantled. It will not be possible to save the plastic clips, since they break with slight movement.
- Access to the crankshaft pulley is provided. Use a 19mm wrench to unscrew.
- After removing the attachment and drive belts, you can remove the pulley.
- Then remove all spark plugs and set the first cylinder to the dead center position. The mark on the pulley should be aligned with the number 0 on the scale on the plastic cover.
- Rotate the pulley clockwise by hand or using a wrench with a center bolt.
- Remove the pulley using your hands. It all depends on the strength of the fit.
- Remove the right power unit support. You can use a jack and a piece of wood to raise the engine slightly.
- Access to the plastic timing belt covers is provided. They need to be dismantled. At the same time, remember which bolt is intended for which hole, since they are of different lengths.
- Loosen the bolt that secures the tension roller. Only then can the timing belt be removed.
Installing a new element
Step-by-step instructions for installing a new timing belt:
- Before installing a new timing belt, all rollers must be secured. Fix the tension roller in the lower position. Now you can install the consumable.
- Check the alignment of the marks on the pulley.
- Install the crankshaft pulley and tighten it clockwise. This action will ensure the belt tension.
- Replace the protective cover and screw all the bolts into place.
- Secure the engine mount.
- Install all attachments and belts in reverse order.
- Reinstall the spark plugs, arch protection, install the wheel and lower the jack.
- Connect the battery terminal. Start the engine and check its operation.
The replacement procedure takes about 6 hours. The main thing is to follow the instructions provided above.
Features of replacement on other models
The peculiarity of replacing the timing belt on Toyota Lucida and Picnic is compared with the replacement process on Toyota Avensis. The similarities lie in the algorithm, while the differences lie in the location of the attachment.
Standard replacement algorithm:
- Remove the decorative engine cover;
- Remove attachments and belts;
- Get to the tension roller, loosen, remove the old belt;
- Install the belt according to the marks;
- Reassemble in reverse order;
- Start and check operation.
THIS IS INTERESTING: Which fuse is responsible for the cigarette lighter of the VAZ 2111?
Consequences of untimely replacement
The timing belt on Toyota Avensis needs to be changed in a timely manner. If you skip the replacement interval or do not pay attention to characteristic sounds, disastrous consequences can occur.
As a result, expensive repairs or replacement of the engine will be required due to:
- Bent valves;
- Deformation of the cylinder block;
- Piston deformations.
Therefore, if a car owner purchases a used vehicle, the first step is to replace the belt and all the rollers. This will protect it from subsequent expensive repairs.
Source: https://fix-my-car.ru/texnicheskoe-obsluzhivanie/zamena-remnya-grm/zamena-remnya-grm-tojota-avensis.html
Consequences of untimely replacement
The timing belt on Toyota Avensis needs to be changed in a timely manner. If you skip the replacement interval or do not pay attention to characteristic sounds, disastrous consequences can occur.
As a result, expensive repairs or replacement of the engine will be required due to:
- Bent valves;
- Deformation of the cylinder block;
- Piston deformations.
Therefore, if a car owner purchases a used vehicle, the first step is to replace the belt and all the rollers. This will protect it from subsequent expensive repairs.
Replacing the timing belt + pump - logbook of the Toyota Avensis D-4D of the year on DRIVE2
Personally, I had to change not the chain itself, but the tensioner assembly - it is hydraulic, it depends on the oil pressure, the adjustment is not a replacement for the Toyota Avensis timing belt. We tighten the belt with a large screwdriver, which is inserted into the slot of the power steering pump tensioner to the left of the fixing nut. This can be done with a 14mm head using two standard extensions and a wrench.
Toyota Avensis timing chain replacement. Toyota Avensis II (T) Noise appears at load of 40
I don’t know what was there before me: To put it back on smoothly, you need to prepare something round of the same size. We control the amount of deflection using marks made with a pencil on the lower timing belt cover.
They have different compositions - they also come with VVT sprockets, but this is not necessary and is very expensive.
https://www.youtube.com/watch?v=aiz6HlP2fhs
Full size how to tighten the crankshaft pulley To remove the timing belt covers you must first unscrew all the nuts that secure them, then remove the bottom cover, then remove the lower part of the engine mount, and then the top cover.
Full size view after removing the lower timing cover Reassemble in reverse order: The spring can be easily removed with long pliers; you do not need to press on the roller to remove it. Full size aligned marks on the crankshaft. The old belt was worn out for about a thousand km.
It was possible not to change it until thousand, and maybe even up to. When you install a new belt, its left part is tensioned by a spring, but the right part is not. First I tried to install the belt according to the manual: In general, I found a stable oil consumption of 0.8 - 1 liter per km.
For 4 liters the price fluctuated around the mark in rubles. Other oils were either more expensive or did not inspire confidence from 25 years of driving used cars. Zhor was stable, both in the city and on the highway.
Therefore, I began to prepare for a mini-capital - rings, seals, bearings, timing belt repair kit, gaskets, belt. When opening the engine, it turned out that the capital would not help - there was an ellipse on the cylinder surface, both along the crankshaft and across. I didn’t risk lining it, so I went to replace the engine. Because of the exchange rate, they jumped in price by 1 times. I chose it with a competent mechanic, a certain year of manufacture, so it’s not really a pig in a poke.
Now the odometer shows about thousand. Oil consumption from replacement to replacement is 10 thousand. On Mannol the waste is less. What was there before me - I don’t know: True, I have a restyled engine, production year. When changing the oil, I first filled in 3.5 liters and measured the oil level on the dipstick with a caliper, then added another 0.5 liter and also measured it.
This means that your oil consumption per 10 km is approximately 1.35 liters, but this falls within the norm that Toyota prescribes in the operating book attached to the car. Regarding my car, I recently changed the oil. Thank you for describing your history with the engine in such detail. oils on the pre-restyling 1ZZ-FE - I know, a lot has actually been written about this. I’m using 5-W30 for now, but I think that soon I’ll have to switch to 5-W40, especially in the summer. It’s located to the right and deep into the power steering pulley.
On the belts, use a pencil to place arrows in the direction of rotation; when assembling, the direction of movement of the belt should be maintained. After removing the drive belts, you can remove the pulley itself. Before this, we turn out the spark plugs and set the first cylinder to the top dead center TDC position.
To do this, align the mark on the pulley, which is a slot on the side closest to the engine, with the number 0 on the scale on the lower plastic cover covering the timing belt.
We rotate the pulley clockwise manually or with a key through a temporarily screwed central bolt.
Replacing the timing belt Toyota Avensis D4D part 3
We remove the pulley by hand or using a three-legged puller, depending on the tightness of the fit. On my engine, the first time the pulley was removed with a puller, and subsequently, after lubricating the seat with lithol, it was easily put on and removed by hand. Now remove the right engine mount. To do this, from the radiator side, so as not to occupy the wheel niche, we place a jack under the engine crankcase and fill it a little, placing a small plank.
This must be done in order to remove the load from the support and so that the engine does not become warped after its removal. We unscrew the four nuts and three bolts: The support is easily removed, which opens access to the upper and lower plastic covers covering the timing belt.
The top cover is secured with five 10mm bolts, the most difficult of which is the bottom left one in the area where the engine bracket is attached to the support. It is convenient to unscrew it with a small 10mm head with an L-shaped lever. When unscrewing these bolts, you have to show ingenuity and extraordinary patience.
The bottom cover is secured with four 10mm bolts, the most inconvenient of which is screwed into the center of the cover in a recess. You need to remember or write down which bolt goes in which hole, since they are different lengths.
After removing both covers, you can directly start working on the timing belt. An unpleasant surprise awaited me on my engine.
It turned out that the Mitsuboshi belt had stretched so much that the tension spring had completely compressed and was no longer tensioning anything, while the upper branch of the belt was dangling freely between the pulleys.
THIS IS INTERESTING: Question: What documents are needed to apply for elder care benefits?
One had to wonder how the belt did not jump over the pulleys and how its teeth were not cut off.
Toyota Avensis 1998, 128 l. With. — scheduled maintenance
The cause of the imbalance in engine operation, which caused the unpleasant consequences listed at the beginning of the article, has been established. In addition, it turned out that the tensioner bearing was heavily worn, had play and was noisy, and the idler roller bearing, which is closer to the pump, was also noisy and had slight play.
There was no oil leakage through the seals. An attempt to lubricate the idler roller bearing was unsuccessful, since its metal-plastic covers were well and deeply pressed in during manufacture.
https://www.youtube.com/watch?v=8dKfXa4btsg
During the removal process, they are irreversibly deformed and, upon subsequent installation, no longer ensure retention of lubricant in the bearing.
Therefore, it was decided to replace both rollers with new ones. To remove the timing belt, loosen the bolt securing the tension roller and, pressing the roller with your fingers, lower it to the lowest position.
Carefully, without moving the camshaft and crankshaft pulleys, remove the timing belt. Immediately apply a mark on top of the camshaft pulley with a simple pencil or marker and next to it a corresponding mark on the engine body.
With this mark we fix the correct position of the camshaft pulley. The fact is that in all repair manuals it is recommended to install the camshaft pulley in the desired position by aligning the hole in it with the mark on the engine body; the mark should be visible through the hole.
But in a real situation, due to the installation of the engine at an angle, it is not possible to look into this hole, since the niche of the front pillar is in the way. It is also impossible to check the alignment of the marks by touch.
Before installing the new timing belt, we fix the new rollers in their places, and apply a medium-strength thread locker to the bolt of the idler roller; traces of its use were clearly visible on the threads.
Source: https://nkscooters.ru/toyota/%D0%B7%D0%B0%D0%BC%D0%B5%D0%BD%D0%B0-%D1%86%D0%B5%D0%BF% D0%B8-%D0%B3%D1%80%D0%BC-toyota-avensis.html
Tension check
Tension checking process
Now let's look at the issue of checking tension. It’s worth mentioning right away that the force values are unique and depend not only on the make and model of the machine, but also on the generators and belts used. Therefore, look for the relevant information in the manuals for your car or in the operating instructions for the alternator or belt. This will also be influenced by the presence of additional equipment installed in the car - power steering and air conditioning. In general terms, we can say that if you press the belt on the longest section between the pulleys with a force of about 10 kg, then it should deflect by approximately 1 cm (for example, for a VAZ 2115 car, when applying a force of 10 kg, the belt deflection limits are 10 …15 mm for generators 37.3701 and 6…10 mm for generators type 9402.3701).
Often, if the alternator belt is loosely tensioned, it begins to make whistling sounds, and the driver sees malfunctions in the operation of the electrical equipment of the car. In some cases, the low battery light will tell you about problems. In such a situation, we recommend checking the tension level of the alternator belt and increasing it.
If during the check you find that your alternator belt is too loose or too tight, you need to adjust the tension. This can be done in two ways depending on what kind of machine you have - using an adjustment bar or using an adjustment bolt. Let's look at them in order.
Toyota Avensis timing chain replacement - DIY car repair
The timing chain connects the operating shafts of the rotating engine components and ensures their interaction is synchronized. A chain drive, unlike a belt drive, is considered more reliable, but it sometimes stretches. If you hear a characteristic rumbling sound from the engine timing chain, then most likely you will have to replace the Toyota Avensis timing chain.
In this case, we advise you to go to a service station and get diagnostics done. Signs of stretching and skipping by 1-2 teeth are sharp, uneven operation of the engine at idle, characteristic sounds when idling. Also, the tensioner reaches its maximum, gear teeth wear out, etc. In this case, the valve timing will be disrupted. There will be a loss of power, or even complete engine failure.
Price:
Type of work: PriceReplacement of Toyota Avensis timing chain Replacement of Toyota Avensis timing chain with removal of internal combustion engine
| from 7500 rub. |
| from 15,000 rub. |
Where to change in St. Petersburg:
Select service station
We advise you not to hesitate to contact a car service center as soon as you notice the first signs of problems, since otherwise, if the gas distribution mechanism is single-row, a break will occur. And this will inevitably lead to expensive engine repairs, probably even to the replacement of the cylinder head. In some cases, it is possible to adjust the tensioner. But more often the tensioner is faulty. In this case, it will be necessary to change it.
Also, in our car services, you will have worn gears, tensioner and stabilizer, gasket under the timing cover, seals, tensioner and stabilizer shoes, etc. replaced. The difficulty of such work is in removing attachments and disassembling the engine. In some car models, independent dismantling by the car owner is completely impossible. It is important to correctly set the marks on the links and align them with the marks on the gears, etc.
Therefore, the most reasonable decision would be to contact our services for repairs.
Source: https://avto-voshod.ru/remont/tojota-avensis-zamena-tsepi-grm.html
Timing belt 1zz: chain replacement
Engines of the ZZ family entered production in 1988 and were installed on many cars, such as Toyota Corolla, Avensis, Caldina, Celica. The most popular engine in the series was the 1ZZ-FE modification.
This type of engine differs from its predecessor in its aluminum cylinder block, the presence of a VVTi variable valve timing system, and lightweight valves.
Another major difference is that the 1ZZ uses a timing chain rather than a drive belt. It is precisely the replacement of the 1ZZ timing chain that will be discussed in our article.
Any car enthusiast knows that a timing drive malfunction is fraught with serious problems. Under different operating conditions, the operating life of the gas distribution mechanism drive varies from 30 to 160 thousand kilometers, and timely replacement of this element will allow you to be confident in the operation of the engine. Below we will go through the process of replacing the timing chain on a 1ZZ engine step by step.
Spare parts
To replace an element, you will need a repair kit, which will include all the necessary spare parts and consumables. There is a large selection of manufacturers on the market whose kits are suitable for the 1ZZ motor. The generator drive belt (accessories) may not be included.
Repair kit contents:
- the timing chain itself;
- automatic hydraulic tensioner;
- sedative;
- tensioner shoe;
- camshaft gear (exhaust valves);
- variable valve timing (VVT) gear;
- crankshaft gear;
- crankshaft oil seal.
Dismantling of attachments
In general, replacing the timing chain on the 1ZZ-FE is not much different from other engines.
https://www.youtube.com/watch?v=K7XcLe-3sAc
You should start by removing the decorative plastic cover of the motor. Then:
- remove the ignition modules (4 bolts);
- unscrew the 8 bolts, the stud and 2 nuts on the 1ZZ-FE valve cover and remove it with the gasket;
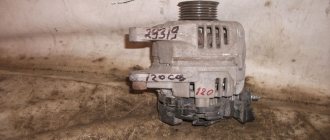
- We turn off and dismantle the generator, having previously removed the negative voltage from the battery.
1 — crankshaft, 2 — power steering pump, 3 — tensioner, 4 — coolant pump, 5 — generator, 6 — air conditioning compressor
For the following manipulations it is necessary to jack up the engine:
- remove support 1ZZ-FE; to do this, you need to unscrew 3 bolts by 14, 2 of which do not require much effort; to unscrew the third, we first dismantle the valve of the variable valve timing system;
- drain the coolant from the cylinder block and radiator;
- set TDC (top dead center) and remove the front right wheel along with the mudguard.
THIS IS INTERESTING: Why doesn’t the computer see wired headphones?
Marks and removal of the belt tensioner for attachments
Timing marks 1ZZ-FE: the marks on the crankshaft pulley must be aligned with the zero mark on the timing cover. This is done by turning the crankshaft.
Remove the generator belt (there is a protrusion on the belt tensioner that needs to be turned).
To remove the chain tensioner, you need to jack up 1ZZ (under the front part). Do not forget to also remove the pin on which the tensioner was attached so that it does not interfere with removing the timing cover. We also remove the engine mount bracket.
Removing the pump pump, chain tensioner and timing cover
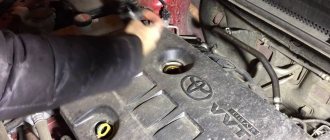
We unscrew the bolts securing the antifreeze pump and dismantle it. After this, you need to lock the crankshaft and remove the pulley. To lock the shaft, put the car in gear (preferably fifth), and insert a screwdriver or wrench between the brake disc and caliper. Then the bolt on the pulley can be unscrewed quite easily.
Then you can begin to remove the timing cover: three 12 bolts and eight 10 bolts, remove the DPKV (crankshaft position sensor) and the power steering pump (power steering).
Afterwards, it is necessary to dismantle the timing chain tensioner.
Removing the old chain
To dismantle the old drive, it is necessary to remove the DPKV rotor, the hydraulic tensioner shoe and a pair of dampers. Align the marks of the crankshaft gear and chain.
Afterwards, you can begin the removal itself: the lower sprocket (moves freely back and forth) is pushed forward, and the chain can be removed. Then we dismantle the VVT-i system gear (by unscrewing the clutch bolt and holding the camshaft) and the exhaust camshaft sprocket.
The new chain, like the old one, will have timing marks; their location on both must match.
All removed elements must be washed and cleaned of traces of sealant, as well as the surfaces of the 1ZZ-FE itself.
New installation and assembly
To begin, we return the gears of the VVT-i system and the exhaust camshaft to their place (note that the camshafts must be stationary), install the crankshaft sprocket and damper.
We pick up a new chain: you need to find the timing marks on it. They represent two marks located from each other at a distance of 6 links. Label colors vary depending on the manufacturer.
When installing, it is necessary to align the marks of the crankshaft and camshafts. After installation, make sure that they all match and that the chain in the area from the exhaust camshaft sprocket to the crankshaft sprocket is tensioned and has no slack. We install the tensioner shoe in the groove allocated for it.
Replacing the generator drive belt is not difficult and is practically no different from replacing it on other engines.
After the above procedures, you can begin installing the timing cover (don’t forget to apply sealant around the perimeter of the cover). Let's start replacing the tensioner: after installing the new tensioner, make sure that it is in working configuration (otherwise you will need to “cock” it with a screwdriver by pressing on the shoe until it clicks). For example, you can try to move the pin using a piece of wire.
After lubricating the new timing chain, rotate the crankshaft 2 turns to make sure that all the marks will then fall into place (you should not pay attention to the crankshaft marks; due to the number of teeth on its sprocket, the marks will “move” in any case).
After the control check, we complete the assembly in the reverse order.
Source: https://toyota-camry-corolla.ru/dvigateli/grm-1zz-zamena-tsepi/
Signs of a damaged belt
The main sign of a worn alternator belt is a characteristic whistle that occurs when there is any load on the electronics.
It is important to note that whistling may occur when liquid gets on the belt or in cold weather. Wear is also indicated by sagging and the presence of cracks and tears on the surface.
The appearance of small transverse cracks and abrasions on the working surface is normal. Signs of more serious wear include long, horizontal tears on the outer surface and frayed edges with threads coming out. If you notice these signs of wear, the belt must be replaced immediately or it may break.
A break in the accessory belt will primarily lead to the shutdown of all electrical equipment in the vehicle. This happens because the charging generator stops receiving torque. Without it, the generator stops charging the battery. Another symptom of a rupture is the power steering system turning off. Without it, the steering wheel becomes very difficult to rotate. However, the biggest problem is the engine cooling system shutting down. A break can lead to a stop in the circulation of coolant due to the fact that torque will no longer be supplied to the water pump. Lack of cooling quickly leads to engine overheating. Overheating can cause serious damage to the piston system, crankshaft, connecting rod, valve stem seals, block gaskets, and so on. If your alternator belt breaks, carefully monitor the engine heating scale, otherwise you may end up needing a major repair.
Instructions for replacing the timing chain on a Toyota Avensis with your own hands - AvtoSovet
The timing belt is used in the design of any modern car to synchronize the operation of the camshaft and crankshaft.
This part is quite reliable, but over time, under heavy load, it still wears out, begins to slip, or even breaks off altogether.
The most negative consequence of such problems may be the need for expensive engine overhauls. To prevent it, just contact our car service to replace the Toyota Avensis 1.8 timing belt.
Symptoms indicating problems with the timing belt in a Toyota car
Minor wear of this part is quite difficult to detect, since there are simply no obvious symptoms of problems. At the same time, it is very advisable to contact our car service center if the following signs of incorrect operation of the car appear:
- constant engine overheating;
- reduction in power. This problem arises for a number of reasons, but most often it can be eliminated by replacing the Toyota Avensis timing belt;
- the occurrence of extraneous sounds under the hood while using the car;
- increased fuel consumption;
- interruptions in engine operation.
According to the manufacturer's requirements, the Toyota Avensis timing belt must be replaced once every 75–100 thousand kilometers.
But if you use your car in difficult conditions or often drive off-road, the procedure may need to be performed much more often.
The main thing is to promptly identify wear or weakening of a part, as well as damage to tensioners or other elements of the gas distribution mechanism.
Professional timing belt replacement
Why choose us?
Spare parts and services in one place
Just-in-time repairs
Qualified craftsmen
Personal manager
If you have the appropriate experience and tools, you can replace the timing belt yourself. But contacting our car service will allow you to get a number of advantages:
- the use of high-quality original spare parts that will ensure the normal operation of the car engine and its other systems;
- affordable fixed price for replacing the Avensis timing chain;
- the use of certified modern equipment in the process of repairing or servicing a car, which allows us to ensure efficiency and high quality of work;
- providing guarantees for all operations performed by specialists.
During the process of replacing the belt, we also evaluate the condition of other parts - tensioner rollers, pump, drive, and, if necessary, provide a set of spare parts that ensures flawless operation of the gas distribution mechanism.
Tension using adjusting bolt
Adjustment with a bolt on a VAZ-2110
This method is more progressive and is used in most modern machines. It is based on the use of a special adjusting bolt , by turning which you can adjust the position of the generator relative to the engine. The algorithm of actions in this case will be as follows:
- loosen the generator, its upper and lower fastenings;
- Using the adjusting bolt, we change the position of the generator;
- fix and tighten the generator mount.
The belt tension level in this case can be determined during the adjustment process.