The design of the flagship Toyota Land Cruiser model has undergone a number of changes over the years of production. The TLC 80 used a conventional classic steering gear. For the sake of comfort, the TLC 100 received a steering rack and independent front axle suspension. On the Land Cruiser 200, the front suspension has already undergone significant changes compared to its predecessor, the famous “hundredth”.
However, in the design of the steering system connecting the steering shaft to the steering rack, cardan transmissions or, more simply put, cardan shafts are used.
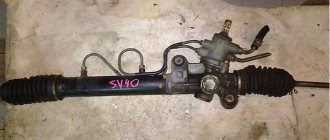
The steering rack of the Land Cruiser 200 is located at the bottom of the frame. The steering wheel is connected to a cardan, which is connected to the rack through a spline connection.
The cardan transmission in its design has several components - a tube, a spline connection and crosspieces. The steering cardan on the Land Cruiser is covered with a shield made of flexible plastic.
But despite this, dirt and moisture accumulate between the body and frame, which over time causes corrosion processes. The shaft itself, the crosspieces and the spline joint are corroded. The crosspieces of the steering cardan on the Land Cruiser 200, unlike the chassis cardan joints, do not provide for lubrication - there are no special grease nipples. Sand and dirt, penetrating the steering cardan on the Toyota Land Cruiser 200, destroy the mechanism. Knocks appear due to wear of both the crosses themselves and the spline joint.
Crosspiece Camry 40
A common problem in the Camry 40 is a knocking sound in the steering wheel.
The problem usually manifests itself when the car reaches 200 thousand km. The presence of a knock in the steering wheel may indicate a malfunction of the Toyota Camry 40 steering rack. In this case, diagnostics and repairs should be carried out as soon as possible to eliminate these defects. The appearance of problems with steering and crosspieces in particular increases the risk of an accident, since the steering column may refuse to obey the driver at any moment.
Causes of knocking in the steering wheel
The causes of knocking in the steering wheel can be different. A common problem is a knocking sound in the steering due to worn crosspieces. The constant movement in this node is the reason for its short resource.
The appearance of backlash is another important reason for knocking in the steering wheel. Plays prevent you from turning the car's steering wheel. Steering rack creaks also often occur, which can appear both in a certain position and throughout the entire range of steering rotation.
The appearance of signs of rattling and vibration may indicate damage to the steering column bushings. Car owners identify typical problems with the steering mechanism:
- bearing wear;
- needle bearing failure;
- bushing failure;
- damage to the crosspiece;
- loosening of the steering shaft cardan;
- steering rack wear;
- detection of hydraulic fluid leaks;
- steering wheel sticking.
The crosspiece is subject to heavy steering loads. It must be replaced in a timely manner. The driver can hear the first signs of a problem when driving on bumps and other road irregularities. If the crosspieces are worn excessively, wheel play may occur.
Knock in the steering column of Toyota Corolla
to shilayev_anton:
shaft with a cross?
Hello Forum members, I have the same problem on a 2008 Corolla with a mileage of 42,000. I went to get the chassis diagnosed. they said everything was fine. We drove along the tram tracks - it was fine. And when you start to move away or slowly drive onto a small curb, a knock appears in the steering wheel. What could it be? The car service either doesn’t understand me or doesn’t want to understand me.
shilayev_anton:
I had the same problem, I replaced the upper steering shaft and the knocking went away (the cost of the shaft was 4500) #
where did you buy or order?
Does the knocking occur when braking?
Check the tightness of the drives and the condition of the support bearings.
to sawa45:
The shaft sleeve at the entrance to the electric motor is changed.
I want to add my 5 cents to the topic, because until last week on my 2006 Corolla, I observed the same annoying knock in the steering column. Before that, I changed the bushing in the steering rack (with ESD), steering rods and ends. But the knocking in the steering column still remained, quite unpleasant, when passing small irregularities. Using scientific research, it was determined that the source of the knock was in the cabin. Namely, in the upper crosspiece of the steering shaft. But the fault was not the crosspiece itself - with a mileage of 175,000, both crosspieces are still in good condition. The problem was in attaching the cross to the shaft. Those. the crosspiece is put on the shaft splines, and then the clamp is tightened with a bolt. First I tried to tighten the bolt (it is possible that even this simple operation will help someone). Upon closer inspection, I discovered that even if the bolt is fully tightened, the clamp still dangles just a little on the shaft. And this is what makes an unpleasant knock when driving over uneven surfaces. All the fuss is due to the bolt itself. Its thread does not reach the head, that is, it turns out that when you tighten it all the way, the thread is already running out, but the clamp is not yet tight enough. I decided simply and without expense - I added another grower and tightened it. Now I enjoy the silence in the cabin.
to Barry:
This knocking is really annoying me, the car is 2 years old, the mileage is 55 thousand from 35 thousand, this knocking started, everyone says that everything is normal, the chassis works only, but that is the knock)) I wanted to ask, did you take it apart yourself? How complicated is the procedure and where should I start? Please tell me if it’s not difficult, thank you in advance..
to Denis_77:
This is easy to determine if you grab the steering shaft while simultaneously rocking the steering wheel in both directions.
Source
Which crosspiece to choose for Toyota Camry 40
If the steering shaft makes a knocking noise, the problem must be repaired as soon as possible. Otherwise, the accompanying elements will wear out, and the cost of fixing the problem will increase significantly. In case of excessive wear of the crosspiece, the owner has a choice:
- purchase a branded cross from an official dealer;
- buy a used stock from a car dismantling station;
- install a non-original crosspiece from a third-party manufacturer.
According to reviews from car owners, Ruei crosspieces with article number RU452080TO and Toyo ST1639 have good performance indicators.
If the auto store does not have a crosspiece, you can order it online. Very often, replacement of crosspieces is required at the front and rear of the cardan, so it is recommended to purchase spare parts in a comprehensive package so as not to carry out repair work twice.
Signs of a faulty steering shaft crosspiece
The need to replace the steering column cross on the Prado 120 (as well as for the 150 model) arises if the following characteristic symptoms are present:
- There is noticeable steering resistance when turning at speeds above 70 km/h. As time passes, the rotation becomes tighter.
- Delay in turning wheels and loss of sensitivity.
- Increased wheel play.
- Uneven rotation of the steering wheel with sudden jerks.
- There is a distinct knocking and grinding noise when the steering column operates.
Most drivers contact a car service center after waiting for the last signs listed to appear. Such neglect is dangerous. A malfunction of a control on a Toyota car (like any other) can lead to an accident if measures are not taken in a timely manner.
If the slightest problem with handling occurs, diagnostics and repairs should be carried out immediately (if necessary).
Knocking in the steering column: causes
The performance of controls in a car is one of the main points of safety on the road.
The rack in the TLK 200 is of high quality and episodes related to the repair or replacement of the Land Cruiser 200 steering shaft are extremely rare. This knocking noise occurs when driving on rough roads. There are many reasons for knocking, but more often it is due to high mileage, corrosion of the crosspiece, and deformation of the driveshaft.
Let's highlight the most common causes of column failure:
- The support sleeve, which is located on the reverse side of the unit, broke. If the knocking noise comes from under the hood, it means it is simply worn out. To find out what the problem is, place the machine on a lift and, grabbing the shaft, move it in a vertical direction. If there is play, then the bushing is worn out. You can replace it at a service station.
- Over time, the bearing may wear out.
- The tie rod ends could break.
- The problem may be with the steering shaft bearing. It needs to be lubricated and adjusted.
- The bolts have come loose from the steering control. To fix this problem, you need to tighten the bolts.
- The appearance of an annular excavation inside the housing wall directly in the power cylinder of the rack. Replacing or sanding should solve the problem.
- Power steering pump. The bearing in it wears out more often, and knocking begins. You need to either change the bearing, or disassemble the pump, or go to a service station.
- The cause of play in the steering wheel may be a defect, a column cross or a broken rack.
Don’t forget the state of our roads, foreign cars are simply not designed for them, so a situation arises in which the mechanisms wear out faster and the steering column of your Toyota Land Cruiser 200 knocks.
Replacing the steering shaft crosspiece on a Prado
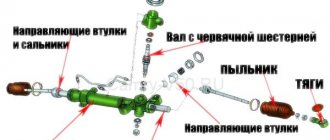
The steering shaft cross is an integral part of the cardan shaft, designed to transmit torque to the rack. This part includes four elbows equipped with needle bearings. For the manufacture of the connecting block, high-strength steel is used, designed to work under high loads.
There are two such connections installed on the car’s steering – at the top and at the bottom. The latter fails more often.
When the first signs of a malfunction of the driveshaft crosspiece on the Prado 120 appear, you should contact a car service center. If the initial diagnosis is confirmed, the node will need to be replaced.
Repairs are carried out in a specialized service station. But if the owner is confident in his abilities and skills, it is possible to perform the work at home. You must first purchase a spare part to replace the worn one. The digital marking index of an element suitable in size for Toyota Prado is 1368, 1639 or 1640. The last two are pressed in a little tighter, so the first option is preferable.
The price of a new spare part ranges from 300 to 500 rubles, depending on the manufacturer.
If the replacement is not carried out on time, you will have to change the entire steering assembly, which will cost up to 9 thousand rubles.
Cardan shaft crosspiece and its replacement
The replacement operation is performed in stages:
- The machine is lifted by a lift or driven onto an inspection pit. It is not necessary to lift the entire car; it is enough to place jacks under the front part.
- The steering wheel is set at an angle of 90 degrees with rotation locking.
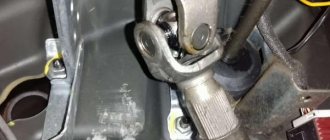
- The front wheel on the driver's side is removed. Work on replacing the crosspiece on the Prado 120 begins in the interior, from where access to the bolt securing the steering column is possible. It needs to be unscrewed first. As a result, the steering shaft can be easily released.
- The top and bottom covers are removed from the bottom of the car, and the driveshaft is cleaned of dirt. The casings are not always protected by anthers - to purchase and install such a seal, you will have to spend about two hundred rubles.
- The mounting bolt is unscrewed. This is not easy to do. To overcome resistance, VD is used. After unscrewing the bolt, the steering shaft is removed from the rack by hand.
- The shaft is removed downwards. The dismantled unit is cleaned and washed from contaminants.
- The shaft is clamped in a vice.
- The connecting block is knocked out using the attachment, first in one direction (the bearing race is removed), then in the other (with a similar operation).
- A new part is installed and the assembly is assembled in the reverse order. A vice is used for pressing. The operation is performed carefully so that the metal does not deform.
- The bearing housings are aligned and rolled using a chisel and hammer.
The disassembled unit is assembled in the reverse order. The functionality of the steering is checked. If everything is done correctly, the steering wheel rotates easily, without effort. On the Prado 150, work on replacing the steering shaft crosspiece is carried out in a similar way.
To disassemble the assembly without problems next time, a protective rubber boot is installed on the connection.
Some car mechanics recommend changing the upper connection at the same time as the lower one to ensure uniform operation of the unit. But the upper unit does not operate in such an aggressive environment, so the need to replace both parts does not always arise.
If you have metalworking skills, which is not uncommon for domestic car enthusiasts, independently replacing the crosspiece on the steering shaft driveshaft in a Toyota Prado 120 will not be difficult. It is important to be careful when pressing in a new part so as not to damage the housing and bearings. Otherwise, you will have to deliver the car to a car service center and pay extra for spare parts and work.
How to properly change the lower crosspiece of the steering column?
To carry out repairs to this unit, we will also need a garage. First of all, we unscrew the protective cover of the steering column itself, which prevents us from getting to the cross itself. We only need to unscrew three bolts - this is not very difficult to do.
Before unscrewing the steering column, you need to block it - this will allow you to leave the signal cable intact and not torn. Next, as when replacing the bushing, we need to mark the position of the steering wheel.
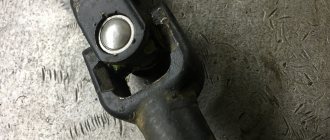
So, we have it in our hands - the lower cross assembly. You can see in the photo that it is slightly worn.
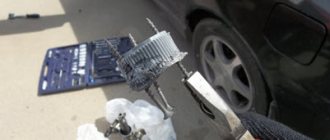
Next we need to disassemble it. We didn’t bother the part too much - we clamped it in a vice and cut off the crosspiece itself. This must be done very carefully so as not to damage the outer part of the knee.
After the crosspiece was removed in such a rough way, we noticed that there was moisture inside it and there was a complete lack of lubrication - these two points became decisive in the process of destruction of the crosspiece and the appearance of knocking. Stop looking at the old cross - let’s take the seats and begin preparing them for the new part. To do this, we need to thoroughly clean the seats.
When the seats on both sides have been cleaned, we take the cross itself and begin to prepare it. We remove the caps and additionally treat everything with lubricant before pressing. The pressing process is very simple, and the photo below will help you understand it in more detail.
Speaking of the cross itself. It is best to buy an original spare part in stores, with technical specifications that will strictly correspond to your car model. However, there is also a cheaper option; on the Internet, many craftsmen say that the crosspiece from the steering column of a VAZ car is perfect for Toyota. That's what we did - it cost us 160 rubles. It is shown separately in the photo below.
When the crosspiece has been completely pressed in, we need to check everything again and lubricate it with additional grease to prevent moisture from getting inside, which destroys the assembly. Bottom photo is the lower cross assembly.
As we can see, there is nothing complicated in the process of replacing it; all we have to do is put everything back in its place. It won't be difficult to do this. Having put everything together, we can check our car - as you will notice, the steering wheel is like new - no knocks or play. This completes the procedure for replacing the crosspiece, enjoy your use.
Source
Cross design
The mechanism of the steering shaft crosspiece performs a transport-guiding function and is designed to transmit the torque of the wheel to the gear of the rack and pinion assembly. The transmission of torque is carried out by the steering shaft cardan, to which the crosspiece is attached. In many models of modern cars, the crosspiece performs the same function and has a similar shape. The cross itself consists of four identical protrusions, each of which is equipped with needle-type bearings. All elements of the cross are made of high-strength steel and must withstand high loads.
Signs of wear on the crosspiece
Often, motorists do not pay attention to insignificant signs that it is time to make repairs, and wait until the problem makes itself known publicly and this is fraught with consequences, especially when it comes to loss of vehicle controllability.
The first signs of wear on the crosspiece appear as:
- the presence of noticeable resistance to the steering wheel when rotating at speeds above 80 km/h;
- delayed wheel turning and loss of sensitivity (delayed response of wheels and steering shaft);
- increased free play angle of the wheels (popularly this symptom is also called “Steering play”);
- uneven rotation of the steering wheel, the steering wheel moves with sharp jerks;
- obvious grinding or knocking noise that occurs when the steering wheel is rotated; the grinding becomes especially noticeable and obvious on an uneven road.
Most often, motorists turn to a car service center to replace the steering shaft crosspiece mechanism only when the last sign of a malfunction appears, but in vain, because in the event of an emergency, the steering control will not be able to adequately respond to the driver’s efforts, and sometimes, the steering control may even fail, this is already fraught with very big troubles.
Repair of the shaft cross is carried out every 50 - 100 thousand, it is better more often, otherwise it will have to be completely replaced with a new one.
To replace, you will need to purchase a crosspiece - on average 150-300 rubles, some car services claim that for the steering to work correctly, you need the entire steering shaft (4 - 7 thousand rubles), but on most cars it is enough to change only the crosspiece.
Talanov family website. Travel, children, cars, DIY
Just like on Ipsuma, the steering wheel began to jam. This Toyota bug is already known to me, the treatment method is clear. For the public and for myself, I am describing how such repairs should take place in a garage environment. My garage is 3*6 meters, of course larger is better, otherwise with a Sienna measuring 2*5 it’s a bit cramped. This time I did everything without children 
What is needed for such an operation:
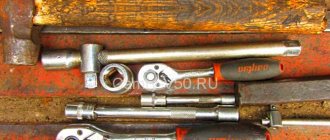
1. A pit or a lift, you can do without it, but this is only out of despair 2. A powerful vice or a small press. 3. Wrenches for 12 different configurations in large quantities 4. A sledgehammer or a heavy hammer + a piece of pipe approximately 0.5 meters. By the way, in one imported video I saw that people use a regular hammer drill for similar purposes in a mode when it does not rotate. 5. Two jacks - it’s convenient to hang the front wheels a little so that the shaft screw can be placed in a convenient position if the steering wheel has already been unhooked. 6. VD-40 and other shamanic ointments will come in handy. 7. How to squeeze out and press the crosspiece, i.e. something with a diameter of 12-15 mm and a “tube” with an internal hole of 17-18 mm. 8. A device for cutting (removing) the guard of the cross. I used a regular chisel and hammer. 9. Actually a new cross. I ordered GMB ST-1639 from Exist for 260 rubles.
Sequencing:
1. We disassemble the interior plastics. First, we pull up the threshold, then another piece of plastic.
2. remove the trim under the steering wheel. there you need to unscrew a couple of bolts and disconnect the wires and the hood opening cable. 4. Remove the “piece of hardware” to which the diagnostic connector is attached. It seems that this rather complex part was just made to secure this connector.
5. Remove a piece of the driver’s foot air duct. 6. In principle, you don’t have to do steps 1-5; there is access to the upper shaft bolt, but it’s too cramped there. So it's worth spending 10-15 minutes cleaning access. Unscrew the upper bolt of the steering shaft. I tried to pull off the spline connection - no problem. You could say it just moved away.
7. Groaning, we climb under the car. I unscrewed the bottom bolt quite quickly. But it was not easy to pull off the rusted splines. He jumped and hit the pipe with a sledgehammer. Only after I loosened the “clamp” of the spline connection did things move forward. How to open it: simply insert the bolt on the other side of the “clamp”, and insert a plate or washer into the slot. In the photo below, I unclenched it one more time before putting it back. I made a bunch of attempts to take photos under the car, but nothing worked. I need to change the phone 8. We take out the shaft through the interior. The elastic band pressed by an iron ring with latches came off without any problems.
Let's move on to the workbench. Photo of the removed shaft.
9. I cut off the lock. I did this with a wood chisel. The shaft steel is soft. 10. Pull out the cross. The Internet is full of videos on how this is done... a small steering cardan is no different from a large one. The only thing worth considering is the softness of the steel. Be careful... although if you bend something a little, it’s easy to bend it back. 11. I cleaned and lubricated the mounting holes for the cross.
12. Insert a new cross. We counter. I did this with the same chisel. To be honest, I don’t really understand how this crosspiece can fall out of there, even if you don’t lock it. 13. Unclench the clamp, clean the spline joints, and lubricate them.
14. We are trying to insert the shaft into the lower splines... maybe you will be lucky and it will insert into you. I was unlucky... 15. Remove the filter housing. It's not a tricky thing, but it will take some time. Because You will need to remove the battery, air duct, disconnect some sensors and tubes. You will spend about 20 minutes on this.
16. Removing the filter housing will give you the opportunity, at the very least, to knock on the shaft so that it falls into place. Let's fuck it up. We check that everything is in the village. I wasn’t very able to take photos of this lower connection on my phone, so excuse me. The best photo is from below, a view of the crosspiece
17. …. Then we put everything back together, like there shouldn’t be any special tricks or ambushes. At least I didn't.
Other points:
— The book says to put marks. I didn't do this, but I was VERY careful about the position of the wheels and steering wheel. Initially, everything stood strictly straight. A test drive showed that I was off by 30 degrees. I fixed it by unscrewing the top connection. Work for 20 minutes. Maybe it should have been marked. — You need to be very careful with the steering wheel, because when it dangles separately, it is easy to turn it 360 and then break the spiral wire through which “data exchange” occurs with the buttons on the steering wheel, the airbag and the sound signal. If you accidentally twist it, it doesn't matter. Before final assembly, rotate from one extreme position to the other, count the revolutions, then count half of these revolutions - this will be the straight position. — most likely it would be more correct to first completely disassemble and remove the lower part of the shaft, then jacks will not be needed, because the shaft can be rotated by the steering wheel. — The whole procedure took me 7 hours, including opening and closing the garage. With these instructions, the time can be reduced to 3-5 hours. — It seems to me unnecessary to install any additional protection for the crosspiece, because Most likely the crosspiece is dying from dried (leaked) oil, and not from dirt. — I discovered that the upper crosspiece was wedged, but because... There was no other crosspiece, so I decided not to change it for now.
Self-replacement procedure for the steering shaft crosspiece
The replacement takes place in several stages:
- We lift the car off the ground using a lift or by rolling it into a hole, but you can also get by by lifting the front of the car.
- We set the steering wheel at a right angle and fix it, and also fix the steering wheel; during replacement, movement of the wheels and steering wheel is not desirable.
- To access the steering shaft, remove the left (right) wheel. We go into the salon and unscrew the fastening bolt; after a slight effort, the steering shaft should come off the steering wheel.
- Under the car, carefully remove the upper and lower casings, check the amount of dirt on the crosspiece and steering shaft driveshaft; not all cars have them protected by a boot (purchase and installation of such rubber will cost 100-200 rubles).
- We find and unscrew the bolt on the crosspiece; you may have to use a WD tool. Once the bolt is removed, the steering shaft should easily come off the steering rack.
- Pull the shaft down and pull it out. Often the crosspiece mechanism is rusty and dirty; first of all, you will need to wash it.
- For flaring you will need a sprocket of the appropriate diameter; fix the shaft in a vice.
- Using a head (presumably a 8-pointer), we knock out the cross first in one direction (remove the bearing cup), and in the other direction (also remove the cup).
- Then we take a new crosspiece and insert it in the same order - we start one side first, and then the other, press it in using a vice (but not too tightly, the metal may wrinkle).
- We align both cups and roll them with a chisel and hammer.
The final assembly procedure is no different from disassembly - the main thing is to maintain order. So, we have replaced the steering shaft crosspiece; if everything is done correctly, the handling will respond better to your efforts.
Replacing the bushing: step-by-step instructions
The process of replacing the bushing is not very complicated. First of all, the car must be driven into the garage, since repairs will take some time. So let's get started. We remove the steering column panel - this is very simple, we need to unscrew all the bolts and remove it from the latches. As a rule, it is held on by three bolts. After this, we remove part of the air vent - which does not interfere with washing - there will be a lot of dust in it.
After our workplace has been prepared, we unscrew everything that prevents us from removing the steering column. When this work has been done, we use a marker to mark the position of the column that we will need to establish during its final collection. So, the column is removed - we do it carefully, since it weighs a lot. In the photo below we will see the place without the column, as well as the column itself and its bushing in an approximate version.
Signs of a faulty steering shaft crosspiece
The need to replace the steering column cross on the Prado 120 (as well as for the 150 model) arises if the following characteristic symptoms are present:
- There is noticeable steering resistance when turning at speeds above 70 km/h. As time passes, the rotation becomes tighter.
- Delay in turning wheels and loss of sensitivity.
- Increased wheel play.
- Uneven rotation of the steering wheel with sudden jerks.
- There is a distinct knocking and grinding noise when the steering column operates.
Most drivers contact a car service center after waiting for the last signs listed to appear. Such neglect is dangerous. A malfunction of a control on a Toyota car (like any other) can lead to an accident if measures are not taken in a timely manner.
If the slightest problem with handling occurs, diagnostics and repairs should be carried out immediately (if necessary).
Replacing the steering shaft crosspiece on a Prado
The steering shaft cross is an integral part of the cardan shaft, designed to transmit torque to the rack. This part includes four elbows equipped with needle bearings. For the manufacture of the connecting block, high-strength steel is used, designed to work under high loads.
There are two such connections installed on the car’s steering – at the top and at the bottom. The latter fails more often.
When the first signs of a malfunction of the driveshaft crosspiece on the Prado 120 appear, you should contact a car service center. If the initial diagnosis is confirmed, the node will need to be replaced.
Repairs are carried out in a specialized service station. But if the owner is confident in his abilities and skills, it is possible to perform the work at home. You must first purchase a spare part to replace the worn one. The digital marking index of an element suitable in size for Toyota Prado is 1368, 1639 or 1640. The last two are pressed in a little tighter, so the first option is preferable.
The price of a new spare part ranges from 300 to 500 rubles, depending on the manufacturer.
If the replacement is not carried out on time, you will have to change the entire steering assembly, which will cost up to 9 thousand rubles.
Cardan shaft crosspiece and its replacement
The replacement operation is performed in stages:
- The machine is lifted by a lift or driven onto an inspection pit. It is not necessary to lift the entire car; it is enough to place jacks under the front part.
- The steering wheel is set at an angle of 90 degrees with rotation locking.
- The front wheel on the driver's side is removed. Work on replacing the crosspiece on the Prado 120 begins in the interior, from where access to the bolt securing the steering column is possible. It needs to be unscrewed first. As a result, the steering shaft can be easily released.
- The top and bottom covers are removed from the bottom of the car, and the driveshaft is cleaned of dirt. The casings are not always protected by anthers - to purchase and install such a seal, you will have to spend about two hundred rubles.
- The mounting bolt is unscrewed. This is not easy to do. To overcome resistance, VD is used. After unscrewing the bolt, the steering shaft is removed from the rack by hand.
- The shaft is removed downwards. The dismantled unit is cleaned and washed from contaminants.
- The shaft is clamped in a vice.
- The connecting block is knocked out using the attachment, first in one direction (the bearing race is removed), then in the other (with a similar operation).
- A new part is installed and the assembly is assembled in the reverse order. A vice is used for pressing. The operation is performed carefully so that the metal does not deform.
- The bearing housings are aligned and rolled using a chisel and hammer.
The disassembled unit is assembled in the reverse order. The functionality of the steering is checked. If everything is done correctly, the steering wheel rotates easily, without effort. On the Prado 150, work on replacing the steering shaft crosspiece is carried out in a similar way.
To disassemble the assembly without problems next time, a protective rubber boot is installed on the connection.
Some car mechanics recommend changing the upper connection at the same time as the lower one to ensure uniform operation of the unit. But the upper unit does not operate in such an aggressive environment, so the need to replace both parts does not always arise.
If you have metalworking skills, which is not uncommon for domestic car enthusiasts, independently replacing the crosspiece on the steering shaft driveshaft in a Toyota Prado 120 will not be difficult. It is important to be careful when pressing in a new part so as not to damage the housing and bearings. Otherwise, you will have to deliver the car to a car service center and pay extra for spare parts and work.
Replacing the steering column crosspiece and bushing in a Toyota Corolla 110
Hello everyone, today we’ll talk about self-repair of the EUR or, more simply, the steering column itself... I’ll start with a little background about what and why I went there, so I’ll answer simply, if anyone has been following my on-board vehicle for a long time and carefully reads every entry, he’ll remember how I suffer with this damn steering wheel, this is the only but crippling sore of the Corolla in the 120th body... so I’m stubborn and won’t stop there, after all this I decided to try the contract column, and I didn’t like it after a couple of weeks of use and a knock of unknown origin appeared again, and not metal or plastic, but annoying and intrusive like a child’s ratchet in the steering wheel area... so, having smoked the forums and together with FLaB4eG I decided to get into the EUR on my own
So, after surfing a bunch of forums, conclusions were drawn about the problems of the EUR 1. Wear of the spline connection of the upper output shaft of the EUR and the upper shaft 2. Wear of the bearings of the EUR gearbox 3. Wear/play in the splines of the EUR gearbox (worm-wheel)
so, as a test speaker, I took my original speaker, which came with the car and was more damaged than the contract one... I won’t tell you the principle of removing the speaker from the car, everything is simple: 1. Remove the steering cardan shafts 2. Unscrew and remove the AIRBAG, not forgetting before this removes the terminals from the battery 3. Remove the steering wheel 4. Disconnect all the chips suitable for the column 5. Unscrew the three bolts securing the column and carefully remove the column without damaging the wiring