The need to replace the steering column cross on the Prado 120 (as well as for the 150 model) arises if the following characteristic symptoms are present:
- There is noticeable steering resistance when turning at speeds above 70 km/h. As time passes, the rotation becomes tighter.
- Delay in turning wheels and loss of sensitivity.
- Increased wheel play.
- Uneven rotation of the steering wheel with sudden jerks.
- There is a distinct knocking and grinding noise when the steering column operates.
Most drivers contact a car service center after waiting for the last signs listed to appear. Such neglect is dangerous. A malfunction of a control on a Toyota car (like any other) can lead to an accident if measures are not taken in a timely manner.
If the slightest problem with handling occurs, diagnostics and repairs should be carried out immediately (if necessary).
The replacement takes place in several stages:
- We lift the car off the ground using a lift or by rolling it into a hole, but you can also get by by lifting the front of the car.
- We set the steering wheel at a right angle and fix it, and also fix the steering wheel; during replacement, movement of the wheels and steering wheel is not desirable.
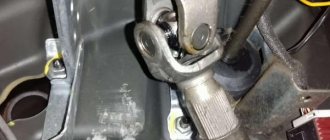
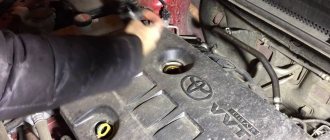
- To access the steering shaft, remove the left (right) wheel. We go into the salon and unscrew the fastening bolt; after a slight effort, the steering shaft should come off the steering wheel.
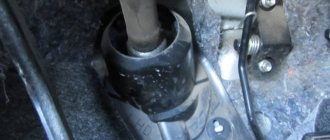
- Under the car, carefully remove the upper and lower casings, check the amount of dirt on the crosspiece and steering shaft driveshaft; not all cars have them protected by a boot (purchase and installation of such rubber will cost 100-200 rubles).
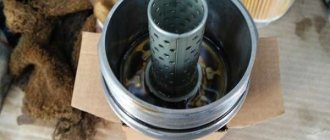
- We find and unscrew the bolt on the crosspiece; you may have to use a WD tool. Once the bolt is removed, the steering shaft should easily come off the steering rack.
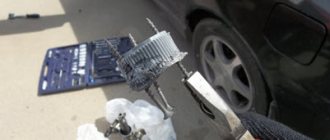
- Pull the shaft down and pull it out. Often the crosspiece mechanism is rusty and dirty; first of all, you will need to wash it.
- For flaring you will need a sprocket of the appropriate diameter; fix the shaft in a vice.
- Using a head (presumably a 8-pointer), we knock out the cross first in one direction (remove the bearing cup), and in the other direction (also remove the cup).
- Then we take a new crosspiece and insert it in the same order - we start one side first, and then the other, press it in using a vice (but not too tightly, the metal may wrinkle).
- We align both cups and roll them with a chisel and hammer.
The final assembly procedure is no different from disassembly - the main thing is to maintain order. So, we have replaced the steering shaft crosspiece; if everything is done correctly, the handling will respond better to your efforts.
Signs of a faulty steering shaft crosspiece
The need to replace the steering column cross on the Prado 120 (as well as for the 150 model) arises if the following characteristic symptoms are present:
- There is noticeable steering resistance when turning at speeds above 70 km/h. As time passes, the rotation becomes tighter.
- Delay in turning wheels and loss of sensitivity.
- Increased wheel play.
- Uneven rotation of the steering wheel with sudden jerks.
- There is a distinct knocking and grinding noise when the steering column operates.
Most drivers contact a car service center after waiting for the last signs listed to appear. Such neglect is dangerous. A malfunction of a control on a Toyota car (like any other) can lead to an accident if measures are not taken in a timely manner.
If the slightest problem with handling occurs, diagnostics and repairs should be carried out immediately (if necessary).
Column repair
It is possible to repair the steering column on a Prado 120 yourself, especially if you follow the video on Youtube.
The main problem with these cars is the malfunction of the lower bearing, which sometimes breaks over time. Troubleshooting occurs as follows:
- The mechanism is removed from the car and disassembled.
- The spitz connection of the steering shaft is being restored.
- The lower support bearing is replaced with a bushing, this significantly increases the life of the column.
- Upon completion of the work, the mechanism is assembled back and installed in place.
The second common cause of a knocking sound in the steering wheel is a faulty steering rack. Operating the car in this condition is prohibited: this can lead to permanent rack failure or even an accident. The problem is solved by purchasing a new steering rod.
There are several types of rack defects:
- A leak through which fluid flows out of the power steering. Occurs due to broken seals or corrosion on the rod. To eliminate the malfunction, replace bushings, anthers with seals, and oil seals.
- The knocking noise occurs due to wear of the anthers and sliding bushings. In this case, the damage is eliminated and the rack is adjusted.
- Steering wheel play, which appears after a broken rack or a defect in the column cross. For repairs, the steering control of the Prado 120 is disassembled, the rack and worn-out components of the device are replaced.
Prices for a repair kit for Toyota Prado range from 2 to 7 thousand rubles, depending on the defect.
It is recommended to repair the Prado 120 steering shaft only after diagnosing and identifying a specific problem.
Do not postpone a visit to a car service center if a malfunction is detected. The reliability of the mechanisms responsible for driving a car ensures safety on the road, and a timely solution to the problem will help to avoid serious financial investments.
Source
Replacing the steering shaft crosspiece on a Prado
The steering shaft cross is an integral part of the cardan shaft, designed to transmit torque to the rack. This part includes four elbows equipped with needle bearings. For the manufacture of the connecting block, high-strength steel is used, designed to work under high loads.
There are two such connections installed on the car’s steering – at the top and at the bottom. The latter fails more often.
When the first signs of a malfunction of the driveshaft crosspiece on the Prado 120 appear, you should contact a car service center. If the initial diagnosis is confirmed, the node will need to be replaced.
Repairs are carried out in a specialized service station. But if the owner is confident in his abilities and skills, it is possible to perform the work at home. You must first purchase a spare part to replace the worn one. The digital marking index of an element suitable in size for Toyota Prado is 1368, 1639 or 1640. The last two are pressed in a little tighter, so the first option is preferable.
The price of a new spare part ranges from 300 to 500 rubles, depending on the manufacturer.
If the replacement is not carried out on time, you will have to change the entire steering assembly, which will cost up to 9 thousand rubles.
Which crosspiece to choose for Toyota Camry 40
If the steering shaft makes a knocking noise, the problem must be repaired as soon as possible. Otherwise, the accompanying elements will wear out, and the cost of fixing the problem will increase significantly. In case of excessive wear of the crosspiece, the owner has a choice:
- purchase a branded cross from an official dealer;
- buy a used stock from a car dismantling station;
- install a non-original crosspiece from a third-party manufacturer.
According to reviews from car owners, Ruei crosspieces with article number RU452080TO and Toyo ST1639 have good performance indicators.
If the auto store does not have a crosspiece, you can order it online. Very often, replacement of crosspieces is required at the front and rear of the cardan, so it is recommended to purchase spare parts in a comprehensive package so as not to carry out repair work twice.
Cardan shaft crosspiece and its replacement
The replacement operation is performed in stages:
- The machine is lifted by a lift or driven onto an inspection pit. It is not necessary to lift the entire car; it is enough to place jacks under the front part.
- The steering wheel is set at an angle of 90 degrees with rotation locking.
- The front wheel on the driver's side is removed. Work on replacing the crosspiece on the Prado 120 begins in the interior, from where access to the bolt securing the steering column is possible. It needs to be unscrewed first. As a result, the steering shaft can be easily released.
- The top and bottom covers are removed from the bottom of the car, and the driveshaft is cleaned of dirt. The casings are not always protected by anthers - to purchase and install such a seal, you will have to spend about two hundred rubles.
- The mounting bolt is unscrewed. This is not easy to do. To overcome resistance, VD is used. After unscrewing the bolt, the steering shaft is removed from the rack by hand.
- The shaft is removed downwards. The dismantled unit is cleaned and washed from contaminants.
- The shaft is clamped in a vice.
- The connecting block is knocked out using the attachment, first in one direction (the bearing race is removed), then in the other (with a similar operation).
- A new part is installed and the assembly is assembled in the reverse order. A vice is used for pressing. The operation is performed carefully so that the metal does not deform.
- The bearing housings are aligned and rolled using a chisel and hammer.
The disassembled unit is assembled in the reverse order. The functionality of the steering is checked. If everything is done correctly, the steering wheel rotates easily, without effort. On the Prado 150, work on replacing the steering shaft crosspiece is carried out in a similar way.
To disassemble the assembly without problems next time, a protective rubber boot is installed on the connection.
Some car mechanics recommend changing the upper connection at the same time as the lower one to ensure uniform operation of the unit. But the upper unit does not operate in such an aggressive environment, so the need to replace both parts does not always arise.
If you have metalworking skills, which is not uncommon for domestic car enthusiasts, independently replacing the crosspiece on the steering shaft driveshaft in a Toyota Prado 120 will not be difficult. It is important to be careful when pressing in a new part so as not to damage the housing and bearings. Otherwise, you will have to deliver the car to a car service center and pay extra for spare parts and work.
Source
Why is there a knock on the speaker?
There are several reasons why a knock occurs in the steering column of the Toyota Prado 120:
- weakening of the connection of the speaker to the body, sometimes the bolts are unscrewed, resulting in extraneous sounds;
- play in cardan joints;
- the knock is caused by a violation of the steering wheel tilt adjustment system, if any;
- defects in the steering shaft - cracks, bends, etc.;
- damage to supporting structures - cardan joints, shaft.
If the last option is confirmed or there are no visible reasons, a visit to the service center is necessary for a more in-depth diagnosis of the machine.
Replacement of crosspieces of both cardans. Restoration of splines.
10 months after purchasing the Pradika, a loud metallic clanging sound appeared when starting off. This appeared immediately after a trip to St. Petersburg and back in the summer of 2021. The total mileage at that time was about 287 thousand km. At the same time, back in Gatchina, a leak arose in the power steering system. The leak was so strong that all the liquid flowed out of the system in a couple of hours. For the sake of interest (although more for fun), I decided to contact the most original Toyota service to diagnose the car. After all, I have a Prado after all!
I had to make an appointment in advance; I chose the time around 10 o'clock. Regardless of its age, the car was accepted for inspection and, after a technical wash, lifted up on a lift. They were not prohibited from being present during the work, although they were forced to wear a bright vest and helmet. To be honest, I really wanted to keep the vest with the Toyota inscription))). The dazzling cleanliness around was constantly striking. Everything is white and perfectly washed. Only my old Pradik stood out for its shabbyness))) The master put on brand new gloves and disgustedly began to inspect my car from below. Along the way, complaining that due to the copious amount of plasticine fuel oil he could not state anything for sure, he nevertheless identified a malfunction of the front driveshaft (as I expected), excessive wear on the CV joints of the drive shafts, leaking crankshaft seals and a violation of the integrity of the high-pressure hose power steering pump. In short, I didn’t discover anything new for me.
Regarding the cost of work to eliminate these deficiencies, I contacted the manager after the inspection. The mechanic inspecting the car doesn’t look into prices because he doesn’t need it. Actually, when they told me the price tag, I immediately guessed everything. And about why the repair area is so exceptionally clean, and about why all the craftsmen look cleaner and more sober than myself, and about why Toyota service offers such excellent customer service... In short, the prices are as close as possible to astronomical ones. For example, it turns out that the crosspieces in the front driveshaft do not change, the entire driveshaft changes! Why then does such a spare part as the Toyota crosspiece 04371-60060 exist? In addition, the cost of the entire Toyota 37140-35140 cardan turned out to be 50 thousand instead of 23 thousand indicated on Existence! The waiting period for delivery of original spare parts is 1.5 months versus a maximum of 10 days from Exist! I will keep silent about the rest of the spare parts, but the total cost, taking into account the work, was around 150 thousand rubles.
Toyota Land Cruiser Prado › Logbook › Toyota Land Cruiser Prado 150 steering rack repair
Elimination of play in the steering rack distributor shaft.
1. Remove the steering rods.2. Unscrew the fastening of the hydraulic pipes from the frame (2 bolts). 3. Unscrew the metal supply tube from the rack. Next, remove the clamp from the return hose and pull the hose off the fitting. Back when you assemble, put this hose first, otherwise it will be inconvenient to install the clamp.4. Unscrew the left stabilizer mount and pull the stabilizer forward.5. Unscrew the 2 bolts securing the rack to the frame. The moment is wild. Prepare a meter pipe.6. We pull the rail out to the left (I tried to pull it out in different ways, but it only came out that way.
The lower and upper roller bearings have VERY large play without visible wear (I think this has been the case since new. Watch the video). I only had the lower bushing prepared (made of bronze-graphite), I took the dimensions from the river from 120 Prado. The only thing that didn’t match was the outer diameter of 21mm, but here we needed 20mm. I had to sand it down. The old bearing was knocked out by drilling the rack. In general, it would be advisable to prepare a metal anchor with a screw so that you don’t have to knock out the bearing or drill anything. The middle bearing DG254708 is a regular ball bearing. There was no play in it at all. The lower bearing has the number 13BTM2012J (KOYO). The upper bearing 12y224vh koyo also has decent play. The bushing for the upper bearing was made from the bushing AS SBU9020 (available in the existent). It is advisable to also buy a key for tightening the rack - a 42 mm square. For the lower bushing, bronze-graphite can be found in a car store, the bushing is from the starter. I couldn’t find the solid blank I needed, so I had to sharpen the outer sleeve from steel and press bronze-graphite into it. I suspect that the uppermost oil seal has the number F-00366 19x32x7 or HA0238 19.00/32.00*6.00/7.00 type 1PM
Removing the steering rack Prado 150
similar to shooting with 120, the video is normal, so I won’t shoot it, everything is there. We have everything 1 to 1.
Here is the play that was in the lower bearing. Tough.
Upper bearing play. Fuck the horror.
Source
once and for all about the knocking in the steering wheel on the tilt column (without offset)
The blog was made so that you don’t go crazy from this annoying problem, I want to help people who have already tried everything but the steering wheel is knocking, it frayed all my nerves, I removed the steering wheel 7 times...
I’ll tell you using my example of a knock in the steering wheel, oddly enough, not everything is written down in the Prado club, even though there are 400 pages of literature. And so we went. To begin with, we check the suspension and rack, since all this can also give back to the steering wheel, if the suspension is in order, we check the rack, I checked it with a tightener, if the knocking does not go away, we return the tightening nut to the reverse position. Now let's move on to the steering column with shafts. look at the photo, each item is shown in the picture
1 this coupling in the passenger compartment, the central rubber bushing is broken. more details www.drive2.ru/l/9982908/
2 this is also a clutch that is not described on the Prado Club, the shaft with splines runs inside this clutch (I had a knock in it) the repair is simple, I welded it in the middle position. or change the entire clutch 4522060140
3, the bearing eats the shaft, the cure is simply to buy a new bearing 4527433020 (which is located in the steering column) and glue it onto lactide inside the column on top of the old bearing, as a result the shaft runs on the new surface and on the new bearing. I did this myself, pressed the shaft with a slight force, before that it simply fell through there, or the entire shaft was jammed 4520335310
4 knock in the ball, tilt adjustment, www.drive2.ru/l/470450790029328759 is checked only on the removed shaft, no need to be fancy, buy a new crosspiece, plastic ball, this is the steering shaft number 4521035240, enter it and with it the offer for this one will come out crosspieces sat price 900 rub.
5 coupling crosspiece in the passenger compartment, it fails extremely rarely, does not carry a load, is located in the passenger compartment, so water does not get there, lives for a very long time, checks for play, if there is any, either change the entire clutch 4522060140, or change the crosspiece just not in China, some Japanese gmb, koyo st1638, st1639, st1640
6, the shaft crosspiece under the hood begins to play and knock, but nothing else breaks on this shaft. either change the crosspiece gmb, koyo st1638, st1639, st1640, or the entire shaft 4520335310
7 The aluminum shaft itself is dismountable in the cabin, inserted into splines, it can also be broken, we check for play, it can be easily treated with lactide.
note coupling 4522060140 buy only the original, all the others will knock again right away and you will think that it was not the problem.
Source
Apple repair in the steering column
After buying the car, there was a knocking sound in the steering column when driving over bumps + there was a slight play on the muffled one (here the coronavirus drove everyone home for self-isolation and we got bored at home (when my father arrives he says take the steering wheel apart for me) he’s afraid to disassemble the plastic and can’t separate the chips from him) )) 30 minutes of fussing and now there is no steering wheel:
In 20 minutes, using Silent-Hunter technology to repair an apple, we only fit 2 gaskets:
When everything was assembled, we noticed that the retaining ring was dangling from the shaft (after reading Drive2 they wrote that the retaining ring could fly off (they returned it to its rightful place) we started installing the steering column in 4 hands with my father, I held it and my father directed the shaft into the splined shaft on the cardan after 5 attempts I freaked out I told my father to go have a smoke and inserted everything into one in a minute))) the most important thing is to get it right since the shaft is fixed with a bolt cotter pin))) and then in 10 minutes I put everything back together:
After we carry out a test drive, voila there is no play and no rattling of the steering wheel on uneven surfaces) this procedure should have been carried out even earlier! And the most interesting thing is that on my 250,000 km mileage there was no such crap, and there wasn’t a lot of other stuff that we encountered with my father))) At the moment I’m comparing my 2004 and my father’s 2007, the number of sores began to increase after the restyling, the quality began to limp somewhere (I started smoking and noticed that the ass looked like it was sagging, I measured it with a tape measure from the floor to the arch 89 cm (I decided to buy aluminum spacers for the rear springs 30 mm:
The price with delivery is 1900 rubles... one of these days we will implement them)))...
I also purchased from my good friend PavelBSR plastic arch protection for the front) in the fall I installed the rear ones and now I want the front ones) In the summer we will remove the factory ones, wash everything, Movil and install new ones on top of the original ones) I bought factory clips for the original ones)
Thank you all for your attention! Take care of yourself and your loved ones!
Do-it-yourself replacement of the driveshaft and steering shaft crosspieces
The steering crosspiece is the key to the control of the car; it is responsible for transmitting the rotation of the wheel to the rack and pinion assembly through the steering shaft cardan (the crosspiece itself is attached to it). Not just the ease of driving, but the safety and health of all passengers depends on its correct functioning. If the car has been in use for more than 100 thousand kilometers, it most likely needs repairs; it is worth studying in advance the question of when and how to change the crosspiece on the steering cardan.
Cross design
The mechanism of the steering shaft crosspiece performs a transport-guiding function and is designed to transmit the torque of the wheel to the gear of the rack and pinion assembly. The transmission of torque is carried out by the steering shaft cardan, to which the crosspiece is attached. In many models of modern cars, the crosspiece performs the same function and has a similar shape. The cross itself consists of four identical protrusions, each of which is equipped with needle-type bearings. All elements of the cross are made of high-strength steel and must withstand high loads.
Device
As you know, the cardan or intermediate steering shaft, as it is also called, consists of two parts. These are components that are connected to each other by a special universal joint.
The steering cardan is connected to the drive gear using a special fastener, indicated by the number 9, but this is from the bottom side. But on the top side the cardan rotates in the bracket pipe on ball bearings (there are two of them). As for the main shaft mounts, they are connected to the welded bracket in four places. The front part of the cardan is attached through two plates with special shear heads. And the rear part of the cardan is connected using welded bolts and nuts that have spring washers or, often, self-locking nuts, but without washers.
Signs of wear on the crosspiece
Often, motorists do not pay attention to insignificant signs that it is time to make repairs, and wait until the problem makes itself known publicly and this is fraught with consequences, especially when it comes to loss of vehicle controllability.
The first signs of wear on the crosspiece appear as:
- the presence of noticeable resistance to the steering wheel when rotating at speeds above 80 km/h;
- delayed wheel turning and loss of sensitivity (delayed response of wheels and steering shaft);
- increased free play angle of the wheels (popularly this symptom is also called “Steering play”);
- uneven rotation of the steering wheel, the steering wheel moves with sharp jerks;
- obvious grinding or knocking noise that occurs when the steering wheel is rotated; the grinding becomes especially noticeable and obvious on an uneven road.
Most often, motorists turn to a car service center to replace the steering shaft crosspiece mechanism only when the last sign of a malfunction appears, but in vain, because in the event of an emergency, the steering control will not be able to adequately respond to the driver’s efforts, and sometimes, the steering control may even fail, this is already fraught with very big troubles.
Repair of the shaft cross is carried out every 50 - 100 thousand, it is better more often, otherwise it will have to be completely replaced with a new one.
To replace, you will need to purchase a crosspiece - on average 150-300 rubles, some car services claim that for the steering to work correctly, you need the entire steering shaft (4 - 7 thousand rubles), but on most cars it is enough to change only the crosspiece.
How power steering works in a Toyota Camry
The hydraulic booster includes the following parts:
- power steering pump driven by the car engine;
- power steering expansion tank;
- steering rack.
Hydraulic oil with a low viscosity is used as the working fluid. Depending on the manufacturer, different types of lubricating fluid are used; in some cases, ATF-2 or ATF-3 is used, which is also poured into the automatic transmission.
The rotation of the steering wheel is transmitted to the rack using a steering shaft (cardan), with crosspieces installed on both sides of it. Thanks to them, it is possible to adjust the position of the steering wheel.
Important!
Driving on unbalanced wheels creates high vibration loads on the steering, which leads to wear on the driveshaft and crosspieces, and in the future the steering shaft may need to be replaced on a Camry 40 body.
Briefly, the work of the power steering is carried out as follows:
- when the engine is running, the power steering pump creates high pressure in the system, reaching 8–9 MPa;
- When the steering wheel is turned, working fluid is pumped under pressure into the rack cylinders, greatly increasing the forces transmitted to the steering rods.
A special valve is installed on the rack, allowing hydraulic oil to flow into the working cylinders when the steering wheel is turned. When it is in the central position, the valve is completely closed and the working fluid circulates freely throughout the system.
Why might the driveshaft break?
The most common reason is constant use of the car on uneven roads, driving over potholes and ruts. During such shaking, a large load falls on this moving part.
The second reason may be oil leakage due to a leaking oil seal. Because of the oil, the sealing ring https://podshipnik-mo.ru/koltsa-uplotnitelnyye hardens, and a gap appears between the oil seal and the rod. Or the mirror on the driveshaft connection is broken, and various roughness and burrs appear on the rod. In this case, the splines will have to be changed or sanded (but this is a temporary remedy).
Self-replacement procedure for the steering shaft crosspiece
The replacement takes place in several stages:
- We lift the car off the ground using a lift or by rolling it into a hole, but you can also get by by lifting the front of the car.
- We set the steering wheel at a right angle and fix it, and also fix the steering wheel; during replacement, movement of the wheels and steering wheel is not desirable.
- To access the steering shaft, remove the left (right) wheel. We go into the salon and unscrew the fastening bolt; after a slight effort, the steering shaft should come off the steering wheel.
- Under the car, carefully remove the upper and lower casings, check the amount of dirt on the crosspiece and steering shaft driveshaft; not all cars have them protected by a boot (purchase and installation of such rubber will cost 100-200 rubles).
- We find and unscrew the bolt on the crosspiece; you may have to use a WD tool. Once the bolt is removed, the steering shaft should easily come off the steering rack.
- Pull the shaft down and pull it out. Often the crosspiece mechanism is rusty and dirty; first of all, you will need to wash it.
- For flaring you will need a sprocket of the appropriate diameter; fix the shaft in a vice.
- Using a head (presumably a 8-pointer), we knock out the cross first in one direction (remove the bearing cup), and in the other direction (also remove the cup).
- Then we take a new crosspiece and insert it in the same order - we start one side first, and then the other, press it in using a vice (but not too tightly, the metal may wrinkle).
- We align both cups and roll them with a chisel and hammer.
The final assembly procedure is no different from disassembly - the main thing is to maintain order. So, we have replaced the steering shaft crosspiece; if everything is done correctly, the handling will respond better to your efforts.
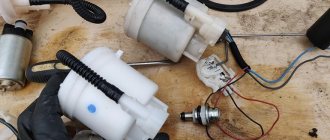
Replacement of protective covers and maintenance of CV joints of Toyota Land Cruiser
Replacement of protective covers and maintenance of CV joints
| If defects in the protective cover are detected, the condition of the corresponding CV joint must be carefully examined. Often, on an exchange basis, you can purchase completely restored drive shaft assemblies, which greatly simplifies the situation and reduces time costs. Before you begin dismantling components, do some marketing by finding out the prices of the parts you need. Compare them with the costs of purchasing refurbished assemblies. Remember that the outer CV joint cannot be disassembled and must be replaced together with the shaft. |
| Execution order |
| Remove the drive shaft (see Section Removing and installing drive shafts). |
Disassembly
Drive Shaft Assembly Components
| 1 — Boot 2 — Inner CV joint housing with axle 3 — Retaining ring 4 — Protective cover 5 — Bandage tapes | 6 — Protective cover 7 — Retaining ring 8 — Tripod assembly 9 — Outer CV joint assembly with drive shaft 10 — Boot |
| Execution order | ||||
| 1. Clamp the shaft in a vice with soft jaws. Check the hinge for radial play, indicating wear on the internal components. Check the smooth movement of both hinges in all directions provided for by their design. If the protective boot is damaged, disassemble the CV joint, thoroughly wipe its components and assess their condition. 2. Using a small screwdriver, bend the locking tabs and remove the protective cover securing straps. 3. Using a screwdriver, pry up the edge of the cover and remove it from the hinge assembly (old and damaged covers can simply be cut off) (refer to the illustration above). Remove the hinge housing from the tripod assembly. 4. Mark the position of the tripod assembly on the shaft journal. 5. Remove the retaining ring. 6. Using a brass drift, knock the tripod assembly off the shaft journal. 7. If you have not cut them off yet, remove the protective covers of both hinges. Wrap the splined inner shaft journal with a protective layer of insulating tape to protect the new boots from damage when they are placed on the shaft. Examination
Assembly
Video about “Replacing protective covers and servicing CV joints” for Toyota Land CruiserReplacing the caliper boot Replacing the boot on the caliper https://youtube.com/watch?v=sRuaxu7NYkk Replacing steering gear boots |
Steering cardan Structural elements, repair and replacement on the industrial portal Myfta.Ru
When driving, the steering cardan or, as it is also called, the steering shaft is the most common source of uncharacteristic clicks. Experienced mechanics claim that repairing this mechanism is not a very difficult procedure, since it is only one small part. True, his drawing consists of several elements, to be precise.
Among these elements are:
- mounting bracket;
- bipod shaft;
- steering mount intermediate shaft
- fasteners;
- steering cardan crosspiece.
When such a mechanism breaks down, car owners are faced with a dilemma: choose to repair the faulty element or buy a new one, so as not to constantly have to worry about repairs. In fact, both repairs and balancing can be reliable if you turn to specialists.
The steering rack cardan (sometimes also called a gearbox) is the power unit of the steering mechanism, which serves to transmit forces to the steered wheels from the steering column. Quite consistently, the forces exerted by the driver using the steering wheel are distributed to the steering column, after which, thanks to tips and rods, through the steering axles, they are transmitted to the steering arms, which are connected to the steering wheels.
Sometimes it may be necessary to restore the steering rack, which involves complex work aimed not only at cleaning the part from contamination, but also at replacing some spare parts with new ones. By the way, sometimes mechanics simply restore factory parts. Restoration involves the complete restoration of the original performance of the steering cardan.
It is noted that the steering rack is an incredibly important part of any car. If somehow it turns out that it is faulty, then not only safety, but also the lives of passengers and the driver of the car may be in danger
Experts recommend approaching the repair of this part with great responsibility, and also carry out diagnostics at least once every six months.
Toyota Land Cruiser steering linkages
General information
Steering gear parts for FJ60, 62 cars
| 1. Vibration damper 2. Cotter pin 3. Bipod 4, 19. Lead rod tip 5. Cover 6. Plug 7. Spring 8. Rod end ball pin 9. Cotter pin | 10. Drive rod end 11. Seat 12. Ball pin bushings 13. Oiler 14. Bipod side 15, 18. Drive rod end 16. Drive rod side 17. Drive rod 20. Steering knuckle lever |
FJ80 steering gear parts
| 1, 4, 6, 10. Lead rod end 2. Rod 3. Clamp 5. Bipod | 7. Vibration damper 8. Bracket 9. Drive rod 11. Cotter pin |
Examination
| General information |
| 1. The rotation of the wheels is ensured by the transmission of force from the steering gearbox through the bipod, steering rods and rod ends. A steering wheel vibration damper is attached parallel to the steering wheel bipod. |
| 2. Place the wheels in a straight driving position and lock the steering wheel. |
| 3. Raise the car so that the wheel is approximately 2.5 cm off the ground. |
| 4. Check the play in the tie rod ends. To do this, install the indicator so that its leg rests against the edge of the wheel. Rock the wheel slightly in a horizontal plane. If the indicator reading exceeds 6 mm, then it is necessary to check the condition of all rod ends and replace worn parts. |
| 5. Raise the front of the car and check the condition of the tie rod end boots and tie rods, as well as sticking joints. |
Removal and installation
DRIVE ROD ENDS
| General information |
| 1. Remove the wheel. |
| 2. Unscrew and loosen the castle nut of the ball joint; do not unscrew the nut completely. |
| 3. Using a puller, press the hinge pin out of the steering knuckle arm eye. |
| 4. When replacing the tip, count the number of threads (indicated by the arrow) onto which the tip is screwed. Release the clamp and unscrew the tip. |
| 5. Lubricate the threaded part of the tip with grease and screw it into the rod so that the end of the tip is spaced from the rod by the number of threads determined before removal. Do not tighten the clamp. |
| 6. Insert your finger into the eye of the lever and tighten the nut. The finger should fit tightly into the eyelet. If the pin rotates in the lever eye when tightening the nut, press it into the tapered hole. |
| 7. Replace the cotter pin and, if necessary, tighten the nut until the groove of the nut coincides with the hole for the cotter pin in the threaded part of the pin. |
| Warning Do not unscrew the nut to ensure free passage of the cotter pin. |
| 8. Tighten the clamp nuts. |
| 9. Install the wheel and lower the car. |
DRIVE ROD
| General information |
| 1. Raise one side of the car. |
| 2. Disconnect the vibration damper from the drive rod (see paragraphs 2 and 3). |
| 3. Disconnect the rod from the bipod of the gearbox shaft, steering knuckle (or driven rod on FJ 60.62 vehicles) by following steps 2 and 3. |
| 4. If necessary, replace the ends by following the appropriate steps for changing the driven rod ends. |
| 5. Assembly is performed in reverse order. Tighten all fasteners to the specified torque. |
bipod
| General information |
| 1. Disconnect the drive rod. |
| 2. Loosen the bipod nut. Mark the position of the bipod relative to the gearbox shaft. |
| 3. Remove the bipod. |
| 4. Unscrew the nut and remove the bipod. |
| 5. Assembly is performed in reverse order. Align the marks made during disassembly. |
VIBRATION DAMPER
| General information |
| 1. Disconnect the vibration damper by following steps in step 2. |
| 2. Unscrew the nut (indicated by the arrow) securing it to the frame and remove the vibration damper. |
| 3. Installation is performed in reverse order. Tighten the nuts to the specified torque. |
Background of the breakdown
About six months ago I felt light, almost imperceptible poking. Never ignore such signs! As I said above, all this can lead to serious problems, and possibly an accident.
I didn't pay attention to this. Apparently there was not enough experience. Then, over time, this all developed into more noticeable clicks. I read it, watched videos on the Internet, and even went to my neighbor for advice. By the way, he helped me with my work. Eventually I realized what the problem was. You also can’t get by with just one article; a friend’s advice can also help in solving the problem.
How to change the universal joint on a VAZ 2107 with your own hands
On any car, in order to move, it is necessary to transmit torque from the gearbox to the drive axle. VAZ 2107 is a rear-wheel drive vehicle. The transmission function is performed by the cardan shaft. The crosspiece fixes the rotating axes. If it breaks, you must be able to remove and replace it, which is not difficult even for a novice car enthusiast.
Purpose and design of the cardan and its purpose
Cardan crosses (CC) are necessary to transmit force at different angles. When the machine moves, the shafts constantly change their position relative to each other. Thanks to the crosspieces, the torque from the gearbox is transmitted through a flexible universal joint to the drive axle, taking into account the angle between the shafts at this moment. Since the VAZ 2107 is a rear-wheel drive car, the cardan transmission is located under the bottom, and in the middle of the cabin the floor is slightly raised.
How to replace the steering cardan
Then a new crosspiece can be installed, or the entire repair kit can be replaced at once. As practice shows, such a replacement is justified, because by replacing each spare part separately, you will have to constantly subconsciously expect that something else will break down in the power steering. This unit must be assembled in the reverse order.
Did the knocking and play go away after that? This means it’s time to pay attention to the wear of the steering rack. When designing this car, engineers left room for additional debugging
The adjustment is made with a bolt located next to the cardan shaft entrance. Tightening it clockwise reduces the backlash, but not for long. This will have its own inconveniences. After all, now controlling the car will require more effort from the driver, and in extreme positions, the steering wheel may bite. In this vein, such adjustment is akin to delaying the problem rather than solving it.
How to remove a column
Repairing such a malfunction can sometimes be done on your own, but to do this you need to know how to remove the Prado 120 steering column. This process is not so simple. But by following detailed instructions, you can avoid difficulties.
The algorithm of actions is as follows:
- Disconnect the battery cables and remove the airbag.
- Unscrew the steering nut, having previously tightened the steering wheel to simplify the task, then it can be removed without any problems.
- Unscrew the three screws and remove the cover from the steering column.
- Using a shaped screwdriver, unscrew four more screws and remove the rotating mechanism.
- Disconnect the terminals from the turn signals and wipers.
- Remove the steering column switches.
- Remove the threshold, left step and trim.
- In the area of the lower point of the steering shaft, unscrew the 4 plastic nuts, then remove the casing.
- Take a 12mm wrench and unscrew the bolt that secures the shaft with the cross.
- Disconnect the ignition terminals and unscrew the nuts that secure the column to the body.
As a result, the column can be easily removed and will be available for repair.
Reassembly after troubleshooting is done in the reverse order.
If you do not deviate from the diagram, removal and further disassembly of the Prado 120 steering shaft will take place without any problems.
Troubleshooting
Before carrying out repairs, you need to find the cause of the problem. To do this, you will need to drive the car onto a pit or a lift. We put the transmission in neutral and climb under the car. We inspect the cardan, special attention should be paid to the condition of the crosspiece seals. Next, holding the crosspiece, we rotate the cardan itself. If the crosspiece requires replacement, the play can be noticed immediately. If there is no play, but various noises and squeaks are heard during rotation, then the crosspiece may not need to be changed. You just need to replace the lubricant. There are two crosspieces in the cardan and both need to be diagnosed. The rear universal joint crosspiece fails most quickly, since it bears heavy loads. When moving, dirt and moisture also fall more onto the rear crosspiece.
Results of my work
After driving around, I finally realized that all the problems had been fixed. The replacement itself in the salon would have cost much more, but at home everything cost about one and a half thousand rubles.
This level of repair is not for everyone, although it is not the most difficult; many are afraid of breaking something or putting it together incorrectly; not everyone can be a car mechanic. There are many nuances, as in all car repair operations. But I did it perfectly the first time, so you can try it too, I’m sure that most novice auto mechanics will succeed.
Main signs indicating a malfunction
It goes without saying that any mechanism sooner or later becomes unusable and fails. Particularly often, the elements of the VAZ 2110 wear out after driving on uneven roads and bad roads, which is very important in Russian conditions. When the cardan or other steering component is faulty, a characteristic knock is heard, indicating the need for replacement. Below are the main signs that characterize a malfunction of the driveshaft, and indeed the entire steering gear:
When the steering shaft is grasped by hand in the area where it connects to the rack and moves up and down, a characteristic knocking sound can be heard.
Often the cause of knocking or play is poor tension of the components, which means doing the following:
- take a wrench or pipe wrench, depending on the situation;
- Tighten any loose bolts and nuts properly.
If this is not the reason, then either the driveshaft has failed, or you need to buy a new one.