The Toyota RAV4 is one of the best-selling crossovers in the world. The company regularly releases new generations, updates current versions, offers additional options and different configuration options.
But some remain unchanged. This is the presence of a generator that powers the on-board network during engine operation and also charges the battery.
Since the generator is actively involved in the functioning of the car, the unit wears out over time. Mostly, car owners are faced with situations where they need to tighten the belt or change it. Less often the generator itself fails. Repairing it is almost pointless. Restoration does not give the desired result, but is expensive. Therefore, the only correct option is to install a new generating device.
Instructions for replacing the drive belt
Replacing the alternator drive belt does not cause problems for most car enthusiasts.
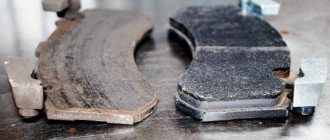
After removing a worn strap, it is recommended to inspect the wear pattern. If there is damage to the edges and contact part, this may indicate misalignment of the pulleys. In this case, you need to find the damaged element and replace it. Installing a new belt on a damaged pulley is pointless, since the rubber will quickly wear out on sharp edges. When replacing a belt, you must follow the sequence of steps recommended by the vehicle manufacturer. When replacing the alternator drive belt, it may be necessary to install a new tension pulley and associated fasteners. Information on the list of parts to be replaced can be found in the vehicle repair and operating instructions.
What will be needed for replacement?
Before changing the alternator belt, you will need to prepare a set of tools and materials (the maximum list is given):
- wrenches and sockets;
- new belt and tension roller;
- rod for fixing the roller;
- mounting blade for removing the belt;
- knife;
- protective gloves;
- a sheet of paper and a pencil for drawing an installation diagram.
A new non-original drive belt may be several millimeters longer than the standard product. The difference in length will be compensated by a tensioning device.
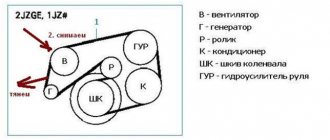
Scheme
Installing the belt on engines with two or three pulleys is not difficult. The situation changes when the belt is installed on a motor equipped with a large number of pulleys. In this case, it is recommended to draw a diagram of the installation of the product. Such an event will speed up the installation process and avoid errors.
Example of belt routing on a Chevrolet Cobalt
Circuit designations:
- 1 — crankshaft pulley;
- 2 — generator pulley;
- 3 - guide roller;
- 4 — air conditioning compressor clutch;
- 5 — pump pulley and additional drive pulley for the amplifier pump;
- 6 — belt;
- 7 - tension roller.
Algorithm of actions
The procedure differs depending on the engine design and the number of attachments. Below are step-by-step instructions for replacing belts on common vehicles. On other vehicles, the operation uses similar technology.
By car VAZ Granta
You can replace the belt on a VAZ Granta car without a tensioner according to the following algorithm:
- Cut off the old strap using a knife.
- Turn the generator mounting bolt from below 3-4 turns.
- Unscrew the top mounting bolt completely and remove it from the hole.
- Push the generator forward until the mounting ear is inserted into the bracket.
- Secure the mechanism with wire or other means.
- Place the belt on the alternator pulley and the top of the crankshaft pulley. Some car owners use an additional device that holds the strap on the device while putting it on.
- Turn the motor shaft with a wrench to fully install the belt.
- Fix the generator in its original place. Check the operation of the components at full load of the generator and at different crankshaft speeds.
On Kia Sid
You can change the alternator belt as follows:
- Remove the fixing bolt located on the top of the generator.
- Lift the clamp up, removing the bolt from the guide groove.
- Rotate the device relative to the bottom bolt. If the mount is “stuck”, then the generator is turned by light blows with a hammer applied through a wooden block.
- Remove the worn belt and pressure roller.
- After this, you need to mount a new roller and only then can you put on the belt.
- Tension the strap as recommended in the operating instructions. Check the operation of the unit, if a whistle appears, increase the tension slightly.
For Volkswagen Polo Sedan
An example of replacing a belt on a Volkswagen Polo Sedan engine equipped with an automatic tensioner:
- Loosen the belt tension by releasing the tension roller fixing bolt. Nut size 16 mm.
- Turn the roller mounting bracket counterclockwise. Turning takes place with effort as the tension spring is compressed.
- Carefully remove the belt from the crankshaft pulleys and drive units.
- Remove the roller using a 16 mm socket inserted into the recess under the generator. If the tension roller does not change, then it is fixed in the spin position using a metal rod inserted into the hole in the housing.
- Place the belt on the pulleys, then carefully release the tension roller. The tensioner automatically adjusts the tension level of the product.
Symptoms of a loose belt
Before you start adjusting the tension or replacing the belt, you need to understand that there are some problems with it.
Not all drivers respond to emerging symptoms in a timely manner. But if you ignore the telltale signs, it can end in disaster. Of course, a breakdown of the alternator belt can hardly be compared with a break in the timing chain or belt, and in the case of Japanese crossovers, most configurations have a timing chain.
But it will be better if the motorist can notice problems with the generating device in time.
The most important characteristic sign is a squealing or whistling sound during engine operation. This symptom indicates that the belt is loose, and this can be heard most clearly when the engine starts and when the speed increases.
At the same time, keep in mind that a whistle from under the hood can also be caused by problems with the timing belt and power steering.
To more accurately determine the malfunction, you need to diagnose the alternator belt. You need to turn off the engine and manually check the tension level. Try to press the element with force. If it bends literally 0.5 mm, then the tension is good. This is enough for normal operation.
If the belt goes much lower, then it is too relaxed. We'll have to tighten it up.
Be sure to visually inspect the belt. If traces of an oil film are visible on it, as well as obvious defects and damage, then no adjustment will help. The only solution is to completely replace the drive belt of the mounted units. This is what the alternator belt is called.
Drive belt tension options
Depending on the design features of the car, manufacturers install various tensioner options under the hood. Such units are in demand if drivers detect sagging belts or excessive overtightening, which may have been allowed at the station after maintenance. Most often, you can adjust the load on the belt connecting the generator and the crankshaft using regulators, in which the force is transmitted through one of the types of element:
- bar;
- bolt;
- video clip.
All designs have their positive and negative characteristics.
Tension with adjuster bar
The technique is more relevant for older generation cars, for example, “classics” from VAZ. The method is to fix the generator on the housing using an arc-shaped strip clamped with a bolted connection through a groove. By loosening the thread, you can move the generator to adjust the force. The following algorithm is used:
- unscrew the fastening nut one turn or half a turn to loosen the bar that acts as a belt tensioner;
- we use a pry bar to pry up the body of the electrical appliance, which must be tensioned by the generator belt to an acceptable level to ensure the required tension;
- tighten the fasteners, fixing the generator in the new position.
Since the process is relatively labor-intensive, it can be repeated as needed.
Tension using adjusting bolt
A more progressive method is to adjust and fix the tension of the generator belt using an adjusting bolt. By moving it along the thread, you will be able to achieve the desired result. The step-by-step algorithm includes the following positions:
- First of all, we loosen the mount of the generator;
- then use a wrench to unscrew/tighten the adjusting bolt;
- tighten the upper and lower bolts securing the generator.
The advantage of this method is that the car owner has the opportunity to control the degree of force directly during the adjustment process
It is important to take into account the error that occurs when tightening fasteners
Optimal tension adjustment via roller
On certain models of modern cars, a structure with a roller is installed to comfortably loosen the belt. For example, this is how the generator at Priora is weakened. It should be taken into account that the installed belt is also used to ensure rotation of the air conditioner and power steering. A special roller is an integral part of the design. To work with Priora, an auto mechanic will need a 17-size open-end wrench. It will help loosen and tighten the threaded system. In addition, you will need a special key used to rotate the roller. The special device looks like a key with a handle, the working end of which has two rods with a diameter of 4 mm, a length of 25 mm, located at a distance of 18 mm perpendicular to the handle.
The cost of a special key usually does not exceed 80-100 rubles. They search for it using the encoding 67.7812-9573. Having selected the optimal force, use a 17 wrench to tighten the adjusting rollers. Access to the settings is simple; it opens from the top from under the hood. You can check the degree of tension after starting the engine and turning on electrical appliances. They should work as normal. While the engine crankshaft is rotating, the “Battery” dashboard light should not light up, and the belt whistle should not appear. Manufacturers recommend monitoring the force on the belt at least every 15 thousand km. Mandatory replacement of consumables is carried out no later than 60 thousand km. Since the product can stretch over time, we recommend periodically checking its performance several times a season.
How to tighten your belt yourself
To tighten the generator belt yourself, you do not have to be an experienced auto mechanic. You can do the tensioning yourself thanks to a well-thought-out design.
In this regard, the Toyota RAV4 does not have any revolutionary solutions, but it does have an adjusting bolt (screw). He is the one who will help complete the task.
If you decide to tighten the alternator belt on a Toyota RAV4 crossover without outside help, follow these instructions:
- turn off the engine and wait for the engine to cool down if it is hot;
- remove the protective cover from the engine compartment;
- disconnect the negative terminal from the battery;
- slightly loosen the fastening nuts that hold the generator;
- check the current tension;
- turn the adjusting screw 0.5 turns;
- look how the situation has changed;
- if the belt continues to sag, make another half turn;
- and so on until the desired degree of tension;
- fix the fastening nuts;
- test run the engine.
If there is no whistle when starting and nothing indicates a weak tension of the generator when picking up speed, then the procedure was carried out successfully.
But when the adjustment does not bring any result, there is a possibility that the repair will be extended beyond the permissible limit. No matter how much they stretch him, he will no longer be able to perform his functions normally. There is only one option left. This is a replacement.
When to change the alternator belt
Modern technologies make it possible to make a generator belt so durable that it can operate without failure for a long time - several tens of thousands of miles. Many manufacturers set a standard for mandatory replacement of the alternator belt at 80–100 thousand kilometers
But there must be monitoring of the condition of this important element of the generator drive. Common practice: Visual inspection for cracks and frayed edges when a persistent whistling noise occurs.
Premature damage is caused by burrs and misalignment on the pulleys, as well as improper tension. A break will be indicated by two indicator lights. The first is about the lack of battery charging. The second is about a sharp increase in coolant temperature (for example, on a classic, the water pump and generator run from one consumable).
What to do if it breaks
Broken alternator belt
If the belt breaks on the road and there is no spare, the situation will be quite serious. It's especially difficult at night. You can only move in tow with the engine turned off, which is very dangerous. If during the day, then you can drive a short distance on the battery, turning off all unnecessary sources of current consumption: lights, radio, stove, navigator and other devices. In a hopeless situation, you can try to use available means:
- cut the torn one in half lengthwise, fold the halves together and make a circle of the required length, wrap both halves with strong twine;
- a waist belt, the ends of which are fastened with wire;
- women's tights, tie the ends in a tight knot;
- strong rope, wrap the ends with strong twine;
- a harness from a car inner tube, wrap the ends with twine or wire.
How to choose the right one
If the belt begins to deteriorate due to prolonged use or severe wear, it must be replaced immediately. The main criterion is the length, which can be found from the catalog, knowing the catalog number of the part of this car brand and its equipment. For example, the length for the VAZ 2110–2112 brand is different for different models:
- for 8 and 16 valve engines, including the Priora, with a minimum configuration - the length is 742 mm;
- for a 16 valve engine with hydraulic booster - 1115 mm;
- for models equipped with air conditioning - 1125 mm.
Marking is applied to the outside of the belt
The length can be determined from the markings that are applied to the outer surface. It is recommended to buy an original product from the manufacturer whose products are equipped with the car on the assembly line.
Alternator Serpentine Belt Manufacturers
GATES alternator serpentine belt
The American Company GATES and its products are the most famous among all manufacturers of ribbed belts. GATES spare parts are supplied to assembly lines of cars and trucks in Italy, France, Germany, Sweden, Japan, Korea, the USA and other countries. Her belts are high quality, durable, but quite expensive. This brand is most often counterfeited by unscrupulous manufacturers of low-quality consumables.
The German company Continental is also well known for the quality of its products.
The German company Bosch has an excellent reputation in the world for many products, including ribbed belts.
The American company DAYCO occupies 2nd place in the belt market and supplies its products to the assembly lines of automobile concerns in Italy, France, Germany and other countries. Original DAYCO products enjoy the trust of consumers not only among motorists in European countries, but also in the USA, Asia, and Africa.
PJSC "BalakovoRezinoTekhnika" is a Russian manufacturer of original rubber products for VAZ, GAZ and KamAZ conveyors. Its products for generators are readily purchased by owners of LADA, Volga, Gazelle and other domestic brands.
3.9.2 Checking belt tension / Toyota Rav4
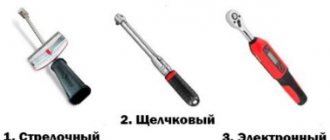
The generator, power steering pump and air conditioning compressor are driven by poly-V belts. Models up to 2001 use one belt to drive the alternator and a second belt to drive the air conditioning compressor and power steering pump, while models after 2001 use one longer belt. Place the gear shift lever in neutral. Use chalk to mark the belt. Using the pulley mounting bolt, turn the crankshaft clockwise until the mark appears, while visually checking the condition of the belt. The following defects can be found on the poly V-belt: – traces of oil and grease; – wear of the edges of the wedge lugs; – hardening of the edges of the wedge projections; – transverse cracks on the back side of the belt; – detachment of individual ribs; – fraying of the end edges of the belt; – transverse cracks in some ribs; – destruction of individual ribs. If any of the defects are present, replace the belt. On cars manufactured before 2001, the tension of poly V-belts is adjusted manually, and starting from 2001 - automatically. Belt tension is checked with Nippondenso or Burroughs measuring instruments. Measure the belt tension according to the Nippondenso or Burroughs factory instructions and compare the measured value with the tension values for a new or used belt.
| NOTE The term “used” in this manual refers to a belt that has been used for more than 5 minutes. |
| Rice. 2.13. Measuring the tension of the poly V-belt on cars produced before 2001 by pressing the thumb on the belt branch |
In the absence of measuring instruments, you can use a simple method that ensures acceptable belt tension accuracy. Using your thumb, with moderate force, press the belt branch at a point equidistant from the centers of the pulleys (Fig. 2.13). Measure the belt deflection, which should be 6–6.5 mm with a pulley center distance of 180–280 mm and 12.5–13 mm with a pulley center distance of 305–405 mm.
Replacing the drive belt idler pulley on a Toyota RAV4 2.0 Toyota RAV 4 2007
Belt or tensioner?
TOYOTA RAV4 DRIVE BELT REPLACEMENT
Toyota Rav4. Extraneous generator noise.
How to check the alternator belt tensioner?
How to repair and change a generator
On Toyota RAV4 cars, the generating device is quite simple. You don't need any special skills or qualifications to change it.
But if almost everyone can cope with replacing a generator on a RAV4, then the situation with equipment repair looks a little different.
Practice shows that most often you have to deal with replacing alternator brushes on RAV4 crossovers.
How to change brushes
Here you will need to study the pinout of the generator on the RAV4, as well as determine which model is on the car. There are several options:
- Lucas.
- Bosch.
- Motorola.
If this device is from Bosch, then you need:
- remove the minus from the battery;
- unscrew the bolts securing the protective casing;
- unscrew the screws securing the voltage regulator and then carefully remove it;
- check the current length on the graphite brushes;
- if it is less than 5 mm, then it needs to be changed;
- for replacement, conductors are soldered off;
- old brushes and springs are removed;
- New brushes are installed and current leads are soldered.
Before reassembling and installing, you need to make sure that the brushes move easily along the holder.
Owners of Lucas generators will find the following instructions useful:
- remove the negative terminal from the battery;
- the protective screen is removed;
- the wire connector from the generator is disconnected;
- the back cover of the device is removed;
- the wires from the regulator are disconnected;
- the connecting plate is displaced;
- the regulator screw is unscrewed;
- the regulator itself is removed;
- the screws holding the graphite brushes are unscrewed;
- the brushes are removed from the brush holder;
- new ones are installed.
And then reassembly.
There is another type of generator. This is Motorola.
The instructions for it are:
- remove the minus from the battery and the protective casing;
- disconnect the connector with wires from the generator;
- unscrew the regulator and remove 2 wires;
- unscrew the screws that hold the brush holder;
- unscrew the brush holder;
- carefully turn it outward and remove it from the generator;
- check the length of the brushes, which should be at least 4 mm;
- If necessary, remove them and replace them.
It seems like nothing complicated. But the work requires extreme accuracy and concentration.
Tools:
We place a board under the pallet and, using a hydraulic jack, slowly raise the engine until the tensioner bracket bolt passes between the cushion and the spar. All the bolts were pulled out... Jack, jumper to the pit. We take out the tensioner bracket with the roller at the top, clamp it in a vice, and unscrew the roller bolt.
Large ratchet, Torex E20 head, vice. Now this is perhaps the most valuable information! Inside the roller there are two sealed single-row ball bearings. Buy Koyo, Nachi or NK and you will be happy.
We press out the old ones, press in the new ones. The belt is very easy to change.
The right wheel is removed, the fender liner protection is small, the crankcase protection is removed, the belt is tensioned using a hydraulic shock absorber, to loosen it, just throw a wrench on the top bolt that holds the shock absorber and tighten it smoothly without jerking, thereby compressing the shock absorber and voila, the belt is free. I bought the pump for something other than original. As for the tension roller, there is a small problem.
I was unable to unscrew the roller itself without the pad; it was tightened very tightly. To unscrew it, I had to unscrew the bolt that holds the platform on which this very roller is located, but the bolt is very long and rests against the body.
Here I had to cheat a little and remove the engine mount, the one that is located under the coolant barrel. The barrel itself had to be removed, after draining all the liquid from the system; the tap is located under the battery.
Then, jacking up the car, placing a stump under the crankcase and raising the engine a little, it took a couple of centimeters to unscrew the bolt from the tension roller mounting area. I didn’t change the roller itself, the craftsmen suggested that it was enough to replace the bearings in it, there are two of them, the name “” in the bearing store understood me.
Which drive belt is better to choose for Toyota Rav4?
When choosing a belt, you need to make sure that its length is suitable and whether it is designed for the number of rollers and pulleys in your car
First of all, you should pay attention to the alternator poly-V belts from the German company Contitech. They combine excellent quality, affordable price, and can withstand up to 40 thousand hours of operation.
Another popular option is generator belts from Gates. However, in quality they do not differ from Contitech products, but their price is somewhat overpriced. Alternatively, use harnesses from Dayco or Bosch
It is important to remember that when replacing the drive belt on a Toyota Rav 4, you cannot save money, because many important units in the car depend on its performance
Replacement process
For safety reasons, you should remove the keys from the ignition and remove the negative terminal of the battery. It's also a good idea to let the engine cool down, otherwise you risk getting burned when replacing it. To replace you will need the following tools:
- Heads for 14 and 12;
- Key for 10 and 14;
- Ratchet;
- Two cardans;
- Ratchet extension.
There is no need to completely remove the engine for replacement.
Replacing the drive belt on Rav 4 proceeds according to the following algorithm:
- Remove the nine clips and remove the radiator support cap.
- Remove the three clips and the decorative engine cover.
- Unscrew the two bolts and disconnect the radiator expansion tank.
- Remove 2 bolts, 4 screws and 10 clips, then remove the engine bottom cover.
- Remove the two clamps and remove the lower engine protection.
- Unscrew the four bolts and remove the front suspension beam mount.
- Release the tension by turning the tensioner pulley and then remove it.
- Fix the tensioner by aligning it with the hole and inserting a 5mm hex key into them.
- Replace the belt and tighten it.
The assembly follows the same plan, but in reverse order.
Assembly with new parts
- Install the exhaust camshaft and crankshaft VVT damper and sprockets.
The camshaft marks located on the new chain should be aligned with the marks on the camshaft and crankshaft. They are located six links away.
Check that the chain running from the exhaust camshaft sprocket to the crankshaft sprocket (via the VVT sprocket) is under tension.
Make sure that the camshaft and crankshaft marks match.
Reinstall the timing cover using sealant. Install a new tensioner.
The tensioner pin should face up. Bring the tensioner into working position by pressing the top of the shoe until it stops. To check, use the material at hand (wire) and try to move the pin. If she gave in, then everything is fine.
Lubricate the timing chain and sprockets with engine oil. Turn the crankshaft two turns.
Check the marks located on the crankshaft pulley and between the camshaft sprockets. You can ignore the marks located on the chain, as they will move. This is due to the fact that there are fewer teeth on the crankshaft sprocket than the number of chain links.
The rest of the assembly of all components and parts is carried out in reverse order.
Take into account the tightening torques
Preparatory activities
It will not be superfluous to listen to the operation of the engine. The first sign of wear is increased noise in the engine compartment area. If during a visual inspection there is play on the camshaft sprockets in all directions and there is no tension, then replacing the timing chain on a Toyota Rav 4 is mandatory.
The replacement process is not complicated, but access to the components that need to be dismantled leaves much to be desired. Without experience or special tools (including measuring tools), this procedure should be left to specialists. It is important to remember that you must use only original spare parts according to the catalog number.
Before installation for Toyota Rav 4, you must purchase all parts. The set consists of:
- chain guide;
- chain tensioner shoe;
- VVT system sprockets;
- exhaust camshaft sprockets;
- crankshaft sprockets;
- crankshaft oil seal;
- timing chains;
- automatic chain tensioner.
You will also need a valve cover gasket and a tube of high temperature sealant.
It is necessary to remove the negative terminal, placing the car securely on an inspection hole or lift, taking into account the need to jack up the engine. Prepare a container for antifreeze with a volume of at least 6.5 liters. Carefully drain the antifreeze from the radiator (bottom of the radiator) and cylinder block (under the exhaust manifold).
Payment via PayPal
After selecting payment via PayPal, the PayPal payment system will launch, where you need to select the payment method: bank card or PayPal account.
If you already have a PayPal account, then you need to log into it and make a payment.
If you do not have a PayPal account and you want to pay using a bank card via PayPal, you need to click on the “Create an Account” button - shown with an arrow in the picture.
PayPal will then prompt you to select your country and provide your credit card information.
After specifying the information required to make the payment, you must click on the “Pay Now” button.
Replacing the drive belt on a Toyota Rav4
Replacing a hinged belt is within the capabilities of all car enthusiasts, including those who are just beginning to learn the basics of car repair with their own hands. Today we will tell you how to correctly carry out the replacement procedure on a Toyota Rav4. We will also touch upon problems that arise due to untimely replacement.
Which drive belt is better to choose for Toyota Rav4?
When choosing a belt, you need to make sure that its length is suitable and whether it is designed for the number of rollers and pulleys in your car
First of all, you should pay attention to the alternator poly-V belts from the German company Contitech. They combine excellent quality, affordable price, and can withstand up to 40 thousand hours of operation.
Another popular option is generator belts from Gates. However, in quality they do not differ from Contitech products, but their price is somewhat overpriced. Alternatively, you can use hanger belts from Dayco or Bosch.
It is important to remember that when replacing the drive belt on a Toyota Rav 4, you cannot save money, because many important units in the car depend on its performance
Replacement process
For safety reasons, you should remove the keys from the ignition and remove the negative terminal of the battery. It's also a good idea to let the engine cool down, otherwise you risk getting burned when replacing it. To replace you will need the following tools:
- Heads for 14 and 12;
- Key for 10 and 14;
- Ratchet;
- Two cardans;
- Ratchet extension.
Replacing the drive belt on Rav 4 proceeds according to the following algorithm:
- Remove the nine clips and remove the radiator support cap.
- Remove the three clips and the decorative engine cover.
- Unscrew the two bolts and disconnect the radiator expansion tank.
- Remove 2 bolts, 4 screws and 10 clips, then remove the engine bottom cover.
- Remove the two clamps and remove the lower engine protection.
- Unscrew the four bolts and remove the front suspension beam mount.
- Release the tension by turning the tensioner pulley and then remove it.
- Fix the tensioner by aligning it with the hole and inserting a 5mm hex key into them.
- Replace the belt and tighten it.
The assembly follows the same plan, but in reverse order.
What happens to the car if the belt wears out?
Wear and loosening of the drive belt tension can lead to a number of unpleasant consequences.
Thus, the most noticeable symptom of a worn belt is a loud squeak or whistle that occurs when electrical equipment is turned on.
This is due to the fact that during operation it begins to slip along the rollers and pulleys of the system. Another unpleasant consequence will be a poorly charging car battery.
Untimely replacement can lead to rupture, and this is fraught with a whole bunch of unpleasant consequences. So, if there is a rupture, the power steering system, air conditioning, lighting and other electrical equipment will turn off. However, the most serious consequence will be the shutdown of the engine cooling system.
If there is a rupture, the water pump stops receiving torque, which in turn leads to a stop in the circulation of the coolant. Without it, the engine begins to overheat very quickly. And this can lead to damage to pistons, cylinders, crankshaft and other parts.
Thus, in the event of a rupture, it is not worth the risk and it is better to call a tow truck.
Ways to find out if repairs are needed
It is impossible to determine the size of the timing belt after a certain mileage without removal, and this procedure itself is not part of the diagnosis. With a chain drive everything is much simpler. In order to determine whether the Rav4 timing chain needs to be replaced, you need to follow simple recommendations.
Using a caliper, measure the distance between the 8 links. The length of the section should not exceed 52.4 mm (2.063 inches). If this value is greater, a replacement must be made.
Using the same tool, the distance between 16 links is determined. It should not exceed 122.6 mm (4.827 inches). To obtain an accurate result, the circuit is measured in both cases in three randomly selected areas.
Measure the thickness of the chain tensioner shoe.
Use a caliper to measure shoe wear. The maximum wear value should not exceed 1.0 mm (0.039 in).
- Measure the diameter of the timing chain sprocket.
- Connect the SST and tools so that they are close to each other during operation.
- When installing the tensioner, slowly rotate it clockwise for at least 3 seconds. Do not apply force suddenly.
- Once the tensioner is fully installed, do not apply more force than necessary.
Wrap the chain around the drive sprocket and measure the diameter. If it is less than 51.6 mm (2.031 inches) there are obvious signs of wear and both elements need to be replaced
Measurements must be carried out in such a way that the measuring device touches the chain rollers.
Removal
REMOVE RADIATOR BRACKET HOLE COVER
Unscrew the 4 bolts and remove the right reinforcement.
Using a 19mm socket wrench (SST), loosen the serpentine belt tensioner by turning the lever clockwise, then remove the fan and alternator serpentine belt.
Special Tool (SST): 09216-42010 NOTE:
Checking and replacing the accessory drive belt
1 Due to its purpose and design, the drive belt operates under difficult conditions and, naturally, becomes unusable over time. For this reason, it needs to be monitored periodically.
2 The vehicle can be equipped with an additional belt in one of two sizes. A single length belt is installed on vehicles with air conditioning, and a shorter belt is installed on models without air conditioning. The belt drives the alternator, power steering, cooling water pump and (on models with air conditioning) the air conditioning compressor.
A Models without air conditioning B Models with air conditioning
1 Tensioner pulley; 2 Crankshaft pulley; 3 Compressor; 4 Generator; 5 Power steering pump pulley; 6 Water pump pulley
3 To gain access to the belt, remove the cooling fan (see chapter “Cooling, heating and ventilation systems”).
4 Stop the engine and carefully inspect the surface of the belt (use a flashlight if necessary). Make sure there are no cracks or other damage to the belt. Make sure there are no signs of belt slippage. Inspect both sides of the belt. To do this, turn the crankshaft using a special wrench.
5 Remove the cooling fan shroud (see chapter “Cooling, heating and ventilation systems”).
6 Unscrew the nut of the bolt securing the tensioner arm
1 Tensioner arm nut; 2 Tensioner lever bolt; 3 Tensioner lever; 4 Tensioner spring
7 Insert a lever (preferably 12mm diameter x 300mm long) into the hole in the tensioner lever and turn the lever counterclockwise until the tensioner bolt slides towards the intake manifold.
8 Turn the lever clockwise and remove the tensioner spring.
9 Remove the tensioner pulley along with the belt.
10 Install the new belt as follows.
11 Lift the tensioner pulley and lock it in this position.
12 Squeeze the belt and slide it between the water pump pulley and the crankshaft pulley
13 With your left hand, press the belt against the water pump pulley and rotate the pump pulley until the belt loop can be placed on the tensioner pulley.
14 Put the belt on the tensioner pulley (Fig. 14, a), then put it on the remaining pulleys in the sequence shown in Fig. 14, b, c.
Place the belt on the pulleys in the following order:
1 Tensioner pulley; 2 Crankshaft pulley; 3 Generator pulley; 4 Power steering pump pulley; 5 Water pump pulley
Place the belt on the pulleys in the following order:
1 Tensioner pulley; 2 Crankshaft pulley; 3 Compressor pulley; 4 Generator pulley; 5 Power steering pump pulley; 6 Water pump pulley
16 Press the tensioner lever until you can insert the bolt into place.
17 Insert the bolt into the tensioner arm (make sure the tensioner spring is installed correctly).
18 Screw the nut onto the tensioner bolt and tighten it to the required torque, holding the bolt.
19 Install the cooling fan shroud (see chapter “Cooling, heating and ventilation systems”).
Theme Options
Sources:
https://fix-my-car.ru/texnicheskoe-obsluzhivanie/zamena-privodnogo-remnya/zamena-privodnogo-remnya-toyota-rav4.html https://remam.ru/elektrik/zamena-remnya-i-generatora -toyota-rav4.html https://assortisport.ru/toyota/kak-pomenyat-remen-generatora-na-toyota-rav-4.php https://automaster67.ru/toyota/tojota-rav-4-zamena -remnya-generatora-osveshhaem-podrobno
Generator drive device
The main condition for the correct functioning of the generator is the correct transmission of rotation from the power plant. To generate the required amount of electricity, the element must rotate at high speed.
The alternator drive belt must be tensioned for proper transmission. If the belt sag, it will begin to slip on the pulleys. If the belt is overtightened, there is a risk of premature wear of the bearings, working surfaces of the pulley and belt.
To avoid these troubles, belt tension adjustment was included in the design.
In modern cars the number of attachments is large. This equipment is also driven by the crankshaft pulley, including the power steering pump and air conditioning compressor.
The drive of these two units and the generator is carried out using a single belt. Because of this, it is impossible to adjust the tension of the drive element using a generator. Such cars have a complex belt position configuration. Belt-driven equipment is located at different levels.
How to change the alternator belt tensioner pulley? To do this, you need to understand its structure. The generator belt tensioner roller is a bearing with a plastic lining on its outer race. The pad has a working surface along which the belt moves. There is a landing sleeve inside the roller. There are two types of rollers:
- Eccentric. The design of this video is quite simple. It contains only a bearing, a plastic lining and a bushing. A through hole passes through the bushing, offset away from the center of the roller. The roller is put on a pin through the hole, which is installed on the engine. To tighten, the roller must be rotated relative to the bolt.
- Roller with bracket. In this design, the roller is fixedly mounted on a bracket. The structure is attached to the power plant using bolts. Moving the bracket relative to the engine adjusts the tension. Manufacturers sometimes use rollers with a spring bracket. The spring allows you to independently adjust the tension.
The bearing is the main weak point of the roller. This part is forced to constantly experience loads. Wear of a part sometimes even ends in its complete breakdown.
It is recommended to change the bearing every time the belt is replaced.
Replacement process
For safety reasons, you should remove the keys from the ignition and remove the negative terminal of the battery. It's also a good idea to let the engine cool down, otherwise you risk getting burned when replacing it. To replace you will need the following tools:
- Heads for 14 and 12;
- Key for 10 and 14;
- Ratchet;
- Two cardans;
- Ratchet extension.
Replacing the drive belt on Rav 4 proceeds according to the following algorithm:
- Remove the nine clips and remove the radiator support cap.
- Remove the three clips and the decorative engine cover.
- Unscrew the two bolts and disconnect the radiator expansion tank.
- Remove 2 bolts, 4 screws and 10 clips, then remove the engine bottom cover.
- Remove the two clamps and remove the lower engine protection.
- Unscrew the four bolts and remove the front suspension beam mount.
- Release the tension by turning the tensioner pulley and then remove it.
- Fix the tensioner by aligning it with the hole and inserting a 5mm hex key into them.
- Replace the belt and tighten it.
The assembly follows the same plan, but in reverse order.
Problems when paying with bank cards
Sometimes difficulties may arise when paying with Visa/MasterCard bank cards. The most common of them:
- There is a restriction on the card for paying for online purchases
- A plastic card is not intended for making payments online.
- The plastic card is not activated for making payments online.
- There are not enough funds on the plastic card.
In order to solve these problems, you need to call or write to the technical support of the bank where you are served. Bank specialists will help you resolve them and make payments.
That's basically it. The entire process of paying for a book in PDF format on car repair on our website takes 1-2 minutes.
Inspect the drive belt for wear, fraying, etc. If any defects are found, replace the drive belt.
Cracks are allowed on the ribbed side of the drive belt. If missing fragments of the belt ribs are found, the belt should be replaced.
After installing the drive belt, make sure it is positioned correctly in the grooves. Check by hand to see if the belt has slipped out of the groove on the bottom of the crankshaft pulley.
- A “new belt” means a belt that has been used with the engine running for less than 5 minutes.
- A “used belt” means a belt that has been on the engine for 5 minutes or more.
- After installing the new belt, run the engine for 5 minutes, then check the tension again.
| 1. REMOVE RADIATOR BRACKET HOLE COVER |
2. REMOVE RIGHT FRONT WHEEL
| 3. REMOVE RIGHT FRONT FENDER APRON |
Unscrew the 4 bolts and remove the right reinforcement.
Using a 19mm socket wrench (SST), loosen the serpentine belt tensioner by turning the lever clockwise, then remove the fan and alternator serpentine belt.
Special Tool (SST): 09216-42010
- Connect the SST and tools so that they are close to each other during operation.
- When installing the tensioner, slowly rotate it clockwise for at least 3 seconds. Do not apply force suddenly.
- Once the tensioner is fully installed, do not apply more force than necessary.
| 1. INSTALL FAN AND ALTERNATOR POLICY BELT |
Using a 19mm socket wrench (SST), loosen the serpentine belt tensioner by turning the lever clockwise, then install the fan and alternator serpentine belt.
The Toyota RAV4 is one of the best-selling crossovers in the world. The company regularly releases new generations, updates current versions, offers additional options and different configuration options.
But some remain unchanged. This is the presence of a generator that powers the on-board network during engine operation and also charges the battery.
Since the generator is actively involved in the functioning of the car, the unit wears out over time. Mostly, car owners are faced with situations where they need to tighten the belt or change it. Less often the generator itself fails. Repairing it is almost pointless. Restoration does not give the desired result, but is expensive. Therefore, the only correct option is to install a new generating device.
Which drive belt is better to choose for Toyota Rav4?
When choosing a belt, you need to make sure that its length is suitable and whether it is designed for the number of rollers and pulleys in your car
First of all, you should pay attention to the alternator poly-V belts from the German company Contitech. They combine excellent quality, affordable price, and can withstand up to 40 thousand hours of operation.
Another popular option is generator belts from Gates. However, in quality they do not differ from Contitech products, but their price is somewhat overpriced. Alternatively, use harnesses from Dayco or Bosch
It is important to remember that when replacing the drive belt on a Toyota Rav 4, you cannot save money, because many important units in the car depend on its performance
Spare parts
If it fails, the alternator belt is replaced together with the tension roller and tensioner. We recommend purchasing original products, the workmanship and service life of which are much higher than their non-original counterparts:
| the name of detail | Year of car manufacture | Factory article |
| Generator belt | 2013-2015 | 90916-02667 |
| 2006-2009 | 90916-02652 | |
| 2009-2010 | 90916-02600 | |
| 2010-2012 | 90916-W2018 | |
| Tension roller | 88440-20120 | |
| Belt tensioner | 166200W093 |