Toyota | Appendix 3. Tightening torques for threaded connections
| Detail | Thread | Tightening torque, N m (kgf m) |
| Engine | ||
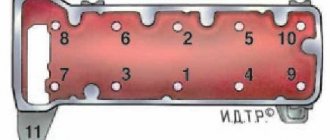
| Cylinder head bolts | M12x1.25 | 1st move: 20.0 (2.0) 2nd move: 71.0–87.0 (7.1–8.7) 3rd move: tighten by 90° 4th move: tighten again at 90° |
| Nut of the stud securing the intake pipe and exhaust manifold | M8 | 21,0–26,0 (2,1–2,6) |
| Tension roller nut | M10x1.25 | 34,0–42,0 (3,4–4,2) |
| Camshaft bearing housing stud nut | M8 | 18,7–23,0 (1,87–2,30) |
| Camshaft pulley bolt | M10 | 68,0–85,0 (6,8–8,5) |
| Accessory housing mounting bolt | M6 | 6,8–8,4 (0,68–0,84) |
| Nuts of the studs securing the outlet pipe of the cooling jacket | M8 | 16,0–23,0 (1,6–2,3) |
| Main bearing cap bolt | M10x1.25 | 69,0–84,0 (6,9–8,4) |
| Oil sump bolt | M6 | 5,0–8,0 (0,5–0,8) |
| Connecting rod cap bolt nuts | M9x1.0 | 44,0–54,0 (4,4–5,4) |
| Flywheel bolt | M10x1.25 | 62,0–87,0 (6,2–8,9) |
| Coolant pump mounting bolt | M6 | 78,0–80,0 (0,78–0,80) |
| Crankshaft pulley bolt | M12x1.25 | 99,0–110,0 (9,90–11,0) |
| Coolant pump inlet pipe mounting bolt | M6 | 4,1–5,1 (0,41–0,51) |
| Muffler exhaust pipe fastening nut | M8x1.25 | 21,0–26,0 (2,1–2,6) |
| Nut securing the flange of the additional muffler | M8x1.25 | 16,0–23,0 (1,6–2,3) |
| Front engine mount bolt nut | M10 | 42,0–51,0 (4,2–5,1) |
| Left engine mount bolt nut | M10 | 42,0–51,0 (4,2–5,1) |
| Nut of the bolt securing the left suspension bracket to the engine | M10 | 32,0–51,0 (3,2–5,1) |
| Rear engine mount bolt nut | M10 | 28,0–34,0 (2,8–3,4) |
| Nut of the bolt securing the rear suspension bracket to the engine | M12 | 62,0–98,0 (6,2–9,8) |
| Bolt securing the oil receiver to the main bearing cover | M6 | 8,0–10,0 (0,8–1,0) |
| Bolt securing the oil receiver to the pump | M6 | 7,0–8,0 (0,7–0,8) |
| Oil pump mounting bolt | M6 | 8,5–10,0 (0,85–1,0) |
| Oil pump housing bolt | M6 | 7,2–9,2 (0,72–0,92) |
| Oil pump pressure reducing valve plug | M16x1.5 | 46,0–73,0 (4,6–7,3) |
| Oil filter fitting | M20x1.5 | 38,0–87,0 (3,8–8,7) |
| Oil pressure warning light sensor | M14x1.5 | 24,0–27,0 (2,4–2,7) |
| Carburetor mounting nuts | M8 | 13,0–16,0 (1,3–1,6) |
| Cylinder head cover nut | M6 | 2,0–4,7 (0,2–0,47) |
| Clutch | ||
| Nut securing the clutch housing to the engine block | M12x1.25 | 55,0–88,0 (5,5–8,8) |
| Bolt securing the clutch housing to the engine block | M12x1.25 | 55,0–88,0 (5,5–8,8) |
| Clutch release bearing guide flange bolt | M6 | 5,0–6,5 (0,5–0,65) |
| Bolt securing clutch housing to flywheel | M8 | 19,0–31,0 (1,9–3,1) |
| Nut securing the clutch housing to the gearbox | M8 | 16,0–26,0 (1,6–2,6) |
| Bolt securing the bottom cover to the clutch housing | M6 | 4,9–7,8 (0,49–0,78) |
| Transmission | ||
| Taper screw for fastening the drive rod joint | M8 | 16,6–20,0 (1,66–2,0) |
| Gear selector mounting bolt | M6 | 5,1–8,2 (0,51–0,82) |
| Shift Lever Housing Bolt | M8 | 16,0–26,0 (1,6–2,6) |
| Nut securing the drive rod clamp | M8 | 16,0–26,0 (1,6–2,6) |
| Nut of the rear end of the primary and secondary shafts | M20x1.5 | 123,0–149,0 (12,3–14,9) |
| Reversing light switch | M14x1.5 | 29,0–45,0 (2,9–4,5) |
| Bolt securing the forks to the rod | M6 | 12,0–19,0 (1,2–1,9) |
| Fastener cover bolt | M8 | 16,0–26,0 (1,6–2,6) |
| Differential driven gear bolt | M10x1.25 | 65,0–83,0 (6,5–8,3) |
| Speedometer drive housing fastening nut | M6 | 4,5–7,2 (0,45–0,72) |
| Gear selector shaft nut | M8 | 16,0–26,0 (1,6–2,6) |
| Nut securing the rear cover to the gearbox housing | M8 | 16,0–26,0 (1,6–2,6) |
| Reverse fork lock plug | M16x1.5 | 28,0–45,0 (2,8–4,5) |
| Tapered screw for securing the gear selector lever | M8 | 28,0–35,0 (2,8–3,5) |
| Clutch housing and gearbox mounting bolt | M8 | 16,0–26,0 (1,6–2,6) |
| Filler and drain plugs | M22x1.5 | 29,0–46,0 (2,9–4,6) |
| Front suspension | ||
| Nut securing the upper support of the telescopic strut to the body | M8 | 20,0–24,0 (2,0–2,4) |
| Nut securing the ball pin to the lever | M12x1.25 | 80,0–96,0 (8,0–9,6) |
| Nut of the eccentric bolt securing the telescopic strut to the steering knuckle | M12x1.25 | 79,0–96,0 (7,9–9,6) |
| Bolt securing the telescopic strut to the steering knuckle | M12x1.25 | 79,0–96,0 (7,9–9,6) |
| Bolt and nut securing the suspension arm to the body | M12x1.25 | 79,0–96,0 (7,9–9,6) |
| Extender fastening nut | M16x1.25 | 160,0–180,0 (16,0–18,0) |
| Bolt and nut securing the stabilizer bar to the arm | M10x1.25 | 43,0–53,0 (4,3–5,3) |
| Nut securing the stabilizer bar to the body | M8 | 13,0–16,0 (1,3–1,6) |
| Bolt securing the brace bracket to the body | M10x1.25 | 43,0–53,0 (4,3–5,3) |
| Nut securing the telescopic rod rod to the upper support | M14x1.5 | 67,0–82,0 (6,7–8,2) |
| Bolt securing the ball joint to the steering knuckle | M10x1.25 | 50,0–63,0 (5,0–6,3) |
| Front wheel hub nut | M20x1.5 | 225,0–250,0 (22,5–25,0) |
| Wheel bolt | M12x1.25 | 65,0–95,0 (6,5–9,5) |
| Rear suspension | ||
| Shock absorber lower mounting nut | M12x1.25 | 68,0–84,0 (6,8–8,4) |
| Rear suspension arm mounting nut | M12x1.25 | 68,0–84,0 (6,8–8,4) |
| Nut for securing the suspension arm brackets | M10x1.25 | 28,0–34,0 (2,8–3,4) |
| Shock absorber upper mounting nut | M10x1.25 | 51,0–63,0 (5,1–6,3) |
| Rear wheel hub bearing nut | M20x1.5 | 190,0–225,0 (19,0–22,5) |
| Brakes | ||
| Bolt securing the brake cylinder to the caliper | M12x1.25 | 117,0–150,0 (11,7–15,0) |
| Bolt securing the guide pin to the cylinder | M8 | 31,0–38,0 (3,1–3,8) |
| Bolt securing the brake caliper to the steering knuckle | M10x1.25 | 29,0–36,0 (2,9–3,6) |
| Bolt securing the rear brake shield to the beam | M10x1.25 | 35,0–43,0 (3,5–4,3) |
| Nut securing the vacuum booster bracket to the bracket booster | M8 | 10,0–16,0 (1,0–1,6) |
| Nut securing the master cylinder to the vacuum booster | M10 | 27,0–32,0 (2,7–3,2) |
| Nut securing the vacuum booster to the bracket booster | M10 | 27,0–32,0 (2,7–3,2) |
| Brake pipe connection fittings | M10 | 15,0–18,0 (1,5–1,8) |
| Front brake flexible hose end | M10x1.25 | 30,0–33,0 (3,0–3,3) |
| Steering | ||
| Steering gear housing mounting nut | M8 | 15,0–19,0 (1,5–1,9) |
| Steering shaft bracket mounting nut | M8 | 15,0–19,0 (1,5–1,9) |
| Steering shaft bracket mounting bolt | M6 | Screw until the head comes off |
| Bolt securing the steering shaft to the gear | M8 | 23,0–27,0 (2,3–2,7) |
| Steering wheel nut | M16x1.5 | 32,0–51,0 (3,2–5,1) |
| Tie rod lock nut | M18x1.5 | 123,0–150,0 (12,3–15,0) |
| Ball stud fastening nut | M12x1.25 | 28,0–33,0 (2,8–3,3) |
| Bolt securing the tie rod to the rack | M10x1.0 | 70,0–86,0 (7,0–8,6) |
| Steering gear bearing nut | M38x1.5 | 46,0–55,0 (4,6–5,5) |
| Electrical equipment | ||
| Spark plug | M14x1.25 | 31,0–39,0 (3,1–3,9) |
| Generator mounting bolt nut | M12x1.25 | 59,0–73,0 (5,9–7,3) |
| Generator mounting stud nut | M10x1.25 | 28,6–46,0 (2,86–4,6) |
Characteristics
| Production | Yokohama Plant Nissan Decherd Powertrain Plant |
| Engine make | QR25DE 2TR |
| Years of manufacture | 2001-present |
| Cylinder block material | aluminum |
| Supply system | injector |
| Type | in-line |
| Number of cylinders | 4 |
| Valves per cylinder | 4 |
| Piston stroke, mm | 100 |
| Cylinder diameter, mm | 89 |
| Compression ratio | 9.1 9.5 10.5 |
| Engine capacity, cc | 2488 |
| Engine power, hp/rpm | 152/5200 160/5600 173/6000 178/6000 182/6000 200/6600 250/5600 |
| Torque, Nm/rpm | 245/4400 240/4000 234/4000 244/4000 244/4000 244/5200 329/3600 |
| Fuel | 95 |
| Environmental standards | Euro 3/4 |
| Engine weight, kg | n.d. |
| Fuel consumption, l/100 km (Sentra SE-R) - city - highway - mixed. | 13.0 8.4 10.7 |
| Oil consumption, g/1000 km | up to 500 |
| Engine oil | 5W-30 5W-40 |
| How much oil is in the engine | 5.1 |
| Oil change carried out, km | 15000 (better 7500) |
| Engine operating temperature, degrees. | ~90 |
| Engine life, thousand km - according to the plant - in practice | n.d. 200+ |
| Tuning - potential - without loss of resource | 250+ ~200 |
| The engine was installed | Nissan Altima Nissan Teana Nissan X-TrailNissan Maxima Nissan MuranoNissan PathfinderNissan Primera Nissan SentraInfiniti QX60 Hybrid Renault KoleosNissan Bassara Nissan Serena Nissan Presage Nissan Frontier Nissan Rogue Suzuki Equator |
Capitalize 5s-fe over the weekend part 3 Sunday — logbook Toyota Harrier 1998 on DRIVE2
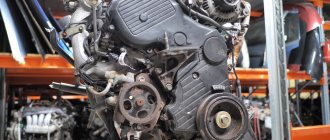
Sunday sounds exactly like the Resurrection of the internal combustion engine))). Waking up in the morning at about 12 o'clock)) I was thinking through a collection plan. The garage is already heated and everything is warming up calmly. Prem to collect the internal combustion engine. I started the assembly from the top in the same way as we will then have to set up the balancers and spend time on adjusting everything. We prepare the surface for the cylinder head, remove the slurry from the bolt channels and carefully lay the cylinder head and tighten it, 49 nm + 90 degree turn, as shown in the graph.
If you don’t have a Dino key, then you can go overboard)) as it happened for me.
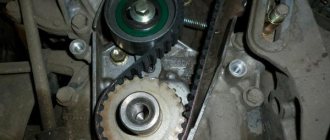
I had to remove the head again; I was lucky that the bolt was sticking out, otherwise drilling it out would be terrible. Next we will install the camshafts, the main thing is not to make a mistake with the marks.
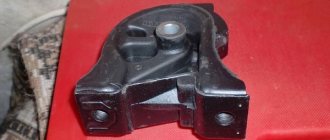
I have three of them, two of which must coincide when the shafts rotate. I installed the suction first and only then brought in the exhaust. We put on the shaft and crankshaft gears and align them with the marks, install the timing belt, and tension it later. We throw the scythe, connect the forces and now connect the manifold to the exhaust))) we struggle with tightening it and only one nut on top can be tightened. Further on the idea of the coil, but I won’t, what if I remove it and in order to unscrew the bolt you need to remove the dz, in general I decided it will be on one bolt. We put a thin layer of the gasket on the sealant. Next we screw the coolant pipe to the head and apply sealant there too. Now we assemble the coils. And now you can tighten the belt, I pulled it with a hammer))) more conveniently than with a pry bar. Next, I assembled the casings and installed the pulley, insert a 24mm wrench into the camshafts and tighten the pulley. Now you can install the valve cover. We put the bracket under the pillow, assemble the whole thing and install the exhaust manifold, and then only the generator. Now, while everything is drying, you can assemble it below. Align the balancers according to the marks, the internal combustion engine also according to the marks
and install the balancer. Next is this pallet with its 18 PPC bolts. And don’t forget to install the bracket on the automatic transmission and internal combustion engine after installing the pan. We install the exhaust elbow and the bottom with us
List of internal combustion engine modifications
The basic version has engine characteristics of 9.5 compression ratio and a power of 130 hp. With. The power drive was equipped with a camshaft with 7.25 mm cam lift and 220 phase. There are three modifications with other characteristics:
- Gen-1 – power 135 hp. p., camshaft with 8 mm cam lift and 218 phases for Toyota Celica ST204 and Camry XV10, produced between 1993 and 2001;
- Gen-2 – power 133 hp. pp., used in Toyota Camry XV20 from 1997 to 1999;
- Gen-3 – power 136 hp. s., modified for Toyota Camry XV20, which came off the assembly line in 2000 - 2001.
Motor 5S FE Gen-3
During the production of the motor, the same standard attachments were used.
Electrics
Battery, Terminal, Alternator, Alternator Belt, Alternator Belt Tensioner, Alternator Brushes, Diode Bridge, Alternator Belt Roller, Overrunning Clutch, Alternator Belt Kit, Alternator Pulley, Alternator Clutch, Alternator Bearing, Starter, Bendix, Solenoid Relay, Starter Brushes, Bearing starter, Control unit, Comfort unit, Fuse block, Steering column switch, Tempomat, Sensors, Oil pressure sensor, Throttle sensor, Injector sensor, Oil level sensor, Air pressure sensor, Engine temperature sensor, Camshaft sensor, Air temperature sensor, Signal sensor, Parking sensors, Crankshaft sensor, Fan sensor, Tire pressure sensor, Fuel pressure sensor, Knock sensor, Mass air flow sensor, Rain sensor, Hall sensor, Idle speed sensor, Relay, Turn signal relay, Signal relay, Wiper relay, Buttons, Horn, Antenna , Wiring harness
2AZ-FE TORQUE RATINGS – 1AZ-FE AND 2AZ-FE ENGINES – TOYOTA RAV4
| Tightened connection | Torque, N*m | |
| Chain Tensioner Plate x Crankshaft Bearing Cap | 12 | |
| Oil pump drive shaft sprocket x oil pump | 29,5 | |
| Chain guide No. 1 x cylinder head, cylinder block | 9,0 | |
| Chain tensioner shoe x cylinder head, cylinder block | 19 | |
| Timing chain guide x crankshaft bearing cover | 9,0 | |
| Timing chain cover x cylinder head, cylinder block | Bolt A (head: 10mm) | 9,0 |
| Bolt B (Head: 12mm) | 25 | |
| Bolt C (Head: 14mm) | 55 | |
| screw | 11 | |
| Serpentine Belt Tensioner x Timing Chain Cover | 59,5 | |
| Right engine mount bracket x timing chain cover | 55 | |
| Crankshaft pulley x crankshaft | 180 | |
| Oil pan x crankcase with stiffeners | Bolt nut | 9,0 |
| Cylinder head cover x cylinder head | Bolt A | 11 |
| Bolt B | 14 | |
| screw | 11 | |
| Engine Wiring Harness x Cylinder Head Cover | 8,4 | |
| Support roller bracket x cylinder block | 60 | |
| Front engine mount x front cross member | 95 | |
| Front engine mount | Pinch bolt x nut | 145 |
| Right engine mount x body | 95 | |
| Right engine mount x engine mount bracket | Nut A | 95 |
| Nut B | 52 | |
| Radiator expansion tank x right radiator support, right engine mount | 5,0 | |
| Engine cover No. 1 x cylinder head | 7,0 | |
Repair and service
Maintenance of the Toyota 2AZ-FE power unit consists of timely replacement of consumables.
It is recommended to change the engine oil and oil filter at least every ten thousand kilometers.
The oil pump is located in the crankcase and is driven by an additional chain.
Adjusting valves on 2AZ is not a simple operation. Not every service will undertake such work, and where they do it correctly, they will ask for quite a small amount. Therefore, owners often neglect this procedure.
If excessive vibration occurs and the smooth operation of the 2AZ-FE engine is disrupted, you will need to check the condition of the balancing shafts. They are located in the engine crankcase.
Repairing a 2AZ-FE series engine requires significant investment. When observing wear and tear on individual engine elements, engine capital repairs involve a complete replacement of the power unit. Many car owners solve the problem by purchasing a contract 2AZ-FE engine.
Replacing the timing chain
The timing chain on the 2AZ-FE power unit is replaced as the main elements included in the gas distribution mechanism wear out. The cost of the original repair kit is very high, so it is more rational to use analog options. Their price can range from 3,500 to 10,000 rubles. Produced by the Japanese company OSK. You will also need to purchase engine oil, an oil filter and sealant. The purchase of these materials will cost three thousand rubles. When replacing the timing chain in service centers, the cost of the work will be about 12,000 rubles.
When replacing the timing chain, it is necessary to match all the marks provided in the 2AZ-FE engine. With their help, the following elements are set in relation to each other:
- crankshaft pulley with a zero mark on the frontal part;
- camshaft sprockets with camshaft bearing caps;
- intake and exhaust camshaft sprockets.
Body
Bumper, Front Bumper, Washer Cap, Rear Bumper, Bumper Grille, Bumper Absorber, Bumper Molding, Rear Bumper Molding, Front Bumper Molding, Bumper Skirt, Rear Bumper Skirt, Front Bumper Skirt, Bumper Reinforcement, Bumper Bracket, Bumper Cover, Rear Cover Bumper, Front bumper cover, Bumper cover, Bumper mount, License plate frame, Fender, Front fender, Rear fender, Fuel filler flap, Fender liner, Front fender liner, Rear fender liner, Fender cover, Fender molding, Fender mount, Fender arch, Hood, Hinge Hood, Hood Cable, Hood Insulation, Hood Seal, Hood Hook, Hood Support, Hood Damper, Trunk, Trunk Damper, Trunk Door, Trunk Button, Trunk Latch, Trunk Lid, Trunk Trim, Trunk Shelf, Trunk Seal, Trunk Support, Doors , Front door, Rear door, Door trim, Door molding, Door handle, Window lifter, Door hinge, Door seal, Door limit switch, Mirror, Side mirror, Left mirror, Right mirror, Mirror element (glass), Mirror button (adjuster), Mirror cover, Mirror cover, Mirror turn signal, Glasses, Windshield, Rear glass, Rear window defogger button, Door glass, Glass seal, Glass molding, Frame, Windshield wiper, Washer reservoir, Washer motor, Wiper motor, Washer nozzles, Trapezium, Motor Windshield wiper, Wiper rod (drive), Wiper blades, Wiper rubber, Lock, Door lock, Lock set, Central locking, Central locking button, Ignition switch, Ignition key, Trunk lock, Fuel tank lock, Hood lock, Lock cylinder, Trim, Grille radiator, Emblem, Air intake (jabot), Mud flaps, Roof molding, Door sill, Arch extension, Panels, Radiator panel, Headlight frame, Threshold, Rear panel, Underbody, Trunk floor, Roof panel, Radiator protection, Side members, Nameplate, Sidewall, Battery mount, Noise insulation, Fasteners, Clips, Pistons, Hatch, Hatch button, Elastic elements
List of car models in which it was installed
The 5S FE inline naturally aspirated engine was used exclusively in Toyota cars for foreign markets:
- Celica ST184 – 5th generation, wide liftback GT-S for Hong Kong, Thailand and North America, FWD or 2WS drive;
- Celica ST184 – 5th generation, liftback, convertible and coupe in SX and GT bodies for Australia, Canada and the USA, 2WS or FWD drive;
- Celica ST204 – 6th generation, convertible, coupe and liftback in GT, ZR, SX-R and SX bodies for New Zealand, Australia, North America, front-wheel drive or all-wheel drive;
- Camry/Scepter – 3rd generation, sedan and station wagon, assembled in Japan, USA and Germany;
- Windom/Lexus ES – 3rd generation, increased body dimensions, 1991 – 1996;
- Camry Solara - 4th generation, coupe, manufactured in Cambridge (Canada), 1996 - 2001;
- Camry Avalon – 4th generation, Luxury class, sedan body, extended wheelbase;
- Camry Gracia – 4th generation, luxury equipment, manufactured in Japan;
- MR2 – 2nd generation, G-Limited equipment, targa or coupe body, 1990 – 1999;
- Scepter – sedan, station wagon and coupe;
- Harrier/Lexus RX – mid-size crossover, 1997 – 2001;
- Mark II Wagon Qualis – 5th generation, station wagon, rear-wheel drive.
Toyota Camry Gracia
In subsequent generations of the same cars, fresh series of Toyota engines were used.
Engine bolt tightening torque 2az
Replacing the cylinder head cover gasket
To complete the task you will need tools: wrenches 14, 13, socket heads 10, 14, 19 and screwdrivers
We prepare the car for the task and remove the negative terminal from the battery
Removing the decorative engine cover
Disconnect the crankcase ventilation system hoses from the cylinder head cover pipes.
Removing the ignition coils
Unscrew the bolt securing the engine management system wire holder and move the wire harness to the side
We also unscrew the bolt securing the engine compartment wiring harness holder and move the harness to the side
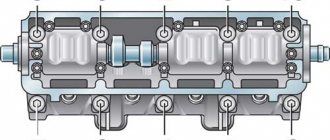
Unscrew the eight bolts securing the cylinder head cover and remove the cover
We remove the gasket and the rubber sealing gasket for the spark plug holes from the grooves in the cover.
We clean the cover groove and the mating surface of the cylinder head from any remaining oil.
Install new cylinder head cover gaskets and parts in reverse order
Required Tools
Adjustment of 3S-FE valves is impossible without previously prepared tools. To carry out the work you will need the following tools:
- micrometer;
- a set of styli, especially those with smaller pitches are of interest;
- tweezers with a curved tip;
- adjusting washers;
- screwdriver;
- flashlight.
Before starting work, remember that the car engine must be cold to accurately measure and adjust the gap.
This is interesting: Replacing the front wheel brake caliper