Motorists often encounter this problem: out of the blue the battery icon lights up. Sometimes this signal passes on its own or does not make itself felt for a long time. However, this problem should not be underestimated. It can be easily solved, because the problem is most often associated with the generator brushes or drive belt. They are quite easy to repair, but workshops sometimes charge a lot of money to remove the generator. To avoid unnecessary expenses, you can remove the generator yourself or change the drive belt. Let's discuss this using the example of the Toyota Land Cruiser Prado.
Payment via Yandex Cashier
After selecting payment via Yandex, the Yandex Cashier payment system will launch, where you need to select a convenient payment method (bank card, QIWI, Yandex Money account, etc.)
After specifying payment details and confirming payment, payment for the goods will occur.
If you have a bank card in a currency other than the ruble, then the money will be debited from the card at the rate of the Central Bank of Russia at the time of the purchase.
This payment method is optimal for residents of Russia, Kazakhstan and Belarus.
Official website of the Yandex Kassa payment system https://kassa.yandex.ru
Repair options for Toyota electric generators
In our workshop
You come by car or bring it by tow truck at any time convenient for you, we remove, repair and install the generator in the workshop.
With the visit of the master
Initial inspection and troubleshooting on site, then delivery of the generator to the workshop and after repair, the technician returns, installs the generator and checks the operation.
You can choose any option convenient for yourself: if Toyota Land Cruiser Prado
can move independently (problems with undercharging, or a freshly charged battery is installed, which is enough for the road), it would be more profitable to contact a workshop for repair of the auto-alternator. Otherwise, it is more convenient to call our technician to the parking lot or garage where the car is parked, so as not to call a tow truck.
Payment via Portmone
After selecting payment through Portmone, the payment system will launch, where you need to select the payment method: bank card or Portmone account.
The price in the Portmone payment system is converted into dollars at the exchange rate of the Central Bank of the country where you are located.
If you have a bank card in a currency other than the dollar, then the money will be debited from the card at the rate of the Central Bank of your country at the time of the purchase.
After specifying payment details and confirming payment, payment for the goods will occur.
Official website of the Portmone payment system https://www.portmone.com
Payment via PayPal
After selecting payment via PayPal, the PayPal payment system will launch, where you need to select the payment method: bank card or PayPal account.
If you already have a PayPal account, then you need to log into it and make a payment.
If you do not have a PayPal account and you want to pay using a bank card via PayPal, you need to click on the “Create an Account” button - shown with an arrow in the picture.
PayPal will then prompt you to select your country and provide your credit card information.
After specifying the information required to make the payment, you must click on the “Pay Now” button.
Official website of the PayPal payment system https://www.paypal.com
Payment via WebMoney
After selecting payment via WebMoney, the payment system will launch, where you need to select the payment method: bank card or WebMoney wallet.
If you already have a WebMoney wallet, then you need to log into it and make a payment.
If you do not have a WebMoney wallet and you want to pay in another way, you need to select any of the methods that WebMoney offers and make the payment
After specifying payment details and confirming payment, payment for the goods will occur.
Official website of the WebMoney payment system https://www.webmoney.ru/
Downloading a book
After successfully completing the payment (by any method) and returning to the KrutilVertel store from the payment system website, you will be taken to the successful payment page:
On this page you need to indicate your e-mail, where access to download the book will be sent.
If you are already registered on our website, then simply follow the link to your personal account.
The book you purchased will be in your personal account, from where you can always download it.
Please note that after making the payment, you need to return back from the payment system website to the KrutilVertel website.
If for some reason you did not return back to the site and closed the payment system tab with a message about the successful completion of the payment, please let us know - we will send you a letter indicating access to download the book.
Problems when paying with bank cards
Sometimes difficulties may arise when paying with Visa/MasterCard bank cards. The most common of them:
- There is a restriction on the card for paying for online purchases
- A plastic card is not intended for making payments online.
- The plastic card is not activated for making payments online.
- There are not enough funds on the plastic card.
In order to solve these problems, you need to call or write to the technical support of the bank where you are served. Bank specialists will help you resolve them and make payments.
That's basically it. The entire process of paying for a book in PDF format on car repair on our website takes 1-2 minutes.
SUVs Toyota Land Cruiser Prado series 150 are fourth generation vehicles. The weak point of the 3-liter turbocharged diesel engine is the timing belt drive. If it breaks, it will damage the motor. Timely replacement of the timing belt on a Prado 150 diesel 3 liter can save you from costly engine repairs.
How to remove a generator on a Prado 150 diesel
The step-by-step process of dismantling the “genes” on the Prado 150 is similar to the procedure for removing the Prado 120 4-liter generator:
- Remove one wheel on the right and the battery.
- To prevent a short circuit, isolate the positive terminal.
- Remove the 140A fuse (ALT).
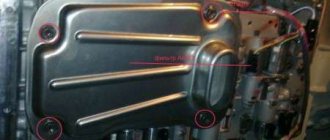
- Unfasten the plastic curtain covering the engine compartment (3 latches are removed, the 4th remains to support the part so that it does not get lost).
- Remove the plastic cap covering the outlet.
- Spray the nut with WD-40.
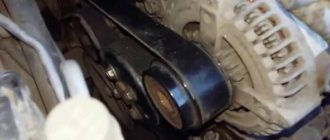
- While it is soaking, start unscrewing the bolts with a wrench (socket wrench or socket wrench 14). Rotate clockwise to remove the tension roller from below.
- The lever locks, so a block is placed where the battery was located to stop it.
- Remove the belt from the generator pulley.
- Unscrew the nut (with a 10mm wrench) from the output winding of the device.
- Disconnect the wire along with the terminal from the “genes”.
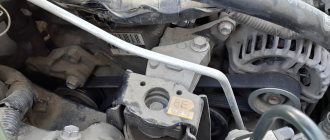
- Unscrew the 2 fastening screws with a ratchet wrench.
- Remove the large bolt.
- Unscrew the lower mount away from the wheel.
- Remove the top bolt using an extended socket wrench (6 cm).
- Disconnect the connector from the "genes".
- Remove the generator on the Prado 150 diesel from the screw (rocking).
- The “gena” is removed from the wheel installation side. If the hose gets in the way, it is moved upward.
When to change the timing belt
In the technical operation manual for the Prado 150 diesel 3 liter engine, the timing belt resource is 120 thousand km. Information that it is time to change it is reflected on the dashboard (the corresponding sign is highlighted).
Replacing the timing belt on Toyota Land Cruiser Prado 150 (diesel):
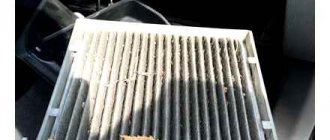
- worn surface (cracks, delamination),
- traces of oil.
To avoid the risk of breakage, the element must be changed at 100 thousand km. It is necessary to use original spare parts.
What is a generator and why is it needed?
The operation of the generator on the Toyota Corolla is necessary to ensure an uninterrupted and timely supply of current with a certain power. In addition, during operation it must also charge the battery.
Malfunctions in the operation of the Toyota Corolla 120 body generator and all other models can be eliminated either with your own hands or with the help of the experience of service station specialists. Usually, with low mileage on models starting with version E11, which is about 50 thousand km, you will have to replace the alternator belt or tighten it, and carry out other repair work to ensure normal and efficient operation of the unit.
Belt replacement instructions
Auto repair shops offer a service for replacing the drive part and roller. The cost of work is 3000–5000 rubles. The price of a repair kit for the Prado LC is 6–7 thousand rubles. It includes a roller, a hydraulic tensioner, a tension roller bolt, and a toothed belt. You can buy spare parts yourself.
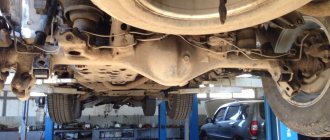
Replacing the Prado 150 (diesel) timing belt with your own hands (removing and installing the spare part) takes a little time. It will take 1–1.5 hours to change an element:
- Drain the coolant. Remove the trim (lower) from the bumper and the engine crankcase protection.
- Unscrew the fan diffuser. To do this, you need to remove 3 bolts and remove the power steering fluid reservoir. Disconnect the hoses from the radiator (bypass system). Remove the expansion tank (secured with 2 bolts). Loosen the nuts that hold the fan. Remove the drive part of the attachments. Remove the diffuser mounting bolts and fan nuts. Remove the elements (diffuser, fan).
- Remove the pulley from the fan.
- Remove the cover from the timing belt drive. Remove the retaining devices from the cooling system hose and wiring. Unscrew the cover (held on by 6 bolts).
- Remove the drive belt. You need to turn the crankshaft clockwise until the timing marks on the Prado 150 align. Remove the tensioner and belt. To avoid damaging the pistons and valves when turning the camshaft with the part removed, you need to turn the crankshaft in the opposite direction (counterclockwise) 90 degrees.
- Fill with coolant. Check for leaks.
- Installing a timing belt drive (Prado):
- When installing, align the marks. Using a press, insert the plunger (part of the tensioner structure) into the body until their holes align. When compressing the plunger, keep the tensioner vertical. Insert the pin (diameter 1.27 mm) into the hole. Move the roller to the belt and install the tensioner on the engine. Tighten the fastening bolts. Remove the tensioner clamp (rod). Make 2 full turns of the crankshaft (360+360 degrees), check the alignment of the marks.
- Install the belt cover. Tighten the fastening bolts (6 pcs.). Install the wiring holder. Secure the cooling system hose.
- Install the fan pin and diffuser.
- Connect the oil cooler pipes (on models with automatic transmission).
On the dashboard you can set information at what mileage to replace the Prado 150 (diesel) timing belt, it will be necessary.
The information on the display about the need to replace the timing part is not automatically reset. Removal is carried out manually.
- Turn on the ignition.
- On the display, use the button to switch to odometer mode (ODO).
- Press and hold the button.
- Turn off the ignition for 5 seconds.
- Turn on the ignition while holding the button.
- After updating the system, release and press the ODO button (the number 15 will be displayed, which means 150,000 km).
- Short press to set the required numbers.
After a few seconds, the timing drive system will confirm the operation.
The car owner must ensure that the drive belt is in good condition. It must be changed in accordance with the regulations. Wear and breakage of the element will lead to breakdown of the SUV (pistons and valves are deformed when they meet).
There are quite a lot of posts on the topic of replacing the drive belt. I just want to share some observations about replacement parts.
Based on one of the recommendations, I ordered bearings for the rollers and the belt itself.
I decided to change everything, because sometimes when starting the engine, a rustling characteristic of the drive belt rollers could be heard from the engine for some time, for 2-3 minutes.
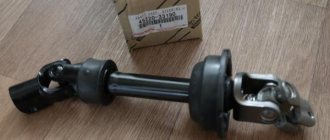
I took the original belt 9091602513 for 1594.11 rubles. I must say that after 11 years and 150,000 honest miles, the original belt looked pretty decent. There were no visible cracks or signs of wear. The only thing that made it different was that it was new: it stretched a little and was visually a little longer when applied to the new one.
I bought bearings KOYO 63012RSCM - 4 pieces for 237.48 rubles. and one bearing NSK B17123T1XDDG8C3E01 for RUB 900.74.
The original bearings had slightly different markings.
4 pieces in rollers were KOYO 630IRDH. The ones I took to replace the 63012RSCM are completely identical in size.
But the tension roller bearing turned out to be 1 mm narrower. The thickness of the original NSK 30BD5222DUM (another marking EPBD17-29 - I don’t know what it means) has a thickness of 22 mm. And the bearing purchased to replace B17123T1XDDG8C3E01 has a thickness of only 21 mm. It stood up normally, I hope it fits well, but it seems to me that in a good way everything should be identical to the original installed at the factory.
The engine of the car is 1KDFTV 3000CC DIESEL TURBO.
If possible, choose bearings by original number.
The replacement itself is not a complicated and quick process. For convenience, I unscrewed the radiator cooling impeller and placed it in the recess of the radiator casing.
Generator operating principle
It doesn’t matter which car you take, all of them, including the Toyota Prado, have technical content. This includes a generator. It is very important what condition this part of the car is in, because the operation and movement of the car depends on it. Therefore, every driver should know how to remove the Prado 120 generator.
Consider the functions of a generator in a car:
- Charges the battery.
- Provides power to the vehicle.
This part wears out quite often, which is why it must be replaced. It's just a matter of time.
IMPORTANT! The generator itself notifies about problems inside with the help of characteristic noise (creaks, knocks).
Before you get a generator, you should protect yourself:
- The engine must be turned off.
- We put on a mask and gloves to protect our hands and face.
- To avoid getting an electric shock, disconnect the wire from the battery.
- We put the car on stands.
Now you need to put together the necessary tools and materials. You will need a set of ratchet wrenches, including long wrenches. A substance such as WD-40 will also come in handy.
DIY generator repair
A generator is a device that converts mechanical energy into electrical energy. Thanks to the presence of this device, all vehicle systems work properly. In addition, it is the generator that charges the battery in the car and powers the power unit.
Taking this into account, it is necessary to understand that a breakdown of the generator leads to the fact that the battery does not receive the required charge, which can cause serious problems.
For this reason, many motorists repair the generator with their own hands in case of various malfunctions. Let's look at typical generator malfunctions.
Common breakdowns
As a rule, the presence of malfunctions in the generator is indicated by the following:
- the generator provides insufficiently high voltage;
- the corresponding indicator lights up on the instrument panel;
- the generator does not generate electricity at all;
- extraneous sounds that appear during generator operation.
Preventive actions
Before you start repairing the generator yourself, we recommend that you check this device, for which you need to disassemble it. Even before this, it is advisable to make sure that the alternator belt is tensioned (for more information on how to tension and replace the alternator belt, read the corresponding article).
To check, press on the central part of the belt with your finger. If the belt is properly tensioned, it will drop a maximum of 5 mm. If the belt was installed recently, it should bend only 1-2 mm.
note
Insufficient tension indicates belt wear. In such cases, tighten the alternator belt. In addition, prevention consists of rotating the tension roller of the generator.
If extraneous noises and squeaks appear during this, you will have to use oil or replace this element.
Checking the generator status
In order to determine the technical condition of the device, you must prepare the following:
Voltmeter. Ammeter. Rheostat.
To determine the rotor speed, you will have to use a tachometer (if this device is installed on the instrument panel near the speedometer, you are in luck). If the generator is working properly, this figure will be at least 2 thousand revolutions per minute.
In what cases is generator repair necessary?
First, we will mention some factors that can lead to failure of the device in question. If your car's alternator is not producing a charge, the most likely reasons are the following:
- wear or damage to the generator brushes;
- winding short circuit or break in the rotor or stator circuit;
- poor contacts or fuse failure;
- regulator relay failure.
In most of these situations, you will have to buy new elements of the device and replace them. And for this you need to know how to disassemble the generator.
First you need to remove the brush holder, as well as the voltage regulator (to do this, carefully unscrew the corresponding fasteners). Pull out the tension bolts, as well as the cover and stator.
Remove the cover, having first disconnected the phase windings from the terminals located on the rectification unit. Remove the pulley mounting nut and the pulley itself from the shaft.
Remove the generator cover (you will need a suitable puller).
Do-it-yourself repair of basic generator faults
If the winding is short-circuited, replacing the element will not be possible. If the winding breaks, it can be restored or new wires installed. Often the problem occurs near the slip rings.
In addition, failure can be caused by unsoldering one of the ends of the winding. To get out of the situation, we unwind the turn in the break zone from the rotor winding.
After this, we remove the broken part of the winding from the slip ring and solder the previously unwound wire to this place. If the wire is simply unsoldered, you just need to solder it back.
If the generator provides an excessively strong or weak charge, the relay must be replaced. If, when checking the voltage, you are convinced that the generator is working normally, but the light on the instrument panel is on, this may indicate that the corresponding diode has burned out. These diodes are located in the generator; to replace them, the device will have to be disassembled.
As you can see, it is quite possible to repair a generator yourself. To do this you only need to have certain knowledge and a few skills. When checking and replacing individual elements of the device, we advise you to adhere to basic safety rules.
Many motorists are faced with the problem of a whistling alternator belt. Read about eliminating it in one of our articles.
Removing the generator of a Toyota Land Cruiser Prado
The sequence of steps is as follows:
- We remove the wheel on the right and the battery.
- We separate the positive terminal to avoid short circuiting.
- We take out the 140A fuse.
- We unfasten the plastic curtain that hides the engine section (there are 4 latches, one of them cannot be pulled out, because it will hold the parts).
- We move aside the plastic cap that closes the passage.
- Lubricate the nut with WD-40
- Take the key and unscrew the bolts (key 14). Move the tension roller to the side at the bottom.
- Remove the drive belt.
- Remove the nut (key 10).
- We separate the terminal and wire from the generator.
- Remove 2 screws from the mounting.
- Move the big bolt.
- In the direction of the wheel, remove the lower mount.
- Remove the top bolt using a long wrench.
- We separate the socket from the generator.
- While shaking, remove the generator. It is pulled out from the wheel side. If something gets in the way, just move it aside.
That's it, the removal process is over.
To install the generator, you need to do all the steps described above, only in reverse. After completing the assembly, remove the tools.
ADVICE! In order to avoid any problems with your car, do regular preventive inspections of your car.
Required Tools and Precautions
Modern cars operate with the appropriate electrical equipment. The car owner is forced to understand the design features, know the operating principle of the device that supplies the equipment with electricity, and be able to remove the Prado 120 4 liter generator.
- recharges the battery;
- powers the electrical equipment of the vehicle.
Since components and parts of vehicles wear out, removing and replacing the generator on Toyota Prado lj78 and other models becomes a matter of time.
Mechanical problems with the “genes” are indicated by the appearance of a characteristic noise.
When preparing for dismantling, it is important to take the following precautions:
- turn off the engine;
- protect your face and hands by wearing a mask and gloves;
- disconnect the wire from the negative terminal of the battery so as not to receive an electric shock;
- After jacking up, place the car on stands.
To work, you need to prepare tools and auxiliary materials. The technician will need a set of socket and socket wrenches with a ratchet, including extended ones, as well as WD-40.
Replacing the alternator belt
The belt must be replaced every ten years. Over time, it simply dries out, tears and may burst. Obvious cracks appear on it, but it is better not to let it reach this state. This is also true if you decide to go on a long journey. Before doing this, it is better to check the belt so that problems do not arise along the way. Another reason to replace the belt occurs in winter, when it starts to creak. This happens because dirt accumulates in the streams and cannot be cleaned out. It can be easily seen as it shines.
ADVICE! The Toyota Prado 120 belt needs to be removed from below due to the tight tensioner. If you do this from above, then the expansion barrel may interfere with you, and not all keys will fit there. It turns out to be very inconvenient for work.
Now let's move on to the removal steps:
- Remove the front protection of the car.
- We look for the bolt on the tensioner and, using a spanner, press it.
- The tensioner moves away and a bolt pops out, which needs to be pressed and supported.
- After this, remove the bypass belt.
To install the belt, follow the steps below:
- Place a new belt under the fan.
- We pull it onto the tensioner.
- Using a spanner, turn the tensioner, remove the stop by pulling out and removing the bolt.
Characteristic symptoms of a breakdown of the Toyota Land Cruiser Prado generator
Typical signs indicating the need for unit repair or replacement:
- Obvious overheating of the generator (burning smell, darkening of the stator windings)
- No charging only at low or all speeds
- Increased level of mechanical noise, varying in proportion to engine speed and load on the unit: wear of bearings, brush assembly, mechanical damage to the rotor
- Obvious damage: cracks in covers, mounting brackets, play of the drive pulley or its runout when rotating
- “Floating” faults (short-term blinking of the warning lamp when the engine is running, without a clear system)
Repair of generator for Toyota Land Cruiser Prado 150, -150, 120
easy on site in case of typical malfunctions and availability of spare parts to be replaced. The technician will conduct initial diagnostics, remove the generator, replace defective parts, install the unit back and check its operation.
In case of serious damage, when the amount of work and spare parts to be replaced is comparable to the installation of a new or contract electric generator for a Toyota Land Cruiser Prado, it is more advisable to replace the assembly.
Source