Replacement of attachment drives should be carried out as part of Camry maintenance. This rule is true for all cars, regardless of year of manufacture, manufacturer, or operating conditions.
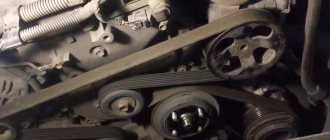
Location of attachment drives (belt) on Toyota Camry
To change the belt on a Camry , there is no need to contact a service center at all - the car owner can easily do it himself. But if the Camry is under warranty, you need to resort to the services of an authorized service - otherwise the car will be removed from service.
How to determine if a generator is broken
Most often, a malfunction of the generator and other elements associated with them can be determined without even looking under the hood. If there is insufficient charging from the generator, then with the engine running (at idle) when additional units are turned on, their operation will not be the same as it should be on a working car. So, when you turn on the headlights, the light from them will be dimmer than usual, and activating the air conditioner or heater can lead to a noticeable drop in engine speed (even stopping the engine).
Another way to determine malfunctions associated with the generator is a control lamp and voltmeter needle/readings (on the Camry 40 model there is no analogue voltage monitoring device-arrow, but this information can be displayed on the display).
A dim glow of the indicator may indicate problems associated with poor contact in the electrical wiring of the control lamp power circuit or a malfunction of the rectifier unit. If the indicator does not light up at all when the engine is turned on, this may indicate a breakdown of the generator, poor contact or faulty electrical wiring (fuses, switches). Often this may indicate a malfunction or the use of a low-quality (discharged) battery.
Signs of trouble
Now the Camry 30 is losing interest among consumers. And there are still not many owners of Toyota Camry 50 (7th generation). And most of them, in order not to take risks, prefer to be serviced at service centers.
There is enough information about the Camry 40 to master a whole range of repair and restoration work carried out on your own. The generator does not have the most complex device. At the same time, Toyota is able to independently signal that a malfunction has occurred in the unit in question.
Often, indirect signs indicate system problems. To determine them, it is not necessary to open the hood. If the generator does not provide the required charge and also cannot fully power the electrical systems, then this will be noticeable when the engine is running. The headlights do not shine so brightly, the battery is in a constant state of undercharging. The multimedia system and other consumers may turn off.
If you turn on the heater or air conditioner while the car is running, the engine speed may drop noticeably. Moreover, in some cases this leads to the car stalling.
One more feature. The problems described above may disappear if you just raise the speed above 2000 rpm.
Battery light on dashboard
Another sign is a hot warning light with a battery icon on the dashboard. If it lights up and does not go out, or flashes when the engine is running, then there is a problem in this unit.
Also, do not forget that when the belt wears or stretches, a characteristic whistle begins to be heard from under the hood.
When should you change the alternator belt?
The frequency of replacing the electric generator drive belt is indicated in the vehicle maintenance instructions. It should be remembered that the period on the same machine supplied to different markets may differ. This is due to different climatic conditions and dust levels in the air, which additionally destroy the material of the product.
For example, the Volvo company recommends making an initial replacement after 80 thousand km, and each subsequent change is performed after 60 thousand km. At the same time, on cars from the European market, the belt is changed every 180 thousand km. On VAZ cars, the product rarely lasts more than 30 thousand kilometers.
A typical sign of a stretched belt is a whistling sound that occurs when starting the engine or after driving through a puddle. The source of the sound is the strap material sliding along the surface of the pulley. Usually the whistle quickly disappears and appears again when starting the engine or after another puddle. In this case, the owner needs to check the belt tension and try to bring it to the standard.
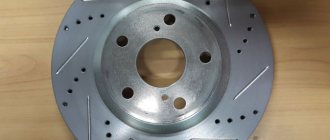
Worn belt (right)
What affects wear?
Factors influencing the life of the drive belt:
- Product operating conditions. The ingress of dust, abrasives or chemicals will significantly reduce the life of the strap. Long-term use at low air temperatures has a negative effect on the material.
- Condition of pulleys. The appearance of beating or deformation leads to the destruction of the tracks and edges of the belt.
- Tension. If the tension is too low or too high, the belt will wear out at an accelerated rate.
- Belt release date. Rubber is susceptible to aging, so the strap may break down while in packaging in the warehouse. Violations of storage rules have an additional negative impact.
- Belt manufacturer. There are products made by small companies from low-quality materials. Such straps can break after several thousand kilometers.
Signs of belt wear and product replacement are demonstrated in a video filmed by Vladimir Bazekin.
Assembly
Assembly is much easier, do everything in reverse order. The noise should disappear if its cause is eliminated.
It is important to ensure that the brushes purchased are suitable for the car. The standard configuration of the car and the extended one with a large number of additional equipment have different generator power.
Replacing the overrunning clutch
Replacing the alternator overrunning clutch is quite simple. The pulley should be disassembled by removing the part from the car. It is important to replace the clutch cover to avoid future breakdowns.
Instructions for replacing the drive belt
Replacing the alternator drive belt does not cause problems for most car enthusiasts. After removing a worn strap, it is recommended to inspect the wear pattern. If there is damage to the edges and contact part, this may indicate misalignment of the pulleys. In this case, you need to find the damaged element and replace it. Installing a new belt on a damaged pulley is pointless, since the rubber will quickly wear out on sharp edges. When replacing a belt, you must follow the sequence of steps recommended by the vehicle manufacturer.
When replacing the alternator drive belt, it may be necessary to install a new tension pulley and associated fasteners. Information on the list of parts to be replaced can be found in the vehicle repair and operating instructions.
What will be needed for replacement?
Before changing the alternator belt, you will need to prepare a set of tools and materials (the maximum list is given):
- wrenches and sockets;
- new belt and tension roller;
- rod for fixing the roller;
- mounting blade for removing the belt;
- knife;
- protective gloves;
- a sheet of paper and a pencil for drawing an installation diagram.
A new non-original drive belt may be several millimeters longer than the standard product. The difference in length will be compensated by a tensioning device.
Scheme
Installing the belt on engines with two or three pulleys is not difficult. The situation changes when the belt is installed on a motor equipped with a large number of pulleys. In this case, it is recommended to draw a diagram of the installation of the product. Such an event will speed up the installation process and avoid errors.
Example of belt routing on a Chevrolet Cobalt
Circuit designations:
- 1 — crankshaft pulley;
- 2 — generator pulley;
- 3 - guide roller;
- 4 — air conditioning compressor clutch;
- 5 — pump pulley and additional drive pulley for the amplifier pump;
- 6 — belt;
- 7 - tension roller.
Algorithm of actions
The procedure differs depending on the engine design and the number of attachments. Below are step-by-step instructions for replacing belts on common vehicles. On other vehicles, the operation uses similar technology.
By car VAZ Granta
You can replace the belt on a VAZ Granta car without a tensioner according to the following algorithm:
- Cut off the old strap using a knife.
- Turn the generator mounting bolt from below 3-4 turns.
- Unscrew the top mounting bolt completely and remove it from the hole.
- Push the generator forward until the mounting ear is inserted into the bracket.
- Secure the mechanism with wire or other means.
- Place the belt on the alternator pulley and the top of the crankshaft pulley. Some car owners use an additional device that holds the strap on the device while putting it on.
- Turn the motor shaft with a wrench to fully install the belt.
- Fix the generator in its original place. Check the operation of the components at full load of the generator and at different crankshaft speeds.
On Kia Sid
You can change the alternator belt as follows:
- Remove the fixing bolt located on the top of the generator.
- Lift the clamp up, removing the bolt from the guide groove.
- Rotate the device relative to the bottom bolt. If the mount is “stuck”, then the generator is turned by light blows with a hammer applied through a wooden block.
- Remove the worn belt and pressure roller.
- After this, you need to mount a new roller and only then can you put on the belt.
- Tension the strap as recommended in the operating instructions. Check the operation of the unit, if a whistle appears, increase the tension slightly.
For Volkswagen Polo Sedan
An example of replacing a belt on a Volkswagen Polo Sedan engine equipped with an automatic tensioner:
- Loosen the belt tension by releasing the tension roller fixing bolt. Nut size 16 mm.
- Turn the roller mounting bracket counterclockwise. Turning takes place with effort as the tension spring is compressed.
- Carefully remove the belt from the crankshaft pulleys and drive units.
- Remove the roller using a 16 mm socket inserted into the recess under the generator. If the tension roller does not change, then it is fixed in the spin position using a metal rod inserted into the hole in the housing.
- Place the belt on the pulleys, then carefully release the tension roller. The tensioner automatically adjusts the tension level of the product.
Why do you need to change
First, we need to explain why this procedure is so important. Over time, belts stretch, causing them to slip on the pulleys. This leads to inefficient operation of the attachments, which is reflected in the following:
- weak generator tension causes insufficient current production, which leads to battery discharge;
- insufficiently tensioned power steering causes the steering wheel to become “heavier”, which leads to a decrease in controllability;
- weak air conditioning compressor drive. This malfunction leads to ineffective operation of the climate system.
Before changing the belt on a Toyota Camry , you need to check its tension. It is quite possible that it simply stretched out, but did not wear out. In this case, it is enough to tighten it, following the instructions in the operating manual.
Worn belt on Toyota Camry needs to be replaced
When adjusting the drive, it is extremely important not to over-tighten it. This will lead to destruction of the attachment bearing or damage to the belt itself.
The tightening torque can also be found in the Toyota Camry repair and operating instructions.
Belt replacement procedure
Before changing the alternator belt on a Camry, you need to stock up on the following tools:
- open-end wrenches for 12 and 14;
- head at 22;
- powerful socket wrench.
Depending on the specific type of engine, either one or several belts may be used to ensure the operation of the attachment.
For example, on a Camry with a 2.4-liter engine, only 1 poly-V belt is used, the adjustment of which is ensured by the tensioner. It also needs to be changed when replacing the drive. In addition, before changing the alternator belt on a Camry 2.4 liter, you need to prepare a jack. The fact is that when unscrewing, the tensioner bolt rests against the Camry spar, and in order to change it you will have to lift the engine.
On older engines with several belts, you can change them as follows:
- The tension adjustment bolt is fully tightened.
- The drive is carefully pryed off with a screwdriver and wound over the edge of the generator pulley.
- Then the key cranks the engine. To do this, you need to put a 22 socket (in some engines 19) on the crankshaft pulley mounting nut.
- As the engine turns over, it will come off the generator pulley.
- The new part is installed in the reverse order.
New belt installed on Toyota Camry
Before changing the belt on a Toyota Camry in the 40 and 50 body, you must approach its purchase with all responsibility.
As practice has shown, inexpensive Chinese products can stretch significantly within the first thousand kilometers, and often the size of the tensioner bolt will not be enough to ensure normal operation of the attachment. Even if it is not possible to purchase an original, it is recommended to stick to OEM manufacturers from Japan or Germany - the quality of their spare parts is often on the same level as factory parts.
Instructions on how to change a belt on a Camry 40 with a 2.4-liter engine are as follows:
- The car is jacked up, then the right wheel is removed.
- The socket wrench is placed on a nut welded to the tensioner pulley.
- Then you need to press the roller as much as possible, and then remove the old drive by hand.
- The new one is installed on the crankshaft pulley, then on the attachment pulleys.
- The tension roller is pressed again, then the drive is installed on it. The tension is carried out automatically.
For clarity, it is recommended to watch a video on how to change the belt on a Camry 2.4 liter. - this will allow you to avoid various mistakes.
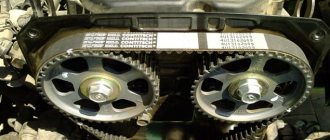
Checking the drive belt for Toyota Camry attachments
| Rice. 7.7 . Adjusting the drive belt tension |
By rotating the adjusting bolts A and C, adjust the belt tension, as shown in Figure 7.7.
Torque:
— bolt A: 17.5 Nm;
— bolt C: 58 Nm.
Video about “Checking the attachment drive belt” for Toyota Camry
Replacing the Camry v 40 (2.4) attachment belt
Replacing the alternator belt Toyota Camry 2.4 l 2AZ
Replacing the Corolla E120 drive belt
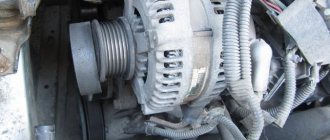
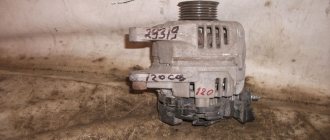
Generators for Camry
Toyota Camry 40 (generation) cars are equipped with a certain type of engine. Accordingly, depending on which engine is installed on the machine, the choice of generator will vary. Camrys that travel the expanses of domestic roads are usually equipped with two types of engines, these are:
- 2.4 liter engine, model (2AZ-FE);
- 3.5 liter engine (V6), model (2GR-FE).
Other modifications are not so often found on the domestic market and are not in great demand among car enthusiasts. Therefore, we will focus on the above common models.
The following generators are designed for engines with a volume of 2.4 liters:
- original Toyota generator (article - 2706028321), price of a new part - from 28 thousand rubles; used parts - from 5-8 thousand rubles, depending on condition;
- Denso generator (article - DAN952), price of a new part - from 10.5 thousand rubles, used parts - from 3-4 thousand rubles, depending on condition;
- generator Nipparts (article - N5112116), part price - from 8t.r.;
- generator JapanParts (article - ALT917), part price - from 8t.r.
The following generators are designed for engines with a volume of 3.5 liters:
- original Toyota generator (article - 270600P141), price of a new part - from 30 thousand rubles; used parts - from 6 thousand rubles, depending on condition;
- BOSCH generator (article - 0986UR0401), price of a new part - from 18 thousand rubles; used parts - from 4-6 thousand rubles, depending on condition;
- generator ASHUKI (article - T400-25), part price - from 8-9t.r.
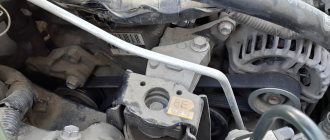
Replacing the generator and brushes
Removing the system is a matter that must be approached with caution so as not to damage the vehicle. The list of tools is small - the brush itself (new) and a full set of heads.
First you need to open the hood and find the part you need. Process:
- disconnect all wiring. The nut needs to be twisted; it is hidden behind a plastic insert;
- the required wire is secured to a special clip. It must be carefully detached from the main part;
- We also disconnect the connector for the valve;
- Next, you need to unscrew all the other nuts and fasteners that secure the installation. The fastening is a bolt, you can see it on the bar that is responsible for tensioning the battery, you need to unscrew it;
- the entire bar is also secured with a nut, unscrew it;
- Opposite the bolt, which is difficult to get to, there is an SRS sensor; it is better to disconnect it together with the clamp (2 bolts);
- All that remains is to remove the generator; now you can simply pull it up; there is nothing else holding it in place.
How to tighten a belt
If there are no cracks or tears on the surface of the belt, then you can try to tighten it. A similar procedure is relevant for Russian-made cars and foreign cars equipped with a mechanical manual tensioner, which is often the generator itself. The belt is tensioned until it stops slipping along the pulleys. At the same time, the car owner must remember that excessive tension loads and disables them.
If the tension of the strap does not allow for normal operation, the part must be replaced. It is prohibited to install spacers under the tension rollers, which will allow you to select an excessive belt length.
Principle of operation
The generator overrunning clutch is an element of the mechanical transmission of a car, which is mounted to prevent the transmission of torque between the shafts (main and driven) if, as a result of some malfunction, the driven shaft begins to gain more revolutions than the main one.
By design, the overrunning clutch does not require any control elements. It is important to highlight the structural features of the pulley - this is the presence of two parts: the outer one, which connects to the coupling, and the inner one, which communicates with the shaft. Another element is rollers. As a rule, they are installed in 2 rows. They are a specific stopping system. Essentially, the overrunning clutch alternator serves to extend the life of the overrunning belts.
One of the main sources of noise in a 2002 or 2004 Toyota Camry alternator is the belt. Replacing the belt is quite simple. You need to take the key 19 and use a special grip to press the tensioner down to move it from the roller. Then remove the generator belt itself. We take a new part and, using the same key, put everything on the structure.