There are green LEDs there. If you wish, you can resolder it.
So, the process itself:
From the bottom, right and left, unscrew the three bolts and disassemble the steering column casing into two parts.
We remove the cruise control plugs and, using T30, unscrew the two airbag bolts. Right and left.
Now we climb under the hood and disconnect the minus from the battery and wait for a minute. Then remove the black and orange terminals from the pillow terminal. First unclip the latches.
Disconnect the cruise control connector.
And carefully cut it out for the buttons..
We install the keys in place and fasten them with a bolt. We connect the connectors. And we collect the pillow. We will not connect the battery terminal for now.
This is what the connector looks like under the steering column. There won’t be enough of them, this is where the cruise control connector comes in handy. And we conjure a tourniquet.
Here is the pinout of the connector inside the pillow.
Which is what we copy below the column.
GND - ground SW1 is the radio signal +/- volume and SEEK, SW 2 is MODE,
Twelve volts can be removed from the radio.
We go to the radio tape recorder.
6 pins on the connector are GND - ground 20 is SW1 is the radio signal +/- volume and SEEK, 19 is SW 2 is MODE, + 12V I took 36 pins from the dimensions of the radio although it can be permanent there. 34 pin
We connect the whole thing under the steering wheel, secure the wiring with a plastic harness, and assemble everything. and we get control of the radio with buttons on the steering wheel!
Maintenance of an expensive jeep is the work of car service specialists. But there are things that drivers do on their own. So, removing the pads on the Prado 150 steering wheel and disassembling the steering wheel is a matter of honor for the driver.
Why disassemble the steering wheel?
The car has no minor parts or minor damage. Drivers look after the condition of the vehicle - chassis, body and interior.
The most noticeable detail of the interior is the steering wheel. It should be comfortable, beautiful and pleasant to the touch. The driver enjoys the ride and feels confident when he has a reliable steering wheel in his hands.
Keeping the steering column in good working order is part of safe driving. The linings on the steering wheel also require inspection.
They perform the following functions:
- Aesthetics. A car with a leather braid looks more solid than with a plastic trim.
- Comfort. In the summer, your hands sweat on the plastic steering wheel; in the winter, your hands get cold. Therefore, they install a leather braid in hot weather, and a fur braid in frosty weather.
- Protective cover. The cover protects the steering wheel from mechanical damage (scratches, chips). This way it will last longer, and if it was damaged, the decorative braid will hide the defect.
When dismantling the steering wheel, first remove the cover.
The steering wheel shakes in the pits
Before removing the steering column, find out why the steering wheel shakes on ruts.
- If this happens at speeds up to 100 km, the cause is sought in the wheels. The tires are worn out, or snow accumulates, which can turn into ice and unbalance the wheel.
- The front brake pads and discs are worn out. Beating is felt during braking. Change consumables, the problem goes away.
- The tips have worn off and wear has appeared on the steering rod.
- The wheel rim is damaged, the ball joint is worn out.
- Poor mounting of the engine to the housing.
Eliminate the causes, then adjust the steering column.
Steering play
This is the main reason why the steering wheel with linings is removed on the Prado 150. Free steering is characterized by the amplitude of rotation before the car begins to change direction.
Occurs due to wear of parts and the appearance of gaps that expand due to vibration during movement. Extraneous noise occurs in the engine and the wheels become loose.
Interior tuning
When they want to change the interior, they start with the steering wheel. Braids are stylish accessories; they come in leather, textured, fluffy, with inserts and in camouflage. Colors are selected to match the color of the seats or contrast.
How to remove the Prado 150 steering wheel
When the reason is determined, they begin to work in their own garage.
- First, disconnect the negative terminal of the battery.
- Find the steering wheel mount. It's under the airbag.
- The cushion is secured with two Torx T30 bolts under the plugs.
- Remove the connectors from the pillow.
- Disconnect two connectors from the cochlea.
- Unscrew the nut 19 and remove the steering wheel.
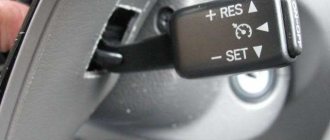
- They find the cruise control joystick and remove it too.
- Release the side covers with buttons.
- The rear casing is removed - it is held in place by latches.
How to remove the steering wheel on a Prado 150 is shown in the video.
The work is completed, the steering wheel is dismantled. Reassemble it in reverse order.
Replacing button backlight lamps on Toyota Land Cruiser Prado 120
Replacing light bulbs in the Prado 120 dashboard begins with purchasing them. You can buy them original at dealerships, but their cost will be high for this category of goods. The second option is to go to a radio equipment store and select suitable ones based on the sample.
When the supply of parts is replenished, you can start replacing the lamps. To do this, remove buttons and blocks using nylon pullers, and use a metal hook for hard-to-reach places. You need to carefully pry the buttons so that they are freed from the clamps. Some elements have their own nuances for removing them:
- The buttons in the mirror control unit are retractable and can be easily pushed out by hand.
- The suspension adjustment module is pryed off from both sides to avoid damage.
- Remove the climate control unit by unscrewing two screws and disconnecting the connector.
- When dismantling the rear air conditioning system, you need to grab the lower edge of the panel with your hands and pull without unscrewing anything. When the block is raised, you need to press the carpet. Make repairs in the resulting gap.
You may need to replace the light bulbs on the instrument panel in the Toyota Land Cruiser Prado 120. You should understand the sequence of removing the panel. But it must be taken into account that it is dangerous to carry out work during cold weather due to the fragility of the plastic. If it’s warm outside, you can begin repair work. To do this you will need a Phillips screwdriver and a 10mm wrench.
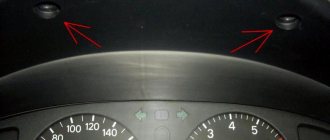
- The shield located under the steering wheel is removed; you need to carefully unhook the two latches.
- Next, remove the plug from the ignition switch, secured in the same way.
- The glass covering the panel from dust and dirt is removed.
- Unscrew the 2 screws located above the speedometer and tachometer; the cover is removed.
- A panel opens, held on by 4 more screws, which are also unscrewed. Carefully pull it out and disconnect all the wires. Replace lamps.
Read also: Shell helix hx8 5w30 4l synthetic oil
Reassembling the panel occurs in the reverse order.
Replacing button light bulbs is more difficult than on a dashboard due to the fact that there are no sockets and you need to attach the wires directly to the terminals. Such work requires diligence and patience, otherwise the fastenings can be damaged, and their restoration will be labor-intensive.
If you do not understand how the replacement process occurs or there is a simple lack of time, it is better to contact professionals at a service station.
How to disassemble the steering wheel of a Toyota Prado 150
To change it to a more convenient design, you need to disassemble the Chinese steering wheel on the Prado SUV. Algorithm of actions:
- The plastic plugs on the side of the steering wheel are pryed with an extractor and removed.
- Unscrew the torxes (bolts) on each side. They are fixed with a fastening device, so they cannot be completely unscrewed.
- Pull the Toyota Prado horn key towards you and place it on top of the steering wheel (the length of the wire is not limited). Remove the battery cable.
- Unscrew the bolts that hold the control joysticks.
- The horn is lowered from the upper to the lower position.
- The joysticks are held on the reverse side with pistons. Therefore, they are gently pulled towards themselves, slightly swaying from side to side.
Drivers with extreme driving habits replace the stock steering wheel with a sports version. It is not difficult to disassemble and reassemble the steering wheel on a Toyota Prado.
The work is done with care so as not to damage the joysticks.
How to remove buttons and covers from the steering wheel
The steering wheel of Japanese SUVs is multifunctional. The driver does not take his hands off the steering wheel, monitors the road, and controls the vehicle systems through buttons. Over time they get dirty. To clean, you need to remove the buttons on the steering wheel of the Prado 150. At the same time, change the linings.
- There is a plastic cover behind the wheel. It is held on by plugs. They need to be removed.
- Next, access to the airbag mounting bolts opens. Unscrew with a 30 serrated hex key.
- Immediately behind the pillows there are fastenings for the buttons, each with two screws. Turn out one by one.
- The last stage is to bend the button latches. Remove them and the braid.
Next, the entire procedure is carried out in reverse order.
Hello! So I decided to put buttons on the steering wheel. There are a lot of installation guides. it's simple. You only need to connect 4 wires. The only problem is finding the pins! The pins were pulled out from a cut chip in a landfill. Well, then according to the scheme: remove the pillow: pull out the plugs on the sides and unscrew 2 T30 bolts. turn off the pillow. I didn’t even remove the terminals from the Akum. remove the pillow. We screw the buttons, then pulled out the cruise pins from the original chip and stuck them into the button chip. I ordered a cover in advance from our Chinese friends for a pillow made to look like buttons. It was not easy to remove the pillow from its original cover. it took 2 people and 4 screwdrivers))) pushing it into a new cover is also not easy. You still need to drill out 4 rivets and rivet the new cover to the old pillow. Well, I think I did. we put everything in place. go ahead. Unscrew the steering casing - 3 cross-bolts. one from the bottom - you can see it, two on the sides, we twist the steering wheel 90 degrees and we see another bolt. the same thing in the other direction. there's a chip at the bottom. We insert our 4 pins into it. and drag it to the big chip under the silver molding, insert the pins there, check everything. it works, everything works) well, nishtak.)) I haven’t connected the right buttons yet. but I think I'll do it soon.
Bulbs that are installed on Toyota
Bulbs that are installed on Japanese cars
It always amazes me that sellers themselves don’t know what they are selling. If you ask for anything good, they offer the most expensive. If you want to buy a coffee grinder, they sell you a coffee machine! And when you ask for a light bulb, the seller is shocked and asks to bring a sample of the light bulb so he can sell the same one. I'm especially happy with phone calls, my lights are off here and there, what happened? Of course, the light bulbs burned out. The answer is change the light bulbs. And then a hail of questions: What kind of light bulbs do I have? Where to buy them? How to change them? How much do they cost? And how many are there? Can you imagine how a person who has never seen light bulbs, except in the entrance, needs to explain all this over the phone! Personally, I don’t know, that’s why a catalog of light bulbs will be posted here with a description and where to plug them in. For those who are especially strong and cunning, nuances will be indicated.
Headlights.
Lamp H4
used in most standard headlights, with one reflector for low and high beam. There are 2 filaments in one bulb, LOW and HIGH beam. Usually the neighbor burns out, because it works much more, and the entire lamp is changed!
Lamp H7
used in left-hand drive Japanese models as low beam and, or high beam, in separate reflectors. Can be used in fog lights.
Lamp H3
used in fog lamps. With success and minor modifications it replaces the Japanese H3B. Usually they are installed in headlights installed at the bottom of the bumper.
Lamp N3s
used in fog lamps of right-handed cars. If the fog lights are located next to the headlights.
Lamp H1
used in low, high and fog headlights. The Japanese usually have it in the fog or high beam version.
Lamp HB3 or 9005
(used in the high beam of cars. Visually, it is similar to the HB4 lamp, but there are some differences. The filaments are located at different distances from the seat. Therefore, the light beams on the road will be different. And for those who don’t care, on the base of the lamp protection from fools has been made in the form of special tides, although this does not stop people much.
HB4 lamp
or 9006 is used in low beam. The nuances are the same as described just above.
# General nuances of NV series lamps!
American and Japanese lamps visually look the same, but have some differences that do not allow them to be interchangeable.
With a little modification with a file and knife, they will fall into place, but the headlight will shine in an unknown direction. This is due to the fact that the filaments in American and Japanese lamps are shifted relative to each other by 90 degrees! Also, the fasteners of the lamps themselves are displaced, and there is another electrical connector, which does not allow you to put a chip with wires on the lamp base. The rest of the lamps.
Lamp P21/5W – two-filament
. Used in old Japanese, and some other more modern inexpensive models. It is placed on STOP + SIZE, where they are combined. Here, too, there is protection against fools, but it does not apply to the strong and inattentive. The mounting lugs are at different heights, and when installing, you need to carefully look at the socket and install the lamp correctly; if it does not fit, turn it 180 degrees. There is no need to compact P21W single-filament lamps here! Then there will be problems such that when you press the brake the lights will light up.
Lamp P21W single filament
. Used in old Japanese cars, and some other more modern inexpensive models. In STOP signals (if they are separate from the side lights), turn signals, reversing lights, rear fog lights.
Lamp W1.2W, W2.3W.
Baseless single-filament lamps with a power of 1.2 and 2.3 watts. Used to illuminate climate control (not in all Japanese models), automatic transmission control levers, and indicator lights on the instrument panel, glove compartment illumination.
In many cars since 2005, the exhaust, instrument panel and climate are illuminated by LEDs, and they are designed to last the entire life of the car.
Lamp W3W, W5W
. Baseless single-filament lamps with a power of 3 and 5 watts. They are used to illuminate the instrument panel, front markers in the headlights, direction indicators in the instrument panel, emergency fuel indicator, trunk and glove compartment lighting, and some other places. When used in instrument panel lighting, the color of the backlight is set by a rubber filter placed on it, green or blue. Keep this in mind when purchasing lamps to illuminate the shield; it is very difficult to remove old filters alive.
Lamp W18W
Baseless single-filament lamp with a power of 18 watts, with a small base like the W5W. Used only for standard additional brake lights of Japanese cars.
Lamp РY21W
single filament yellow lamp, used for direction indicators only! Mainly on cars from European manufacturers. Some handy comrades are trying to install them in Japanese turn signals. This is difficult to do, because there are special protrusions that do not allow it to be inserted instead of the P21W lamp. And during installation, the socket is damaged, and the lamp falls out of it over time.
Lamp W21/5W
double thread baseless. It is used in most modern Japanese cars, in combined brake lights and headlights.
Lamp W21W
single thread baseless. Similar in size and base to the P21/5W, it differs in the presence of only one filament. Used in direction indicators, reverse indicators, and if present, in rear fog lights.
Lamp WY21W
single thread baseless. Similar to P21W, only painted yellow (orange) and used exclusively in turn indicators, which do not have a yellow filter inside.
These bulbs are used both for button illumination and climate control illumination. The color is set by rubber filters; if there is no filter, the backlight will be yellow.
This light bulb is used in ceiling lamps. If you see such a light bulb in a store, do not rush to happily run to the cash register and pay money! First, check the length of the light bulb itself; it should be within 28 mm. If its length is 35-36 mm, then you can safely move on, today is not your day.
LED light bulbs suck! Don't even think about putting them in your car. All optics designed for light bulbs are made to work from the diffused light of incandescent lamps, which comes in all directions from the incandescent filament. LEDs have directional light, and as a result, everything starts to glow in spots. And instead of a luminous headlight measuring 10x15 cm, you get a spot with a diameter of 3 cm, which is no longer visible from 40-50 meters. The rear lenses are also not designed for LEDs. They only scatter the light that is directed at it. As a result, instead of a large rectangular stop, we get a red circle with a diameter of 5 cm. I’m generally silent about the backlighting of the instrument panel, see for yourself if you install it.
Typically, light bulbs on Toyotas last quite a long time. Unless they are made in the back alley of China. Original light bulbs last an average of 5 years or more, with the exception of headlight bulbs. And once you buy original light bulbs, you no longer have to worry about replacing them. If you want to save money, you can buy cheap light bulbs and change them yourself regularly, or pay money to have them changed for you. In order not to ruin your brain about which light bulb to put where, you need to come to the store and buy original light bulbs, the seller will look at the program and give you the ones you need. They will install without problems and you will not have to disassemble the car twice, once to remove the sample, the second time to install new bulbs.
Replacing rear lights with LED modules may cause a malfunction in the vehicle. At best, nothing will happen, if the car has a lamp health monitoring system - then it will complain that the lamps are burned out, and you will have to add an additional load to deceive the system. In the worst case, I don't know. But one of my friends' Subaru electronics began to malfunction in the transfer case, in the form of disabling the rear-wheel drive, and gave a fault code for the transfer case valve. After the incandescent lights were returned to their place, the problem disappeared.
Tags Toyota, lamps
Toyota Land Cruiser Prado 2004, engine Diesel 3.0 liter., 166 hp, AWD drive, Automatic — tuning
Comments 26
Good afternoon, can you tell me where to get the pins?
Personally, I pulled it from some BMW connector. but they still exist in the original anyway. Try googling, maybe you'll find it.
I look at the buttons from the Camry V30, they seem to be no different, they are needed for the Alphard ’06, only the numbers are different 8424433090E0 8424733060E0, I want to take the right keys as a donor, as I myself have a dummy without the ability to install keys.
Tell me, does the airbag have a polarity?
in fact there is. but you can’t confuse the chips.
That's the whole point: the chips are different. I changed the cochlea and the steering wheel, the chip is different and so is the airbag connector. From the main braid to the chip there are two wires: yellow and yellow with a black stripe; the chip that is inserted into the cushion has yellow and blue wires. I can’t figure out which wire + which -.
Do you want to receive news about new Toyota Prado tuning products, our promotions and discounts?
Confidentiality guaranteed
As equipment, we (cars) have been using equipment from one St. Petersburg company for a long time, and I must say without any complaints.
The kit contains everything needed for installation.
Two elements with spirals that are glued onto the steering wheel, a voltage converter, a button.
A pulse voltage converter allows you to regulate the current (respectively, power and heating intensity).
Well, the actual installation process.
Remove the standard trim from the steering wheel.
The heating elements themselves already have a sticky layer. However, despite this (from the experience of previous installations) we apply additional adhesive.
Next, along the two edges of the rim, we stretch and glue the heating elements.
Separate the spirals from the base and transfer them to the steering wheel.
Now that the heating elements are fixed on the rim, we mill the grooves into which the power wires will be placed (so that after the finishing of the rim they do not stick out).
We sew up the steering wheel with new leather.
The connector on the steering wheel has loose contacts. We insert the “pins” into them and connect the power supply.
In this report I will omit the installation and connection of the pulse voltage converter (connected through the ignition, fuse, everything is routine..))
But let’s look at the button that turns on the heating for more detail.
On the one hand, of course, you can use the button included in the kit, but it looks, to put it mildly, in the interior of the Prado, not ice. Therefore, for aesthetes, we suggest considering the option of using a standard Toyota button from the restyled LC-200.
The truth is that in this case, not everything is so simple.
The thing is that this button does not have a lock (pressed - on, pressed - off). Accordingly, in order to adapt it to our needs, the standard button is also subject to modification.
A trigger key is implanted into it!
After which, it works as usual! That is, if you pressed it once, the heated steering wheel turned on and, accordingly, the control light on the button turned on, confirming that the option was turned on. Pressed again and turned off the heating. No fixation! Also (since there is no mating connector for this button in the wiring), we solder the wiring onto the pins of the button.
The cost of a standard “heated steering wheel” button, including its modification, is 5,000 rubles.
By the way, if it doesn’t matter to anyone that there is a steering wheel logo on the button, there is a more budget-friendly option. Using the same standard button to control the heating, but with a different logo. For example, “parking sensors” or “power hitter”. Firstly, these buttons are cheaper, and secondly, they have a standard fixation, that is, they do not require the integration of a trigger key into them.
Payment for goods and downloading of the book in electronic form (PDF format) is made on the website.
To do this, you need to find the book you are interested in and click on the “Buy” button. The price of the book is indicated on the button.
For convenience, the price on the website for residents of Russia, Belarus and Kazakhstan is presented in rubles.
For residents of Ukraine in hryvnias, and for all other countries - dollars.
After clicking on the “BUY” button, a payment window will open where you can select a payment system with which you can pay for the selected book using any bank card (Visa, MasterCard, MIR, etc.)
When you click on the “Pay by bank card” button, the Portmone payment system will open, which is the easiest way to make a payment.
In addition, the website offers four payment systems for payment:
- Yandex (payment from any bank cards, Yandex Money account, QIWI Wallet, terminals, etc.);
- Portmone (payment from any bank cards, Portmone account);
- PayPal (payment from any bank cards, PayPal account);
- WebMoney (payment from any bank cards, payment from WebMoney wallets).
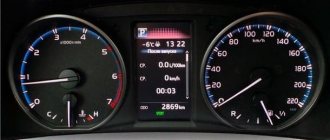
Instrument panel lights
On the instrument panel, where the speedometer and tachometer are located, there are a large number of lamps, with the help of which the condition of the car is monitored. The entire set of lighting devices, their number, some sizes of bases are presented below, by type:
- A - used to monitor turn signals, high beams, the state of the battery and other mechanisms, lamp base T5, - 21 pcs. in total;
- B – main illumination, T10 – 4 pcs.;
- C – additional lighting, T5 – 1 pc.;
- D – lamp for monitoring the amount of fuel – 1 pc.;
- E – indicates the readiness of the airbag for operation – 1 pc.
At night, all available keys in the car should be illuminated, except for the joystick for controlling the mirror rotation. They use lamps that do not have a base, with a voltage of 12 volts.
Replacement work and changing the backlight of Prado 120 buttons must be carried out carefully so as not to break the fasteners. If you are unsure about the correct replacement of lamps, it is better to contact the services of maintenance specialists.
Payment via Yandex Cashier
After selecting payment via Yandex, the Yandex Cashier payment system will launch, where you need to select a convenient payment method (bank card, QIWI, Yandex Money account, etc.)
After specifying payment details and confirming payment, payment for the goods will occur.
If you have a bank card in a currency other than the ruble, then the money will be debited from the card at the rate of the Central Bank of Russia at the time of the purchase.
This payment method is optimal for residents of Russia, Kazakhstan and Belarus.
Official website of the Yandex Kassa payment system https://kassa.yandex.ru
Payment via Portmone
After selecting payment through Portmone, the payment system will launch, where you need to select the payment method: bank card or Portmone account.
The price in the Portmone payment system is converted into dollars at the exchange rate of the Central Bank of the country where you are located.
If you have a bank card in a currency other than the dollar, then the money will be debited from the card at the rate of the Central Bank of your country at the time of the purchase.
After specifying payment details and confirming payment, payment for the goods will occur.
Official website of the Portmone payment system https://www.portmone.com
How to install a multifunction steering wheel on a Corolla with your own hands?
The multi-steering wheel is a complex functional device that allows you to duplicate the car control levers directly in direct access, thereby increasing the comfort and convenience of operating the car. The Corolla E150 configuration does not provide for the possibility of installing a multi-steering wheel, but this device can be installed by hand - this will require no more than 1 hour of time, as well as wheel wrenches and wrenches, a set of screwdrivers and a Torx-20 wrench that comes with the car. To install the multifunction steering wheel you need:
- Open the hood and turn off the power to the car by disconnecting the negative terminal from the battery;
- Next, on the sides of the steering wheel, using a Torx-20 wrench, unscrew the bolts securing the airbag;
- Then we dismantle the connectors from the block with wires and the airbag, after which we align the wheels and remove the central nut with a wheel wrench;
- Now, with a smooth movement towards yourself, you need to remove the steering wheel. During dismantling, it is not allowed to sharply pull or push the steering wheel, as there is a risk of damaging the fixing brackets;
- Next, we install the new steering wheel and connect the connectors with plugs according to the instructions supplied in the kit, after which we tighten the central nut with a wheel wrench and restore the airbag.
After installation, it is advisable to check all control levers for operation and, if necessary, restore damaged components.
10.14. Anti-lock brake system (ABS)
| 1 – wheel speed sensor; 2 – wheel brake mechanism; 3 – hydraulic block; 3a – solenoid valve; 3b – pump; 4 – main brake cylinder; 5 – control unit; 6 – warning lamp in the instrument cluster; 7 – ABS switch |
The ABS consists of four wheel speed sensors, a pressure distributor, an electronic control unit, four ring gears mounted on the wheel hubs, as well as a warning lamp and an ABS switch located on the instrument panel.
The electronic control unit is installed under the rear seat cushion. The unit receives data on wheel speed from sensors and, based on this data, sends signals to the solenoid valves of the pressure distributor. The pressure distributor is installed in the engine compartment after the main brake cylinder. The distributor is equipped with four solenoid valves, from which tubes extend to the working cylinders of the wheel brake mechanisms. Based on a signal from the control unit, the valves maintain the required pressure in the hydraulic drive of each brake mechanism. When carrying out electric welding work, it is necessary to disconnect the block with wires from the electronic control unit with the ignition off. When painting the body and then drying it in a chamber at a temperature of 85° C or higher, the electronic control unit must be removed from the car. Otherwise, the control unit may be damaged.
Removing and installing pressure distributor Pressure distributor
| 1 – pressure distributor; 2 – solenoid valve relay; 3 – pump relay; 4 – wire holder; 5 – cover; 6 – tube to the brake mechanism of the front right wheel; 7 – tube to the brake master cylinder; 8 – tube to the brake mechanism of the rear left wheel; | 9 – tube to the brake mechanism of the rear right wheel; 10 – nut; 11 – clip; 12 – rubber cushion; 13 – tube to the brake mechanism of the front left wheel; 14 – wire to ground |
| EXECUTION ORDER |
| 1. Disconnect the wire from the negative terminal of the battery. |
| 2. Pump out the brake fluid from the reservoir. |
| 3. Disconnect the tubes from the pressure distributor. |
| 4. Remove the cover by unscrewing the fastening screw. |
| 5. Disconnect the block with wires from the distributor. |
| 6. Unscrew the fastening nut and disconnect the wire going to ground from the distributor. |
| 7. Unscrew the fastening nuts and remove the pressure distributor from the bracket. |
| 8. Install the pressure distributor in reverse order. When installing, replace the fastening nuts and tighten them to a torque of 7 N·m (0.7 kgf·m). After installation, bleed the hydraulic brake system. |
Removing and installing the ABS electronic control unit
| EXECUTION ORDER |
| 1. Disconnect the wire from the negative terminal of the battery. |
| 2. Remove the rear seat cushion. |
| 3. Disconnect the block with wires from the electronic control unit by squeezing the spring clip. |
| 4. Unscrew the two fastening nuts and remove the electronic control unit. |
| 5. Install the electronic control unit in reverse order. The block with wires can only be connected to the control unit when the ignition is turned off or the battery is disconnected. |
Removing and installing the wheel speed sensor
Installing the speed sensor of the front (a) and rear (b) wheels
| 1 – steering knuckle; 2 – block with wires; 3 – holder; 4 – rotation speed sensor; 5 – gasket; 6 – bolt; | 7 – hub; 8 – ring gear; 9 – brake shield; 10 – axle; 11 – rear axle beam |
| EXECUTION ORDER |
| 1. Remove the wheel. |
| 2. When removing the right front wheel sensor, you need to remove the windshield washer reservoir to disconnect the sensor block from the wiring harness, and the rear wheel sensors from the rear seat back. Disconnect the block. |
| 3. Unscrew the mounting bolt and remove the sensor. |
| 4. Install the wheel speed sensor in reverse order. |
Payment via PayPal
After selecting payment via PayPal, the PayPal payment system will launch, where you need to select the payment method: bank card or PayPal account.
If you already have a PayPal account, then you need to log into it and make a payment.
If you do not have a PayPal account and you want to pay using a bank card via PayPal, you need to click on the “Create an Account” button - shown with an arrow in the picture.
PayPal will then prompt you to select your country and provide your credit card information.
After specifying the information required to make the payment, you must click on the “Pay Now” button.
Official website of the PayPal payment system https://www.paypal.com
Procedure for removing the steering wheel
To remove the steering wheel on a Camry, you need to follow a certain sequence of actions.
Attention! All operations must be carried out with the terminals disconnected from the battery. Otherwise, there is a risk of spontaneous deployment of the airbag. After disconnecting the terminal, it is recommended to wait 2 minutes for the capacitors to completely discharge.
To remove the steering wheel on a Camry v50 or v40, you will need the following tools:
- Phillips and flat screwdriver;
- multifaceted key N4 or No. 6;
- 19mm head with ratchet.
The removal process is performed as follows:
- To gain access to the mounting bolts, you must remove the plugs installed on both ends of the steering wheel. This can be done by prying them off with a screwdriver or other flat, pointed object. To avoid leaving marks on soft plastic, you can use an unnecessary bank card.
Before removing the steering wheel on a Camry, you should prepare a special puller or use improvised means. The fact is that the steering wheel splines are strongly compressed by the fastening nut, and over time they “stick”. It is not recommended to knock the steering wheel off the shaft with a hammer - you can not only ruin its appearance, but also disrupt its geometry, as a result of which it will become unusable.
There is a proven way to remove the steering wheel on a Toyota Camry 30, 40 or 50 using improvised means. For this you will need:
- 2 bolts with a diameter of 6 mm and a length of 3–4 cm.
- a small metal plate 4–5 mm thick;
- a bolt with a diameter of 10–12 mm and a length of 5–8 cm with a nut.
At the base of the steering wheel, under the airbag, there are symmetrically located holes for 6 mm threaded bolts. Similar holes are drilled in the metal plate along the edges, and one large hole in the center, located exactly between them. Then the plate is screwed to the steering wheel with small bolts, and a small gap is left, sufficient to place a nut between it and the end of the shaft.
As it twists into the nut, the bolt begins to put pressure on the end of the shaft, gradually lifting the plate along with the steering wheel attached to it.
As practice shows, 3-4 turns of the bolt are enough to “snap” the steering wheel off the shaft. This is the only known and easiest way to remove the steering wheel on a Camry 50 without using a special puller.
Fuses and relays Land Cruiser Prado 120
The mounting block in the interior, containing fuses and relays, is installed on the dashboard at the steering wheel on the driver's side of the Prado 120 (from different sides depending on the location of the steering wheel). The relays are located on the reverse side of the mounting block.
There are a total of 25 fuses for 6-30A: 24 are arranged in three columns, and 25 are installed separately. Some fuses are responsible for several nodes, others for individual ones:
- 2 refers to the ignition system, air conditioning control, and its compressor clutch;
- 9 – to lighting (fog lights and lights) and trailer connector;
- 17 and 20 – to the electric drives of the right and left front seats;
- 29 – to the anti-theft system and central locking.
The latter are duplicated by fuses 36 and 42.
There are 17 relays and 48 fuses for 7.5-140A. The first are concentrated in the central part of the block, and the second - along the edges. Most of them are responsible for individual nodes.
In addition, the following are installed in the engine compartment:
- headlight washer relay (at the right headlight);
- VSC control unit (on the right side of the engine panel);
- relay block No. 1 (left or right on the engine panel on the opposite side of the steering wheel);
- No. 3 and No. 4 (to the right and top of the mounting block, respectively);
- 3 relays for intake heater, spark plugs, starter, air suspension, low beam.
On the reverse side there are 4 relays installed in a row: signal, connector for additional devices, dimensions, multifunctional control unit.
The electrical circuit and the purpose of the relays and fuses differ depending on the modification and configuration of the Prado 120.
Payment via WebMoney
After selecting payment via WebMoney, the payment system will launch, where you need to select the payment method: bank card or WebMoney wallet.
If you already have a WebMoney wallet, then you need to log into it and make a payment.
If you do not have a WebMoney wallet and you want to pay in another way, you need to select any of the methods that WebMoney offers and make the payment
After specifying payment details and confirming payment, payment for the goods will occur.
Official website of the WebMoney payment system https://www.webmoney.ru/
A few tips for car owners
Before removing the Camry steering wheel buttons or the steering wheel itself, it would be useful to follow some recommendations:
Having instructions on how to remove the buttons on the steering wheel in a Camry 40 or the steering wheel itself, you can easily perform these procedures yourself - even for a beginner they will take no more than 2-3 hours. The main condition is to be extremely careful.
Photos are provided for general information only.
- Tweet
- Share 0
- +1
- LinkedIn 0
Despite its apparent simplicity, repairing and replacing the steering wheel on a Toyota Camry 40 is a rather complex process, since modern steering wheels are stuffed with electronics, control buttons and airbags, but if you follow the instructions, it is quite possible to repair it yourself without overpaying significant sums car service workers.
Right steering wheel buttons Prado 120
I've had the car for three months. I briefly describe what I did at the time of the decision to create a flight magazine :)
So, a new car, a new epic with the installation of radio control buttons on the steering wheel :) Backstory: I once had a 2006 Jeep Grand Cherokee, in the maximum configuration (although this, as far as I remember, is not really important) - so for the period of use I'm very used to these wonderful buttons. You don’t stretch anywhere, you don’t have to tear yourself away from the back of the seat to simply turn down the volume. But having this, I, as usual, did not appreciate it!)
And, having bought my first Prado 120, I felt an acute shortage of this wonderful device.
I thought - bullshit, I’ll get used to it, and in general the steering wheel - it’s okay to steer! Yeah, yeah.
Thanks to the Prado Club. I have studied countless pages on the topic of installing buttons on the steering wheel. The buttons are ordered, the pillow is cut crookedly, everything is connected - hurray, it works))
And so, I again have a Prado 120. And again without buttons. There was not a second of hesitation about whether to install it or not. Literally in the first days of owning the car, buttons for the steering wheel were ordered. New, from burjauto.com
And so, when the details of the quest were assembled and it was a sunny day off, the fearless subarist Zwick and I got down to business) The second time, although everything was simpler, it took quite a long time.
But we firmly decided that if we ever need to repeat the procedure, everything will be performed with strong drinks and relaxing music)
After installing the GU on Android, the right steering wheel buttons became a necessity, especially controlling the phone. There weren’t many proposals for right beige buttons at all, and what’s more, finding all 5 buttons in a block is a very labor-intensive task. I was looking for 3 months, I already wanted to order new ones.
Downloading a book
After successfully completing the payment (by any method) and returning to the KrutilVertel store from the payment system website, you will be taken to the successful payment page:
On this page you need to indicate your e-mail, where access to download the book will be sent.
If you are already registered on our website, then simply follow the link to your personal account.
The book you purchased will be in your personal account, from where you can always download it.
Please note that after making the payment, you need to return back from the payment system website to the KrutilVertel website.
If for some reason you did not return back to the site and closed the payment system tab with a message about the successful completion of the payment, please let us know - we will send you a letter indicating access to download the book.
How to remove the Prado 150 steering wheel
When the reason is determined, they begin to work in their own garage.
- First, disconnect the negative terminal of the battery.
- Find the steering wheel mount. It's under the airbag.
- The cushion is secured with two Torx T30 bolts under the plugs.
- Remove the connectors from the pillow.
- Disconnect two connectors from the cochlea.
- Unscrew the nut 19 and remove the steering wheel.
- They find the cruise control joystick and remove it too.
- Release the side covers with buttons.
- The rear casing is removed - it is held in place by latches.
How to remove the steering wheel on a Prado 150 is shown in the video.
The work is completed, the steering wheel is dismantled. Reassemble it in reverse order.
Toyota Prado electrical circuit diagrams
The electrical circuit of the Prado 120 is simple. This allows low-skilled technicians to service electronics without specialized equipment, which often creates problems in the future. In addition, for this reason, the car is often equipped with many additional devices such as non-standard lighting fixtures, security systems, and acoustics.
The main problematic part of the electrics is the voltage regulator, which is considered a consumable item. It is replaced every 3 years. Using a faulty part will damage the battery and alternator.
In suspension, there are cases of failure of the electrical wiring of TEMS shock absorbers. It is subject to restoration. The rear air suspension compressor wears out quickly: even when taking air from the passenger compartment, it can withstand 150–200 thousand km when operating on asphalt and 30–40 thousand on the ground. Failures of its sensors on the rear axle are observed.
In the engine compartment, the main electrical problems are caused by gasoline engine sensors and oxidizing connectors.
Despite the simplicity of the device, the car has many electrical systems due to its extensive equipment. For maintenance, repairs and changes, electrical diagrams for all Prado 120 systems can be found online. Descriptions are provided of individual Prado 120 systems, such as the interior light electrical circuit, and general electrical diagrams.
Problems when paying with bank cards
Sometimes difficulties may arise when paying with Visa/MasterCard bank cards. The most common of them:
- There is a restriction on the card for paying for online purchases
- A plastic card is not intended for making payments online.
- The plastic card is not activated for making payments online.
- There are not enough funds on the plastic card.
In order to solve these problems, you need to call or write to the technical support of the bank where you are served. Bank specialists will help you resolve them and make payments.
That's basically it. The entire process of paying for a book in PDF format on car repair on our website takes 1-2 minutes.
How to install a multifunction steering wheel on a Corolla with your own hands?
The multi-steering wheel is a complex functional device that allows you to duplicate the car control levers directly in direct access, thereby increasing the comfort and convenience of operating the car. The Corolla E150 configuration does not provide for the possibility of installing a multi-steering wheel, but this device can be installed by hand - this will require no more than 1 hour of time, as well as wheel wrenches and wrenches, a set of screwdrivers and a Torx-20 wrench that comes with the car. To install the multifunction steering wheel you need:
- Open the hood and turn off the power to the car by disconnecting the negative terminal from the battery,
- Next, on the sides of the steering wheel, using a Torx-20 wrench, unscrew the bolts securing the airbag,
- Then we dismantle the connectors from the block with wires and the airbag, after which we align the wheels and remove the central nut with a wheel wrench,
- Now, with a smooth movement towards yourself, you need to remove the steering wheel. During dismantling, it is not allowed to sharply pull or push the steering wheel, as there is a risk of damaging the fixing brackets,
- Next, we install the new steering wheel and connect the connectors with plugs according to the instructions supplied in the kit, after which we tighten the central nut with a wheel wrench and restore the airbag.
After installation, it is advisable to check all control levers for operation and, if necessary, restore damaged components.
Toyota Land Cruiser control panel
General information
Control panel, general view (for left-hand drive vehicles)
| 1. Electric sunroof switches 2. Clock 3. Mirror 4. Side window blower nozzle 5. Window switch 6. Cassette recorder 7. Ashtray 8. Transfer case lever 9. Gearbox lever 10. Differential switch 11. Headlight switch 12. Fuse box 13. Dashboard lighting control | 14. Electric mirror control 15. Side window blower nozzle 16. Rear fog lamp switch 17. High beam switch 18. Headlight switch and turn signal 19. Front rear differential lock switch 20. Central vents 21. Mirror 22. Light switch salon |
| 1. Central differential lock 2. Hazard warning light 3. Electric antenna 4. Side deflector 5. Ignition switch 6. Climate control 7. Glove compartment 8. Lighter 9. Heater switch 10. Choke | 11. Deflector 12. Fuel tank opening handle 13. Hood opening handle 14. Power window switch 15. Signal 16. Mirror 17. Side deflector 18, 19. Front window wiper and washer switch 20. Emergency warning lamp |
Control panel, general view (for right-hand drive vehicles)
| 1. Power sunroof switches 2. Rear view mirror 3. Central vents 4. Headlight and turn signal switch 5. Ignition switch 6. High beam switch 7. Rear fog lamp switch 8. Side vent 9. Power mirror control 10. Regulator instrument panel lighting 11. Fuse box | 12. Choke 13. Gearbox handle 14. Handbrake 15. Transfer case lever 16. Ashtray 17. Radio 18. Window switch 19. Glove compartment 20. Side deflector 21. Mirror 22. Clock 23. Interior light switch |
| 1. Emergency warning light 2, 3. Windshield wiper and washer switch 4. Side deflector 5. Mirror 6. Front and rear differential lock switch 7. Signal 8. Window lifter switch 9. Hood opening handle 10. Fuel tank opening handle 11. Deflector | 12. Winch control lever 13. Heater switch 14. Dashboard backlight control 15. Lighter 16. Climate control 17. Differential activation 18. Side deflector 19. Electric antenna drive 20. Hazard warning lights 21. Central differential lock |
Video about “Control Panel” for Toyota Land Cruiser
Toyota Land Cruiser Crawl Control system control
Removing the dashboard (instrument panel) Toyota Land Cruiser 200 (LC200)