Toyota Corolla 120 is considered one of the most popular and convenient models in the line. But, unfortunately, the suspension of this car is quite problematic: after all, the parts are subject to daily wear and tear. Let's figure out what the features of the suspension are and what you should pay attention to when diagnosing faults. We will also consider in detail how to replace or repair it.
The suspension is the connecting link between the body, frame and wheels. It not only ensures the mobility of the connection, but also limits the movement of the wheels. Thanks to the suspension, they not only move freely vertically, but also cannot make angular and lateral movements. This significantly increases the stability of the machine.
It is almost impossible to drive a car with an unbalanced or poor-quality suspension. Accordingly, with any push, the car will wobble along the road, since the impacts will be transmitted to its body.
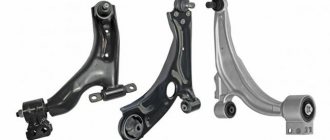
Suspension elements include:
- link arms;
- damping shock absorbers;
- steering knuckles;
- brake discs;
- guide arms;
- wheel hubs;
- stretcher;
- silent blocks of the rear and front beams, supports, brackets and other fastening elements.
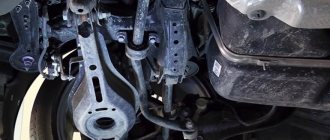
The front suspension consists of telescopic shock absorber struts. The suspension is lever-spring, with coil springs, independent. There are also wishbones and a stabilizer. The main functions of the part are to absorb shocks, increase stability, protect parts from increased wear and ensure smooth operation. Toyota rear beam silent blocks also soften the car's ride.
Among the weak points of the Toyota Corolla suspensions are the connecting elements. This is due to the fact that they are subject to maximum load and wear out quickly. Rubber parts must be promptly replaced with similar ones, as well as nuts or bolts with damaged threads.
Replacing the rear silent blocks of the lower front suspension arm and ball joints on a Toyota Corolla E120
After replacing the front struts and rear shock absorbers, it was decided to also change the ball joints and rear silent blocks of the lower arm of the front suspension, since after replacing the struts there was still an incomprehensible rattling sound in the front suspension.
We need to put things in order in the suspension.
So for your information: the chronology of events is not observed on the blog when writing articles, work is carried out at different times, perhaps something is described later than it was done, therefore the price of spare parts will differ from the current one at the time of writing due to fluctuations in the dollar exchange rate.
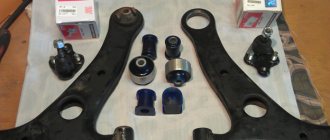
Purchasing spare parts for the front suspension
Having studied reviews on the Internet and prices, it was eventually purchased in August 2014 (spare parts were changed on 06/13/2015), as usual on the existential: Silent block of the lower front suspension arm rear VTR TO0133R 2 pieces for 879 rubles 96 kopecks and a ball joint, front lower Sidem 45095 2 pieces for 1108 rubles 28 kopecks each.
Silent block VTR TO0133R Ball joint Sidem 45095
We are going to service station 76 express, car service on Lenina, 149 Chita
I don’t know why I decided to change the silent blocks and ball joints there, maybe it’s just that their location in the city is convenient, but in the end it turned out that this is just a terrible place to service a car, with illiterate specialists.
Repressing the rear vertical silent blocks of the front suspension arm
We lifted the car onto a lift, the problem arose when removing the levers; during operation, all the bolts rusted and as a result, one bolt broke when unscrewed on the front horizontal silent block.
Broken front suspension arm bolt 90119-14086
The situation was complicated by the fact that the nut of this bolt is a “cracker” (that’s what they call it), which is welded inside the front beam and there is no direct access to it. I had to saw the beam with a grinder to knock down the cracker and pull out a piece of the bolt.
Cut in the front beam Removing the front suspension arm
With the help of welding and a pneumatic chisel, the cracker gave way, and the rest of the bolt was safely removed from the beam; they spent half an hour poking around to get it out. The levers were removed and taken to re-pressing the silent blocks. The front horizontal silent blocks are in good condition, I only replaced the rear vertical ones.
The silent blocks were pressed in crookedly, but as “very competent specialists” said: “it’s normal, you can drive, it doesn’t affect anything.”
In general, the other day I changed the steering tips and rods (photo report will be later), removed the levers to look at the condition of the silent blocks and lubricate them with graphite grease for the future, and so it’s clear that the silent block is already starting to crack from uneven load, it’s clear that the crack is due to the inclination silent block, so you need to press the silent blocks evenly.
Pressed silent blocks
The service technicians left the slot like that, they said that for the future, so as not to cut the beam next time, although there was something that prevented us from tightening the bolts, welding the nut from the inside and welding the slot. Such “competent” specialists did not think of this. That’s what I did, the nut was welded, the slot was welded and, to prevent rye, it was painted over with spray paint.
Slot in the beam, and it was released. Welded front beam
Replacing ball joints on a Toyota Corolla
There were no problems replacing the ball joints; first I sprayed all the bolts with liquid wrench. Using a wrench and a large pipe-lever, the nuts were unscrewed. The ball joint was removed without a puller, with one blow to the steering knuckle in the ball joint area, it fell out. As the STO workers said, the ball ones would still be fine, don’t throw them away, let them lie around just in case.
Poor quality wheel alignment at service station 76 in Chita
After all the work was done, a wheel alignment was done (700 rubles), after their manipulations the car began to tilt to the right. Another specialist came to them, redid the alignment, after that the car still tilted, they couldn’t find anything, they shrugged their shoulders and that was it, even though they had new equipment. It was necessary to take the money from these “specialists”, well, no negative reviews, including this article I wrote about them.
As a result, after driving 1600 kilometers, the good front tires became worse than the bad rear ones. Next year we need to get new summer tires, I think I’ll bring these to the service station as a gift.
I did a wheel alignment in another person’s garage for 400 rubles, with old equipment, and everything became fine, it doesn’t go anywhere and the steering wheel is straight.
On the left is a bad tire, on the right is a “good” tire.
So it is recommended, if possible, to do all the work yourself, it will be of higher quality and the spare parts will last a long time. Then I’ll buy myself a hydraulic jack and weld myself a mini press for repressing the silent blocks and redo all the silent blocks.
Step-by-step instructions or how and what to do?
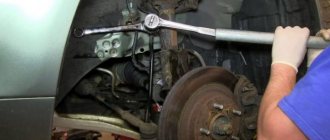
The first step is to lift the car and hang the rear end on wooden blocks. It is important that the car rests on them - this is necessary for the safe carrying out of all further work.
After all this is done, let's unscrew both rear wheels. This is not difficult to do and does not require detailed explanations. After the wheels are removed and we have direct access to the suspension, we first need to disconnect the ABS sensor and unscrew it from the beam. We look at photographs of the work in progress.
Next you need to disconnect the brake pipe. During assembly, it is important to tighten it well, however, you need to do this carefully and not overtighten (the nut is soft).
Next, we unclench the staples and slowly remove the handset. You might want to lay something down as the brake fluid will start leaking. Let's look at the photos.
When all the wires and hoses have been disconnected, we move on to the next stage and begin to free the racks. To do this, take the key we need and unscrew the bolt at the bottom of the rack. The photo shows the unscrewing process.
Next you need to remove the brake drum. To do this, you need to remove four bolts - this will require a 12 mm socket. Let's look at the photos.
After all the bolts are unscrewed, you need to remove the drum. It's very easy to do.
Next, after removing the drum, we need to pull out the bolt, having first unscrewed the nut (you need to tighten it from the side of the bolt. Important!) When assembling, you need to tighten it last with the machine lowered and loaded.
After everything is unscrewed, we remove the part from the body fasteners. If it doesn’t come out on its own, you can tap it a little with a hammer.
Next, remove the rack, having first completely unscrewed the bolts.
The same actions must be performed on the other side. At this point, the parsing procedure is almost complete. If there is nothing else in the way, you can remove the beam from under the car. Let's look at the photos.
That's all for analysis. The photo below shows what a disassembled Toyota Corolla 120 looks like. There’s nothing complicated, everything is as simple as a children’s construction set.
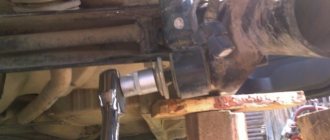
So, the beam has been removed, worn-out silent blocks have been installed in it - they need to be knocked out.
In order to do this, you need to find a suitable tool and a pipe of suitable diameter. Which we will run around, place on the beam and knock out the silent blocks from the beam. It is important to find a suitable support for the removed part before knocking it out. Below are photos and a diagram of how everything should happen. Nothing complicated.
Part selection
Not original silent blocks.
The choice of silent blocks should be taken seriously, since the quality of the spare parts will determine how stable the suspension will be, as well as the softness of the levers. Many car enthusiasts replace original products with polyurethane analogues, which have a longer service life, but are much more expensive.
Original
48068-12300 – original catalog number of the rear silent block of the front suspension arm. The cost of the product is 3000 rubles.
Analogs
Due to the high cost of silent blocks of levers, many motorists are often looking for a lower quality and cheaper substitute. The automotive market offers a lot of different options.
| Manufacturer's name | Catalog number | Price |
| ABS | 270969 | 1000 |
| Akitaka | 0101-150B | 1000 |
| Amiwa | 02-35-1177 | 600 |
| Caster | FFD9321 | 700 |
| Febest | TAB-ACA30S | 600 |
| Fenox | CAB10013 | 600 |
| Gufu Parts | SRM-21105 | 600 |
| JD | JDT24ZE150B | 1000 |
| Jikiu | BH21118 | 700 |
| LYNXauto | C8572 | 800 |
| Nipparts | N4232056 | 1000 |
| Patron | PSE1428 | 700 |
| Sidem | 845638 | 600 |
| Stellox | 77-00438-SX | 800 |
| VAG | 357 407 182 | 400 |
| VAG | 1J0 407 181 | 1200 |
Replacement 120-150 body
When everything necessary for the work is prepared, you can start replacing;
- First of all, the car is driven into a pit, this will allow you to gain access to the necessary components;
- The car is lifted with a jack;
- The lever is dismantled; to do this, the ball is disconnected from it and the through bolt of the front silent block and the rear bracket are removed; if you can’t unscrew the bolt, you can cut it off with a grinder;
- Using a puller, a silent block appears from the lever to make removing the part easier; it is advisable to tap it with a hammer and cut it off as much as possible;
- A new silent block is installed, pressing is carried out, this can be done using a vice or any other press. Before installation, it is advisable to clean the surface and apply lubricant;
- The assembled part is mounted back on the car.
Step-by-step instructions or how and what to do?
The first step is to lift the car and hang the rear end on wooden blocks. It is important that the car rests on them - this is necessary for the safe carrying out of all further work.
After all this is done, let's unscrew both rear wheels. This is not difficult to do and does not require detailed explanations. After the wheels are removed and we have direct access to the suspension, we first need to disconnect the ABS sensor and unscrew it from the beam. We look at photographs of the work in progress.
Next you need to disconnect the brake pipe. During assembly, it is important to tighten it well, however, you need to do this carefully and not overtighten (the nut is soft).
Next, we unclench the staples and slowly remove the handset. You might want to lay something down as the brake fluid will start leaking. Let's look at the photos.
When all the wires and hoses have been disconnected, we move on to the next stage and begin to free the racks. To do this, take the key we need and unscrew the bolt at the bottom of the rack. The photo shows the unscrewing process.
Next you need to remove the brake drum. To do this, you need to remove four bolts - this will require a 12 mm socket. Let's look at the photos.
After all the bolts are unscrewed, you need to remove the drum. It's very easy to do.
Next, after removing the drum, we need to pull out the bolt, having first unscrewed the nut (you need to tighten it from the side of the bolt. Important!) When assembling, you need to tighten it last with the machine lowered and loaded.
After everything is unscrewed, we remove the part from the body fasteners. If it doesn’t come out on its own, you can tap it a little with a hammer.
Next, remove the rack, having first completely unscrewed the bolts.
The same actions must be performed on the other side. At this point, the parsing procedure is almost complete. If there is nothing else in the way, you can remove the beam from under the car. Let's look at the photos.
That's all for analysis. The photo below shows what a disassembled Toyota Corolla 120 looks like. There’s nothing complicated, everything is as simple as a children’s construction set.
So, the beam has been removed, worn-out silent blocks have been installed in it - they need to be knocked out.
In order to do this, you need to find a suitable tool and a pipe of suitable diameter. Which we will run around, place on the beam and knock out the silent blocks from the beam. It is important to find a suitable support for the removed part before knocking it out. Below are photos and a diagram of how everything should happen. Nothing complicated.
After the old ones are knocked out, we clean the inner surface of the beams, lubricate and install new ones, using approximately the same method, only by tapping lightly with a hammer over the entire surface - you can put a piece of wood between the silent block and the hammer.
This completes the replacement process and you can begin reassembling the car. When assembling, you need to check all the bolts and nuts - tighten them and where necessary, fix them with spindles.
Front suspension silent blocks.
Gentlemen, who changed these things? which ones did you install? Has anyone bothered with polyurethane?
There are 84 replies to this topic
Collerus writes: According to the Masumov catalog: Silent block of the front lower arm rear (large) - RU-386, silent block of the front lower arm front - RU-385. I myself installed what was in the stores: Febest went out for a year and was in the trash, RBI went for the second year.
I mostly order everything from emex because... There is a lot of junk in our stores, but there you can at least choose and see photos of how it was made. but Masuma never took it. How is their quality? Is it really Japan? About LYNXAvto I can say that the company is supposedly Japanese, but the plant is in Russia, so it costs less, many say the quality is good, all the suspension on my Corolla was from this company. Each part has its own unique batch number; if you wish, I think you can find out for it at the factory. Not an advertisement, just sharing my experience)
But Masumu hasn’t installed anything yet, on the same emex there is a photo of a “prototype” in the size of a type from the original, but is that so? How are their parts going? Masuma generally does everything (from brake pads to wipers)
LYNXAvto installed silent blocks in the levers, it lasted for half a year
Masuma is China but the quality is not bad.
Linx is what we have been making for 3 years. My bump stops on the racks fell apart this spring when I jacked up the car to change shoes, about 3 years have passed since the replacement, maybe a little more.
The text of the message was changed by the user on June 21, 2021 at 09:09:07
LYNXAvto installed silent blocks in the levers, it lasted for half a year
Masumu only recently installed silent blocks on the rear lever, I don’t know how long it comes off yet.
Is the Lynx plant located in Moscow? How do you generally speak about them and their spare parts? It’s just an inexpensive analogue and a good replacement for China)) Although SAT also seems to be a Russian company, but it is manufactured in China))
PS I’m thinking that if LynxAvto is made in Russia, then they take into account the condition of our roads and frosts, maybe all these will be a more reliable analogue of the original only at a good price for the buyer
The plant is located in the Moscow region, if I’m not mistaken, not far from the city of Kolomna. On average, it lasts for 3 years of active driving. Think for yourself here. If we allow changing only on a pair of levers, then this period, taking into account our roads, is not bad. But if you are going to shake up the entire suspension on a Linx, then you really need to think about it; the price for the work will not be small, taking into account the shelf life of their parts.
The text of the message was changed by the user on June 21, 2021 at 09:12:57
Burn80 writes: The plant is located in the Moscow region, if I’m not mistaken, not far from the city of Kolomna. On average, it lasts for 3 years of active driving. Think for yourself here. If we allow changing only on a pair of levers, then this period, taking into account our roads, is not bad. But if you are going to shake up the entire suspension on a Linx, then you really need to think about it; the price for the work will not be small, taking into account the shelf life of their parts.
Last fall, on the advice of the master, I stuck large silent blocks from the fulcrum of polyurethane into the levers and small ones (candies) from VTR - rubber so far holding up well
I mostly order everything from emex because... There is a lot of junk in our stores, but there you can at least choose and see photos of how it was made. but Masuma never took it. How is their quality? Is it really Japan? About LYNXAvto I can say that the company is supposedly Japanese, but the plant is in Russia, so it costs less, many say the quality is good, all the suspension on my Corolla was from this company. Each part has its own unique batch number; if you wish, I think you can find out for it at the factory. Not an advertisement, just sharing my experience)
The text of the message was changed by the user on June 25, 2021 at 05:03:40
online now
No car club members
based on activity data for the last 5 minutes.
Happy Birthday!
- serg413
Turned: 50 Age: 50
Turned: 39 Age: 39
Turned: 32 Age: 32
There are 30 birthday people in total. The list includes the most active ones.
Report: On replacing the silent block on the front arm of Toyota Funcargo (Alexli)
Before starting work, you just need to compare your desire and state of health with the price of work on the service. It often turns out that the service ends up being cheaper than the cost of a back or a sore leg, for example. From the experience of installing a silent block for the front lever of a Toyota, I installed Febest silent blocks, complete nonsense. We drove 3 thousand km.
The silent blocks that I supplied are original, original packaging, catalog number. In my opinion, no one should have any doubts about the Daihatsu company. By the way, about the original. They tell me which one you will install, original or non-original. I'm certainly original. I installed it, did the wheel alignment, drove off. Installing the silent block of the Toyota front arm is walking along the road. I came back and asked why the car was running, and they said it was because of the original, these are the ones they supply now.
They changed it to a Swedish non-original one. The car drove as expected and I drove 80 thousand on them until I sold the car. On the forum I only shared my installation experience and never forced anyone to do anything.
Replacing front control arms Yaris 2004
I did everything myself, it worked out, as I already wrote in rubles, both sides took 4 hours of work. I also changed the struts and steering rack, so I had to do a wheel alignment. By the way, no one needs KAYABA struts, I don’t even know how long they have been used, but they are in good condition, maybe I should have changed them in vain. I’m not a car mechanic, I can afford a service, but I did the change myself and it took about an hour.
On all my BMWs I always changed only the silent blocks. I agree that it’s all a matter of taste, installing the silent block of the Toyota front arm is still trustworthy. The lever is an important part, that’s why I do it myself, since I don’t trust services a little. And the front silent bone in the photo is very similar to. You need to know the length, diameter of the polyurethane rubber and holes. I’ll stop by the guys’ store and take a photo of the Daihatsu silent blocks.
They are exactly the same in size and holes. The shape of the rubber is slightly different and there are no notches in the places where it is attached to the body. By the way, mine too, only the right one was torn, and the left one was good. It’s not in vain that the stiffness of the ammo is not an indicator, but the speed of working out compressions - oh, how different it is for old and new ones. I have original silent blocks. The mileage is already over. He is installing the silent block of the front lever of Toyota rubber. And my original silent blocks have gone through more than a thousand kilometers.
Moreover, after 12 years of driving Subaru cars, with their “indestructible” suspension, I also drive a Sienna according to the principle “higher speed, fewer potholes.” Yes, and it seems that I blew up the left silent block in a critical situation a month ago when overtaking a caravan of trucks, one of them in front of me also jumped out to overtake, and I had to fly into the oncoming side of the road at mph into a large hard hole.
Thank God, Sienna coped with this extreme. I bow to those who can repair a car on their own, this is not given to me, so only car service money. In my case, replacing one lever with a wheel alignment is still cheaper than sequentially replacing 4 non-original bushings. And yet, let's stick to the correct terminology: And if you once come across an unsuccessful original part in your practice, you should not conclude that you need to switch to non-original spare parts.
It would be nice to see a photo and part number, I think many will thank you. And here’s what the Polyurethane company produces by substituting the catalog numbers into their Daihatsu and Toyota search engine for the margin indicated in the post: Are they stiffer than rubber ones? Polyurethane is a good thing, especially in our frosty climate and where high abrasion resistance is needed for industrial floors. Rigidity and elasticity can be adjusted when drawing up the formulation, but the adhesion to metal of polyurethane is rather low.
Installing a Toyota front arm silent block At least 7 years ago we tried to make samples of polyurethane silent blocks. During testing, the separation along the border with the metal occurred quite quickly and we installed a silent block for the Toyota front arm to do them. I don’t understand about the equation between replacing silent parts and changing the oil?
When replacing the entire lever, is it not necessary to do the camber?
Does the lever assembly have different rubber in the silent block? According to the author’s terminology above, “whoever wants it as he wants” and “please forgive my French! Therefore, he is in favor of putting on the original Dmitry, but what is the difference between an original not in a pair and a non-original in a pair?
We make risks on the silent block and the lever so that when installing a new silent block, place it in exactly the same position. It is very important that it stands exactly the same as it does. And one more thing: This is what the entire assembled mandrel looks like.
There is no point in describing the entire 15-minute process of pressing 4 silent blocks, I will only show a couple of glides of the process and the end result. Two clicks on the hydraulic pump and the silent block is in place.
Horizontal only double, took RBI. The first stage before the replacement went perfectly, let's move on to the second!
how to properly install the lever sales block
In order to remove the left lever, it was necessary to untie the left and front engine cushions, which made it possible to raise the automatic transmission, which would not allow pulling out the fatal bolt securing the horizontal silent block.
The first sign of failure of the silent blocks of the levers is a characteristic metallic knock in the suspension. Typically, rubber parts are exposed to the environment, namely heat and cold, which wears out the rubber components. Also, it is worth noting that the reinforced installation of the silent block of the front lever of the Toyota front lever silent blocks affects the stability of the vehicle on the road surface and disrupts the alignment position, which in turn will affect tire wear.
Replacement algorithm Let's consider the sequence of actions aimed at replacing the silent blocks of the front control arms of a Toyota Corolla: The stabilizer struts seem to be from Lexus, I don’t know for sure, but they fit me the first time. In short, I repeat, I took the installation of the silent block of the front lever of a Toyota rubber band from them and I’m sure that next time I won’t go there. Published by amasa2 - April 3, - Hello, I have a problem replacing the front silent block in the front suspension arm.
For Exist only assembled with a lever, there is still a replacement for Febest TAB, but the reviews for this brand are not entirely good. Who will advise what?? Published Diagnosis - April 3, - Read above. Suitable vtr Published by amasa2 - April 4, - The diagnosis is the rear silent block, and I'm talking about the front, sweetie, eared Published by andy - April 4, - I changed it myself, installed the installation of the silent block of the front Toyota arm, I'm happy.
Published by amasa2 - April 5, - Published by andy - April 17, - On their website http: You enter the original part number there and it gives out their fulcrum number.
As if I talked to a person and installed the silent block of the Toyota front arm, he gave me this installation of the silent block of the Toyota front arm. He said that their centers would pick up the part without any problems. Published by wolk - April 17, - We would like a direct link to the part installed for you. Published by Okella - April 17, - Published by leon - April 17, - I installed this http: In general, we praise this company, but in terms of the fulcrum the reviews are so-so, supposedly polyurethane lags behind metal quickly, like on Chinese silent compounds.
Published by Colonel - April 18, - In general, installing a Toyota front arm silent block polyurethane is a good alternative to rubber, provided the correct manufacturing technology is used. But, since in our country everyone who is not too lazy is engaged in polyurethane, without having basic knowledge and conditions for the correct manufacture of products from it, the results are accordingly.
Therefore, it is better not to worry and buy original spare parts or decent analogues. Published by wolk - April 18, - Yours is also polyurethane. What worries me is that the shape of the silencers is fundamentally different on the link and our original. Well, since 40 tkm works, then we should consider it as an option.
Published by leon - April 18, - I can’t vouch for it, I convey people’s opinions in reviews. The most difficult thing in their production is just “blinding” the metal with polyurethane; there is some kind of special processing there. Maybe the chemical composition is different, I don’t know all the details.
Published by De-mui - April 21, - Good day everyone. Anyone who has installed silent blocks for their own “fulcrum points”, please tell me the exact number or link for installing a silent block for the Toyota front arm. Sienna 04. There is definitely no Sienna on their website http: I want to know the exact part number so that I can ask my friends to buy it and send it to Minsk. A cut in the front beam Removing the front suspension arm With the help of welding and a pneumatic chisel, the cracker gave in, and the rest of the bolt was safely removed from the beam; they spent half an hour poking around to get it out.
The levers were removed and taken to re-pressing the silent blocks. The front horizontal silent blocks are in good condition, I only replaced the rear vertical ones.
In general, the other day I changed the steering tips and rods, a photo report will be later, I removed the levers to see the condition of the silent blocks and lubricate them with graphite lubricant for the future, and so you can see that the silent block is already starting to crack due to uneven load, it is clear that the crack is due to the tilt of the silent block, so The silent blocks must be pressed evenly.
Replacing silent blocks on a Toyota Corolla Fielder
To do this, place the car on a lift or inspection hole. In this case, the wheels must be removed and the front axle suspended. To install the lever on the right side in the direction of travel of the car, it is necessary to perform some operations. Remove the lever from the ball joint; to do this, unscrew 2 nuts and 1 bolt.
Front suspension arm Toyota Corolla 120 2 bolts holding the arm bracket. Unscrew the bolt of the front silent block and remove the lever. Due to the fact that it is screwed into the subframe and access to the threaded connection is difficult, there may be a problem with unscrewing.
Suspension and steering
In order to prevent the bolt from breaking, it is recommended to preheat it. The procedure for removing the lever from the box side is slightly different. In addition to the above operations, it is necessary to loosen the subframe. To do this, unscrew the cross beam held on by 9 bolts.
This will make it possible to remove the bolt, since otherwise it will rest against the gearbox housing.
Replacing the rear silent blocks of a Toyota Corolla is done using a special puller. Replacing the front silent blocks of a Toyota Corolla is carried out using a vice or a hydraulic press. You can’t do without it when installing new parts. It is also necessary to have extensions that match in size with the outer diameter of the rubber-metal parts. In the absence of special equipment, disassembly can be done independently. And for pressing out and installing new ones, it is better to contact specialists at a service station.
When installing parts, the seats must be cleaned of rust and lubricated with oil. Toyota Corolla 120 front suspension arm
Also remove rust from the bolts and apply graphite lubricant. This will allow you to easily unscrew them the next time you replace them. If the material was interesting or useful for you, publish it on your page on a social network: The average service life of suspension elements is 60 - 85 thousand.
The quality of manufacturing of spare parts and the driving style of the car are the fundamental factors affecting the life of the front suspension arm of the Toyota Corolla 120.
Removing and replacing levers on a Toyota Corolla Rubber-metal hinges that look like metal bushings are installed in the front levers. As a rule, polyurethane or rubber inserts are located inside them.
Many car owners note that bushings need to be replaced as they wear out, that is, enough. While silent blocks remain operational even after a hundred thousand kilometers. Usually. An unpleasant noise may be heard when parts come into contact.
Accordingly, you will have to replace them. If you hear a slight knocking sound from where the front suspension is located, you need to inspect the chassis by placing the car on a lift. Take a mounting spatula for the front suspension arm of the Toyota Corolla 120, carefully check all the connections of the parts, as well as the integrity of the rubber elements. To successfully replace the levers, you will need to place the car on a pit or a lift, taking into account that the front axle is suspended and the wheels are completely removed.
Useful video
We recommend watching the video below:
To replace the silent blocks of the front levers on a Toyota Corolla, for convenience, you need to use a pit or a lift. And you should pay special attention to the choice of parts, since this will determine how long they will last.
Quick viewRear lower arm silent block MZABMZ3RKIT FEBEST for TOYOTA COROLLA E150 (2006–2013)Article: MZABMZ3RKITManufacturer: FEBEST640 rub.Quick viewRear axle (knuckle) silent block FEBEST TAB497 for TOYOTA COROLLA E150 (2006–2013)Article : TAB497Manufacturer: FEBEST610 rub.Quick viewSilent block front lower arm 60926304 SWAG for TOYOTA COROLLA E150 (2006–2013) Article number: 60926304 Manufacturer: SWAG290 RUR Quick view Rear subframe silent block JP-GROUP 1150100400 for TOYOTA COROLLA E150 (2006–2013) Article number: 11 50100400Manufacturer: JP-Group490 RURQuick viewFront silent block lever CAB30001 FENOX for TOYOTA COROLLA E150 (2006–2013) Article number: CAB30001 Manufacturer: FENOX RUB 1,060 Quick view Right front arm silent block 3003112919HD MEYLE for TOYOTA COROLLA E150 (2006–2013) Article number: 3003112 919HDManufacturer: MEYLERUB2,030Quick viewFront knuckle silent block (trunnion ) MEYLE 1004070086 for TOYOTA COROLLA E150 (2006–2013) Article number: 1004070086 Manufacturer: MEYLE RUR 580 Quick view Rear arm silent block 55930944 SWAG for TOYOTA COROLLA E150 (2006–2013) Article number: 5593094 4Manufacturer: SWAG RUB 3,800 Quick view Rear subframe silent block CORTECO 49360953 for TOYOTA COROLLA E150 (2006–2013) Article number: 49360953 Manufacturer: CORTECO360 RUR Quick view Spring silent block LEMFORDER 2931401 for TOYOTA COROLLA E150 (2006–2013) Article number: 2931401 Manufacturer: LEMFORDER 480 RUR Quick view Rear silent block subframe SWAG 60927539 for TOYOTA COROLLA E150 (2006–2013) Article number: 60927539Manufacturer: SWAG840 rub.Quick viewSilent block of the front lower arm TABACA30S FEBEST for TOYOTA COROLLA E150 (2006–2013)Article: TABACA30SManufacturer: FEBEST410 rub.Quick viewSilent block of the front lever CAB20007 FENOX for TOYOTA COROLLA E1 50 (2006–2013)Article: CAB20007Manufacturer: FENOX460 RURQuick viewFront lower arm silent block TABZZE150B FEBEST for TOYOTA COROLLA E150 (2006–2013)Article: TABZZE150BManufacturer: FEBEST680 RURQuick viewFront arm silent block TAB024 FEBEST for TOYOTA COROLLA E150 (2006–2013)Article: TAB0 24Manufacturer: FEBEST410 rub.