A Toyota Camry V50 arrived at our car service center in Fergana. The car is a notorious “rumbler” and will have to be worked on thoroughly. The work was carried out in the presence of the owner, who occasionally walked around the service, but most of the time he rested in a comfortable client room, where there is Wi-Fi and a TV.
We have prepared new gloves and all the necessary materials. The main work will be done by two masters, and occasionally two more will help them. Get to work!
Soundproofing doors Toyota Camry V50
All four doors are made by two craftsmen, while the other two work on the interior. This way there will be no crowd and no one will disturb anyone. Everyone is busy.
Having removed the door trim, we see a small piece of felt, which serves as a standard noise for the doors. And thanks for that!
We remove the protective film, degrease the metal and begin to correct the shortcomings of Toyota engineers.
The first inner layer will be SGM M2 - for vibration protection.
We glue Splen on top of the vibration isolation. It serves as a sound absorber and provides thermal insulation (relevant for winter).
We glue another layer of SGM M2 along the contour of the door. We do not close the left hole - the speaker is located there.
The last layer on the door will be Bibiton. Lightweight and porous, it completes the soundproofing of Camry doors.
There is no need to glue additional layers as there is a risk of the doors sagging, and 4 layers are optimal for almost any car, proven by experience.
Camry 30 body tuning
Beautiful, elegant Camry XV30
Exterior allows you to truly give free rein to your imagination and realize the body in different styles. The appearance of the Toyota Camry XV30 2005 will look equally good both in a sporty “sleek” style and in a solid or aggressive design. Thanks to various types of body kits, it will be almost impossible to recognize the Camry 2001 - 2006 model. Modern body parts for tuning are made from high-strength composite materials such as fiberglass and carbon.
Auto-tuning of the body also includes covering with armor film, which protects problem areas, such as: handles and the recess under them, the edge of the roof, the hood, which over time look worn and scratched. Protective stickers will not spoil the paintwork, and thanks to the correctly chosen tone, they will completely blend with the color of the car.
Red cool Camry 30
Camry tuning: “Lexus style”
Tuning is very popular - “Lexus Style”. It is moderately sporty and at the same time representative. This upgrade will require replacing:
- Front bumper;
- Headlights;
- Radiator grille;
- Moldings;
- Exterior trim around grille and fog lights;
Toyota Camry color change
There are three tuning options for changing color:
- Regular staining (full or partial);
- Airbrush – applying an original design;
- Pasting with a special film – tapography;
Well-modified appearance of the white Camry 30
Trust this work only to reputable auto painting workshops. Be sure to ask the master about previous work before entrusting painting.
Types of radiator grilles
A fashionable restyling would be replacing the standard radiator grille with one more suitable to the new style of your car. There are many types of grilles on the Camry XV30 2003:
- Mesh gratings;
- Grilles made of combined composite materials;
- With horizontal or vertical stripe;
- Solid;
- Grilles without emblem.
Camry 30 with custom grille
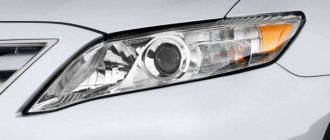
Toyota Camry optics tuning
The Camry car will become much more attractive if you apply Depo Eagle Eyes Sonar headlight tuning. Eagle Eyes, equipped with angel eyes and a dot strip of daytime running lights, will increase traffic safety on the road. The car will become more visible on the road. As standard, the Toyota Camry V30 2004 is equipped with halogen headlights, but xenon will look much more impressive. Many car enthusiasts make the mistake of installing xenon in standard housings. In this case, it will attract the attention of the traffic police, whose employees will easily determine that the light is not standard. Proper installation of xenon involves replacing headlights marked HCR with DCR headlights. Despite this, many still install xenon in stock optics, but this is not a simple matter, and the slightest error will lead to questionable light quality.
Beautiful optics for Camry 30
Tuning tail lights Camry V30
On the rear of the body, non-original lights made under the BMW or Mersedes brands look luxurious. Installing such headlights will require effort, since the Toyota Camry 30 has a slightly larger segment on the trunk for rear optics. There are different options for carrying out this tuning work. Some craftsmen prefer to grind down the “saber” located above the number, others perform various “tricks” with the headlight housing itself. In the first case, additional problems will arise with closing the trunk, in the second, you will have to redo the “chips” in the wiring.
Camry 30 lights
Soundproofing Camry 50 floor
Before working with the floor, you need to remove everything unnecessary from the interior, as well as remove the covering.
Carefully remove the covering, disconnecting the fasteners.
Under the trim we see layers of felt under the seats and a little near the engine compartment.
This picture can often be seen in other cars. Many automakers are thinking of protecting against engine noise. By the way, the previous generation Camry V40 does not have such protection.
We must give Toyota credit, the felt here is at least a centimeter thick!
We remove everything unnecessary, including standard sound insulation.
A very important point! Thoroughly degrease the metal surface. Without this, the material simply will not stick.
We start our noise insulation with SGM M2. Its thickness of 2 mm is enough to reduce vibration and noise from metal. The sound of small stones on the bottom will not be heard.
The entire floor is covered with a vibration damper. Every bend and nook is taken into account. Holes are made for wiring and mounting holes.
It was done cleanly no matter how you look at it!
The next layer is Bibiton. It bends easily, which is a definite advantage on a tortuous floor.
Coordinated teamwork is the key to success in this difficult task.
The floor is ready! The Bibiton noise absorber easily stuck to the vibration insulation layer. We put the standard felt back in place and the floor is ready.
In parallel with the floor, we made vibration isolation for the acoustic shelf, now the music will sound much clearer.
Materials
When used correctly, they help make the interior 80-85% quieter. The basis of soundproofing substances are bitumen resins. An additional advantage of this body treatment is its protection against corrosion. Better, lighter materials are being developed every day.
Categories of insulators used for noise reduction:
- Vibration isolators (vibration absorbers) significantly make the body heavier, but very effectively protect against noise; absorb about 0.5 kHz.
- The sound absorber has a cellular structure, most often covered with a soundproof film that protects the body from moisture. Very effective for noise absorption.
- Sealing materials applied to problem areas of the car. They provide better noise absorption.
Bitumen-based raw materials are most often heavy sheet rolls, which do not provide 100% noise protection. Why is that?
- For the required level of absorption, the thickness of the material must be at least 1 cm, and with such a thickness the material will be quite heavy.
- Such an insulator is very inconvenient to lay on curved surfaces, of which there are many in the Camry.
- Temperature changes reduce the effectiveness of this type of material. For maximum performance, a temperature of 15-20 degrees is required.
Shumka material
Read also:
- Tuning Toyota Camry v40: body, interior and engine.
- Toyota Camry or Mazda 6 – how to decide?
However, progress does not stand still. A lot of different insulators have already been invented (mastics, Shumkov and vibration isolators), which are much more reliable and do their job better.
Soundproofing the trunk and wheel arches of Toyota Camry V50
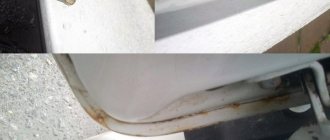
The trunk is a traditional source of noise, mainly due to the thin side walls and wheel arches.
The walls are bare metal. All the noise from the wheels goes straight into the cabin.
Already better! We cover the arches with SGM M3, which is one third thicker than M2.
We completely cover the trunk with SGM M2. There should be no joints or visible parts of metal.
The second layer will be Bibiton. We glue the sound absorber only in certain places. We do not touch the surface on which there may not be enough space for covering.
A completely snow-white trunk that smoothly merges into the floor. Now the lower part of the cabin is isolated from vibration and road noise!
We put the covering in place, everything fit perfectly, there was enough space between the covering and the floor for two layers of materials.
Materials and tools for self-soundproofing a car
To independently improve the acoustic comfort of your car, you will need the following tools:
Technical hair dryer
- the usual kit for a car enthusiast to disassemble the interior,
- Camry V40 manual, which will significantly speed up the process of removing internal body panels,
- clip remover, an optional item, but convenient,
- a vacuum cleaner or brush for collecting dust and debris from body parts,
- liquid for degreasing surfaces, 1.5-2 l is enough for the entire car,
- ruler, tape measure, marker,
- scissors must be sharp and comfortable,
- painting knife,
- industrial dryer,
- stitching roller.
We’ll tell you what materials will be needed for vibration and noise insulation of the Camry; using identical ones, of course, is not necessary. Use something with similar characteristics.
Vibration-absorbing:
- STP Aero, size 750-470 mm, thickness 2 mm – 12 sheets,
- STP Aero Plus, size 750-470 mm, thickness 3 mm – 10 sheets,
- STP Bimast Bomb Premium, size 750-530 mm, thickness 4.2 mm – 2 sheets.
Soundproofing materials:
Biplast Premium
- STP Noise Block, size 570-350 mm, thickness 2 mm – 12 sheets,
- STP Accent Premium, size 1000-750 mm, thickness 6 mm – 3 sheets,
- STP Biplast Premium, size 1000-750 mm, thickness 15 mm – 6 sheets.
Thermal insulating materials:
- STP Barrier, 1000-750 mm, thickness 4 mm – 7 sheets.
The total weight of the materials used will not exceed 50 kg.
This is interesting: Speakers for Toyota Camry 40: replacing speakers
Soundproofing the ceiling of Toyota Camry V50
Next in line for us is the ceiling.
We open the fastenings and remove everything unnecessary.
Having lowered the casing, we sit on a beautiful, but very thin sheet of metal.
The surface itself is divided by partitions into several sectors. We can glue the ceiling with separate solid sheets, just along the contour.
Cleanliness is the key to success and safety! Our craftsmen work only with gloves.
While one specialist is gluing a new layer, another specialist is pressing the material to the surface with a mounting roller.
It turned out to be of very high quality, the SGM M2 stood tightly, you don’t have to worry about it coming off.
The second layer will be felt. It traps noise in its wool fibers. The soundproofing of the ceiling is almost ready - all that remains is to put the trim back in place.
Part Description
Any hood is, first of all, a removable part. It covers the engine compartment and protects it from any damage. The hood consists of an outer panel and various reinforcements that increase strength. The part is held on two hinges, its rear part is attached to the car with a lock.
This mounting method not only simplifies access to the power unit compartment. but also makes the movement of the vehicle safer.
With the help of rubber buffers, the gaps between the hood and other body parts become uniform. The car owner can adjust the position of the hinges at his own discretion by tightening the fastening bolts. Note that there is also a gap between the radiator shield and the front part of the hood, covered by an apron. The photo below shows what this part looks like.
A car hood can be made of carbon fiber, aluminum, steel and fiberglass (as insulation). It performs “vital” functions in the operation of the vehicle, so it must be prepared for exposure to various temperatures and be as safe as possible. In this regard, the part is usually made of steel.
Soundproofing the hood of Toyota Camry V50
The case is nearing completion, and it is already evening. Next up is the hood.
Under the skin we see several sectors; we will glue small pieces of materials into them.
We drive the vibration-isolating material SGM M2 into the sinuses and roll it with a roller.
We seal everything with felt. It will protect against engine noise. There is no need to be afraid of fire from high temperatures; we strictly follow the regulations for installing materials.
Installation, replacement of the hood on Camry 40
The hood replacement procedure is a last resort because most visible damage can be repaired without purchasing a new part. For successful work, you will need tools and an assistant, since replacing the hood on a Camry 40 yourself is problematic.
You will have to not only remove the trim from the body, but also mark the location of the hinges. To carry out the installation, follow these steps:
- With the engine stopped, set your vehicle's parking brake.
- Open the hood.
- After removing the keys from the ignition, disconnect the negative terminal from the battery.
- After cleaning the hinges from dirt, disconnect the electronic hood lock. To do this, remove the tongue and get rid of the screws. Don't forget to disconnect the wires and cable.
- Mark the position of the hinges with a marker to install the new piece in the same position as the old one.
- When unscrewing the bolts, first get rid of the front and then the rear hinges. Otherwise, the hinges may become bent and the hood may fall forward and become damaged. Check the lock escutcheon.
- Carefully inspect the engine compartment for any loose fasteners.
- Lift the part and remove it. Degrease all fasteners, then prime and paint in the desired color (if necessary).
- Activate the electronic lock (if you have one).
- Install the new part in the reverse order of removing the old one. Re-lubricate the hinges.
- Screw in the bolts, aligning the body holes with the hinge holes. This is why you marked their location earlier.
- The negative terminal of the battery must be connected back.
This completes the immediate replacement of the hood on the Camry. Do not forget that incorrect connection of wires can lead to a short circuit. If you are not confident in your abilities or are afraid of causing any mechanical damage to the vehicle, contact the salon.
Our specialists will help you choose the part that is suitable for replacement and will install it yourself. Usually the process takes no more than an hour. Otherwise, you can cause irreparable damage or completely disable the car.
Sound insulation of the trunk lid Camry 50
The last step is the trunk lid.
As on the hood, here we see several sectors where the metal is thinnest.
We glue vibration insulation to open areas.
To complete we need Spleen. Its large sheets provide effective sound absorption.
How to Remove Camry 40 Door Trim
So, the honorable owners of the pre-restyling V40 (2006-2008), finally got around to creating a photo report on installing other exterior mirror housings with built-in turn signals.
The process is as follows: First, remove the front door trim. The process is not easy))
Use a flat tool (preferably a plastic spatula) to wipe and remove the decorative insert from the door handle.
Under it (top and bottom) there are two Phillips mounting screws. We unscrew them naturally.
Next, using the same flat tool, we sweat and remove the insert from the body of the door opening “hook”.
Under the removed insert there is another screw.
There is a fastening “piston” in the corner of the casing. To remove it, you must first press on the core.
- Using a “pull” motion, remove (with a small movement, snapping off the fastening clips) the triangle-overlay.
- Now you can begin to remove the casing.
- For this purpose, starting from the speaker, push the bottom of the door trim away from the door by moving it towards you.
- After making sure that the pistons are unlatched, move upward to remove the casing from the groove where the glass seal fits.
- Now it is necessary to disconnect the cables from the door opening mechanism located on the inner surface of the casing.
You should also disconnect the wiring connector that goes to the E.S.P. buttons.
And disconnect the connector that goes to the lamp.
Now you can start removing the mirror.
10mm head. unscrew the three nuts and remove the mirror from its seat. Naturally, we disconnect the wiring connector as well.
The work is then divided into two steps:
Step #1. Installation of a new case.
We place the mirror on a soft surface and unwind the standard insulation on the incoming wiring harness.
Now you should remove the mirror element. For this purpose, press on the top edge of the mirror in such a way that the mirror tilts very upward.
Through the gap formed at the bottom, using a small tool (screwdriver as an option), we release the mirror element from the fastening latches.
Disconnect the terminals suitable for the mirror element and remove the element.
Remove the upper mirror housing. For this purpose, use a screwdriver to bend the fastening latches from the inside.
Next, for the convenience of laying the wire, you should unscrew the three screws (Torx) and remove the rotating part of the mirror.
Now you can start pulling the wire. To make this operation easier, generously lubricate the wiring area with WD-40 liquid, and use electrical tape to attach a narrow, rigid wire to the wire from the turn signal of the new housing being installed to be pulled.
- We fix the laid wire together with the standard one using electrical tape and assemble the mirror.
- After the mirror is assembled, we install it in place and begin laying the wiring from the door to the salon.
- To make it easier to drag the wire from the turn signal into the cabin, remove the speaker.
- In the Kari V40, the standard wiring from the door to the passenger compartment goes along a corrugated cable without connecting connectors, so there will be no problems with the routing of the wire.
To make it easier to pull the wire through the corrugation, I also recommend “spraying” VE-Dashka into the corrugation and attaching the wire to the wire being pulled through. Or even better, a flexible, narrow iron spring that can be removed from a windshield wiper that has expired.
We secure the laid wires to the standard harnesses using zip ties or electrical tape.
Both turn signals should be connected in the left threshold. We call the wires and determine the pair suitable for connection.
Yellowish. left, greenish. right.
We connect to them “” from the wires pulled from the turn signals in the mirrors, isolate and assemble the car in the reverse order.
We admire the work done. ))
For those who are too lazy to bother themselves, you are welcome to come to us for installation. Because our “hands” have been full for a long time. ))
Completing soundproofing
And one more, far from easy task is to put the interior back together. Fortunately, we document interior details so that nothing is lost or damaged.
Ready! It's time to inform the happy owner that the work is complete.
In the process of soundproofing the Camry V50, the car became heavier by about 60 kg. 4 craftsmen took part in the work. Due to the large volume, a whole day was spent on soundproofing. But at the same time, everything possible was done to improve the comfort of driving in this wonderful car.
Thank you for your attention, see you at 12 Volt!
Introduction
Like any process, sound insulation has its pros and cons. The advantages of additional noise insulation include the fact that it makes it possible to get rid of creaks and noise.
Read also:
- We independently repair steering rack faults on Toyota Camry 40
In addition, the sound insulation of the doors is felt immediately (the thin metal of the doors gains additional thickness and stops vibrating when the car moves).
The main disadvantage of additional treatment with soundproofing substances is the weighting of the body.
You can either sound the iron horse completely or process its individual parts. During the soundproofing process, the entire surface is carefully processed. It is very important to perform this procedure efficiently in the space between the passenger compartment and the engine. This will eliminate the main source of noise, because some Toyota Camry models have cavities or cracks in this place.
Completely ridding your car of noise is not a cheap pleasure. There is a crisis outside the window, there is little money in your wallet, but you want to travel in comfort, without distracting yourself with extraneous sounds. On the other hand, everyone can soundproof their iron horse on their own, saving money and wasting their time and effort.
First, calculate how much you will have to spend. An option for partial sound insulation is possible, which is much more attractive in terms of money. For example, you can only treat the doors or the rear of the vehicle. The insulation process is simple. If you wish, you can produce it yourself. The result will be a high-quality “noisy” car and also financial savings.