Replacing the rear axle bearing of Toyota Land Cruiser Prado 120
To change the wheel bearing of the rear axle shaft of a Toyota Land Cruiser Prado 120 (Toyota Land Cruiser Prado 120), you must have a vice, a small pipe of suitable diameter, a gas pressure gauge, a powerful hammer and a standard set of tools. In general, the procedure for replacing the hub bearing on the rear axle shaft of a Prado 120 is not an easy one; you will have to work hard. To guide your own actions, see the nice photo annotation, a report on replacing a bearing on a Toyota Prado 120.
You can also read the photo report Replacing the front wheel bearing of Toyota Prado 120 and Lexus LX 470 (UZJ).
Front wheel bearing life
Depends on many factors. Wide wheel rims with increased offset, off-road vehicle operation, overcoming water obstacles, reagents and salt, harsh climate and driving style - all this affects the service life of wheel bearings.
The front wheel bearings of the Toyota Land Cruiser Prado 150 are more loaded than the rear axle bearings. This is explained by the design of the SUV's axles. In our case, the car's mileage was more than 200,000 km.
Which rear axle bearing to install on the Toyota Land Cruiser Prado 120, when to change it?
There is no unusual number for the separate bearing; it comes exclusively assembled with the hub. The unique number of the right hub is 42450-60050, average cost is 12,000 rubles, the left hub is 42460-60010, average cost is 11,523 rubles.
Wei Jianjun, Chairman of the Board of Great Wall Motor Ltd. paid a visit to the Tula region, where he was met by the local governor Alexey Dyumin. On October 12, they signed a memorandum outlining the idea of developing sports in the region.
The diplomatic document implies the active participation of the Chinese brand in the sports life of the region. In particular, financial assistance will be provided to the Arsenal football club in Tula.
For now we are talking about some kind of “bilateral cooperation”, but in the future a sponsorship contract will be signed. According to the press service of the regional government, such actions will lead to the development of the football club and future achievements.
The arsenal's sponsors at the moment are Rosneft, Rostec and local enterprises, including NPO Splav: their logo is emblazoned on the chests of the football players.
Let us remind you that the Haval brand, owned by Great Wall, has big plans to introduce its products to the Russian market. These initiatives are supported by Xiaomi, a collaboration with which the automaker has high hopes, which, however, is mutual.
This photo report describes in detail the process of replacing the rear axle oil seal on a Toyota Land Cruiser Prado 120. The replacement procedure itself is not very complicated. To make the replacement you will need from the tool:
To begin replacing the rear axle shaft seal, you need to jack up the car, remove the wheel, remove the brake disc, and then the procedure for dismantling and replacing the seal due to humming and knocking, wheel play and leakage.
First of all, use a metal brush to clean the threads on the bolts if there is rust there.
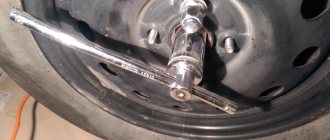
Next, remove the bolts, preferably with the car standing on the ground. To do this, you need a 17mm head and extensions of different lengths with a cardan.
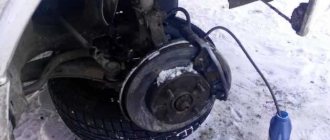
Next, jack up and remove the wheel. We put the car on reliable supports.
Next in line is the brake pipe. Unscrew it from the hose.
We unscrew the parking brake cable bracket to give some freedom to the axle shaft, unscrew the nuts (the ones we took off at the beginning), don’t forget to disconnect the ABS sensor connector and pull out the axle shaft. It will go as far as the cable will go.
Next, remove one handbrake block (I removed the front one) and release the cable. We unscrew the two bolts securing the cable to the support disk and remove the cable from the brake mechanism.
You can remove the block and release the handbrake cable while the axle shaft is still in place.
Now nothing prevents us from pulling out the axle shaft completely.
At first I thought that the oil seal spring just fell out. But after removing it I saw that the working edge was missing altogether. There is simply nothing for the spring to hold on to.
Replacing the oil seal on the rear axle shaft of a Prado 120 takes about half an hour: there is nothing complicated in the operation.
Shank seal
At the rear of the Toyota Prado there is a gearbox shank oil seal. It protects the joint between the gearbox and the driveshaft from leaks. It's easy to change this part:
- Jack up the rear of the car.
- Remove both rear wheels and install stands.
- Tighten the handbrake to prevent the shank from turning.
- Unscrew the bolts at the junction of the cardan and gearbox.
- Unscrew the drain plug, draining the transmission oil (there will be several liters of it, so it’s worth preparing a container).
- Unscrew the nut securing the drive gear.
- Remove the gear flange from the shank.
- Remove the old oil seal.
- Clean the flange from contamination.
- Lubricate the working area with transmission oil.
- Install a new part.
New oil is poured
into the rear
Hub replacement
Replacing the Prado 120 rear hub is similar to replacing the bearing: the latter is usually purchased complete with the hub, repairing everything at once.
You can extend the service life of this part without disassembling the car:
- Remove the anti-lock braking system sensors.
- Using a medical syringe, pour transmission oil into the hole to the brim.
If the oil does not leak, the hubs are in perfect order, and the bearings have received additional lubrication, which will have a positive effect on their operation. If the hub leaks, it is better to repair it before serious problems arise.
The cost of repairing the front axle gearbox of this car:
Remove play in the axle gearbox with complete preventive adjustment of the gearbox.
The cost of repairing a removed gearbox will be 7,000 rubles . The price includes:
- work on the gearbox 4000 rubles;
- adjusting rings, spacer sleeve, oil seals (3 pieces) - 3000 rubles.
Replacement of worn axle gear bearings
The cost of repairing a removed gearbox will be 14,000 rubles . The price includes:
- work on the gearbox 4000 rubles;
- bearings 7,000 rubles (set of 4 pieces);
- adjusting rings, spacer sleeve, oil seals (3 pieces) - 3000 rubles;
Replacing the hypoid pair of the axle gearbox
The cost of repairing a removed gearbox will be 41,000 rubles. The price includes:
- work on the gearbox 4000 rubles;
- hypoid pair (includes shank oil seal, spacer sleeve and fastening bolts) - 35,000* rubles;
- adjusting rings, oil seals (2 pieces) - 2000 rubles.
Replacement of the hypoid pair and bearings of the axle gearbox (Full repair)
The cost of repairing the removed gearbox will be 48,000 rubles. The price includes:
- work on the gearbox 4000 rubles;
- hypoid pair (includes shank oil seal, spacer sleeve and mounting bolts) 35,000* rubles,
- bearings - 7000 rubles (set of 4 pieces), adjusting rings, oil seals (2 pieces) - 2000 rubles.
Replacing the Prado 120 drive oil seal
Everyone ✌️️I recently noticed fresh oil stains under the car in the garage. I crawled under the car and discovered a leak from the left drive. I recently changed the oil in the transfer case and axles, apparently the fresh oil is thinner and has leaked from the oil seal cracks). At one time I decided to change the drain plug, since the old one was in poor condition. I bought: 90311-47012 - original drive oil seal 291р90430-24003 - drain plug gasket 36р90341-24014 - drain plug 275
READ Replacing cabin filter Honda CR-V 1
The replacement process is simple. We unscrew the two lower ball bolts, then one person pulls the hub wisely, the second takes the mounting bracket, rests against the inner grenade from below and pulls out the drive with sharp jerks. We pry the oil seal with a mounting tool and pull it out. We slowly tap the new oil seal back into place and put the drive back. We tighten our two ball bolts back, put the wheel on and we're done.
The owner of any car, as in this case with the Toyota Land Cruiser Prado 120 (Toyota Prado 120), sooner or later begins to worry about the problem when the CV joint (constant velocity joint) crunches.
To solve this problem, you can rebuild the CV joints, change them or the like, but you can also use another method discussed here - swap the drive shafts. Since it is known that the drive shafts on the 120th model are the same on both sides, this “old-fashioned” method has a chance to help your car.
Bearing replacement
Replacing the rear wheel bearing of a Prado 120 is a labor-intensive process, which can only be facilitated by special equipment (press, gas burner) - even experience will not help. Perhaps, instead of getting your hands dirty and trying to cope on your own, it’s easier to take the car to a service station.
- Raise the rear of the car.
- Remove the wheel.
- Unscrew the caliper.
- Disable anti-lock braking system sensors.
- Remove the brake disc and pads.
- Remove the handbrake cable.
- Unscrew the fastening nuts.
- Pull out the axle shaft along with the hub.
- Remove the retaining ring.
- Partially cut the locking sleeve. When working with an angle grinder, you need to be careful not to damage the axle shaft and washer.
- Remove the bushing.
- Install the axle shaft vertically.
- Knock off the spline with a sharp blow.
- Remove the studs from the spline.
- Cut off the remaining bearing.
- Install the new bearing into the housing.
- Secure with pins.
- After heating the locking sleeve with a gas burner, install it in place.
- Install the retaining ring on top.
- Reassemble in reverse order.
When disassembling, you don’t have to replace the old anti-lock braking system rotor and o-ring - according to the owners, they sometimes wear out more slowly than the main mechanism.
Gearbox repair for out-of-town clients
If you are in another city (not in Novosibirsk) and cannot repair this gearbox yourself, we are ready to help you with the repair using our own resources. To do this you need:
- Contact us by email and arrange a repair
- Send the gearbox by transport company (or passing transport) to our address.
Upon receipt, we will carry out the repair (and you will pay for this repair) and send the repaired unit back through the transport company.
This repair will cost you approximately 1000 rubles more than the indicated prices (the cost of delivery services to the transport company). And it will take approximately 2 weeks (while your gearbox will be on the way). We will carry out the repairs immediately - out of turn.
Which bearing to install and when to change?
Prado 120 axle bearings are replaced as necessary: they are inspected at each maintenance, installing a new one if there are signs of wear. Instead of original parts, you can use more affordable analogues.
| Front axle bearing | 43570-60011 | 43570-60010 |
| Right rear hub | 42450-60050 | WB-2516 |
| Right front hub | 43502-60180 | 80059LCHB |
| Left rear hub | 42460-60010 | WB-2517 |
| Left front hub | 43502-60201 | HF-JT0011-F |
| OEM | Analogs | |
| Rear axle bearing | 90369-48001 | ST-90369-48001 |
As can be seen from the table, some of the parts are interchangeable.
Which tripod should I install on the Toyota Land Cruiser Prado 120?
There is no original number for a separate tripod, but you can use an analogue Febest 0116GRJ120 - 1966 RUR.
We put the car on a jack and remove the wheels. Remove the protective cap and pull out the cotter pin.
Remove the lock nut and unscrew the hub nut with a 35 socket.
We take out the cotter pin on the tie rod nut and unscrew the nut with a 19mm head. If you have problems knocking out the ball joint, you can use a puller.
Unscrew the two bolts of the lower ball joint bracket with a 19mm socket.
Carefully move the steering knuckle to the side and pull out the outer CV joint from the splines.
In order to remove the drive, the large clamp is removed from the inner boot. After the drive has been pulled out, we place marks on the tripod and the cup to ensure proper reassembly.
We clamp it in a vice and remove the tripod; to do this, remove the locking ring and pull it up to remove the tripod bearing.
We repeat similar steps with removing the tripod from the right drive.
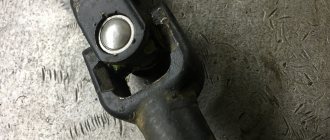
The photo shows a damaged right oil seal. Because of this, a lot of dirt accumulated near the wheel bearing. In this place you need to wash everything and replace the oil seal with a new one.
For comparison - new and old seals.
Left (top) and right (bottom) drives. We swap the tripods on them so that the tripod bearings remain in their cups. We carry out the assembly in the reverse order, not forgetting to install the cotter pins and tighten the CV joint boot clamps.
Replacing the oil seal on the rear axle shaft of a Prado 120 takes about half an hour: there is nothing complicated in the operation.
Flushing the Prado 120 radiator
A big plus about the stove radiator is that it can even be washed at home in the bathtub. If external pollution is easy to remove, then how to deal with internal pollution . For the next recipe you will need citric acid and hot water. Algorithm for washing:
- Take 50 g of acid , if the pollution is strong, then 100 g of acid, and dilute them with 1 liter of water.
- Pour this solution inside and wait 15-20 minutes .
- Drain the solution and rinse the element with plain water.
- Repeat the procedure at least 1 more time .
- After you've rinsed the piece with water for the last time, pour plumber's pipe cleaner into it.
- Wait another 15 minutes , rinse the part with water in two directions.
At the final stage of assembling the connection, we apply sealant and roll it (link to photo source)
When processing a part, pay close attention to the rubber seals. If they are severely damaged, they should be replaced with new ones.
After washing, reinstall the element. Carefully roll the joints and seal with sealant.
Replacing the oil seal
Replacing the Prado axle shaft seal is required if:
- oil is leaking from the gearbox;
- wheel play appeared;
- When driving, the car makes knocking sounds.
This part is located behind the car's brake pads on the front and rear axles. When making repairs, it is recommended to select an original spare part: it will ensure the best sealing of the moving parts.
If there is no opportunity to purchase a “original” part, then you should give preference to one that is slightly smaller than needed: it will fit into the right place without any problems.
To replace the rear axle axle seal on a Prado 120:
- Remove rust from wheel bolt threads.
- Treat with WD-40 or white spirit.
- Unscrew the bolts.
- Remove the wheel.
- Jack up the rear axle.
- Place it on supports.
- Remove the caliper and brake disc.
- Unscrew the brake pipe.
- Install the plug on the tube.
- Unscrew the parking brake cable bracket, releasing the axle shaft.
- Unscrew the wheel nuts.
- Disconnect the anti-lock braking system sensor.
- Partially pull out the axle shaft.
- Take out the handbrake block.
- Unscrew the cable fastenings to the support disk.
- Pull the cable out of the brake mechanism.
- Remove the axle shaft.
- Remove the oil seal.
- Install the new part by “driving” it inside.
- Degrease the brake mechanism.
Only the oil seals corresponding to them are installed on the right and left axles: they differ in the direction of the oil notches. If you install the wrong part, the leakage problem will most likely not be solved. The side is determined by the direction the SUV is moving.
Removing and installing the gearbox from the car
Please note that the indicated prices are valid for repairs of a gearbox removed (by you yourself or through a third-party service) and brought to us for repair.
If we remove and install the gearbox from the car, then 5,000 rubles will be added to the above price. The indicated price includes removal/installation work of 4,000 rubles and a portion of oil of 1,000 rubles.
* The cost of a pair of p/h is 43/11, 43/9 - 39,000 rubles.
Which front wheel bearing to install on the Toyota Land Cruiser Prado 120, when to change?
Original number 43570-60010 (with ABS), average price 4419 rubles.
- Koyo 2DUF054N-2GR — 3800 rub.
- LYNXauto WB-1028 — 2490 rub.
- SKF VKBA 6906 — 4580 rub.
Replacement frequency: check wheel bearings for play at each scheduled maintenance. Average service life is over 150 thousand km.
Unscrew the drive nut, tie rod end, brake caliper and remove the brake disc. Use a spanner to remove the bearing housing mounting bolts. Next, unscrew the upper mount of the stabilizer bar, the ABS sensor (if such an option is available), the mount of the upper ball joint, the lower ball joint from the steering knuckle and remove.
We unscrew the bearing from the fist and we get this picture. If you don’t have a special tool or at least a wide press, then do the following.
Secure in yew. Remove the bearing boot.
We make a cut along the hub and remove the fragment.
Remove the plastic separator and rollers one at a time.
Knock the seal off the bearing and remove the bearing from the hub (there will be a little resistance).
READ After changing the oil in the automatic transmission there were shocks
Remove the second part of the rollers, the oil seal and the remaining “pieces” of the bearing.
here is the answer to the question: Will the bearing tighten if the hub nut is tightened? Definitely no. The photo shows that the inner races of the bearing come together closely during initial tightening. If play appears on the hub, this means that the bearing has exhausted its service life.
We cut the clips and remove... The hub is ready.
Pay attention to the working surface for the oil seal. there are remnants of burnt bearing grease on it... clean it to the “mirror”.
We change the steering knuckle oil seal... This is mandatory. Many people are lazy and don’t change it (then they don’t have to remove the steering knuckle), but this significantly reduces the life of the bearing, because it is deprived of protection from the external environment. And you won’t have to trash the good name of the spare part supplier, saying it’s not a high-quality spare part.
We install a new hub seal on the new bearing (the reason is the same).
We twist the steering knuckle and bearing.
Press the entire structure onto the hub. Be sure to place a stand under the hub, otherwise the wheel studs will fly out when pressed in. We use the old bearing housing as a stand for the hub.
TOYOTA PRADO 120,150, Land Cruiser 200, HILUX axle bearing replacement.
Even more useful tips in a convenient format
How to adjust the Lexus LIX body height position sensor?
Car owners with high mileage cars often encounter improper operation or breakdown of the roller bearing. Crunching, vibration and hum when driving - this is how to understand that the front wheel bearing on a Prado 120 to be replaced
Replacing the wheel bearing Prado 120 video
Well, now it’s my turn for the front left wheel bearing to fail. When dismantling the steering knuckle, it turned out that the upper ball had gone to another world, having a vertical play of 5 mm, and the lower one was also requested #128578; Everyone knows that ball joints come with levers, thank you for producing them separately! The bearing and steering knuckle seals were also replaced.
The most important thing for those who will change bearings: there is one with an ABS sensor, and there is one without it! 2DUF054N-2GR2DUF054N-2BThese bearings are 100% with ABS.
This photo report shows in detail how to replace wheel bearing on a Toyota Land Cruiser Prado 120. This photo report is also suitable for the Lexus LX470 (UZJ). The replacement procedure is quite complicated.
Required: garage, jack, as well as a set of wrenches, screwdrivers, hammer, set of hex keys, pliers, gas torch, press.
- If you tighten the nut on the hub, will the bearing tighten?
- No... Definitely! During the initial tightening, the races inside the bearing come together tightly. Is there any play in the hub? This means the bearing has exhausted its service life.
You can also see a photo report on replacing the rear axle bearing on a Toyota Land Cruser Prado 120, Lexus LX470 (UZJ).
On the feasibility of repairing gearboxes of these vehicles
Quality
After repairs, the gearbox produced by us has a service life much greater than that purchased under contract or used. The possibility of mistakenly purchasing spare parts (gearboxes) that are not suitable for your car is completely eliminated, which often happens when purchasing a used gearbox.
Economically, repairing (even a complete) gearbox on a given vehicle is almost 1.5 times more profitable than purchasing a new gearbox.
Deadlines
Our standard repair time for the (already removed) gearbox of this vehicle is 1.5 hours. If we remove and install the gearbox, the total repair time will be 2 hours.
Guarantee
Not a single auto repair shop (where you can buy a used gearbox), and often even a store (where you can buy a new gearbox on order) will give a guarantee for a spare part purchased from them for more than 3-5 days. That, given the high cost of the spare part, is a big risk.
We provide a guarantee for our repairs (work and spare parts used during repairs) for a period of 12 months.
Which bearing to install on Toyota Land Cruiser Prado 120
Auto parts stores offer replacement bearings from different manufacturers:
- hub assembly with front roller bearing with abs B-ring BK8986, RUB 1,326;
- wheel hub Zekkert RL-1065, RUB 2,140;
- bearing repair kit with oil seals with sensor ring ABS Optimal 981.887, 2853 RUR;
- hub unit Masuma MW-11009, RUB 3,637.
Everyone will be able to choose a part based on their financial capabilities.
How to tell if a wheel bearing needs replacement
A wheel bearing is a car part that connects the wheel and the hub. This part is made of durable material that can withstand high loads.
But the service life does its job. By 250,000 km, roller bearings often fail. Replacing the front wheel bearing of a Prado 120 is mandatory, otherwise there is a high probability of causing an accident.
The main reason for hub failure is high mileage of the car. All other reasons are indirect. This can be understood by the characteristic crunch. The cone rollers have damaged the cage and are rolling chaotically. If there is a crunching sound, you should immediately go to a service station and have the part replaced by knowledgeable car mechanics.
The bearing is protected from excessive wear by high-temperature grease, the exit of which is blocked by rubber or plastic spacers. If the seal is broken, the lubricant leaks out, and a characteristic hum and vibration is created during movement. This is a symptom that requires immediate replacement of the wheel roller bearing. Vibration reverberates through the steering wheel and body, and it is impossible to confuse it with anything else.
The breakdown is indirectly affected by the driver's careless driving. Flying into a pit at high speed will not go unnoticed.
There are situations when, when replacing at a service station, the new part is installed crookedly. This will result in premature wear and will require replacement again. A problem is discovered by the constant skidding of the Prado.
If the instructions are not followed and the roller bearing is compressed, severe overheating occurs, which leads to its failure. The tightening torque of the Prado 120 wheel bearing must be monitored.
Possible difficulties
It is not always possible to guarantee a 100% result when flushing the Prado 120 radiator. Sometimes, after flushing, a leak may occur. It can only be solved by replacement.
Another unpleasant consequence of flushing is the formation of an air lock . In order to eliminate it, you need to make sure that the tightness of the connections is not broken. Only after this can the air lock be removed.
When removing the air lock, do not forget to open the coolant expansion tank cap
The best way is to warm up the engine at idle or drive for 10 km . After this, you need to drive up the hill and select the maximum heating mode. Operate the accelerator pedal for 5 minutes in neutral, just remember to open the cap on the expansion tank.
Instructions for replacing the wheel roller bearing on a Prado 120
Changing the front hub of the Prado 120 is required according to the rules. Doing this with your own hands is very problematic. You will need a couple of pullers and some knowledge of car suspension.
- We remove the wheel.
- Unscrew the drive nut.
- Remove the brake disc and caliper using a 12 and 10 wrench.
- Using a chisel and hammer, remove the cover.
- Unscrew the nut to 35.
- We move the shruz tail a little and unscrew the bearing. An air hammer helps a lot.
- We take out the roller bearing from the steering knuckle.
- We press the hub out of the roller bearing itself.
- The center bolt must be tightened to 235 Newtons.
- The new bearing comes with 2 seals.
- We put the new oil seal from the kit on the new bearing.
- We screw the roller bearing to the steering knuckle.
- We press it in.
When assembling, be sure to clean everything from accumulated dirt and lubricate it. Assembly occurs in reverse order.
Replacing the hub on the rear axle of a Prado will require a lot of effort and the necessary tools: a vice, a gas torch, a hammer and a standard set of tools.
- We remove the wheel.
- Unscrew the brake caliper and ABC sensor.
- Remove the handbrake pads.
- Using a grinder, carefully cut the bushing without touching the axle shaft.
- We place the preheated locking sleeve with the chamfer facing up.
- We install a new oil seal.
- Pressing in
- Reassemble in reverse order.
Pressing the roller bearings is done only using the old housing. Maintaining the clearance and avoiding misalignment will affect the durability of the wheel bearing. Under no circumstances should you use sharp tools to avoid damaging the seal and preventing subsequent leakage of lubricant.
Replacing a wheel roller bearing is not an easy job. The consequence of incorrect installation can be a threat to the life of the driver. Therefore, it is recommended to replace it yourself only if you have the necessary knowledge and follow all the rules.
Sources:
https://dtp-avarii.ru/zamena-salnika-poluosi-prado-120/ https://tuning-ecosport.ru/zamena-salnika-privoda-prado-120/ https://avtovestie.ru/info/ zamena-stupichnogo-podshipnika-prado-120-video/