Any breakdowns or malfunctions of such an important electrical unit as a generator or its components threaten the driver with great potential troubles. Drivers of such popular Japanese cars as the Toyota Avensis should take note of the following recommendations for repair or replacement, including the serpentine belt.
Signs of a damaged alternator belt
Probably every motorist, regardless of the make and model of the car he or she drives, can easily recognize the main symptom of a stretched or damaged alternator belt. If it whistles, especially when the load on the car’s electronics increases, it means that action must be taken as soon as possible.
But this is not the only sign you should pay attention to. The belt should also be periodically inspected visually for noticeable cracks, abrasions and other visible physical damage. Ordinary small abrasions are not yet dangerous and are a consequence of constant use under load. Another thing is long oblong cracks or the appearance of frayed edges of rubber. This is direct evidence that the belt requires replacement in the near future.
Failure to replace the belt in a timely manner can result in the shutdown of all or some electrical devices in the on-board vehicle network. This is due to the fact that the generator will not be able to provide the required torque. The battery we need to start the engine also stops fully charging. The power steering system may also turn off, making it difficult for the driver to turn the steering wheel. And another major problem may be the cessation of normal coolant circulation, because the generator also powers the pump using a drive belt. We think every Toyota Avensis driver knows about the dangers of engine overheating.
The service life of generator components directly affects the frequency of their replacement. Regarding belts, the original ones and those recommended by the factory are of high quality. It is generally accepted that they need to be changed after 25-30 thousand hours of continuous operation. This means much more mileage, but wear also occurs while the car is not moving and the engine is idling.
However, you cannot rely solely on dry figures from experts and other car enthusiasts who own a Toyota Avensis. Other important factors also have an influence: driving style, climatic features of the region of operation, the amount of electrical equipment and the load on it.
Drive belt replacement interval
Drive belts made of modern materials have a fairly large margin of safety. So, according to the regulations, in Toyota Vitz the drive belt must be replaced after 25 - 30 thousand hours of operation. Service life is measured in hours, not kilometers. The fact is that mileage cannot be an accurate indicator of their service life. They rotate even when the machine is idle, with the engine idling. However, in reality, the “life” of drive belts differs significantly from the figures specified in the regulations. The service life is influenced by many different factors, for example: driving style, operating conditions, degree of load on electrical appliances and even climatic conditions.
Where is the drive belt located?
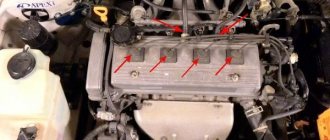
To begin repair work, you need to have an understanding of where the alternator belt is located. Just look into the engine compartment, on the left side of the power unit. Stretched over several tension rollers, it is located in the area between the motor, cooling pump and engine mounts.
Before repairing or replacing the belt, some preparation work will be required. First of all, we turn off the car engine, remove the key, and then remove the negative wire from the battery to de-energize it completely. Of course, if the engine is hot, then it needs to be allowed to cool for a couple of hours or less, depending on the ambient temperature.
We will also need the following tools, which, as a rule, are in the arsenal of every self-respecting car enthusiast:
- keys for 10, 14 and 17;
- wrench heads for 10 and 12;
- special ratchet and extension;
- jack;
- screwdrivers are different.
Methods for replacing the belt and the Toyota Avensis generator itself
Any breakdowns or malfunctions of such an important electrical unit as a generator or its components threaten the driver with great potential troubles. Drivers of such popular Japanese cars as the Toyota Avensis should take note of the following recommendations for repair or replacement, including the serpentine belt.
Signs of a damaged alternator belt
Probably every motorist, regardless of the make and model of the car he or she drives, can easily recognize the main symptom of a stretched or damaged alternator belt. If it whistles, especially when the load on the car’s electronics increases, it means that action must be taken as soon as possible.
But this is not the only sign you should pay attention to. The belt should also be periodically inspected visually for noticeable cracks, abrasions and other visible physical damage. Ordinary small abrasions are not yet dangerous and are a consequence of constant use under load. Another thing is long oblong cracks or the appearance of frayed edges of rubber. This is direct evidence that the belt requires replacement in the near future.
Failure to replace the belt in a timely manner can result in the shutdown of all or some electrical devices in the on-board vehicle network. This is due to the fact that the generator will not be able to provide the required torque. The battery we need to start the engine also stops fully charging. The power steering system may also turn off, making it difficult for the driver to turn the steering wheel. And another major problem may be the cessation of normal coolant circulation, because the generator also powers the pump using a drive belt. We think every Toyota Avensis driver knows about the dangers of engine overheating.
The service life of generator components directly affects the frequency of their replacement. Regarding belts, the original ones and those recommended by the factory are of high quality. It is generally accepted that they need to be changed after 25-30 thousand hours of continuous operation. This means much more mileage, but wear also occurs while the car is not moving and the engine is idling.
However, you cannot rely solely on dry figures from experts and other car enthusiasts who own a Toyota Avensis. Other important factors also have an influence: driving style, climatic features of the region of operation, the amount of electrical equipment and the load on it.
Where is the drive belt located?
To begin repair work, you need to have an understanding of where the alternator belt is located. Just look into the engine compartment, on the left side of the power unit. Stretched over several tension rollers, it is located in the area between the motor, cooling pump and engine mounts.
Before repairing or replacing the belt, some preparation work will be required. First of all, we turn off the car engine, remove the key, and then remove the negative wire from the battery to de-energize it completely. Of course, if the engine is hot, then it needs to be allowed to cool for a couple of hours or less, depending on the ambient temperature.
We will also need the following tools, which, as a rule, are in the arsenal of every self-respecting car enthusiast:
- keys for 10, 14 and 17;
- wrench heads for 10 and 12;
- special ratchet and extension;
- jack;
- screwdrivers are different.
Step-by-step replacement instructions
You can replace the alternator drive belt on a Toyota Avensis yourself or with the help of an assistant, without taking the car to a car service center for this. All you need to do is follow the instructions compiled by experienced car enthusiasts.
So, our step-by-step algorithm will look like this:
- The car is rolled into a garage with a pit or onto a specialized lift (overpass).
- First of all, we unscrew the so-called counter screw.
- Now unscrew all three bolts of the mounting support.
- There is a bolt on the rotation axis of the generator; it is necessary to loosen the degree of its fixation.
- Next, we need to move the generator closer to the engine - to do this, the engine is raised with a jack, using the engine support as stands.
- We lower the tension on the belt, and then remove it completely to replace it.
- We put a new one in its place and stretch it.
- We reassemble all dismantled units and components in the reverse order.
Generator repair and replacement
During operation, a more global problem may arise: how to remove the Toyota Avensis generator for subsequent repairs or replacement with a new one? Let’s say right away that only car enthusiasts with considerable experience can repair such a complex unit, and not every one of them will undertake it. It is better to trust repair work to generator specialists who will competently replace brushes or bearings.
The disassembly procedure is quite complicated, but first of all, the device must be blown off dust with a strong stream of compressed air. Then you can start dismantling the brushes along with their holders. If they protrude from the holder by less than 5 mm, they must be replaced immediately. After this, the pulley is removed. Then there is the back cover, under which there is a stator, rotor and rectifier unit.
You can replace it yourself, as a ready-made unit assembled and complete. However, this purchase is very expensive, and therefore it is resorted to only in the following situations:
- excessive wear of equipment brushes;
- completely burnt out winding;
- voltage regulator failure;
- malfunctions in the operation of the rectifier unit;
- large gaps between slip rings and brushes.
In order to change this device in your garage, you will need the usual tools that every driver has. Let's say we made a decision and bought a new assembly, and also prepared the tools and found an inspection hole. If the engine has cooled down, you first need to clear access to the generator in the engine compartment. We remove all the plastic that is there, including the engine protection. Using a jack, we temporarily dismantle the right front wheel and fender liner to gain access to the fastening elements.
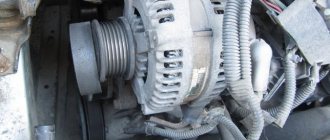
Now you should unscrew and pull out the ball joint from the removed wheel. You can additionally disconnect the steering rod and CV joint to move the hub with the brake disc to the side. Thus, it will take up less space. We take a special key and loosen the belt tension on the tension roller so that it can be removed. Once removed, unscrew the generator fasteners, remove it from the mounting socket and set it aside. It's time to install the new Toyota Avensis generator and perform the assembly in reverse order.
As you can see, the generator ensures the functionality of not only the battery, but also all electrical consumers in Toyota Avensis. As soon as problems arise with it or with the drive belt, they need to be restored or replaced. If necessary, most of such work can be done with your own hands - anyone who has such experience, please share it or leave your feedback.
Step-by-step replacement instructions
You can replace the alternator drive belt on a Toyota Avensis yourself or with the help of an assistant, without taking the car to a car service center for this. All you need to do is follow the instructions compiled by experienced car enthusiasts.
So, our step-by-step algorithm will look like this:
- The car is rolled into a garage with a pit or onto a specialized lift (overpass).
- First of all, we unscrew the so-called counter screw.
- Now unscrew all three bolts of the mounting support.
- There is a bolt on the rotation axis of the generator; it is necessary to loosen the degree of its fixation.
- Next, we need to move the generator closer to the engine - to do this, the engine is raised with a jack, using the engine support as stands.
- We lower the tension on the belt, and then remove it completely to replace it.
- We put a new one in its place and stretch it.
- We reassemble all dismantled units and components in the reverse order.
Generator repair and replacement
During operation, a more global problem may arise: how to remove the Toyota Avensis generator for subsequent repairs or replacement with a new one? Let’s say right away that only car enthusiasts with considerable experience can repair such a complex unit, and not every one of them will undertake it. It is better to trust repair work to generator specialists who will competently replace brushes or bearings.
The disassembly procedure is quite complicated, but first of all, the device must be blown off dust with a strong stream of compressed air. Then you can start dismantling the brushes along with their holders. If they protrude from the holder by less than 5 mm, they must be replaced immediately. After this, the pulley is removed. Then there is the back cover, under which there is a stator, rotor and rectifier unit.
You can replace it yourself, as a ready-made unit assembled and complete. However, this purchase is very expensive, and therefore it is resorted to only in the following situations:
- excessive wear of equipment brushes;
- completely burnt out winding;
- voltage regulator failure;
- malfunctions in the operation of the rectifier unit;
- large gaps between slip rings and brushes.
In order to change this device in your garage, you will need the usual tools that every driver has. Let's say we made a decision and bought a new assembly, and also prepared the tools and found an inspection hole. If the engine has cooled down, you first need to clear access to the generator in the engine compartment. We remove all the plastic that is there, including the engine protection. Using a jack, we temporarily dismantle the right front wheel and fender liner to gain access to the fastening elements.
Now you should unscrew and pull out the ball joint from the removed wheel. You can additionally disconnect the steering rod and CV joint to move the hub with the brake disc to the side. Thus, it will take up less space. We take a special key and loosen the belt tension on the tension roller so that it can be removed. Once removed, unscrew the generator fasteners, remove it from the mounting socket and set it aside. It's time to install the new Toyota Avensis generator and perform the assembly in reverse order.
As you can see, the generator ensures the functionality of not only the battery, but also all electrical consumers in Toyota Avensis. As soon as problems arise with it or with the drive belt, they need to be restored or replaced. If necessary, most of such work can be done with your own hands - anyone who has such experience, please share it or leave your feedback.
Replacing the belt tensioner on 1ZZ-FE, pump and idler pulley
Hi all!
I found time today and decided to change the belt tensioner assembly, pump and idler pulley; spare parts were ordered in advance and all that was left was to overcome my own laziness)). The reason for the replacement was a parasitic sound or even some kind of barely audible chirping, plus the mileage was already 213,000 km, of course there were doubts about replacing the pump, but ... if we do it all at once and as it should be, so as not to think later and not return to that question , and the car is already 10 years old..., below are the spare parts: And so, we open the hood, remove the plastic. We look... I understand that the engine mount is clearly in my way. It’s already cramped, I’m dismantling the support...
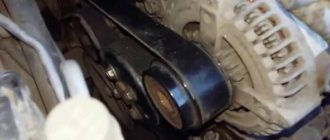
Then it became clear that when dismantling the old tensioner, it would be necessary to either raise it or lower it... otherwise the bolt on which it is attached rests against the body... then I remembered the experience of one of my predecessors... he placed a jack under the bottom of the engine where the pallet was made of wood and lifted the engine ...I considered it too dangerous, because... the pan is most likely made of a very soft material and deformation is possible, laziness overcame me... and I couldn’t think of anything better than jacking up the engine by the paw with a native Toyota jack... to which the gel support is attached... it took a long time to adjust)))) and it turned out... one thing - BUT... when I was holding the end of the jack with great effort so that it wouldn’t slip and shoot into the radiator... - of course, this method is also not the best and not the most correct))) but if you do everything carefully, it turns out quite deftly and quickly))), below is the photo perversions:
Actually, that’s all, the bolt was removed, the tensioner was removed:
In fact, it turned out that the tensioner pulley had play and creaked, but the tensioner itself seemed to be alive and even without smudges... but when I installed a new one. That’s when I realized that my old one simply didn’t work anymore, the force with which I I pulled back the tensioner to put the belt on, it’s just awesome compared to the old one...
Next, the turn came to the pump... and again laziness won))), I didn’t want to climb into the hole. Drain it from the block, then from the radiator... I cut off the neck of a 5-liter canister... threw off the pipe that goes to the thermostat... and quickly pushed the canister. Yes, of course, a little spilled, but not critical... about 4 liters spilled. Then I unscrewed 6 bolts to “10” and the pump was in my hands...another 300 grams leaked off when removing the pump...well, it doesn’t matter, I had ready-made antifreeze in stock, and a year ago I changed it completely, so it’s not critical, later I just added about 1 liter. The pump is original, it comes with a gasket, and in all respects it is exactly the same as the factory one:
Upon inspection, it is also clear that the working surface of the roller is very worn out, of course there is no shoulder, but you can feel it to the touch and by rotation - the old one is somehow looser or something... it spins easily, I didn’t find any play.
Next was the bypass roller... actually, it’s not difficult to remove it... on the one hand, the nut is turned to the entire hinged “12”, on the other... i.e. if you stand in a doggy style pose and pretend to be a gutta-percha boy and stick your hand into the bowels...to feel for the fucking bolt at “14”, then it seems like nothing complicated. But he’s a bastard... - the video... took me 1 hour... this is a scribe comrades. there was not enough friendly hand to fix the nut..., in the end I removed it and replaced it, upon inspection: there was a lot of play, it rattled a little..., below is the photo:
Well, that’s all, I’ve replaced a bunch of belts... it seems like it’s time to go home, but I remembered that... I need to clean the DS and finally change the coil tips... and another hour of fun)))
As for the DZ, I clean it about once every two years or every 40,000 km, and usually I also clean the MAF right away, but today I didn’t take the MAF cleaner..., regarding the tips - the old ones are very bad steel... when you press, they are all cracked. And if there were cracks before were at the very bottom at the tip. Then today I saw how long cracks had already crawled from the tip to the top. i.e. the process of destruction progressed, everything was done on time, it’s time to go home))
The attachment belt broke (aka generator belt, also known as rivulet belt, also known as poly-V belt)
There was a misfortune on the highway - the belt broke while overtaking. Signs
The steering wheel began to spin, as if in a dead Urals. The “battery” indicator is on on the dashboard. The coolant temperature began to rise sharply.
I decided not to break the box, not to pull the car for more than 50 km, so I called a tow truck. I decided to install a new belt myself, throw a spare belt in the trunk and not get into such situations again.
What did it take?
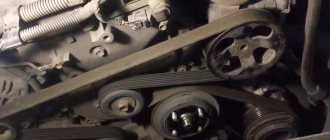
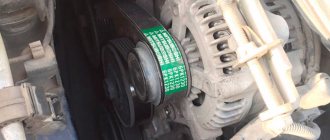
I took a belt (Gates), 7PK1933, price 965 rubles. I armed myself with a wrench with a perpendicular head at 19. I studied the belt installation diagram.
I threaded the belt as it should (turned the wheels to the right, removed the protection under the right fender so that there was access to distant elements). I loosened the tensioner, pulled the belt onto the alternator, tightened it and it was done.
Hi all! PS I ordered the video, but didn’t take it right away, I wanted to study the experience of others to understand which one to take. Ordered SKF for 4,200 rubles. In total, a DIY belt with a roller will cost 5,100 rubles.
Toyota Avensis 2004, 147 hp - DIY
Comments 20
My belt, too, has already begun to fray, although it was installed as I bought it in the fall, nine months have passed, and the tensioner also needs to be changed... Are there any problems with replacing the roller?
The only problem is getting to him. And it is easy to attach.
people, I don’t know about anyone, but I just changed the bearing inside the roller, there are 2 single-row bearings made by Koyo, nothing difficult to stick out! I pressed it out and pressed it in and installed it and everything works for 60 thousand)))
Regarding the replacement of bearings... there was a negative case, only on a Toyota Harrier. The bearings were also changed - it took about three months! When traveling from Novokuznetsk to Kemerovo on the highway, they stupidly jammed - the drive belt not only broke, but practically burned out