Every driver wants everything in his car to be perfect and as comfortable as possible, but finances do not always allow this, so you have to take a model with a cheaper configuration. And after buying a car, start improving the car in every possible way, adding various options. Such options may be heated seats, installation of a multimedia system, alarm system, installation of cruise control and other gadgets and options that will increase the level of comfort inside the cabin. In this article we will talk about how to connect the buttons on the steering wheel to the radio on a Toyota Coroll or Prius - there is not much difference.
Let's start with the fact that the simplest option would be to attach the standard radio to the buttons. We'll talk about it today. Let's buy buttons for the steering wheel and connect them to the radio.
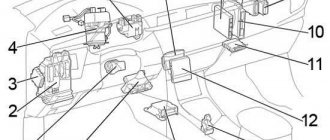
Multi steering wheel for Toyota Corolla
A new multi-steering wheel for a Toyota Corolla Fielder is expensive, so drivers often pick up the part at car dismantling yards. You can also buy separately a steering wheel with holes for keys (from 1,700 rubles), a block of buttons and adapters for them.
The Toyota Corolla car is a collection of complex components and assemblies. The driver controls the movement of vehicles and numerous options: audio system, climate and cruise control, lighting, various sensors. To directly duplicate the levers, manufacturers came up with a car accessory - a multifunction steering wheel for the Corolla E150 and other modifications.
Chip tuning. Part III. Why don't manufacturers make the chip right away?
Hello everyone again, here is the 3rd part of articles about chip tuning.
In this part I will answer the question why the manufacturer does not immediately do chip tuning on their cars.
In the comments to the previous article, they wrote to me that a person does not believe that “a guy with a computer can tune a car better than a factory.”
Previously, when most cars had carburetors, there was a main person at the service station - a carburetor technician. This man, usually by ear, used a screwdriver and other tools to adjust carburetors and ignitions on cars. Who remembers, you could even ask the carburetor technician to adjust the car for dynamics or consumption. But times have changed, a carburetor on a car is becoming less and less common, but car tuning is now done by people with a computer.
Now to why the manufacturer doesn’t do chip tuning right away at the factory.
Firstly, everything that automakers have been doing in the last 20 years is aimed at complying with ever-tightening toxicity standards, sometimes to the detriment of engine efficiency, its elasticity, power and even service life (hello to modern TSI VAG and N62 engines from BMW). To comply with toxicity standards, the engine first acquired electronic fuel injection instead of a carburetor. After the introduction of Euro 2 standards, the injector acquired an oxygen sensor. After Euro 3 standards, the USR valve and catalyst appeared. After Euro 4 electronic throttle, rear oxygen sensor. Later, systems for capturing nitrogen oxides, etc. appeared. Unfortunately, most of these innovations have a negative impact on the dynamics and efficiency of the engine.
The same goes for mixture formation in the engine. It’s no secret that the optimal mixture is considered to be 14.7 kg of air to 1 kg of fuel (14.7 to 1). What an optimal mixture means is that when such a mixture is burned, only CO2 and H2O are formed. To ensure an economical mode, the mixture must be leaner, but at the same time the temperature in the combustion chamber rises and nitrogen from the air begins to react with oxygen, forming nitrogen oxides (NO), the emission of which has strict standards. Recently, nitrogen oxide traps (NOx-trap) have begun to appear. For high-power mode, the mixture must be enriched, which leads to the entrainment of CO emissions, which are burned in the catalyst, increasing its temperature. The catalyst cannot be heated endlessly, therefore the use of an enriched mixture is minimized. Therefore, if we set the parameters optimal for the engine, we will get a powerful and economical engine.
Secondly, the plant makes a mass product and they make the firmware so that even the worst engine they assemble will work normally on it. It's no secret that no two identical engines exist, just as no two identical people exist. When assembling an engine, there are many steps where things can go wrong. The differences begin when engine parts are cast from silumin and end with inaccuracies when tightening the bolts. Therefore, the plant makes firmware for the worst engine that can come off their assembly line, thereby preventing other engines from reaching their potential.
Chip tuners also take into account regional factors, for example, what kind of gasoline is available in their region, and tune the car to use this gasoline.
Therefore, having removed the restrictions of Euro standards from the engine, revealing its full potential, chip tuners create firmware, thanks to which the power in the car increases and consumption decreases.
Alexey Fokin (Moscow) was with you, ask questions in the comments, put pluses.
The automotive industry is in a constant process of development. Designers are constantly coming up with various kinds of improvements that aim to make driving as safe as possible and make driving more comfortable.
One of these improvements is the installation of a multifunction steering wheel. In this review we will answer the question of what a multifunction steering wheel is and whether it can be installed instead of a regular steering wheel.
Instructions
- The first thing to do is to align the steering wheel and wheels straight.
- Disconnect the battery, wait a little (about 2-3 minutes), then remove the plugs from the steering wheel (lower part), then you need to unscrew one screw on both sides, a screwdriver with an asterisk bit will help.
- Disconnect the airbag and disconnect the wires.
- It is necessary to make marks on the steering wheel and shaft to secure them after removal. Unscrew the nut with a wrench.
- Remove the steering wheel, as well as the lower fragment of the casing, disconnect the old wires and disconnect the screw cable (there are 3 of them), then connect a new cable and connect the wires.
- Now you need to put the casing in place, you also need to break the safety stop (it prevents the cable from rotating). It is important not to move it before installing the steering wheel; the opening should be at the top.
- Connect the steering wheel, aligning the previously made marks.
- Connect the cruise control cable and secure the joystick with 2 clips.
- Connect the airbag and horn key.
- Twist the pillow, install a new plug with a connector for the lever on the right, and the old one on the left.
- Connect the battery.
That's it, the cruise control switch is connected.
When choosing the diameter of the steering wheel, it is important to take into account the driver’s body type: After installing the steering wheel, it is also recommended to install a braid, which will reduce wear on the factory coating and increase the grip between the driver’s hands and the steering wheel. How to install a multifunction steering wheel on a Corolla with your own hands?
The multi-steering wheel is a complex functional device that allows you to duplicate the car control levers directly in direct access, thereby increasing the comfort and convenience of operating the car.
Corolla E configurations do not provide for installing buttons on the Toyota Corolla steering wheel for installing a multifunction steering wheel, however, this device can be installed with your own hands - this will require no more than 1 hour of time, as well as wheel wrenches and wrenches, a set of screwdrivers and a Torx wrench that comes with the car.
On the diagram you need to find a button with the inscription ASLD, from the original location of the button two cables run along the board to the opening, then the original wiring - they are all there. Next, you need to cut the tracks going to this button and connect them with wires to suitable contacts.
It is necessary to check all wires with a tester and do not damage them with screws during assembly. How to remove the airbag - there was already a description, screw the buttons, neatly lay out the cables and connect the connector to the screw cable. The most important touch: You also need to remove the stiffener, because if you leave it, it will interfere with the signal, as is known, in which case the signal button does not work. Finally, connect the pad so as not to pinch the wire. Tighten the screws, attach the plugs and connect the battery.
As for the buttons for installing buttons on the steering wheel of a Toyota Corolla Toyota CorollaToyota CorollaToyota Corolla and model years in the E body, their steering wheel buttons are practically the same.
Toyota Corolla Forum
installing buttons on the Toyota Corolla steering wheel Photo report on installing cruise control, radio control buttons and implementing the speed limit function in a Corolla with a 1.6 engine and manual transmission. List of ordered parts: Required tools: For owners of configurations 17 MMT and 32, replacement of the twisted cable is not required, but the speed limiter does not work according to the experiments carried out by the owners.
We put the steering wheel and wheels in the “straight” position. Remove the terminal from the battery. We wait 2 minutes according to the manual and remove the two plugs from the bottom of the steering wheel, then unscrew 1 screw on each side using an asterisk; the screws are tightened quite tightly - don’t skimp on the cue balls, you can’t unscrew them with a hexagon.
Remove the pillow and disconnect the wires. We put marks on the steering wheel and steering shaft to align them after removing and installing the steering wheel. Such options may be heated seats, installation of a multimedia system, alarm system, installation of cruise control and other gadgets and options that will increase the level of comfort inside the cabin.
In this article we will talk about how to connect the buttons on the steering wheel to the radio on a Toyota Coroll or Prius - there is a special difference. Let's start with the fact that the simplest option would be to attach the standard radio to the buttons.
We'll talk about it today. Let's buy buttons for the steering wheel and connect them to the radio. Selecting the required parts and tools First of all, you need to select the buttons. As a rule, they are standard; their size and type depend only on the year of manufacture of the model.
The purchased kit should contain two sets of buttons - left and right. As always, such parts are divided into original and non-original. Since the original is very difficult to find - this can be done at various Toyota disassemblies, many people buy non-original parts. They will work perfectly, their only drawback is that over time they will rub considerably.
What to do if the buttons don't work
It happens that the button on the steering wheel of a Toyota Corolla 151 (all or some) does not work. After connecting, all the buttons worked with a bang, but at one point the buttons stopped responding to their pressing. The reasons can be very different. First, try disconnecting the battery for a while; as a rule, they should work after such manipulation. If this does not help, then you should check the buttons themselves; most likely, the problem is with them. We check the wires to see if they are pinched, if the connectors and the head unit itself are intact.
It also happens that switching cruise control stops working for unknown reasons. The first thing you need to do is remove the airbag and check if there is contact in the cruise control connector. And also repeat the procedure of disconnecting the battery. If that doesn't work, then the cruise switch itself may have become unusable.
Connecting and adapting steering wheel buttons to a non-standard Nissan Qashqai radio
The content of the article:
Connecting steering wheel buttons to a non-standard Nissan Qashqai radio
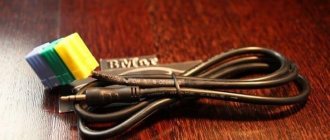
Today we will talk about how to connect the control buttons on the steering wheel with a non-standard radio. It’s been two years since I installed a Pioneer AVH-1400DVD, everything was connected, installed and to my question “will the buttons on the steering wheel work?” I received the answer that I need to buy a special adapter and configure everything. I decided not to bother with this, I drove like this, poking the buttons on the Mayfun. But now I’ve decided to implement this connection. How is it that there are buttons, but they don’t work? Not in order! And how nice it is to keep your hand on the steering wheel to switch songs and adjust the volume. An Incar Omega 1 adapter was purchased
, a universal steering adapter, its beauty is that it is learnable, that is, you can assign any button to any programmed function.
It cost 2500 rubles. For example, I muted the sound with the call answer button (I previously had a standard radio with Bluetooth, I could answer calls with a button on the steering wheel - a car from the summer of 2010, SE equipment). So, the device has been purchased, it’s time to install it! I installed it with the help of an electrician friend, he mainly specializes in car wiring, all sorts of “relays and brains”, he doesn’t install acoustics often, this is the first time he’s installed such an adapter, but he coped with the task with a bang! So, we started by disassembling the panels to get to the tape recorder (I won’t describe that process, it’s all on many forums, even a child can do it), they removed everything, disconnected all the connectors and began to think about where to connect everything. To connect, we need to find only 4 wires from the main block going to the radio (fortunately, when we installed it, we didn’t cut off the original chips, but simply cut new wires into the factory ones, so that later we could install everything back). We found the pinout of this block on the Internet, I am attaching a photo. For those who will install the same adapter, I’ll give you a hint, the instructions say this: Red wire: “ACC”
Supplies +12V power to the adapter when the ignition key is in the first position.
— we connect this wire to wire number 7 from the block. Black wire: “Ground”
Will supply ground to the adapter.
You need to connect the “common” steering wheel wire to it. — we connect this wire to wire number 15 from the block. Blue wire: “Input 1”
Connects to the signal wire of the steering wheel buttons.
— we connect this wire to wire number 6 from the block. Green wire: “Input 2”
Connects only on Nissan and Toyota vehicles. For other cars it can be removed. — we connect this wire to wire number 16 from the block. Attention! The colors indicated on the block diagram are not correct, they do not always match, so be guided only by the wire number, so to speak, count from the edge of the block. It turns out that the colors are different in the restyling, but that’s not the point! The main thing is that all the numbers match. This is where all the nuances are over, then everything is according to the instructions. It is in Russian, accessible and understandable. It is necessary to train the adapter and program the buttons. Now I can use the steering wheel to: switch songs/radio stations, volume -/+, mute the sound and select Disk/USB/AUX/Radio modes. Now I drive and am happy, I no longer need to reach for the radio.
Adaptation of InCar steering wheel buttons in Nissan Qashqai
A common question is how to connect and register steering wheel buttons in Incar, let's try to make instructions
connect the wires following the pinout
6 pins for steering wheel buttons No. 1, 16 pins for steering wheel buttons No. 2, 15 pins for ground. Restyle and pre-restyle have different wire colors, but the pinouts are the same, so we look not at the colors, but at the location of the pins
Next, go to the steering wheel settings and immediately change the sensitivity to low, so that there are no failures due to the ambient temperature
The radio asks you to press the steering wheel button that you want to register, press the button and hold it
Now she asks you to select a key on the radio screen to select the value of the steering wheel key. select and tap
The inscription “saved” does not mean that the settings are saved; at the end of all actions you still need to click the “yes” button, otherwise nothing will be saved. repeat the procedure for each key
Connecting the trailer hitch socket in Nissan Qashqai
Task: connect the trailer hitch sockets in the Nissan Qashqai. There were no difficulties. Progress of work on connecting the trailer hitch socket in the Nissan Qashqai...
Installing cruise control on a Corolla E150
All owners of Toyotas, and in general other brands of cars, have long known that any car initially includes the installation of additional options, and their availability depends only on the configuration and, accordingly, the final cost of the car. As a rule, all wiring and mounting points for additional options are present, and only in rare exceptions are they not present.
On vacation, I usually drive a car, the distance is just over 1,500 kilometers, and while driving, my right throttle leg gets tired and goes numb. Although some people say that the leg usually gets tired from pressing the clutch, I have a manual transmission, but this is not so. So, against the backdrop of this problem, I wondered about installing cruise control.
What is cruise control in a car?
I think many have heard what cruise control is? But most likely, even if the car has it, few people use it over short distances, and over long distances it turns out to be very necessary.
And no matter how surprising it may be, the cruise control on the manual is also installed and functions perfectly, it’s a pity that of course it doesn’t change gears. ????
Well, in general, cruise control, in its own words, is an automatic, user-specified, adjustment of the vehicle’s speed.
How to use cruise control? We pick up the desired speed, activate cruise control and the car drives at the speed we set, while we can remove our foot from the gas pedal. We will describe below how to use cruise specifically on the Toyota Corolla E150.
Components for installing cruise control on Toyota Corolla E150
If you think about buying original spare parts for the implementation of a cruise, then the desire somehow immediately disappears and your leg no longer seems to be numb or hurt???? , they are very expensive.
The steering wheel contact is spiral, the steering column cable, the steering spiral, in general, as soon as it is not called names, simply put, “spiral” - article 84306-12110 , average price 9,000 rubles, analogues from 1,000 rubles. For those who have a multifunction steering wheel (control buttons on the steering wheel), there is no need to purchase this item, you already have it installed. In the future I also plan to install buttons on my steering wheel; I already have a spiral.
Next, the steering column cruise control switch also has different names, article number 84632-34011 , the average price of the original is 4000 rubles, the analogue starts from 1500 rubles.
If you decide to buy the original, you will also have to buy 2 screws with a washer to secure the cruise shift lever in the steering wheel, article number 90159-50199 , an unrealistically high price of 60-90 rubles per piece. When purchased on Ali, bolts are included.
Also, according to some data, you will have to purchase a wiring harness for the cruise control switch, article number 84633-48020 , price on average 500 rubles.
a plastic plug or plug for the steering column casing Toyota 45186-42040-B0 for 197 rubles on emex.
The average price on Exist and Emex is around 200 rubles, depending on delivery times.
There are no analogues, so only the original, on Ali they seem to be sold complete with a cruise switch, I didn’t bother with this, in principle it’s possible without this plug at all, it’s not visible from behind the steering wheel.
In total, on average, you will have to spend about 14,000 rubles on original spare parts.
So we buy everything as usual on Aliexpress, links to where I bought are attached:
- Toyota cruise control steering column switch 600 rubles
- spiral cable 562 rubles
Total: 1100 rubles (prices vary depending on the dollar exchange rate) and about a month of waiting, the difference is obvious. But the quality of the Chinese spiral coil may not be very good, so we take a couple of pieces for future use or look for disassembly, I’ll write later how it behaves in operation.
Even in some pre-restyling configurations of the Toyota Corolla E150, somewhere around 2010, 2 wires responsible for the operation of the cruise control were not laid between the steering column contact E6 and the on-board engine compartment computer, contact AE6.
In this case, you need to purchase a kit with this wire, all in the same place on Aliexpress: a switch with a wiring harness.
More details about pulling wires can be found on car forums; I was lucky and didn’t have to bother with this either.
How to remove the airbag Corolla 150 restyling
There are many instructions on the Internet on how to remove airbags from the steering wheel on pre-restalization car models.
But when I needed to remove the pillow, I was stupefied, after removing the decorative plugs on both sides of the steering wheel, I couldn’t find any 30mm Torx screws, they simply weren’t there and there was nothing to turn.
Everything is much simpler, we press the spring latches on both sides with a screwdriver and the pillow is removed. Install in reverse order, just press harder.
Installing cruise control for Corolla 150
Some people recommend disconnecting the battery terminals when disconnecting the airbag, as it may later show the AIRBAG error. I didn’t disconnect the terminal, although I unplugged the airbag more than once, everything was fine, I just didn’t turn the key in the ignition.
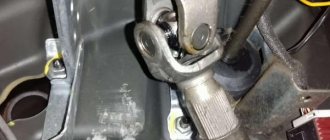
After undocking the pillow, disconnect the wires from it; to do this, lift the yellow stopper with something sharp and remove the plug. We also disconnect the white horn plug from the spiral cable connector.
Next, use a 19 mm socket to unscrew the central bolt securing the steering wheel. Then, shaking it a little and tapping the steering wheel, remove it. Some people have to use a steering wheel puller, I was lucky, I knocked and tugged for a couple of minutes and the steering wheel came off.
Next, remove the upper and lower steering column casings to gain access to removing the spiral cable; using the steering column adjuster, we move the steering wheel forward for better and more convenient access. The casing sits on latches, the lower part is docked to the upper, so first remove the lower and then the upper part, which is attached to the steering column with latches.
We unplug the two plugs from the bottom of the spiral cable and remove it; it is secured with three latches, one at the bottom and two on the sides. Next, in the reverse order, we install the new spiral contact of the steering wheel on the latches; after installation, we break off the shipping pin, which blocks the spiral from turning.
Everything is ready, there is a lot of tedious schedule, but in fact it only takes 15-20 minutes of work.
Operation and speed limits of cruise control on Toyota Corolla
- Lower speed limit: The minimum permissible set speed is approximately 40 km/h. To activate cruise control, you need to pick up a speed of more than 40 km per hour, turn the cruise control ON-OFF, while the corresponding icon or the word CRUISE (depending on the car model) will light up on the instrument panel and pull the cruise control lever down -RES. Then you can change the speed indicators by switching the +RES/-RES lever. The cruise control system does not engage when driving below the specified lower speed limit. If the vehicle's speed drops below the 40 km/h limit while the cruise control is on, the cruise control is automatically switched off, but the preset speed is retained.
- Upper speed limit: The maximum permissible speed limit is set at approximately 200 km/h. The cruise control system does not engage when driving above the specified upper speed limit. In addition, the + (ACCEL)/RES (RESUME) function cannot be used to increase the speed beyond the specified limit.
Car radio for Toyota Corolla 2013+ left hand drive
To install it on a Toyota Corolla 2013+ radio, you also do not need any modifications to the design, adapter frames or an adapter to match the pinout.
Left-hand drive version
The color of the radio completely matches the color of the car panel. It has a large 8-inch screen and a dual-core processor, as well as a built-in GPS receiver and DVD player. There is a digital radio and 2 USB connectors with extension cords for connecting flash devices, slots for SD and SIM cards. It is possible to connect a parking camera, as well as a hands-free function.
The main control menu for the Toyota Corolla 2013 radio is designed in the style of Windows 8 tiles. The Navitel navigation program is preinstalled. One of the unique features is turning off the screen glow when driving in the dark.
KEY2 to WHITE wire
This is a standard procedure that is always performed when connecting all 2 or 1 DIN Chinese radios. But the catch is that the color of the wires to which you need to connect KEY1 and KEY2 may not be brown and white, but any color, depending on the manufacturer and model of your car. On Mazda, for example, these wires are just brown and white, but if you have a car from another manufacturer, fate may not leave you such a gift. In addition, you will definitely need a pinout diagram for the radio connector in your car, which you will probably find on our website, search and you will find it. In general, the main task for you will be to find the wiring diagram on the pinout diagram that is responsible for the buttons on the steering wheel.
Location of contacts on the plug responsible for controlling the radio using the buttons on the steering wheel (approx. Mazda 3)
Chinese Android radio tape recorders, for the most part (and not only Chinese ones, modern non-standard ones as well) are designed to work with resistive button response, so if your buttons are connected via a CAN bus, then initially you will need a radio tape recorder with the ability to control it via buttons on the steering wheel connected via a CAN module. Therefore, before buying a radio, find out exactly how you control the radio from the steering wheel. We will consider such a case (control via CAN) in the connection instructions below.
After successfully connecting the wires, the buttons will be powered from the radio and ready for use; all that remains is to program them on the radio. This process is not at all complicated and not long, however, look how the guys on roller skates do it about connecting the steering wheel buttons to the radio. Let's look:
Videos of connecting the radio to the buttons on the steering wheel in various brands of cars
Connecting buttons to the radio on Mazda 3
Connecting buttons to the radio on a Mazda CX-7 (Connecting buttons to the radio via a CAN module)
Connecting buttons to the radio on Mitsubishi L200 (Alpine radio)
Connecting buttons to the radio on Hyundai Solaris (Solaris, Kia Rio and similar cars)
Connecting buttons to the radio on the Kia Sorento
Connecting buttons to the radio on a Hyundai Elantra
Installing and connecting buttons to the radio on Lada (Kalina, Priora, Granta and similar cars)
Connecting buttons to a Toyota radio (Pioneer radio)
Installation and connection of non-standard buttons to the radio and steering wheel
Sometimes it happens that with the correct connection of standard buttons to a Chinese Android radio, an unbearable hassle arises and users simply give up (this happens especially often if the buttons are connected via a CAN module). Or it may be that these standard buttons on the steering wheel are not there at all. In such cases, connecting non-standard buttons to the steering wheel may be an appropriate solution to the problem. They are wireless; they are connected to the radio via a Bluetooth repeater, which connects to the radio itself extremely and extremely simply. Watch the video:
Installation and connection of buttons on any make of car (installation of non-standard buttons on the steering wheel)
Installation and connection of non-standard buttons 1 DIN radio
Connection diagram for non-standard buttons to the radio
Connection diagram for non-standard buttons to the radio
Connecting and adapting steering wheel buttons to a non-standard Nissan Qashqai radio
The content of the article:
Connecting steering wheel buttons to a non-standard Nissan Qashqai radio
Today we will talk about how to connect the control buttons on the steering wheel with a non-standard radio. It’s been two years since I installed a Pioneer AVH-1400DVD, everything was connected, installed and to my question “will the buttons on the steering wheel work?” I received the answer that I need to buy a special adapter and configure everything. I decided not to bother with this, I drove like this, poking the buttons on the Mayfun. But now I’ve decided to implement this connection. How is it that there are buttons, but they don’t work? Not in order! And how nice it is to keep your hand on the steering wheel to switch songs and adjust the volume. An Incar Omega 1 adapter was purchased
, a universal steering adapter, its beauty is that it is learnable, that is, you can assign any button to any programmed function.
It cost 2500 rubles. For example, I muted the sound with the call answer button (I previously had a standard radio with Bluetooth, I could answer calls with a button on the steering wheel - a car from the summer of 2010, SE equipment). So, the device has been purchased, it’s time to install it! I installed it with the help of an electrician friend, he mainly specializes in car wiring, all sorts of “relays and brains”, he doesn’t install acoustics often, this is the first time he’s installed such an adapter, but he coped with the task with a bang! So, we started by disassembling the panels to get to the tape recorder (I won’t describe that process, it’s all on many forums, even a child can do it), they removed everything, disconnected all the connectors and began to think about where to connect everything. To connect, we need to find only 4 wires from the main block going to the radio (fortunately, when we installed it, we didn’t cut off the original chips, but simply cut new wires into the factory ones, so that later we could install everything back). We found the pinout of this block on the Internet, I am attaching a photo. For those who will install the same adapter, I’ll give you a hint, the instructions say this: Red wire: “ACC”
Supplies +12V power to the adapter when the ignition key is in the first position.
— we connect this wire to wire number 7 from the block. Black wire: “Ground”
Will supply ground to the adapter.
You need to connect the “common” steering wheel wire to it. — we connect this wire to wire number 15 from the block. Blue wire: “Input 1”
Connects to the signal wire of the steering wheel buttons.
— we connect this wire to wire number 6 from the block. Green wire: “Input 2”
Connects only on Nissan and Toyota vehicles. For other cars it can be removed. — we connect this wire to wire number 16 from the block. Attention! The colors indicated on the block diagram are not correct, they do not always match, so be guided only by the wire number, so to speak, count from the edge of the block. It turns out that the colors are different in the restyling, but that’s not the point! The main thing is that all the numbers match. This is where all the nuances are over, then everything is according to the instructions. It is in Russian, accessible and understandable. It is necessary to train the adapter and program the buttons. Now I can use the steering wheel to: switch songs/radio stations, volume -/+, mute the sound and select Disk/USB/AUX/Radio modes. Now I drive and am happy, I no longer need to reach for the radio.
How to remove a TOYOTA steering wheel: Control system
- In this article I will tell you how to remove the steering wheel from a
2005-2008 Toyota Corolla e12 - To remove the steering wheel we need the following tool:
- -socket wrench with 19mm head
- -screwdriver with bits (cross and asterisk T30)
- First of all, remove the terminal from the battery. Next we align the wheels
and check that the ignition is turned off. After these manipulations, we proceed to removing the steering wheel.
Open two plugs on the bottom of the steering wheel
Next, unscrew the screws (T30 sprocket). The screws unscrew with force!
We take out the pillow and disconnect the connector. Do not shake the pillow, carefully place it aside away from heat (the sun is an engine...)
We put marks on the steering column and steering wheel for further installation and unscrew the nut
a wrench with a 19-mm head (do not unscrew the nut completely; this will save your chin from hitting the steering wheel). Pull the steering wheel towards you by lightly tapping it.
The steering wheel has been removed. Next, the steering wheel can be reupholstered or replaced.
- Removing the steering wheel gives us access to the turn switches, ignition switch and steering column.
- You can also install a Bluetooth module, radio control module or cruise control.
- Let's stick to cruise control.
- To do this you need to purchase:
- under the steering switch - Toyota original code 84632-34011
- spiral wire - original code 84306-12110 (in the configuration 17 MMT and 32 are already installed)
- pistons - original code 90159-50199 (4 pieces) or select M5x10mm screws with a wide head, you can put a washer.
- steering column switch wire - original code 84633-48020
- steering column plug - original code 45186-12010-B0
Carefully remove the lower casing so as not to break off the latches. Disconnect the wires and the spiral cable (the cable is secured with three latches).
We install a new spiral cable on the latches and connect the wires.
- We break off the locking tab, being careful not to dislodge it.
- We fasten the steering wheel according to the pre-set marks.
- We connect the cruise control wire and secure the remote control with pistons.
- We connect the airbag and signal connectors.
- Carefully install the airbag and attach a new plug under the cruise control switch.
We put the terminals back on the battery. Turn on the ignition.
- To install the Bluetooth module remote control and radio control module.
- We need to purchase them in addition to the original code (84250-12020) they come in pairs.
- We install remote controls instead of standard plugs.
- We connect the connectors of the remote controls to the chip of the steering column switch (the connectors are different, you won’t confuse them)
- All that remains is to install the airbag.
- There is a small problem here, the airbag stiffeners rest against the edge of the remote control and the signal does not work.
- They should be removed very carefully.
- Connect the airbag connector.
- We install the pillow as described above, making sure not to pinch the wires.
Modernization of multimedia and multi-steering wheel
Remove the steering wheel, as well as the lower fragment of the casing, disconnect the old wires and disconnect the screw cable, 3 of them. Now you need to put the casing in place, you also need to break the safety stop; it prevents the cable from rotating. It is important not to move it before installing the steering wheel; the opening should be at the top.
Connect the steering wheel, aligning the previously made marks. Connect the cruise control cable and secure the joystick with 2 clips.
Connect the airbag and horn key.
Installing cruise control on a Toyota Corolla 150
Twist the pillow, install a new plug with a connector for the lever on the right, and the old one on the left. That's it, the cruise control switch is connected. Connecting buttons Unfortunately, there are no buttons for the speed limiter in the version.
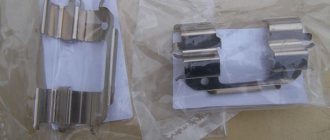
We couldn't find them at the disassembly site and therefore had to order buttons from the online store. You can see them in the photo below.
The user said thank you:
No additional adapters are needed, but it is worth finding out whether your car is designed for audio steering or not. If yes, then you can safely install them. As for spare parts, we will need: This is where the list of tools ends. Instructions for installing buttons on the steering wheel Before installing the buttons, they need to be partially modified.
First of all, we will have to modify the button on which the phone is drawn.
Purpose
What is the purpose of the cruise control button? For example, using cruise you can slow down or speed up the car by 1 km/h with one press of a button. Below are step-by-step instructions on how to connect the cruise control switch lever and tape recorder control buttons to the steering wheel.
Required parts:
- lever under the steering wheel Toyota 84632-34011 – 1 pc.;
- right and left buttons 84250-12020 – 1 pc.;
- wire under the steering switch 84633-48020 – 1 pc.;
- Steering column plugs - 1 piece required, model 45186-12010-B0;
- spiral wire, model 84306-12110 – 1 pc.;
- pistons (buttons + cruise) 90159-50199 – 4 pcs.
Tools that will be useful during the work: a screwdriver with T30 star bits, a wrench size 19. For a car with an assembly of 17 MMT and 32, there is no need to change the screw cable.