Recently, the demand for rear view cameras for Toyota Corolla cars has increased significantly, which has a simple explanation. The number of car owners is growing exponentially these days, and it has become a problem not only to find a place to park a car, but also to park in it. Reversing is considered one of the most difficult driving maneuvers and requires a certain level of driving skill. You have to deal with it almost every day: when parking, entering a garage, or when there is no room to make a U-turn.
We should also not forget about the difficulties of driving a car when the view through the rear window is limited (due to ice or tinting). To solve all these problems, a special device was created: a rear view camera (RCC).
Many versions of Toyota Corolla cars already have a rear view camera of satisfactory quality. But in cases where the car was not originally equipped with it or if the quality of the installed device does not suit the driver, it becomes necessary to select and install a new rear view camera.
In this regard, you should consider in detail the questions: what kind of rear view camera should you purchase for a Toyota Corolla car, and whether you can install it yourself.
What cars are they installed on?
First of all, these are long and oversized machines. For example, Toyota with the new E150 body version has slightly increased dimensions. This affects your visibility - you see a little worse behind you, especially below, near the pavement. In addition, parking comfort is greatly influenced by the shape of the rear. The hatchback and sedan are easy to park. But if you have “wings” at the back above the lights (as happens on some variations of the E150 and E120 body), then installing a rear view camera is advisable. If you are the owner of a coupe body, then the camera is simply a must have.
Monitor position
The screen can be of several types:
- with image display on the screen of the recorder or navigator. The recorder or navigator must have an external additional video input;
- output to the radio screen. Typically, a Toyota Corolla's interior is equipped with a radio with a large screen. This allows you to easily display an image on it;
- mirrors with monitor. This option has both pros and cons.
The screen of the recorder or navigator allows you to quickly display the image without any additional work. This is one of the cheapest options. However, they are usually small in size. Therefore, when parking, you will have to strain your eyesight. In addition, you can configure the recorder to record not only from the front, but also from the second camera at the back. This may be helpful.
Displaying the radio on the screen is a good option if you just need to estimate the distance to the curb. The screen is big enough. You see everything that is behind you large and clearly. However, it is located at the bottom. When moving backwards, you are focused on the screen, and you can accidentally hit the hood, fenders or mirrors of cars standing on the side - you are not looking forward through the windshield.
Step-by-step cleaning of the throttle body on a Toyota Corolla
So, let's start cleaning the throttle. First, it’s worth talking about exactly what tools we need. For removal and cleaning we need:
- Special product for cleaning carburetors;
- A few clean and dry rags, preferably lint-free;
- A set of keys, various sockets and screwdrivers - which will help in removing the throttle;
- You also need a room in which the relevant work can be carried out.
Having decided on the tools and materials, we proceed to removing the throttle. Disconnect the pipe, throttle cable and two sensors. The photo below shows where the throttle is located.
Next, we need to unscrew the bolts securing the damper - unscrew several nuts and bolts, and then carefully remove the damper from its place. This is not difficult to do, but you should be careful and careful not to damage the unit. So, the knot is removed. The photo below shows what a dirty throttle valve looks like. It is because of this dirt that instability of engine operation and floating speed on the tachometer can occur.
We removed the throttle. We take the aerosol we bought for cleaning carburetors and thoroughly spray the entire throttle body, both inside and out. It is important to remember that it is best to use chemical-resistant gloves, as the aerosol is very caustic. We spray and wait 20-30 minutes until the applied liquid corrodes the dirt and it can not be easily washed off.
After waiting a little time, we wash the throttle with gasoline, then wipe it clean and let it dry. It is advisable to carry out cleaning in a place without drafts and wind, so that dust does not get stuck in the various cracks of the damper. The photo below shows what a clean damper looks like. This is exactly the result we should strive for.
After all cleaning, we put the damper back on, not forgetting to put on the sensors, throttle cable and air duct. We start the car and check its performance. Most likely, the speed will return to its previous position, the car will work quietly and calmly, as if you had just bought it.
This concludes cleaning the damper, searching for the problem and eliminating it. When the cause of the breakdown has been eliminated, it is worth talking about how to prevent such phenomena from occurring:
- The first and most important thing is to change the air filters in a timely manner and not let the car become covered in dust;
- The second and also no less important is that you, as a driver, should look for normal, clean fuel for your car - you should not refuel your car at dubious gas stations;
- And finally, thirdly, the car needs timely maintenance - the throttle valve should be cleaned at least once every 10-15 thousand kilometers. This point is mandatory, because at one point the car will simply let you down.
We'll stop there. The three points presented are mandatory, since next time the car simply will not start. Timely inspection and cleaning of your car will help significantly save your money and minimize your digging under the hood to find problems.
Mirrors with monitor
When installing, you deliberately give up part of the central mirror for the monitor. This impairs normal visibility and the use of the mirror as a mirror rather than a camera. If you are using a combination mirror/camera where the mirror surface is solid and the image turns on automatically when you reverse, you may accidentally catch something. For example, in a traffic jam you are forced to back up to take a turn, and your mirror camera automatically turns on while reversing. You may not expect this, your view to the rear will be blocked, and you could crash into a car standing behind you.
All of these options are good in their own way, but they also have disadvantages. The choice is yours.
Replacing a Toyota universal joint
PLAY of crosspieces in glasses! Dad said that he saw this for the first time. By the way, masuma and toyo are like two peas in a pod. The lubricant, of course, is all like Vaseline, and not enough of it.
The only difference between these crosspieces is the color and that’s all. Then a master I knew told me that backlash in Masuma and Toyo is a common thing! And in general, it all seems to be China. But GMB is just not backlash.
And so I won’t describe the process itself in detail. We took a pipe with an outer diameter of 22. We cut 4.5 mm rings from it. They measured it with a caliper on the factory crosspiece so that the couple would remain relatives. It is clear that there are 4 pieces per cross.
Toyota Town Ice driveshaft malfunctions
And then, when driving the cups of the cross into the eye in a vice, these rings were placed, thereby achieving an even position of the cross in the cardan. Without opening the vice, we grabbed it by welding in two places.
This was done symmetrically on both sides so as not to upset the balance. I cooled it immediately, immersing only the welding points in water.
Punching of the permanent crosspiece of the cardan stamped of the crosspiece of cardan
By the way, do not forget to mark the positions of the removed part of the cardan to the other when removing. Install it back the same way it was.
I marked the marks before removing them, for example. After leisurely fiddling around for almost the entire working day, we rolled Noah out to the “Run-in” The joy knew no bounds! Let's hope they last longer. But I’ll reserve a couple of GMB to replace it from my salary right away.
As a result, replacing the crosspiece becomes impossible.
The manufacturer does not provide lubrication of driveshafts, as well as replacement of spiders on these cars - which makes the service life of the spider and cardan as a whole limited. Basically, it all depends on the thousands of kilometers driven and on the environment in which the car is used. If the environment is hot and dusty, the service life is reduced; If the environment is moderate and not dusty, then the period increases.
But the crosspiece can still be changed, but it will not be original from third-party manufacturers.
Since the cost of the cardan is much higher than the cost of replacing the cardan cross, this makes replacing the cardan cross more relevant. Let's look at replacing the driveshaft crosspiece with Toyota and Lexus using an example. Replacing the Lexus RX universal joint The initial procedure is diagnostics, only after which it is worth removing the universal joint for re-pressing.
We will need two new crosspieces. After removing the cardan, you need to dismantle the old crosspiece. You need to cut the crosspiece by first pressing it in one direction to free up the space for cutting it. We cut off the remaining cups for easier pressing.
Professional repair of Toyota Town Ice driveshaft
When pressing the crosspiece, it is necessary to maintain alignment and place the new crosspiece exactly according to the marks of the old one. Otherwise, there will be a beating and you will have to re-send everything again.
Another point is the fixation of the cups. It needs to be cored thoroughly, otherwise the cups will diverge under heavy loads and the cardan will start to hit, and in some cases it will even fly apart.
Tags: i30, manual, Hyundai, operation
- Related Posts
- Replacement of the ignition switch (cylinder) or another mochi trick.
- Replacing the fuel pump for a Chevrolet Aveo. Recommendations, facts, videos
« Previous entry
Location
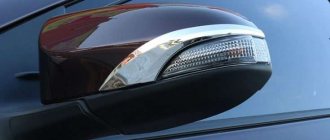
There are two main places where the rear view camera is most often installed on the Toyota Corolla E120:
- under the trunk lid;
- under the turn signals.
Installing a rear view camera on a Toyota Corolla under the trunk lid allows you to see what is located at the bottom of the car near the bumper as closely as possible. However, you will not be able to see anything other than the curb, and in other cases, for example, when parking backwards to another car, it may be useless if the second car is a truck and its bumper is much higher than the image coverage.
Installing under the turn signals shows the bottom area near the wheels less clearly, but allows you to better see everything behind your car. However, in this case it is shifted to the left or right, under the left or right lamp. Some people find this not entirely convenient. In addition, the camera itself is clearly visible from the outside and is accessible to those who want to unscrew something from your car.
Why can the idle speed fluctuate?
The effect of floating speed occurs most often in cars with electronic fuel injection and is associated with excessive air supply. Here the whole problem rests on the system control unit or the computer, which regulates the air supply to the overall system.
The computer must provide a sufficient amount of air entering the cylinders, while taking into account the readings of a number of sensors. After processing and reading information from the latter, the computer opens the injector solenoid valves at one time or another. When a failure occurs and excess air enters, the throttle sensor indicates that there has been an oversaturation of air and it should not be there, and the temperature sensor dictates its rules to the control unit and indicates that the engine has already left the warm-up and air-saturated mode Less fuel needs to be poured. As a result of a sensor conflict, the computer has a problem - it does not understand where to put the excess air. This whole situation, as a rule, leads to the fact that engine speeds begin to fluctuate from 800 rpm, then 1200 rpm, and so a periodicity of 3-5 seconds occurs. Floating speeds cause great inconvenience for the driver, increase fuel consumption and disrupt the operation of the fuel supply system. If such a problem occurs, it must be eliminated.
If such a situation arises, we will try to correct the situation ourselves. First, let's tighten the speed control screw - by doing so we will close the hole through which the air enters and we will be able to stabilize the air supply. By tightening the bolt, the excess rich mixture should be compensated. If this operation does not give the effect we need and does not restore the speed, we can try to squeeze the rubber tubes; if, by squeezing one of the tubes, the engine speed levels out and becomes quite stable, we need to remove it from the pipe and determine where the excess air is coming from. The most common causes of excess air are devices such as:
- Starting device for Toyota Corolla;
- Device for maintaining speed;
- Any valve;
- Or, as practice shows, the crankcase ventilation valve of a Toyota Corolla engine.
If, after all the tubes were clamped one by one, a solution to the problem was not found, you can safely remove the air duct in front of the throttle valve. Having removed it, in front of the throttle valve you can find a hole with a diameter of about 1 centimeter - through this hole air flows bypassing the throttle valve. It’s worth starting the engine and plugging the hole with your fingers; if this doesn’t help, then let’s move on to the next possible cause of floating speed.
It’s worth checking all the sensors - we check for contamination and external damage; for a more detailed inspection, you will need a specialist who can test the car’s sensors; if the specialist finds nothing, we check the throttle cable. It should be reasonably tensioned, but should not initially open the throttle assembly. If everything is in order with the cable, the tubes have no damage or obvious cracks, there is only one reason for this behavior of the car - a clogged throttle valve.
Installation procedure
There are usually three outputs - video out, power and on/off wire. The video output must be at the monitor input. The power cord must provide the voltage and current that your camera needs. The value can be taken from the passport.
For example, when connecting a rear view camera on a Toyota Corolla to the radio display, behind it there is a video input and a power wire, which is orange. The corresponding camera terminals are connected to these wires.
The third wire is control. You can set the image to turn on automatically when reversing, or use manual turn on. Automatic activation will work when you engage reverse gear at the gearbox. When turning on manually, the button is conveniently located on the gearshift handle, so that when reverse gear is engaged, the image can be turned on without taking your hand off the machine.
It is advisable to install all wires leading to the screen under the car body parts, bumpers or moldings. It is best to carry out installation not with electrical tape, but with heat shrink, so that later nothing will come apart due to vibrations.
Car monitor, front camera and rear view camera, installation in toyota rav4
Hello! Today I will talk about the car monitor, the front camera and the rear view camera. The goods were purchased in a Chinese aliexpress store, some call it a trading platform, a market, a stall. In other words, the goods were purchased in China. I will tell you about the products themselves, and also show you the installation of a monitor and cameras in a Toyota Rav 4(III) car. Of course, there were similar reviews of these products separately, but as you understand, these products are purchased for a specific purpose, installation in a car. And often for a car enthusiast, a review of just a product, without assessing the installation in the car, does not give the full picture. And since all these products interact and are connected together, there is a review about all these products at once. For professionals, I’ll say right away that I’m not an electrician, I’ve never dismantled cars before, and I’ve never done anything electrical on a car. In other words, this is the story of an absolute layman, you can tell an ordinary car user to other similar users, car enthusiasts.
Who may be wondering what can be done on the weekend, having such products, and not having experience in installing such equipment. I want to apologize, the review turned out to be quite long, and for those who don’t like to read a lot, a video review is attached at the end. Well, in the text review, of course, there is no video material, and interactive elements, arrows and the like. However, the text review is complete, not abbreviated. The goods were purchased at good discounts; I chose sellers based on positive reviews of the goods, speed of delivery and the availability of a tracking number by Russian Post. Delivery of goods was really very fast, as stated in the reviews, no more than two weeks. And thanks to the number that the Russian Post is tracking, I could see where my parcel was, and by registering on the Russian Post website, I received an email notification for each stage of the parcel’s journey, including its arrival at my post office. Agree this is convenient.
The monitor and rearview camera were purchased from one seller, and from another the front camera for Toyota Rav 4. The goods were well packaged, the cameras and monitor were in individual boxes. Inside each individual box there are instructions in English and a set of wires.
The front camera purchased for Toyota Rav 4 is installed in the front emblem. The website indicates the brands of cars and even the dimensions of the camera, but this did not help me, so for the Rav 4 of the third modification the camera turned out to be too large, and I had to tinker a little with its installation.
The camera has a wire with video output and power. Includes a meter cord for connecting power and a 6 meter video cable. The camera's power supply is 12 volts, and the stated resolution is 520. The website does not indicate how many degrees of view the camera has, but it seems to me at least 170. The picture comes to the monitor in color, clear and bright. The quality is very good.
The rear view camera was not purchased for the license plate, where cameras are often built in, but was planned to be installed in the cabin. Of course, there was an understanding that the view would be blocked by the spare tire mounted on the tailgate. But it seemed easier to install this way, and it should be easier to see from above. A camera with a view of 170 degrees, a resolution of 420, and a camera power supply of 12 volts are declared. The kit includes a small cord for connecting power and a 6 meter video cable, as well as two screws for installing the camera. The picture on the monitor is the same as from the front camera, color, clear and bright.
However, I did my own thing with the monitor, disassembling it, but everything was in order.
Monitor 4.3 inches, power supply 12 volts, power 3 watts, stated resolution 480*240. The color screen of the monitor transmits images of very high quality. There are no buttons on the monitor, there are two video inputs and a power connection. A small power cord is included. As well as double-sided tape for attaching the monitor. The monitor displays an image from two cameras, both cameras are connected to the monitor and when power is supplied to the front camera, the image is displayed from the front camera, and when power is supplied to the rear view camera, the monitor switches to the rear view camera. Why this monitor. Why such a design, and not replacing the head unit, I mean the Toyota Rav 4 radio with a radio with a screen. Everything is very simple, so cheap, and a standard radio is fine, but this monitor is just in case. As they say, if you suddenly need it, then it’s easy to install and look at. And so we don’t use it. That is why it is advisable to change the radio for those who always park only using cameras and who need a large screen for the radio. To navigate, I also don’t need a head unit with a screen, I always use an iPad, but as they say, there are so many people’s opinions. In this case, I’m telling what can be done to the same person who got into the car for the first time. Of course, I used data from the Internet, but there wasn’t a lot of information about installing cameras in the Toyota Rav 4 of the third series. I found some, and some, as they say, I discovered myself. First I drew a connection diagram.
For the rear view camera I planned power supply from the reverse lamp. The monitor and the front camera are powered simultaneously via a button. In other words, when you turn on the button, to which power is supplied after the dimensions are turned on, power is supplied to the monitor and the front camera, and accordingly the image from the front camera appears on the monitor. When you engage reverse gear and turn on the reverse lamp, power is supplied to the rear view camera and this monitor automatically switches to the rear view camera. I started disassembling from the central panel. It turned out to be not at all difficult. Using a screwdriver wrapped in electrical tape, prying the side panels from below and easily removed them.
I started with the rear view camera. I installed the camera itself on the ceiling in front of the back door, but not in the center, but closer to the edge, where the spare tire is less obstructed. The two screws that came with the camera were perfect, and I used them to secure the camera to the ceiling. I ran the wires along the edge behind the ceiling trim, simply bending it a little towards the side plastic panel, then bending the plastic panel a little, there is a latch there, we separate the wires. We lower the power wire down, there is a hatch through which we have access to the reversing lamp, and accordingly we are powered from its wire. I did it very simply, I took two wires to the lamp, plus and minus, and soldered the power wires to the camera to them. True, I had to add some of my own wires; the camera’s power wire was not enough. Well, doing all this in a small hatch is very inconvenient. By the way, to determine where the plus and where the minus are, I used a simple tester.
And we run the video wire behind the plastic, along the side window, and lead it to the rear left door. We hide the wire behind the decorative plastic; to do this, we move the rubber seal and unclip the latches. At the bottom of the door opening we snap off the plastic plug, all the wires go there, so we lay our video wire together with the others. So we run the wire down below, along the front left door, also snapping off the plastic plug.
It’s better not to pull them, but to pry them at the edges with a screwdriver. In fact, we have already routed the video wire to the fuse panel in the cabin, then we run the video wire up and out behind the steering column into the central panel. Be careful, the lowermost plastic decorative panel under the fuses is held on by an inconvenient latch, be careful with it. I had to tinker with the front camera. Open the hood and remove the front plastic panel. It is held only by plastic plugs, which are removed either by slightly picking up their central part and loosening the clamp, or, conversely, by pressing on the central part of the plug and loosening the clamp. It depends on who has which plugs. After removing all the plugs, remove the panel.
We remove the Toyota emblem, there are three latches, you can pry them off with a screwdriver. Behind the plastic to which the emblem is attached there is a grid and a hole in the grid for the wire can be easily made with a needle file or file.
And while trying on the camera, I discovered that the camera didn’t fit, it didn’t fit and that’s it. I had to do some work; I used a file to file down the protruding sides near the camera. And the socket for the camera, in the plastic behind the emblem, had to be enlarged using a drill; it is inconvenient to work there with a file.
After these tricks, the camera stood up as if it were original. I laid the power and video wires along the grille, securing them with plastic clips, and then led them along the body into the interior. There is a hole covered with a rubber plug. Well, then I ran the wires behind the lower glove compartment into the central panel. So, we have cameras installed and wires routed to the central panel. The monitor is in the opening under the central panel, I make a hole and bring the wires from the monitor to the center of the panel where the wires from the cameras are routed. I get power for the monitor and front camera from a small light bulb located under the central panel, which became accessible after disassembling the panel with the air conditioning control unit. Power is supplied to it after the dimensions are turned on, and in the socket instead of a light bulb I installed a small toggle switch that turns on power to the monitor and front camera.
I connect the power plugs to the monitor and two cameras. By the way, above the fuses there is a block of buttons, including empty ones where a button could be placed, but since my monitor is hidden in the opening under the central panel, I decided to make the button there. Well, just for convenience, I pressed and took out the monitor with my right hand. I was thinking about what to do with the monitor. As I said, I put it under the central panel, I need it, I took it out, I don’t need it, it lies there, it doesn’t interfere. First I decided to reduce its size, for this I disassembled it, using a few small screws and a little manual effort, and all that was left was the monitor itself and the plastic tail for it. Then the idea came to use a magnet, I installed one magnet on this plastic tail of the monitor, and placed the other in the lower part of the panel, where the air conditioner is controlled.
Now everything is simple, you don’t need a monitor, it lies under the panel, it’s not visible, if you suddenly need it, it’s easy to get and install. There is also a power switch there.
Well, in conclusion, a little test
, I take a wooden block, 30 centimeters high, and place it close in front of the front bumper. I turn on the monitor and front camera. As you can see on the monitor screen, the block is clearly visible.
The next test is with a rear view camera. Let me remind you that the camera is installed in the cabin, and the view in the Toyota Rav 4 is blocked by the spare tire located on the rear door. Nevertheless, the block is visible, albeit not so well, from the bumper to the block for at least 50 centimeters. Perhaps this is not critical, but it was not possible to see how the camera installed in the rear license plate of the Toyota Rav4 of the third version will show, and how to install it. So there was nothing to compare with.
I hope my review will be useful to someone. Well, below is a video review. Enjoy watching.