The bottom line is this: the switch turns on the relay, the circuit is closed through it and power is supplied from the battery to the headlights.
Diagram for connecting fog lights via a relay Before starting installation, you need to decide on the switching circuit: Autonomous, the fog lights will turn on independently, although then the headlights can drain the battery completely, which is associated with problems. In places where the wire may be bent or the insulation may be damaged, they should be protected with corrugation or an additional layer of electrical tape. Connecting additional headlights via a relay The only thing you need for connection is to buy a base and an incandescent or LED lamp of the appropriate size. It is important to remember that the fuse should always be selected with a reserve. This will help you pass inspection without any problems and ensure good visibility even in fog or snow. The main thing is that you do not get confused in the polarity. At the same time, there is normally no strong blinding of oncoming car drivers. The main thing is that you do not get confused in the polarity. Installation recommendations and equipment requirements Installation of fog lights must be in accordance with the current Road Traffic Regulations.
It is best to carry out the procedure in an inspection pit or using a lift.
Button + relay + fuse for connecting PTF and other car devices
Installing fog lights on a Toyota Corolla 150
The fog light installation kit includes the following parts:
- Sidelight (2).
- Wires.
- Fog lamp (2).
- On/off block(1).
- Clamps.
On average, such a kit will cost 2,500 rubles.
To begin with, it is worth noting that you will need a three-pin relay, which will need to be installed in the cabin.
Selection of fog lights
Modernization of the PTF of the Toyota Corolla 150 begins with the selection of the fog lights themselves. When purchasing fog lights, you should ensure that the lens is made of glass and not plastic. Glass for PTF in Toyota Corolla E150 will not melt, unlike plastic.
Important! Such headlights must emit white or yellow light. Other colors and xenon are prohibited by road regulations.
When choosing headlights for your car, be guided not by the diameter, but by the car body model. Just ask for fog lights on your 2008-2014 Toyota Corolla E150. The kit must indicate the number and article.
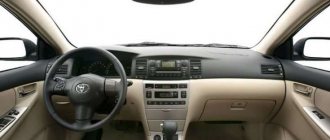
Button for turning on fog lights Toyota Corolla 150
Toyota Corolla Fog Lights: Make Your Own Installation
Some people buy cars with standard equipment that lack climate control, fog lights and other amenities. Now let's talk about how to install fog lights on a Toyota Corolla. The question is, what are they for? The answer is very simple. such lights are needed to translate them into strict meteorological criteria. They provide improved road visibility and overall poor vehicle visibility.
At the same time, they simply give the car a more exciting look, making the car instantly look impressive, especially at night. What you will need to understand the purpose of PTFs is to look at the step-by-step process of installing them in a Toyota Corolla.
Content
Step-by-step installation of fog lights on a Corolla
Before we do this, we need to make sure that we can install the PTF headlights ourselves. It all depends on how well you can choose a studio. Does your car have standard wiring for them differently? If such wiring is a standalone installation and you need this note if the wiring is missing, then a professional's hand will come in handy as it will be very difficult to do the wiring in the car. Check that the wiring is correct; you can remove one of the fog lamp plugs on the bumper. If there are wires, it means the wiring is on the job site, if not, then you're out of luck. you will have to spend money on wiring and running an electrician.
READ How to Remove Ford C Max Headlight
What you need to know is that the standard wiring is located, you can shop around. For self-insertion of headlights, we will be useful for:
- Special relay for fog lights
Toyota Corolla; - A switch that fits into the car's dashboard;
- Fog. suitable for your model;
- And finally, headlights that also fit into your crown.
The result should be approximately the same as in the photo below.
When we purchase what is left over to make our customers' parts, we begin a specific installation process. First, we need to remove both stubs. First we extract this, then the other. After making room for the headlights you purchased, you should thoroughly wash the bumper around these holes and then wipe it with a dry cloth. This will allow for a cleaner but tighter installation of the new plugs.
Having cleared the work area of dirt and dust, we take the second step. We need to remove the wires from the headlight holes and connect them to your PTF. Then you need to firmly fix the attached headlights in the holes of the bumper. It's easy to do. one side headlight
inserted into the bumper, and even today we just screw it on. We do the same with other headlights.
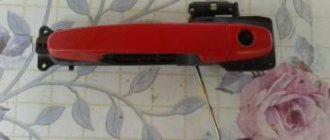
button Toyota PTF T11-3732050 Corolla E150
Power button
PTF T11-3732050 for
Toyota Corolla
E150.
READ How to Remove Headlight on Renault Sandero 2
How to connect PTF in standard wiring of Toyota Corolla yourself
How to connect fog lights
PTF in standard
Toyota Corolla wiring itself in 1 hour.
How to remove the bumper | With the fog light securely in place and making sure it doesn't pop out, unscrew, etc., you can put the forks in place and give the car a finished look from the outside. If you put the plugs in, you'll see that they were always there. Each headlight takes about 5-10 minutes.
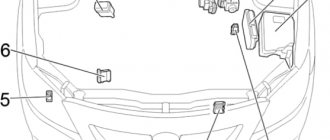
After training in the fresh air, let's go into the car and start installing the relay. This step is the most difficult when installing PTF. This will take you about half an hour if you don't get lost in the annotations. The relay is installed in a special block above the glove on the unfamiliar front passenger seat, the easier it will be for those who have already changed the cabin filter in their cars, since the filter container is located next to the block where the relay is located to be glued together. The box with the block looks like the photo.
The relay is inserted by touch, so in order to at least roughly understand where to insert it, you need to remove the cover of this window. to do this simply, you need to unscrew it, as there are also called two bolts. The photo below shows the approximate installation location of the relay, which is inserted from above.
After installing the relay, we put back together what our client needs to do. And we move on to the last stage. installing and connecting the switch. Then who should decide for themselves where it is more convenient to install the switch. we used the piggy bank slot.
READ What kind of bulbs are in the headlights of Niva Chevrolet
In order to connect the switch itself and have it work correctly, we need to remove the control column cover. this will allow us to access the left control switch connector.
When accessed, pull out the connector. The photo shows two types of arrows. greenish and blue. These arrows indicate likely fog lights on a Toyota Corolla. If you connect green arrows, the PTF will be clipped when the main optic is down or down. The green arrows indicate that the switch wires are connected to the red/blue wire and have a greenish tint.
The blue arrows indicate that the fog lights can be turned on and off independently. For this option, we need to connect the switch wires to the red-blue wire and the reddish one. You need to connect to one of the options shown in the photo.
After connecting the wires, inserting the connector back, we check if the PTF is working correctly, if our customer continues to work properly, we fix the case and use it for you, if it doesn't work, you need to check the composition of the wires again.
Source
Lamp installation
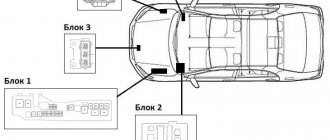
To improve the car's optics, we will need an inspection hole or a lift. The first step is to remove the plastic covers shown in the photo below.
Behind them there is standard wiring, to which you can attach fog lights.
To gain access to the plastic trim, you need to remove the fender liner, which is secured with three bolts:
Having removed the Toyota fender liner, you can see the standard plug into which we will turn on the lighting. We unscrew the bolts that hold the plugs in place and remove them. The bolt holes in the plugs match the bolt holes in the foglights, so you won't need to drill anything.
We connect the PTF to the standard wiring connector. Each fog light is marked with the letters L or R (Left/Right), which will help you avoid mixing them up.
Relay installation
Now you need to move into the cabin and disassemble the center console. We remove all the plastic covers that are secured with latches. To remove them, you need to pull them firmly and not be afraid of breaking them.
The radio is fixed on four bolts, which must be unscrewed, after which we remove it and pull out all the plugs from there.
To make it more convenient to work, remove the plastic climate control panel, which is held on by latches and two screws. Having dismantled all these parts, we get the following picture:
The red arrow marks the place where you need to connect the relay. Unscrew this bolt:
On the reverse side of the disconnected plastic there will be a socket where we connect the relay, after which we assemble everything in the reverse order.
Installing fog lights on a Toyota Corolla 120
To install PTF we will need:
- Sidelights.
- Fog lamp (2).
- Relay.
- 4 screws.
- Button.
- Set of wires.
Important! When purchasing flashlights, pay attention to what material the lens is made of. You should purchase a glass option, but in no case a plastic one, because PTF glass will not melt.
In order to install the relay, you need to remove the glove compartment. After this operation, a white box will be visible, in the back of which you need to insert a relay into the middle slot.
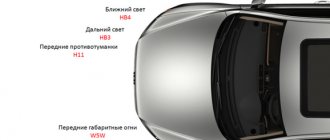
Behind the bumper there are factory connectors for connecting PTF, to which we will connect our lights. These connectors are designed for bulbs with an HB4 socket, while fog lights require H11. Therefore, it is necessary to replace the connector.
The headlight is installed from the reverse side into the lower hole of the bumper, after which it must be screwed with two self-tapping screws at the bottom and top.
Important! Before installing the PTF, do not forget to remove the white paper sticker from its back and insert a light bulb into the resulting hole.
There is an adjusting bolt on the headlight itself, with which you can adjust the direction of the light (adjustment higher or lower).
What are fog lights for?
In order to remove them, you need to unscrew the screws on the inside of the bumper.
During operation, it is important to prevent clouding or fogging of the optics glass. Fuse and relay panel. And so, the fog lights have been purchased, just the ones you need for your model of car, motorcycle, etc.
To prevent this, you should regularly treat their surface with special polishes at least once a month. Connect the button and the th output of the relay. There is nothing complicated about connecting fog lights, and anyone can handle this task!
During installation, you should insulate the wire connections and terminals using heat-shrinkable tubing or electrical tape. If installed correctly, you only need to adjust the luminous flux, which will be discussed below. Measure the distance from the ground to the middle of the headlight. Taking into account the fact that according to this scheme, power is supplied to the fog lamps only when the ignition is on, the decision to connect the fog lights according to this scheme allows you to automatically turn off the PTF after removing the key from the lock.
Article Archives
The cross-section of the wire and the switch are not designed for such a load. Measure the distance from the ground to the middle of the headlight.
Improper installation of fog lights can lead to an accident or cause discomfort to drivers of oncoming cars. For example, on VAZ cars, connecting foglights in this way takes no more than minutes of time, and this despite the fact that the car owner has no experience installing such equipment on a vehicle. This will reduce nerve cells and personal time. We also recommend reading the article on how to install Webasto on a car with your own hands.
Post navigation
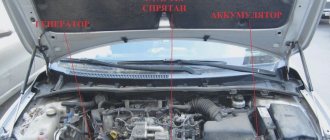
It is worth mentioning the cross-section of the wires, which depends on the load, that is, on the current strength. The installation order may be as follows - more precisely, to the battery terminals, two wires are installed under them, as we have already said, black and red, which go first to the left headlight on the driver's side, and then to the right.
It will serve as a guide for the light spot of the center of the second headlight. Let's list them: fuse;. Then two fog lights can be connected to each other in series. 2 WAYS TO CONNECT A CHINESE SWITCH WITH LIGHT 3 CONTACTS, 220 VOLT.
Installing a button
Before installing the button, you must remove the “-” terminal from your car’s battery. Also, for the safety of the electrical circuit, it is worth checking the presence of a fuse responsible for the PTF. In the event of a short circuit, all the damage will be taken by the installed fuse, and not by the wiring, headlight or switch.
The fog light on/off button can be placed in any place convenient for you. Most often, a coin box is used as this place. Now you need to remove the plastic in order to gain access to the left steering column switch, and then remove the white connector from it. In the connector we find two wires: red with a blue stripe and green. The connection will be made to them.
Some insulation (5 MM) must be removed from the wires so that you can connect to them. It is necessary to connect the wires coming from the switch to them, and then isolate the connections.
What are fog lights for?
Fog lights will also be useful in fog. Try to place them as close to the roadway as possible. It is recommended to install a fuse at this stage. It is necessary to wrap all exposed wires with electrical tape and check the reliability of the connections.
This list may differ depending on the vehicle's configuration. Connection diagrams for fog lights. There are several connection diagrams, as well as methods. With this connection, there is no risk that the minus will rot away from the body, the fastening will deteriorate, or the fastening site will be damaged by corrosion.
You can install fog lights yourself, the main thing is to strictly follow the instructions. Then you need to direct them to the relay and connect to the connector under number
The connection diagrams for fog lights may be slightly different, but the meaning and elements used remain the same. Installing PTF The entire process of installing fog lights can be divided into several stages: installing headlights in the bumper; installation of relay and fuse; button installation.
We extend contact number 86 to ground to the body.
Then you need to direct them to the relay and connect to the connector numbered So, in Russia, only factory-certified PTFs are allowed to be installed. Now, when you press the power button, the minus is applied to the relay winding - the relay is activated and thereby closes contacts 30 and 87 of the relay and - our light bulbs light up! Button for PTF VAZ 2114