3596 Apr 20
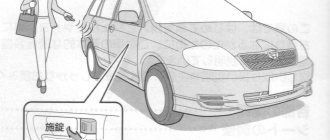
Factors that ensure comfort include the level of sound insulation of the car interior. It depends on the quality of soundproofing materials that are placed on the hood, trunk, roof and wheel arches of the car. During operation, the level of noise protection may decrease, which will ultimately lead to a decrease in comfort when using the vehicle. Often, the original sound insulation of the Toyota Corolla 120 and 150 models does not suit the car enthusiast, and there is a need to increase the sound insulation of the vehicle.
There are many videos on how to remove standard sound insulation, which show step by step how to remove insulating materials from various parts of the car.
Installing hood soundproofing
The hood noise insulation on the Toyota Corolla is installed in two stages:
- Hood vibration insulation
- Thermal and sound insulation
This stage will protect the interior from vibrations resulting from the operation of the power unit. It is recommended to use materials that are not afraid of constant exposure to elevated temperatures (high temperatures may constantly remain in the engine compartment). Foil material is a good choice; it will act as a heat-reflecting layer.
To create a high-quality vibration-proofing layer, it is necessary to process all planes located between the stiffeners. Often there is a need to replace already installed vibration protection. To do this, you need to order more effective materials online. Typically, order delivery takes several days.
To create a second layer, responsible for the thermal and noise insulation of the vehicle, you can use heat-insulating materials using a foil layer. It is worth noting that using noise-absorbing elements on the hood will not be as effective. It is better to install sound-reflective materials.
Process algorithm for working with doors
Disassembling the Corolla door trim
As mentioned above, doors are an essential component of a Toyota car, which must be soundproofed to improve acoustic properties. The instructions imply the following actions:
- First, decorative plastic panels and waterproofing film are removed. This ensures access to the outer and inner trim (door panels from the street and interior).
Note. The speaker of the acoustic system will be fixed to the inner panel, preferably on a special podium. The plastic door trim is also attached to the same panel.
You should know that combined processing is used for doors:
- Directly behind the speaker (see How to choose speakers for a car radio on your own) vibration materials, such as Bimast Bomb, are glued;
- As for the rest of the surface, it must be covered with Bimast Super, keeping a short distance.
Podium with speaker on Corolla doors
Advice. We leave the stiffeners alone and do not touch them.
- We glue the outer panel with sound absorbers, which are recommended for this case (this is described in detail above).
Advice. It will be necessary to try to soundproof as much of the surface area of the outer panel as possible.
- The remaining pieces are vibro-glued to the interior panel. It is recommended to process technological holes for greater acoustic effect;
- “Shumka” is placed on top of the vibration.
Installation of roof sound insulation
Installing sound insulation on the roof of your car is the most necessary step to improve the insulation of the entire interior. This is due to the fact that the roof does not have sound protection, and is limited only by the material of the upholstery. This leads to the driver and passengers clearly hearing the noise of passing cars, wind and rain through the ceiling. Also, a relatively thin layer of metal resonates well when used in a car speaker system.
Roof insulation is also carried out in two stages: installation of vibration insulation and, directly, the noise insulation itself. To protect against various types of vibrations, it is recommended to use a two-millimeter layer of Vizomat material. They should cover the space between the roof stiffeners by 80 or 100%. To seal the space between the roof and the stiffeners, vibration damper strips can be used.
How to Remove a Door Trim on a Toyota Corolla 100
Door to Toyota Corolla
Body parts are often damaged, especially doors and wings. However, knowing how, for example, the rear right door is disassembled, it may be necessary not so much to replace it as to perform other work: replacing electrical wiring, repairing windows, installing speakers for an audio system.
How to remove the casing?
Rear left door of Toyota Corolla 150 is easy to remove
, simply open the bolts that hold it in place, but this procedure is not very common. A more popular question among owners is how to disassemble the doors on a Toyota Corolla 150.
Noise insulation of wheel arches
In middle-class cars, little attention is paid to noise insulation of wheel arches. However, it is this part of the vehicle that is the noisiest. The sound generated when the car is moving penetrates into the cabin and interferes with a comfortable journey.
Sound insulation of Toyota Corolla includes measures for finishing the wheel arches with sound-absorbing material. To do this, each wheel arch is finished both on the outside of the body and inside the cabin. On the outside, it is recommended to use vibration-absorbing materials that have been used to improve the sound protection of vehicle doors and hoods. Sound-absorbing materials are used inside. They process the rear wheel arches, the floor of the car, the trunk and the partition of the engine compartment.
Soundproofing of Toyota Corolla 150 and 120 cars is carried out in several stages: hood, roof, doors, wheel arches, engine compartment partition, trunk. Actions aimed at improving insulation must be carried out accurately and carefully, since many interior trim parts are made of plastic, which tends to break if handled carelessly. Broken latches do not contribute to the tight fixation of one or another part of the car interior, and this significantly spoils the comfort of using the vehicle.
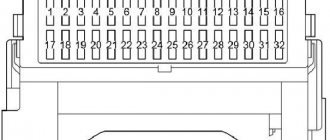
SOUND INSULATION of doors, trunk lid, rear parcel shelf and fifth door of Toyota Corolla E150, 120
Before purchasing SOUND INSULATION materials, take the time to visit the websites of the main manufacturers in order to familiarize yourself with their characteristics and intended purpose. StP – stp-russia.ru/ Smartmat – smartmat.pro/ Shumoff – shumoff.biz/
0:409
1:914
Table of recommended applicability of SOUND INSULATION materials. And in particular for doors - in layers.
1:1098 1:1108
2:1613 2:1623
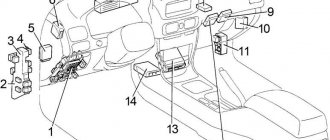
In the documents - TechDoc V1.0 Corolla-Auris, the procedure for removing the door card is not fully clear to all owners - this diagram will be sufficient for those who have already removed it, but have already forgotten something over time, so more details are given below detailed guide.
2:2108 2:9
3:514 3:524 3:534
4:1039 4:1049
In order to make it easier to remove the locking bracket (see point 8), which holds the rear door window lifter handle while eliminating the risk of scratching the front side of the door card, I took ordinary soft steel wire Ø2mm and at one end I made a small hook with pliers, which I can easily removed these staples.
4:1624
I would like to express my gratitude to the publishing house “Third RIM” for the materials used, but omitting the manic desire to “pry it off with a screwdriver”, because The vast majority of the elements can be removed by hand without much difficulty, but for what is difficult, I used plastic spatulas, remove all the “extra” and apply SOUND INSULATION.
4:2236
By the way, so that you do not miss anything important in the amount of information provided; – after removing the fasteners (for image #3 this is after point 7, for image #4 this is after point 9) at the bottom of the door between the door card and the door itself there is a gap into which we insert our fingers and, overcoming the resistance of the pistons, remove the door card with sufficient ease .
4:624 4:634
5:1139 5:1149
Having removed the door card - we remove the polyethylene, now you can be convinced that, contrary to the statements of opponents of the use of SOUND INSULATION, “ventilation” in the doors even before applying SOUND INSULATION is, to put it mildly, limited, and if you consider that SOUND INSULATION mastic does not particularly contribute to the development of corrosion, and taking into account that , that the access of moisture under the applied SOUND INSULATION almost completely eliminates contact with metal - we can safely say that SOUND INSULATION is also an additional anti-corrosion protection for the inside of the door, I marked with a marker the places where it is necessary to leave space free from SOUND INSULATION
5:2295 5:9
6:514 6:524
I made patterns from a sheet of Vibroplast to more fully cover the inner surface of the door in one layer with the smallest possible number of elements, first I worked on the left door and immediately used these patterns as a template for the right door, making them mirrored. The top photo shows the patterns for the front doors, the bottom photo shows the patterns for the rear doors.
6:1221
For the front doors you will need a little more than a sheet of Vibroplast measuring 53x75cm.
6:1376
7:1881
I glued Splen on top of the Vibroplast, in order to avoid messing around with the elements from Splen once again - I prepared them in advance, using existing patterns from Vibroplast as a template, adding one centimeter on each side.
7:2307
Before gluing the Vibroplast, I peeled off the backing from it and glued it back, so that later it would peel off much easier and throw up some surprises - breaking off during the process. And I do this so that the “vibra” can be brought into the cavity of the door with one large sheet and at the same time it will not stick to anything and will not stick to itself. We do this not only with Vibroplast, but also with Splen - it uses a film as a substrate, which is directly prone to tearing when NOT necessary.
7:957
8:1462
On the outer part of the door I began to seal the large holes; on the rest of the surface I used scraps of vibroplast. In order to avoid problems during reassembly, the boundaries for sticking the vibroplast can be the remains of the mastic on which the film was previously held
8:1980
Don't forget about the marked places where there should NOT be SOUND INSULATION.
8:2118
The “technological hole” for the cables - so that they do not rub against the edge of the foil along the perimeter - was covered with a strip of bitoplast about 3 cm wide.
8:259 8:269
9:774 9:784
I bought Splen which was available with a sheet size of 100x150cm, this allowed me to make overlaps for the inside of the door, and carefully seal the outer part of the door, having previously cut it into not very wide strips.
9:1178 9:1188
10:1693 10:1703
Due to the fact that I glued the SOUND INSULATION in the evenings on weekdays after work, so as not to stain anything with mastic once again, I stuck a paper backing from bitoplast onto the mastic and applied it to the mastic with the polished side, which later made it possible to easily remove it.
10:2181
Well, in general, these photographs show that the inside of the door is also sealed quite neatly.
10:189
Unfortunately, there are no photographs in the report that show that I covered the door stiffeners (pipes) with vibroplast and also glued Splen on top of it - I discovered it much later.
10:519 10:529
11:1034 11:1044
To ensure that the “vibe” does not stick to anything, that dust and dirt do not stick to the mastic, and so that you yourself do not get smeared with mastic during the work, we partially leave a backing approximately comparable in size to the size of the hole, marking its boundaries with a marker and cutting the backing with a shoe knife.
11:1607
The bottom photo clearly shows that even a cheap plastic roller allows you to roll out the “vibration” with high quality.
11:1820
After I pasted over the inside of the doors, I additionally treated the lower part with Movil - although I didn’t find any traces of corrosion there, it definitely wouldn’t hurt.
11:2121 11:9
12:514 12:524
I wrapped the wiring harnesses in strips of bitoplast - to prevent them from rattling, I cut strips 3.5 cm wide for small bundles, and cut strips 5 cm wide for larger harnesses. – these values were determined experimentally; this width will ensure normal closing of the wires with a guarantee that the bitoplast will not come off in the future.
12:1119
SOUND INSULATION OF THE TRUNK LID The Coroll's trunk lid, although not large, is nevertheless quite “musical”. This disadvantage can be eliminated at very modest cost.
12:1455 12:1465
13:1970 13:1980
I glued the trunk lid with vibroplast in two layers and, as it turned out, it was in vain, to achieve an acceptable result, one layer of vibroplast would have been enough, the material is certainly not a pity, but the critical indicator here is the weight, because if you get too carried away with SOUND INSULATION, the trunk lid may not open (I also happened to see this).
13:2617 13:9
14:514 14:524
I went through the second layer of vibroplast - which, by and large, should have been done first (and only).
14:724
The first photo shows the difference between unrolled and well-rolled vibroplast.
14:894
15:1399
At this point, I got a little carried away and forgot to cut the splen right away, I had to use the remaining paper backing from the already rolled vibroplast as a template, there’s nothing wrong with that, of course, but it’s not particularly convenient to work with paper - which bends, like splen, Vibroplast will be tougher.
15:1952
Well, what I couldn’t photograph was that I glued narrow strips of vibroplast about 2cm wide inside the trunk lid (on the back wall). - from waste. Here, too, you shouldn’t get carried away - the back wall is not so “musical”, and remembering TER.FUR. – every extra gram will have a more significant impact here.
15:2519
Well, at the same time, I covered the inside perimeter with strips of vibrated plastic 1 cm wide. decorative trim for the trunk lid. I did the same with the taillight covers by gluing strips narrower than 5.7 millimeters.
15:349
16:854
Tools and materials Stitching roller. . . . . . . . . 2 pcs. Key for 10. . . . . . . . . . . . . . . . . 1 PC. Needle nose pliers. . . . . . . . . . . . . . . . .1 PC. Tailor's scissors. . . . . . .1 PC. Shoe knife. . . . . . . . . . . . . .1 PC. Large screwdriver - Phillips .1 pc. Screwdriver small - flat .1 pc. The spatula is plastic. . . . . . . . .1 PC. Small clamps (various). . . 6 pcs. Flashlight . . . . . . . . . . . . . . . . . . . . .1 PC. Marker. . . . . . . . . . . . . . . . . . . . 1 PC. Radiator brush. . . . . . . . . . .1 PC. Gasoline "Galosh". . . . . . . . . . . .0.5 l. Spray bottle. . . . . . . . . . . . . . 1 PC. Cotton pads. . . . . . . . . . . . . . . .1 pack Movil. . . . . . . . . . . . . . . . . . . . .1 bottle Gloves. . . . . . . . . . . . . . . . . . . .1 pair
16:1975
I couldn’t immediately find a metal roller for rolling the SOUND INSULATION, but as it turned out later, it was very successful, it allowed me to save money, and it didn’t spoil the paintwork again, because independently made specifically for this event in metal - I practically didn’t use it, but the plastic one, despite the low price, justified the task assigned to it in terms of the quality of the rolling and, despite the fairly high efforts applied to it, it didn’t even break, you can believe me - I did it I didn’t regret it; its only drawback, as it turned out, was the large radius of the roller.
16:3042
17:504
For those who decide to make the roller themselves, taking into account the experience gained, I would now make a couple of changes to the drawing - I would reduce the rounding radius from R=200 to R=150 and make both edges of the roller rounded with a radius of R=5mm. – so that the edge does not cut the foil. And I would also make a second roller with a much smaller diameter - Ø20mm, or even better - Ø15mm.
17:1139
MY MISTAKES After completing the work, I partly agree that the SOUND INSULATION materials should have been applied according to the diagram shown in the second picture. I can’t say whether it was worth gluing Accent to the inside of the door instead of Splen.
17:1562
18:2067
In order for the door card to fit properly into place and not protrude, we had to rip off the Splen in these places, despite its already thin thickness of 4 mm. Instead of Splen, it would be more correct to use Bitoplast; I would glue it on the door, and not on the door card, contrary to what is indicated in the diagram - but this is my personal opinion. Although if possible, if there was enough space for the door card as well. In reality, Bitoplast compresses “to zero” - but it also has elasticity to a certain extent, which means it will bulge, but with what force this is not yet clear to me.
18:1093
19:1598
Here near Spleno there is also Vibroplast - I made the “Shumka” conscientiously, for myself - I had to completely rip it off.
19:1797
I don’t know what an “Acoustic Lens” is, but maybe I would have used it.
19:1938
Volume of materials used SOUND INSULATION Vibroplast GOLD - 53x75cm - 8 sheets Splen 4 - 150x100 cm - 3 sheets Bitoplast 5 - 53x75cm - 1 sheet In the work I used Vibroplast and Bitoplast produced by "STP" Splen produced by another manufacturer - information not preserved The cost of materials was - approx. 2,500 rub. (August 2014)
19:2545
Result You shouldn’t expect global results from the fact that SOUNDPROOFING the doors will be done - this is just part of an extensive work, but what will definitely change for the better - even the standard speakers will start playing, before I thought that I was rather cool about music, but as it turned out later , although I’m not a music lover, I’ve begun to look at bad music more critically; now it’s especially unpleasant when good music is playing on the radio, but the reception quality is “lame.”
19:863
SOUND INSULATION of the rear shelf of Toyota Corolla E150
19:938
20:1443 20:1453
21:1958 21:1968
The material was borrowed from the book by the publishing house "Third ROME" There are several points that are not very clear, for this reason I decided to provide a disassembly diagram from TechDoc V1.0 Corolla-Auris
21:2271 21:9
22:514 22:524 22:534
23:1039 23:1049
Of course, this diagram is not without its shortcomings, but it more clearly highlights points that were not covered very correctly above.
23:1265
Initially, I planned to use a “classic” combination of Vibroplast as the first layer and Splen as the second layer as SOUND INSULATION for the rear shelf, but after disassembling I discovered that there was not so much space there, for this reason I used the one I had purchased earlier (by mistake) – Vizomat covered with non-woven fabric.
23:1869
24:2374
A significant part of the noise is created by a profiled beam, so I glued the largest piece of Vizomat inside the beam itself, glued it in such a way as not to block the holes, especially on a horizontal surface, which can significantly impair the flow of air and drainage of condensate, which in turn can have a detrimental effect on the body , significantly accelerating corrosion processes. In addition, Vizomat was applied in places to the surface of the shelf itself on fairly large and even surfaces.
24:896
25:1401
26:1906
Using not very strong blows of the fingers on the last remaining plastic cover that had not been removed, revealed the places where the contact of the plastic with the metal occurs with an impact. After removing this plate, Madeline was glued to these places of contact
26:2339
27:504
Well, at the same time I glued Visomat onto the hidden surface of the plastic lining between the stiffening ribs.
27:683
At the back of the shelf there are 5 guides; I glued a piece of Bitoplast into the holes intended for these guides.
27:920
28:1425
Reassembling in reverse order
28:1480
To perform SOUNDPROOFING the rear shelf I spent; Vizomat - about half a sheet (based on a sheet size of 53x75cm), Madeline - less than 2 meters in a strip 2 cm wide, Bitoplast - from leftovers (quite a bit).
28:1861
I pre-degreased the surfaces for pasting with Galosh gasoline. I rolled it with a plastic stitching roller - it can be purchased at a building materials store, it costs less than 100 rubles.
28:2204
I finished it in a couple of hours – slowly. Despite the minimum expenses and not the most extensive scope of work, the result satisfied me to the fullest - it doesn’t seem that the sound has become better, but there is no rattling or ringing now.
28:372
Sound insulation of the fifth door of Toyota Corolla 120
28:443
Probably everyone has encountered the problem of the trunk door and license plate rattling after installing a subwoofer. Some people, of course, don’t care much about what’s rattling on the street, the main thing is that everything is fine in the car. I was somehow not very happy with this moment. I decided to fix it.
28:934
We remove all the trim from the fifth door, wash the inner surface of the iron, degrease and apply: 1 layer
— Vibration insulation Shumoff M3 (of course, now stones can fly at me, saying that there is better or worse... I used this material on doors and it suits me in every way for door stitching. It’s convenient to cut, glue and roll out. I’ve never used anything else, so nothing to compare with)
28:1635
29:2140
vibration isolation Shumoff M3
29:42
Gluing large sheets turned out to be not so easy due to the rigidity partitions. I had to work hard.
29:234
We proceed to the second layer, again degrease the entire surface of the vibration insulation and glue the next one.
29:415
2 layer
- sound-absorbing material and, according to compatibility, heat insulator Splen 8mm
29:564 30:1069
second layer - splen 8mm
30:1115
I had to tinker a bit with this layer as well. We put everything back together in reverse order.
30:1259
Result: the door became heavier, noticeably. We turn on the radio and the door itself no longer rattles.
30:1429
https://www.drive2.ru/l/4911586/
30:1465
https://www.drive2.ru/l/7939958/, https://www.drive2.ru/l/7940207/
30:1535 30:1545 next article:
Repair of the window adjustment and window lowering button for the rear passenger in a Toyota Corolla 110
The content of the article:
Repair of window adjustment button in Toyota Corolla 110 Repair of window down button for rear passenger
31:2466
Rating 0.00 [0 Vote(s)]
56088