Toyota Land Cruiser 100
and
Toyota Land Cruiser 105
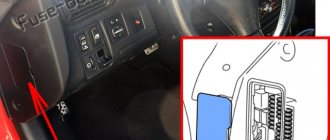
were produced in 1998, 1999, 2000, 2001, 2002, 2003, 2004, 2005, 2006, 2007. During this time, the model underwent restyling. In this publication we will show the location of electronic control units, a description of fuses and relays of the Toyota Land Cruiser 100 (105) with block diagrams and their locations. Let's highlight the cigarette lighter fuse.
The location of the blocks and the purpose of the elements in them may differ from that presented and depend on the year of manufacture and the region of delivery. Check the purpose with your diagrams on the covers of the blocks.
Fuse boxes Prado 120 in the cabin
The Prado 120 fuse block diagram looks like this:
Relay:
- R1 – sound notification;
- R2 – high beam lights of Prado 120;
- R3 – power toggle switch;
- R4 – sockets with power supply.
Relay in the cabin
The relay diagram in the Prado 120 looks like this:
- R1 – console;
- R2 – rear headlight bulbs Prado 120;
- R3 – mirror heating system.
Fuse blocks under the hood of Prado 120
Relay
Relay
The Prado 120 car relay consists of three parts.
Relay block No. 1:
- R1 – STA launcher;
- R2 – GLOW glow plugs.
Toggle switch block No. 2:
- R1 – AIR SUS suspension, which allows you to adjust the ground clearance, otherwise the height of the body in relation to the road;
- R2 is an electronic device used to change power when daytime running lights are present.
Relay block No. 3:
- R1 – additional heater RTS 1;
- R2 – auxiliary heater RTS 2;
- R3 – additional heater RTS 3.
Changing fuses correctly
Not every Prado 120 driver knows what to do if the fuse fails. Before you familiarize yourself with the sequence of actions for replacing a part, you need to understand whether it really needs to be replaced:
- They are looking for a block of fuse links to which non-functioning units lead.
- Find the fuse connected to the electrical appliance. The diagram will speed up the search.
- Use special tongs to remove the fusible insert.
- Inspect it for visual damage and defects. If the owner finds deficiencies, then it needs to be replaced.
The damaged fuse is replaced with a serviceable one, which is purchased at the store. Plastic must have a flat surface, and on metal there should be no change in cross-section. If you have any concerns, test it before installing.
Instructions:
- Buy a second Prado 120 fuse link as a spare for the main one.
- Attach to the metal bases of the cable fuse.
- Connect one end to the plus, the other to the minus.
See how the fuses behave. A high-quality one will burn out, a low-quality one will melt.
Replacement consists of installing a new fuse-link instead of the damaged one. Check out some details:
- If necessary, identify and eliminate the cause of the short circuit so that the new product does not deteriorate again.
- There are three types of machine fuses: mini, medium and maximum. Each size fits into its proper place.
All electrical circuits of the car are protected by fuses, they are also called protective devices or protective inserts, as well as circuit breakers, which are installed in two blocks. These units are installed in different places of the Toyota Corolla car.
If any insert burns out, it must be replaced. You can do it yourself if you know where the fuse assembly is located, its number, and also the installation location of the failed one.
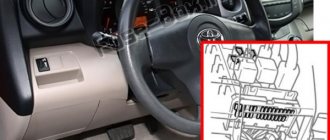
The central unit is located under the vehicle's instrument panel. It is located on the wall. It is covered with an easily removable decorative panel. The second block is located in the engine compartment. For Toyota models that have air conditioning installed, its location is slightly different; it is located next to the battery.
- What indicates a failed fuse?
- About the types of fuse links
- Instructions for replacing fuses
How do you know when it's time to change silent blocks?
What signs and symptoms indicate that the front suspension arm bushings or rear beam bushings need to be replaced?
Failures can manifest themselves as follows:
- the car begins to react poorly to steering turns;
- extraneous sounds, tapping, etc. are heard;
- at high speeds the car pulls to the side is noticeable;
- Uneven tire wear is noticeable.
If you feel any of the above, then replacing the silent blocks is already necessary. To do this, you can visit a car service center, where specialists will do everything, or you can deal with the problem yourself. Let's look at how to do this below.
Symptoms of a problem
How to determine that a car needs to replace the rear silent block of the rear beam? The main feature is the nature of the suspension. As you drive, you will feel squeaks and bumps in the rear of the car. They will get stronger every day.
Externally, this can be determined by the displacement of the central bushing of the silent block or the breakage of the rubber lining. If the vehicle has been used carefully, the part may fail due to normal wear and tear. So, after 5-7 years the rubber begins to “tan”. The silent block ceases to be so elastic and begins to play.
If the problem is ignored, uneven tire wear may occur (due to beam misalignment and rear wheel alignment angle violations). The car will lose its previous controllability - it will skid when turning.
Diagnostics – how to identify a problem or make sure it doesn’t exist?
- We drive into the “pit” or lift the vehicle using a jack.
- Remove the ball joints.
- We check the parts whose operation is related to the silent block. We swing the suspension arm to the sides: you need to make sure that it does not “fall”. The lever should spring back to its natural position (if it is working properly).
- Checking the bushing. It should not be observed to rotate relative to the eyes.
- We check the silent block directly: for knocking inside the element, as well as for the presence of visible mechanical damage and cracks (note: on rubber and metal).
- We check to see if there is any play. Its presence is a signal for an urgent replacement of the element.
Who can check the condition of silent blocks
- Service center specialist. It is realistic to contact a person who specializes in repairing your brand of car to get advice on how to check the silent blocks on a VAZ 2110. And with an expert assessment, decide whether it is worth replacing the parts, or whether they are in acceptable condition, so they can still be used exploit. It is possible to get a full range of services from a specialist: undergo vehicle diagnostics, discuss possible cooperation, receive a set of new parts for installation and pick up the car from the site, absolutely ready for use on the roads. On average, for the work of a service specialist, you will be asked for somewhere between 500-1000 rubles, but this does not take into account the material necessary for replacement.
- Car owner. He himself is able to independently inspect and replace the silent blocks as necessary. It is possible to decide on this if you clearly and competently understand how to check the silent blocks of the rear beam of the VAZ 2110. You should be aware that the silent blocks for the VAZ 2110 are very important; they necessarily affect the wheel alignment angles. And if you skip the moment of diagnosing these small parts, the result is disastrous - the VAZ 2110’s suspension mounts and all important connections will break and unwanted play will appear. It is not recommended to carry out an inspection yourself for the first time; it is worth contacting friends who are already familiar with the situation and clearly understand how to check the silent blocks on a VAZ 2110; they, of course, watched the profile video. Let us note that by doing the repairs yourself, you will save money, but perhaps such precious time will become more costly than if the work was done at a service center. On average, spend 100-160 rubles per part to purchase new silent blocks and mounts for the rear suspension. If you don’t have the necessary tools in the garage, you’ll have to borrow them or buy them. So there will be another expense item. And the car can be unpredictable, because there are situations when you are repairing one thing, and at the same moment a new problem pops up, and it will also have to be eliminated.
This is interesting: How many seasons can you drive on one set of tires - the shelf life of car tires
Why are they needed?
The fuse in a vehicle is made of a fusible alloy and protects the wiring from fire and short circuit. Its operating principle is as follows:
- A short circuit occurs in the circuit.
- The wiring heats up, and then the entire circuit.
- The heat reaches the fuse. But since the melting point of the part is low, it quickly melts and fails.
- The circuit opens.
Attention! If the car owner discovers that a component or device does not work in the Toyota Corolla E150, then first of all it is necessary to check the fuse box for operability.
Fuse blocks and their location in the car interior
So, we’ve dealt with the main fuse and relay box in the engine compartment, now let’s move on to two other and no less important fuse and relay boxes located inside the car.
However, before proceeding with a detailed analysis of the blocks, you should go back a little and mention the location of the interior control units. The fact is that the location of the interior units differs in cars intended for Europe and America from “right-handed” models for the Asian market.
On “right-handed” versions of cars, the layout of the interior units and their pinout are somewhat different, and some control relays are also “scattered” under the dashboard.
In European versions of cars, all the main relays are mostly located in one place.
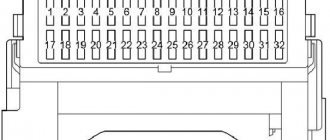
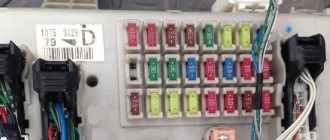
Let's look at the cabin unit No. 2 of a European car. The location of this block is on the bottom of the dashboard, on the driver's side. In order to get to this block, you will need to remove the retractable plastic pocket-lining, after which an abundance of fuses and relays will appear. Let's figure out what and where, the circuit design is as follows.
Now, let's look at another unit located inside the car, this is executive unit No. 5 with a relay located in it. In order to get to this unit, you will need to remove the right air duct on the passenger side, as well as the glove compartment. There are 4 relays in this small block, let’s look at what they are responsible for.
| Location/ | Purpose (for which circuit/node is it needed) |
| marking | |
| A | Idle control relay |
| B | Fog light relay |
| C | Relays for accessories |
| D | Heater relay |
How to change rear silent blocks?
You can replace the rear silent blocks yourself if you prepare properly. The most important thing when performing repair work is not to rush and act consistently.
Techniques for replacing silent blocks of the rear suspension using the example of a VAZ2109
If there is no lift, jack up the wheel by first loosening its mounting bolts. But first, place safety supports under the beam. Prepare keys for “19”, puller, hammer, WD40, new parts. At the following stages:
- Disconnect the brake pipes, unscrew the nut, which will loosen the bolt connecting the body and the beam.
- Remove the bolt using a metal rod of smaller diameter and a hammer.
- Lower the beam down.
- To remove the old part, use special tools or simply crumble the rubber.
- Clean the freed area and lubricate it with liquid soap or other similar household product.
- To install a new product, use a homemade device if you do not have special tools. Insert a long bolt into the hole in the bushing and the eye of the beam. Now place the washers and gradually tighten the nut until it is in place.
- Now you can install the beam by tightening the fasteners in the reverse order.
This is interesting: Troubleshooting and troubleshooting if the oil pressure light comes on at idle
Installation
When installing, you should thoroughly clean the seat from dirt and dust. To do this, use white spirit or another solvent soaked in rags. Generously lubricate the area with soapy water. Next (using the same puller) we evenly press in the new silent block. When installing, try to avoid distortions. Otherwise you will damage the new item. At the next stage, we take out a wooden block from under the body and put on the bolt securing the beam, and also attach the nut. Reinstall the rear wheel and lower the car from the jack.
Next, we move to the adjacent side - all suspension elements, as well as the brakes, are changed in pairs. Then we go for a short test drive. After five to ten kilometers, we drive the car back into the garage and tighten the mounting bolts until they stop. Then you can safely begin normal use.
Location of fuse blocks and decoding for Toyota Corolla 120 body
Location of fuse boxes.
In the Toyota Corolla vehicle in the E120 body there are five mounting blocks, which are located both in the engine compartment and in the vehicle interior. Finding these blocks is quite easy if you know where to look.
Another diagram of the location of fuse blocks
Fuse block No. 1
The first fuse box is located on the left side of the engine compartment. The lid is held on by latches that are fairly easy to remove. In addition to fuses, this block contains control relays.
Let's look at the decoding of the fuses and relays of the first block of the Toyota Corolla E120:
Instructions for removing the rear hub and replacing the Chevrolet Aveo stud
- We place the car on a flat surface, install stops under the front wheels, remove the hand brake, jack up the rear part and remove the wheel where the hub stud is broken, and we see the brake drum in front of us, it will be necessary to remove it.
- There are 2 mounting bolts on the drum. Using a screwdriver, unscrew them and remove the brake drum using a rocking motion.
Note! When removing the Chevrolet Aveo brake drum, it is not recommended to use a hammer on the edges, as the wheel bearing may be damaged.
- If the car is equipped with an ABS system, it is recommended to disconnect the chip from the sensor to avoid damage.
- After this, remove the protective metal cap of the hub nut. The cap fits quite tightly, but with the help of a screwdriver, with a little tugging, it gives in easily.
- Having loosened the edges of the fixing flange of the nut, unscrew it and remove the hub.
Instructions for replacing fuses
Before replacing the fuse, it is necessary to establish the cause of the burnout of the protective element and eliminate it. As a rule, a short circuit, a break in the electrical wiring, or a power surge causes a fuse to burn out.
To replace a blown fuse, specialized pliers are used. Their use allows you to grab the Toyota Corolla E120 fuse and pull it out of the seat. It is not always possible to perform this operation manually.
Replacement of fuses must be carried out in compliance with the following safety rules:
perform the operation with the battery terminals disconnected;
Why are studs needed in the hub?
To replace the stud, you need to know the structure of the rear hub and have the necessary tools.
This car part has 5 or 6 holes. Of these, one is large, 4 or 5 are small. The large hole is necessary to fit the hub onto the wheel axle, and the small ones are used to install fasteners - studs. On a note!
Studs are widely used in mechanical engineering, as they are superior to bolts in strength and reliability. In cars of different brands, spare parts in many units are secured using these durable parts.
A hairpin is a metal rod with threads cut at both ends. It differs from a bolt in that it lacks a head. Connections are formed through additional elements and a threaded hole. Pins are usually made from alloy steel.
Advantages of hairpins:
- allow you to quickly and easily change a wheel;
- have a large margin of safety;
- a large assortment;
- are manufactured under the control of automatic systems, checked and packaged individually.
Wheel studs have a diameter of 12 and 14 mm. Their main task is to ensure correct alignment of the wheel on the hub. Centering is especially important if the wheels are secured with nuts. When using them, the disc may slip out. This situation leads to loosening of the wheel, destruction of the studs and holes. The worst-case scenario is losing a wheel at speed.
To prevent the disc from slipping out when moving, it is recommended to use fastening bolts to secure it - they will not allow the wheel to fall off.
How to find out about a breakdown
The main purpose of Toyota Corolla fuses is to protect the circuit on which they are installed and for which they are responsible, including the cigarette lighter. Each fuse that is included in the block has a special designation on its panel indicating this circuit. Thus, the location of information on it helps during repairs.
The Toyota Corolla block consists of three types of miniature parts. These small-sized fuses have contacts made in the form of plates in their design. They are easily removed and can be replaced with new ones without the use of additional equipment. All work is done on Toyota Corolla manually.
The first thing you need to pay attention to when a unit or one of the elements of the electrical equipment of a Toyota Corolla stops functioning normally is the fuse. It is its breakdown that often causes a car malfunction.
To find out what condition the Toyota Corolla block is in, just look closely at the connecting wire on the part. This can be done directly through the plastic case, which is transparent. Sometimes it is worth paying attention to the integrity of the case itself.
There are three types of fuses:
- Type A.
- Type B.
- Type C.
Each of them looks different, and fuse failures are characterized differently.
Details of the first type can be seen in more detail in the following picture.
Here you can clearly see that the Toyota Corolla fuse on the left is intact, and the fuse on the right is blown.
The second type looks different; you can examine its integrity not from the side, but from above. The picture shows which fuse is intact and which is not.
Type C products burn out internally. The picture shows how this happens.
How to change the stud on the front wheel of a Toyota
- Mounting features
- Replacement process
For many cars, especially those made in Japan, the wheels are attached to the hub using nuts placed on studs.
And they are an endless headache for both car owners and tire fitters, since they break not only while driving, but also when the wheels are unscrewed to change shoes.
We won’t find out who is to blame for this, but we’ll just figure out how to change the stud on the front wheel of a Toyota.
Removing a wheel from a Toyota
Mounting features
Unlike bolts, which are also used to fasten wheels in many brands of cars, studs provide the most rigid fastening. They can break, but replacing the front wheel stud (as well as the rear one) may be necessary for another reason.
Stud sizes
On all Toyotas, with the exception of some SUVs, the diameter of the wheel fasteners (in this case, nuts) is 12 mm, with a thread pitch of 1.5 mm. The length of the pin fixing the casting is 52 mm. A shorter version of 42 mm is placed on the iron disc. But there are also studs extended to 65 mm, which may be needed when using spacers to increase the wheel offset.
Stud sizes for Toyota
So, if instead of factory iron disks you are going to install castings, all the fasteners - and not only the studs, but also the nuts, which have a different height of the product itself and the shape of the conical part, will have to be changed.
Note: the task of the studs is to properly center the wheel, in which the cone of the nut plays an important role.
Replacement process
When tightening the nut, a certain force is applied to it, which is regulated by the manufacturer and indicated in the car's passport. Tire shops often use a wrench and tighten the threads.
As a result, the nut practically sticks to the stud and it is not possible to unscrew it without breaking it.
One way or another, you end up with unusable fasteners for new ones, so we advise you to always have a supply of studs with you - preferably original ones.
Here's how to
replace a stud on a Toyota front wheel hub:
| Steps, photo | Description of work |
| Step 1 - remove the wheel | The car is jacked up and the fasteners are removed using a wheel wrench or wrench. The wheel is removed from the hub. |
| Step 2 - remove the brake cylinder | After removing the wheel, you will see the wheel hub assembled with the brake disc and the cylinder holding it. Replacing the Toyota front wheel studs can only be done after they have been removed. First, the cylinder is removed. To do this, you need to unscrew the nut securing the brake pipe and, after disconnecting it, plug it. Then, unscrewing the two bolts, remove the cylinder itself. |
| Step 3 - remove the brake disc | Before removing the brake disc, it is advisable to clean it from deposits, for which you need to spray it with WD-40. Unscrew the two guide pins and remove the disc from the hub. |
| Step 4 – shortening the stud | If the pin that needs to be replaced is too long, then when knocked out of its socket it will rest against the steering knuckle. In order to be able to remove it, it is necessary to trim the rod, departing from the hub by about 5 mm. |
| Step 5 - knocking out the pin | Having placed a copper mandrel or other available device, the pin is knocked out of the socket with hammer blows. |
| Step 6 – trying on a new hairpin | Try installing a new pin into the socket. Whatever car you have - Toyota Camry or RAV, the steering knuckle will most likely interfere with the passage of the hairpin. |
| Step 7 – trimming the stiletto hat | In order to avoid large-scale disassembly of the hub assembly, you just need to cut off a segment at the head of the stud. |
| Step 8 - installing a new pin into the socket | Turning the pin with the cut side of the cap towards the steering knuckle, insert it into the seat. |
| Step 9 - pressing in the stud | In order for the new pin to fit tightly into the hole, it needs to be driven in through the same mandrel that was used to knock out the old one. But from that side it is inconvenient to do this - it is much easier to press in the connection using nuts, as shown in the photo. |
| Step 10 - tighten the nuts | The nuts are simply tightened by hand at first and then tightened with a torque wrench. After making sure that the stud is firmly in its rightful place, these nuts need to be unscrewed. |
That's it, the replacement of the front wheel stud is complete. All that remains is to reassemble it and you’re good to go.
- and, comparisons
- and, comparisons
- and, comparisons
Source: https://kolesadom.ru/kak-pomenjat-shpilku-na-perednem-kolese-tojota/
Fuse box Toyota Corolla
The unit is protected from water and dust by a plastic case. It consists of electrical fuses and control relays. On the protective casing there is an electrical diagram indicating the circuit elements.
The Toyota Corolla E fuses of the unit in question correspond to the following numbering, decoding and rated current: A - electric power steering; B — compressor clutch electromagnet; C—signal; D - fuel supply system; E, Toyota Corolla 2003 Fuse Diagram - Radiator Fan.
Powerful current consumers are connected via relays. Fuses and relays are installed in mounting blocks, which are located in the vehicle interior and in the engine compartment.
Most of the fuses are installed in the interior relay and fuse mounting block, located on the left side of the instrument panel at the bottom, in the same block there is a toyota corolla 2003 fuse diagram body electrical control unit. The purpose of the fuses and relays, their numbers are shown in the figures and indicated in the table.
In addition, fuses, relays and fuse links are located in the 8th mounting block installed in the engine compartment on the left side in the direction of travel.
Electrical equipment Toyota Corolla - fuses
The table indicates the purpose of these fuses, a diagram of toyota corolla 2003 fuse inserts and relays, but on a specific car model, some of the circuits indicated in the table may be missing. To gain access to the fuses of the mounting block located in the passenger compartment, press the latch. A diagram of the location of the fuses is shown on the front side of the cover. Before replacing a blown fuse, find out the cause of its blown and eliminate it.
When troubleshooting, look at the circuits indicated in the table that this fuse protects. Do not replace fuses with jumpers or fuses rated for a different amperage, or with homemade jumpers - this may damage electrical appliances and even cause a fire.
This is what a blown fuse looks like; the jumper inside the holder, shown by the arrow, has burned out and opened. To replace a fuse, use a spare fuse of the same rating and color 6.
Fuse block diagram for Toyota Corolla E120-E130
To access the fuses and relays of the mounting block located in the engine compartment, press the latch. If necessary, remove the relay or fuse link by rocking it slightly from side to side. To replace the Toyota Corolla 2003 fuse diagram, use special tweezers. Install the parts in the reverse order of removal.
Electric cooling fan Headlight cleaner Air pump EMPS 50 A:
Why do studs break?
Despite the strength of alloy steel, studs can break under the influence of various types of loads.
There are several reasons for breakdowns:
- When replacing the rear wheel hub stud, tighten the nuts and bolts to the torque specified in the vehicle's owner's manual. If you overtighten the bolts, the disc becomes deformed, the profile of the hole changes, and as a result, the wheel is not held in place by the fasteners.
- If the car owner purchased studs of low quality, with internal defects, then if a situation arises in which tension is applied to one part of the part, but not to the other, it becomes wedged and breaks. In such cases, motorists usually say “the hairpin has broken.” In this case, you have to replace the broken part.
- If the car owner decides to change the tires himself (from winter to summer or vice versa) that sit on the rims, then when unscrewing the studs, too much force can be applied. In this case, the nut remains in your hands, and the stud is cut off to the very root. In such a situation, you still have to contact a car service, but with two problems.
Without professional equipment, it is not possible to identify defective studs. To avoid putting yourself at risk, it is recommended that these fasteners be replaced by a workshop to identify any defective parts.
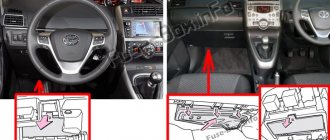
Location of relay and fuse boxes (instrument panel)
For Toyota Auris, the fuses for the rear dimensions of the toyota auris are located:
Location of relay and fuse boxes
Location of relay blocks and fuses for Toyota Auris 2011 (the fuses are located here according to the following diagram):
- electronic driver's door window control unit.
- electronic sunroof control unit.
- top mounting block.
- electronic control unit for the front passenger door window lifter.
- receiver for the central locking remote control system.
Relay block and mounting block in the engine compartment
Toyota Auris Toyota has located the fuse box in the engine compartment.
- 50A HTR Air Conditioner
- 50A ABS No.1
- 30A ABS No.3
- 40A RDI FAN Cooling Fan
- 30A H-LP CLN. headlight washer
- 50A H-LP MAIN. Fuse circuit “H-LP LH LO”, “H-LP RH LO”, “H-LP LH HI”, “H-LP RH HI”
- 50A P/l Fuse circuit “EFI MAIN”, “HORN”, “IG2”, “EDU”
- 80A GLOW
- 60A EPS Electric Power Steering
- 120A ALT Charging system, fuse circuit “RDI FAN”, “H-LP CLN”, “ABS No. 1”, “ABS No. 3”, “ABS No. 2”, “HTR”, “HTR SUB No. 1”, “HTR” SUB №2″, “HTR SUB №3″, “STV HTR”, “ACC”, “CIG”, “METER”, “IGN”, “ECU-IG №2″, “HTR-IG”, “WIPER” , “RR WIPER”, “WASHER”, “”ECU-IG №1″, “SEAT HTR”, “AM1″, “DOOR”, “RL DOOR”, “STOP”, “FR DOOR”, “POWER”, “RR DOOR”, “OBD”, “ACC-B”, “RR FOG”, “FR FOG”, “DEF”, “MIR HTR”, “TAIL”, “PANEL”
- 50A AMT manual transmission (multimode)
- 30A HTR SUB No. 3 air conditioner
- 30A HTR SUB No. 2 air conditioner
- 30A HTR SUB №1 air conditioner
- 15A H-LP LH LO (models with xenon headlights) Left headlight - low beam
- 10A H-LP LH LO (except for models with xenon headlights) Left headlight - low beam
- 15A H-LP RH-LO (models with xenon headlights) right headlight - low beam
- 10A H-LP RH LO (except for models with xenon headlights) right headlight - low beam
- 10A H-LP LH HI left headlight - high beam
- 10A H-LP RH HI right headlight - high beam
- 10A EFI No.1 Injection System
- 10A EFI No. 2 Injection system
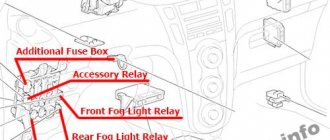
Scheme. Block A Scheme. Block B Scheme. Relay block No. 5
- power supply relay,
- starter relay,
- rear fog light relay
Scheme. Relay block No. 6
- dashboard relay,
- front fog lamp relay,
- starter cut-off relay.
Scheme. Relay block No. 7
- Auxiliary heater relay No. 1.
- Auxiliary heater relay No. 3.
- Auxiliary heater relay No. 2.
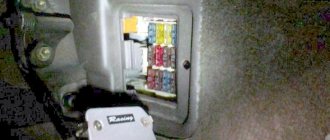
Mounting block in the cabin under the instrument panel
Toyota Auris 2009 fuses and relays located under the instrument panel:
Purpose of fuses, fuses and relays installed in the mounting block in the engine compartment of the Toyota Corolla 150 Toyota Auris
Fuses and relays in the mounting block located in the engine compartment
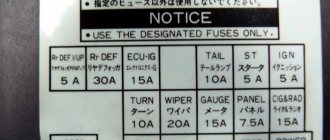
The following diagram will help you determine where the Toyota Auris cigarette lighter fuse is located.
There are over 40 fuses and 19 relays under the hood. In addition, 7 more relays are combined into 3 independent blocks.
Problems in the main mounting block often occur when the battery is not charged correctly.